


Topic: AIF - 3B - 9 LHR
The Battle of Magdhaba
Sinai, 23 December 1916
El Arish and El Magdhaba, 9th LHR, AIF, Commentary
El Arish and El Magdhaba with the 9th Light Horse Regiment
Subtle things were happening at Bir el Malha indicating that something was in the wind. On Sunday, 10 December 1916, while the Regiment carried out routine work a draft of 35 men arrived from Kantara to bring the Regiment up to strength. In addition, another 31 remounts arrived to provide rides for the reinforcements. Stores and supplies were moving up to Bir el Mazar in greater abundance than normal. An aerodrome was being constructed at Bir Abu Tilul. Military police units seemed to appear in increasing numbers and wire enclosures were constructed indicating that Chauvel expected an offensive action and the resulting prisoners. The men put all the information together and speculated that an attack was not far away with the 9th LHR playing a role.
As if to be right on cue, “Galloping” Jack Royston rode into the 9th LHR camp on Monday, 11 December 1916 and called the officers together. After a long chat, Royston went out with the key Regimental leadership cadre: Daly, Parsons, Ragless, and McKenzie, men who were the 2IC and OCs of ‘A’, ‘B’ and ‘C’ Squadrons respectively. The party spent the rest of the day scouting the front line areas where the 9th LHR was scheduled to move in the coming days. Royston did the same the next day with Daly, Chanter, and Ayliffe. This time they took a ride around the Bir el Gerarat area to observe and examine the enemy positions out from El Arish.
The Turks were busy too. While Royston was at Bir el Gerarat planning for the next attack with the officers, the Turks sent over a Taube to observe and bomb Bir el Malha. This resulted in the killing of a horse from the 3rd Machine Gun Squadron. To ensure the Turks were not forgotten, they made this a daily activity causing great annoyance and the occasional casualties. The disruption was of the greatest nuisance as the horses and men had to scatter to reduce the possibility of casualties. After a visit, it would take half and hour to an hour to collect all the horses together again and put them in the lines.
On Wednesday, 13 December 1916, Royston ran a practice alarm for the Brigade, which meant that the 9th LHR had to turn out with the rest of the regiments. While not as annoying in the numbers as was the practice of Antill, it was disruptive enough.
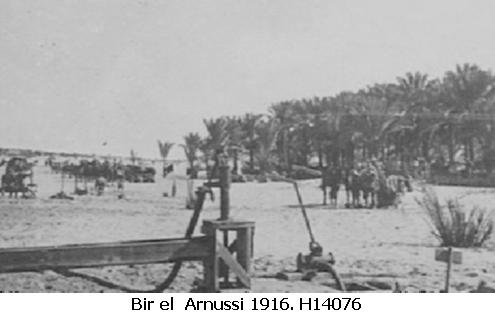
The next morning at 3am, Thursday, 14 December 1916, the 9th LHR mounted up and joined up with the 10th LHR for a route march to Bir el Arnussi. After a three hour march, the two Regiments arrived at Bir el Arnussi somewhere around 6.15 am where they watched other formations assemble. Bir el Arnussi was a gathering point for the Desert Column for a practice attack. While the rehearsal was taking place, at 1pm, the regular Turkish Taube made its appearance and observed the action. No bombs were dropped as it was a purely observational flight. What the observers saw created consternation amongst the Turks and the Germans. Von Kress now knew an attack was imminent and made his troop dispositions.
The men of the 9th LHR drew the same conclusion. Aeroplanes, dress rehearsals, and officers’ patrols all pointed to movement in one direction – El Arish. The men were so confident in their own ability, not withstanding the Bir el Mazar fiasco, that they had no doubts that any obstacle posed by the Turks would be readily overcome. It was with these thoughts in mind that they finished their rehearsal, watered and fed the horses. Afterwards they sat down to a hearty lunch, as hearty as cold bully beef and army biscuit could be, while washing it down with a warm mug of black, but very sweet, billy tea. When everyone was ready, the Regiment marched back to Bir el Malha arriving there at 6pm feeling very excited over the days’ activities.
The Turkish aeroplane flew over Bir el Malha the next day and the day following, Saturday, 16 December 1916. On that day the Taube circled around observing the relief of the 8th LHR by C Squadron at Bir el Kasseiba. Next day, Sunday, 17 December 1916, they flew another observation mission over Bir el Malha, although this time there was a variation, after circling the camp, the aeroplane flew onto Bir el Mazar and bombed it. While it caused little damage, it did cause a great deal of inconvenience.
Monday, 18 December 1916, was a time for Regimental consolidation. All members of the Regiment who were on various courses at Zeitoun all began to return and take their place. This included Siekmann, Bleechmore, Pender, and Nelson who spent a couple weeks at Zeitoun undertaking a cavalry course. Their return was timely as the next day they were ordered to take their places in the Squadrons while leading the Regiment in squadron advancing practice. By this time the Regiment was almost up to strength with 487 men, some 29 men under establishment, and 539 horses. They were ready for action.
After a day of kitting out and ensuring everything was in order the men went to sleep that night knowing that an operation was about to begin. At 6am Tuesday, 19 December 1916, the Regiment set off with the rest of the Brigade to the divisional concentration point at Bir el Gympie which they reached some eleven hours later, at 5pm. The horses were fed and watered while the cooks prepared something for the men. The men then snatched whatever sleep they could as they were warned that a night march was ordered.
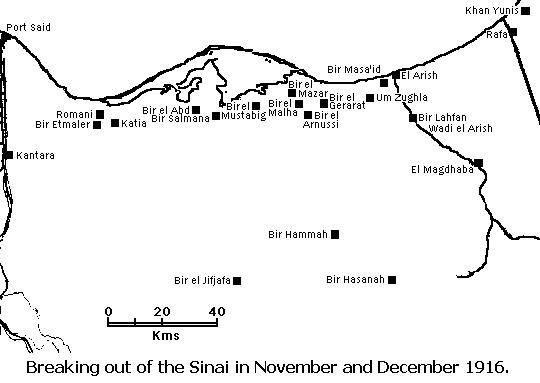
At 11pm the Regiment rode off in company with the Brigade, marching towards the ridge of Umm Zughla, a large sand hill 12km south west of El Arish. From that location, the Regiment moved in a north easterly diagonal to Bir el Masmi, a small oasis with ten wells, some 6km south west of El Arish on the inland Rafa road. They watered the horses and moved off to Hill 110 where they arrived at 6am, on Thursday, 21 December 1916. The view from the hill was unbelievable for the men who had spent the better part of a year in the Sinai desert. The men saw pastures that were cultivated and green. There was a town with substantial buildings filled with people bustling about on their daily chores. It looked like paradise in comparison to where they had been. But the lure of El Arish was outside their grasp. The men were ordered to remain at this position until they received further instructions. So near and yet so far thought the men as they waited in the boiling heat. They heard nothing and even less was happening.
The dust cloud in the distance slowly moved closer to the Brigade. After a wearisome couple of hours waiting in the sun, the men looked forward to some change, any sort of action because broiling while doing nothing was pure hell. Dust clouds heading in their direction meant a despatch rider. Minutes later, a rider covered in dust arrived from Chauvel’s Headquarters with news and new orders. Things moved so fast the 3rd LH Bde were among the last to find out the latest information. The men were eager to hear everything the messenger had to say.
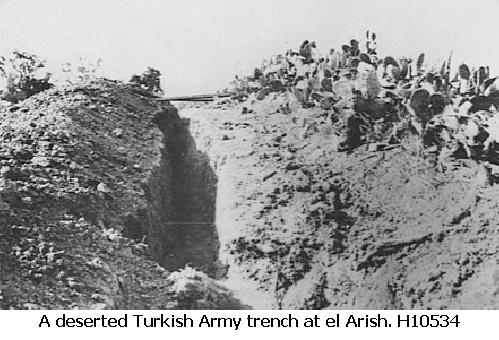
Apparently the 1st LH Bde had taken up their assigned position on the eastern side of El Arish, thus performing the traditional cavalry role in blocking off any escape by the Turks in the town. After outflanking the Turkish positions and taking up a line, the various Regiments in the Brigade sent out scouting patrols to find where the Turks were located and thus prepare for the anticipated attack. As the men went in the general direction of the Turkish trenches, they approached with great caution but much to their surprise, they were not fired upon. The patrols moved ever closer sensing a trap. Still no shooting. Finally, taking their courage in hand, some of the men crawled up to the gun pits in front of the trenches.
Every patrol found the same thing. The gun pits were empty. By this time, the troops on patrol became more confident as they raced to the trenches making up the various redoubts around El Arish. Much to everyone’s astonishment, the trenches were completely empty. Not a Turk to be seen defending them. It appeared as though the Turks had evacuated their positions during the night and melted away to Rafa. The town had been left to the Allied forces.
Much to everyone’s relief, the Battle of El Arish was over without a shot being fired. The men were quite happy with a victory like this. If only the rest of the war could be the same, many of the Gallipoli veterans mused.
For all the new chums, they had to wait to taste battle, an experience that would leave few desiring trying more but stoically accepting their lot to see the war through to the end. But today they celebrated a bloodless victory and enjoyed its splendour.
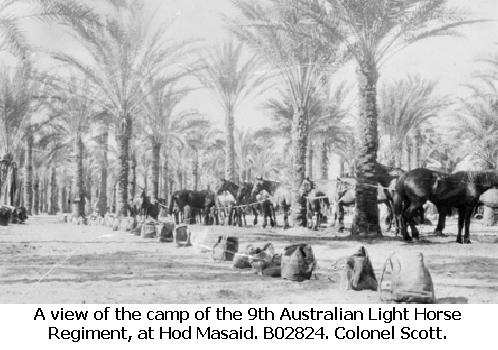
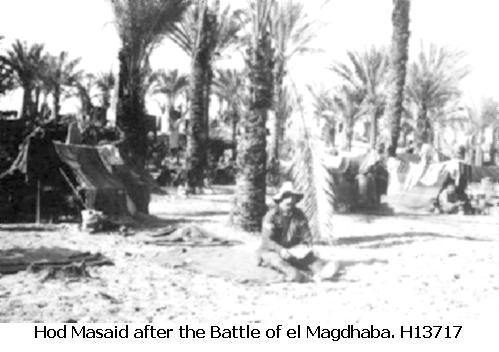
The 9th LHR received orders to make camp at Hod Masaid, a palm grove 2km west of El Arish. Exhausted from their march and elated by their good fortune, the men bivouacked the night and slept well.
The next morning, Friday, 22 December 1916, the regular Turkish Taube flown by German aviators appeared over the camp, loitering in the sky seemingly drawing large languid circles while observing the Australian positions. Occasionally the sound of a Lewis Gun broke the stillness of the morning as the anti aircraft gunners tried their luck.
For the men on the ground, they were given orders to prepare for action again. For the rest of the day, they were occupied in preparing their equipment, cleaning their rifles, sharpening bayonets, polishing the leather, grooming horses and cleaning their clothes. In between the entire bustle, the men received their instructions on the upcoming action. The arrangements for rations and water were discussed, the location of the action and the part they would play in the overall projected attack.
Their mission: to capture the Turkish outpost at el Magdhaba.
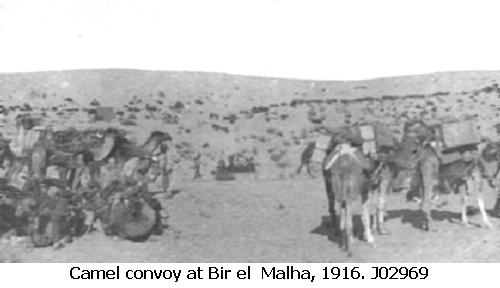
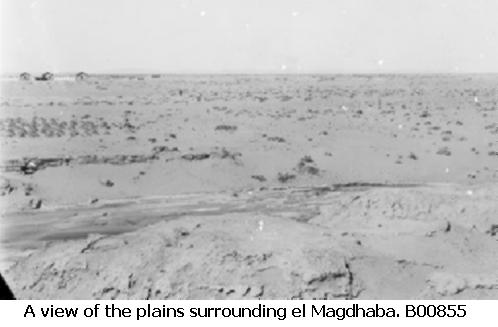
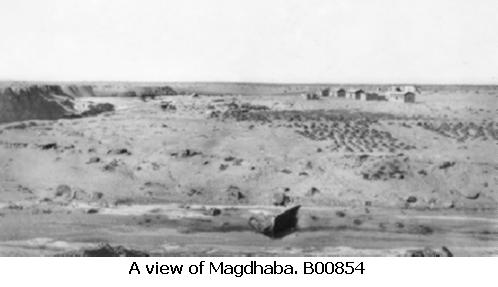
El Magdhaba consisted of a few buildings of any substance. Laying some 32km south east of el Arish on the north side of the major wadi, which flowed from the hills and to the Mediterranean Sea, known as Wadi el Arish. Its key element was that it had wells of abundant water, which enabled the Turks to maintain a garrison at el Magdhaba. Their presence posed a strategic threat to the Allied advance along the Darb el Sultani by exposing the right flank to attack. Originally, both el Magdhaba and its companion Abu Aweigila had been garrisoned to protect Turkish railhead at El Kossaima, the jumping off point for developing an assault on Egypt via the Darb el Maghaza. As mentioned earlier, the raid at Bir el Jifjafa put an end to that plan. However, the rail link and troops were still in position and ready to strike at the Allies if given an opportunity.
To threaten the Allies, the Turks beefed up the numbers at the garrison. The troops came from the 2nd and 3rd Battalions of the 80th Turkish Infantry Regiment, units of the 27th Division, making up some 1,700 men under the command of Khadir Bey. The troops were local Arabs recruited from Palestine and so were not considered to be reliable by the Ottoman military authorities. In addition there were irregular units, a small Camel company and one battery of mountain artillery with their four guns.
British aerial reconnaissance showed that the area had been fortified with trenches and rifle pits surrounding Magdhaba, which were buttressed upon six main redoubts. The mountain guns faced the flat open ground of the north east approach where any attack was likely to arrive. The Turks gave every impression that they were ready and waiting for the anticipated Allied attack. They did not have long to wait.
The reality at Magdhaba for the Turks was vastly different to the British intelligence reports. This was a scratch force put into an isolated position at least one day’s march from help. The Machine Gun Company from the 80th Regiment had been sent to Khan Yunis. At this time every Regiment had only 4 machine guns concentrated within a single company. In this case, three machine guns and the respective platoons were at Khan Yunis leaving only one platoon with one machine gun at Magdhaba. The artillery they had was the antiquated 7.5cm Gebirgskanone M 1873, a mountain gun that had been phased out of service except for a few odd pieces within the Turkish forces. Despite being inspected by Kress on 22 December 1917 who recognised the shortcomings of the garrison, he was satisfied that the force was capable of withstanding any assault. In essence, the Turkish troops at Magdhaba were very much undergunned and on their own. Turkish intelligence confirmed this with the assessment that they faced 9 Cavalry Regiments with the Anzac Mounted Division and an artillery battery. In addition, they faced the ICC with 18 companies, one artillery battery and one machine gun company. Although the ICC had no Machine Gun Company at the time, the force was enough to overwhelm Magdhaba. Even knowing all of this, Kress left Magdhaba virtually defenceless.
At 4.50pm the Regiment mounted up and marched off with the Brigade to a place about a kilometre south of the El Arish Mosque and waited for further orders. At 6pm the order was given to mass with the Division at a point 3 kilometres south of El Arish by the main wadi. All surplus equipment was discarded by the men and placed in holding areas under Divisional police guard. The only items allowed were essential combat equipment and rations. This was no rehearsal as they had done many times before the capture of el Arish, it was obvious to all that this attack was the real thing.
While milling around in the wadi on that cold and dark night, the first problem emerged. The supply column holding all the rations were meant to rendezvous with the Division at 6pm, the same as everyone else so extra rations could be drawn. As luck would have it, instead of proceeding along the southern track to the meeting point, the column missed the correct turn off and set off for a journey to the east along the Rafa Road. It was only after travelling some 3kms without encountering a single man from the Division that the penny dropped. The column leader knew he was in trouble and ordered the supply train to turn around and head back to El Arish. This was no mean feat. Turning heavily laden wagons around in desert sands was executed with difficulty. Finally the column was able to set off again to the west until it arrived back at El Arish. Then the column slowly made its way to the assembly point with the Division. On arrival, each squadron’s quartermaster staff had to quickly get their allocated supplies from a specific wagon. Since the late arrival of the supply column there was no time to unpack at the wagons. What eventuated was havoc and chaos. Chauvel could only watch in exasperation as his Division disintegrated into anarchy.
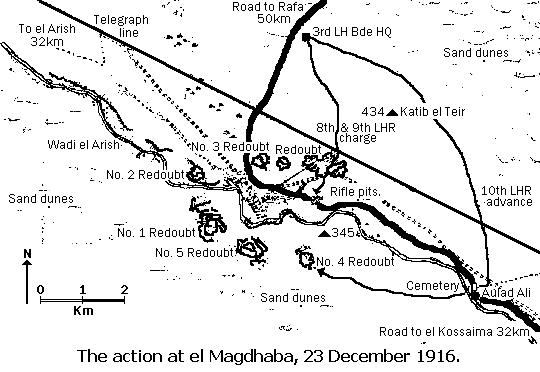
It took many hours from the scheduled set off time before the Division was ready to move. Early in the morning, at 1.30am, Saturday, 23 December 1916, the Regiment was able to march off with the Division. Adjacent to Wadi El Arish was the telegraph line, which the Division followed until arriving at Es Ria, an empty well and locality some 5km north of el Magdhaba. It was cold in the saddle and rules of march were observed – silence and no smoking. The only relief occurred when at the end of 40 minutes riding, the men led their horses for ten minutes and then rested for ten minutes every hour. By dawn the men could see the camp fires of the Turks in the distance. Orders were given for the 9th LHR to deploy to a position 3 kilometres north of El Magdhaba.
While sitting around having their breakfast and a cup of tea the remaining men of the 9th LHR watched the several British aircraft buzz the Turks at about 6.30am. They sounded like angry mosquitoes tormenting the head of a sleeping giant. The first response was some desultory fire from the anti aircraft machine gunners. This did not satisfy the pilots who then proceeded to bomb the garrison. This produced the desired result. Firing became more concentrated and organised from the various redoubts. The pilots had done their work well. Their task was to draw the Turks into as much retaliation as possible through the calculated torment and so disclose the actual positions of the machine guns and trenches. The information was duly noted and dropped off at Chauvel’s headquarters where the plans for the attack were receiving their final touches.
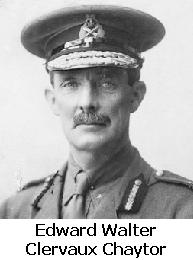
At 8.30am, orders were issued for deployment. The 3rd LH Bde was combined with the NZMRB, both units being placed under the overall command of Chaytor. The New Zealanders were deployed in the sandhills to the east of Magdhaba but south of the Camel Corps. To the right of the New Zealanders the 3rd LH Bde deployed as part of the divisional reserve. Half the Regiment was allocated as escorts with one troop going to Division Headquarters, two troops went to the Camel Corps and one troop to each of the Machine Gun Squadrons.At the same time, the 10th LHR was detached and led by Royston in a dash to the south and seal off any escape routes for the Turks. Already parties of Turks were attempting to flee from the garrison by going south through Wadi el Arish. The hard riding from the 10th LHR put an end to that ambition as they drove south and crossed Wadi el Arish at the cemetery, 3km south of Magdhaba. Closing the bag at the northern end was the CMR who galloped the rifle pits and took the vital Hill 345. Both Regiments then converged onto what was known as Redoubt No 4 at the immediate south of el Magdhaba.
At the same time, the balance of the 9th LHR was deployed to the left of the New Zealanders while the 8th LHR was placed to the left of the 9th LHR and touched the ICC units about 2 kilometres from the Turkish lines. By placing this force to the east of el Magdhaba, the Turkish mountain battery had no targets. When they were finally put into action, the Inverness Battery quickly silenced them when they began firing at 10am.
Simultaneous to the field guns firing, the men from the 9th LHR could see the dust kicked up by the horses of the 1st LH Bde as they moved south for deployment. It was a thrill for them to watch the 1st LH Bde men gallop in the style of Cavalrymen until they disappeared in the wadi where they remained, about 1,800 metres from the Turkish redoubts. The evaporation of the Brigade into the heat haze and wadi proved to be an anticlimax. They were still left waiting around with nothing to do but watch the battle from a distance.
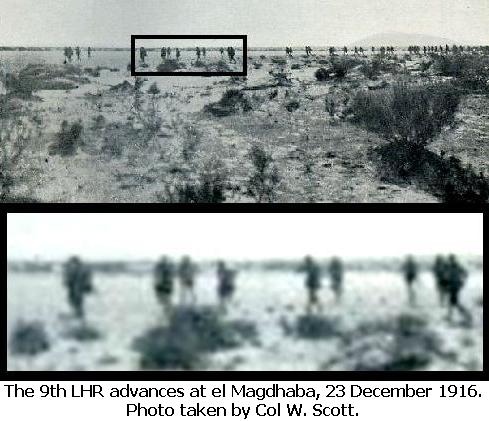
As part of the move, the 8th and 9th LHRs were ordered to cover a flat open plain, which gave no cover. It was a tricky operation requiring discipline and cooperation between the machine gunners and the troops. The regiments dismounted and the horse holders took the horses back out of range of the Turkish guns. The rest of the Regiments moved up on foot and got into position to attack. At first it was relatively easy going until they reached 1,000 metres when all hell broke loose. Snipers and machine gunners from the Regiments were quickly moved forward and began to return fire. The Turks were forced to drop their heads below the parapets of their trenches or hunker down in the rifle pits. At a given signal, two troops rushed forward some 25 to 50 metres when they dropped. The machine gunners opened fire again to begin the whole process, as another two troops would make the dash. By 2.30pm this leapfrogging gave an advance of 500 metres.
The Turks seeing the inevitable result of these tactics sought to hold it up by sending over a shower of shrapnel. The Turks artillery fire ended almost as soon as it began due to the accurate supporting fire from the Inverness Battery. While the artillery duel was on, the men rested and reserve ammunition was brought up for the final assault.
News now came through that a combined force of the ICC and 3rd LHR had taken No 2 Redoubt at 2.30pm and captured 95 prisoners. The door was open to capture the balance of el Magdhaba. Some 45 minutes previously Chauvel had despondently cabled Chetwode that he was thinking of calling off the attack. Now he was chuffed. The attack would succeed. This renewed the confidence of the troops who were ready to perform any feat just to bring things to an end.
At 3.15pm the 9th LHR recommenced the assault. Again they used the leapfrog method to quickly gain 350 metres in half an hour when they stopped and rested. The order was given to fix bayonets for the final rush. The machine gunners poured a tremendous amount of fire on the Turkish trenches when on a given signal, the machine gunners turned their guns away in support of the Camel Corps and New Zealanders.
Once the machine guns had altered their firing positions, together the men of the 8th and 9th LHRs jumped up, cheering with blood curdling calls and charged headlong into the Turkish trenches. Despite laying suppressing fire, the machine gunners could do no more to support the men from the two Regiments. Initially a Turkish machine gun section with one gun opened up on the right of the charging squadrons from the 8th and 9th LHRs. The 8th LHR was in full view of the machine gun and suffered the full brunt that killed 7 men while one man from the 9th LHR was killed. A further group of men from the 9th LHR received their wounds at this point. ‘C’ Squadron was particularly hard hit, losing 10 wounded.
From the perspective of the Turks, the charging Australians presented a terrifying sight to which the Turkish defenders lost heart. Apart from a few committed soldiers, the Turks offered little resistance. ‘C’ Squadron was the first into the Turkish trenches. One or two Turks put up some sort of fight and were bayoneted for their troubles. The rest surrendered as quickly as possible.
After the men of the 9th LHR began to round up their prisoners. There was intense rivalry between the units in collecting prisoners. Until a prisoner had been attributed to a Regiment, it was a free for all to claim the prisoner as theirs. This led to some very friendly, and sometimes decidedly unfriendly, actions. When the 9th LHR prisoner group was finally rounded up it totalled four officers and 154 Other Ranks who were rapidly moved off to the Divisional holding area.
The Regiment moved towards the buildings, which formed the bulwark of the defence of el Magdhaba. While pressing forward with the attack, Capt Wearne the leader of the Brigade Scouts, arrived asking for troops to help the 10th LHR attack the buildings. Maj McKenzie put together two troops and went on foot to give their support. A few minutes after McKenzie’s group moved out, Royston galloped up and gave Scott the same request. Chanter was despatched in command with two mounted troops. It took a few minutes for the horse holders to bring up the mounts. Once in the saddle, they moved off following Royston. By the time they arrived to support the 10thLHR, the fight was over.
Despite worries to the contrary, the well supplying el Magdhaba was filled with an abundance of water so the horses and men drank all they could. The Turks, without intending to do so, obligingly provided large stocks of firewood for use by the Division. As the chill of night descended, fires were lit all over the captured garrison while meals cooked. Men, who were sworn enemies a few hours before, now sat side by side swapping tales, cups of tea, food and cigarettes. This characterised the campaign in the Sinai and Palestine. There may have been a war on and fought accordingly, but there was rarely any animus displayed in this conflict. Both Turks and Australians shared a great deal of respect between each other. By and large, they fought within the boundaries of implied rules of conduct. Rarely did the combatants transgress. Until the Turks were to be marched off to the POW camp prepared for them at el Arish, they were given rich hospitality by the Allied troops. The men of the 9th LHR were enthusiastic in this companionship of shared hardship. That evening was preserved for the camaraderie of men who did their job but understood their antagonists better than some of their own country folk. Afterwards, the Turkish prisoners were given the same rations as the Australian troops in anticipation of their journey to El Arish and the POW camps in Egypt.
After everyone had their thirst and hunger sated, the 9th LHR moved off with the Division at 11pm for yet another night march to Bir Lahfan, their first stop. This was when a good slow docile horse was the treasure of the Lighthorseman. While the horse plodded on following the horse in front, the men could sleep in the saddle. The men were exhausted after three night marches and two attacks.
It was on this ride that many men reported hallucinating, even Chauvel himself. Idriess, in his book, “The Desert Column”, tells the story:
Later—A very peculiar story is being discussed throughout the Desert Column. It appears that the troop when riding back the thirty miles from Magdhaba were enveloped in blinding clouds of dust. Nearly the whole column was riding in snatches of sleep; no one had slept for four nights and they had ridden ninety miles.
Hundreds of men saw the queerest visions—weird looking soldiers were riding beside them, many were mounted on strange animals. Hordes walked right amongst the horses making not the slightest sound. The column rode through towns with lights gleaming from the shuttered windows of quaint buildings. The country was all waving green fields and trees and flower gardens. Numbers of the men are speaking of what they saw in a most interesting, queer way. There were tall stone temples with marble pillars and swinging oil lamps—our fellows could smell the incense—and white mosques with stately minarets.
It is strange to hear the chaps discussing what they saw, as they sit smoking under the palms. I don't think they would talk so openly had it not been for a general riding with his staff. Suddenly he and a companion officer galloped off into the darkness. It has just come out that both officers suddenly saw a fox and galloped after it!
At Bir Lahfan the division was met at 3am by 400 camels filled with supplies. These were distributed to the 1,300 Turkish prisoners who arrived at 4.30am. Once they had been supplied, the Division moved off to El Arish. The 9th LHR arrived at Hod Masaid at 10am in the morning Sunday, 24 December 1916, where the grateful men lay down and slept.
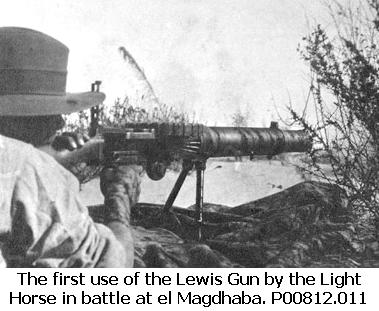
Later on that day the men who took part in the battle could reflect upon their achievement. There were a number of firsts involved at Magdhaba. This was the first time the Anzac Division had been deployed in a set piece battle. The use of the Lewis gun in battle proved the value of their ability to suppress fire. This brought up an additional need to get mobile automatic rifles as part of the Light Horsemen’s fighting tools, which led to the introduction of the Hotchkiss Rifle. It was Chauvel’s first independent battle where he had total command of the allied forces. It was the first decisive victory over the Turkish forces where the enemy had been completely removed from the war. Very few Turks escaped the net. Finally, the risks were high and the margin between success and failure very slim indeed. There was a time when Chauvel had sent orders calling off the attack. The only reason for the attack pressing on was the refusal of the pivotal field commander, Brigadier General Charles Frederick 'Fighting Charlie' Cox, GOC of the 1st LH Bde, to read the withdrawal order until his men finished capturing Redoubt No 2. After that, the battle was nearly won, so Chauvel prudently and quickly countermanded the order.
L/Cpl Henry Richard Alfred Pix, a labourer from Port Lincoln and former Gallipoli veteran, was killed during the charge on the Turkish trenches. After the action, he was buried near where he fell, some 600m from No. 3 Redoubt. The Regimental padre, Chaplain Finnigan officiated over the funeral. Sadly, after his death was notified, his estranged mother sought to capitalise upon his death by claiming a pension. His mother had abandoned Pix and his two sisters some 20 years before upon the death of their father. An uncle raised the three children. As adults, their mother returned occasionally to torment the children and blackmail them into giving her money. When Pix departed Port Lincoln for the AIF, he left his will with a solicitor to ensure his mother would not be able to touch his estate. After a great deal of heartache and fighting, the sisters finally received all their entitlements.
If the men of the 9th LHR thought they did well, this opinion was reinforced on Christmas Day, 1916. At a Brigade parade specially called for the occasion, Royston was effusive in his praise for the men and their achievement. Then he brought on the lead act for the day, Lieutenant General Sir Philip Chetwode, their Commander in chief, who let the men know in no uncertain terms as to the gratitude he felt for their loyal service and fighting abilities in producing a local success. Chetwode read out the official statistics of the battle:
Turkish losses1290 Prisoners including 45 OfficersAllied losses
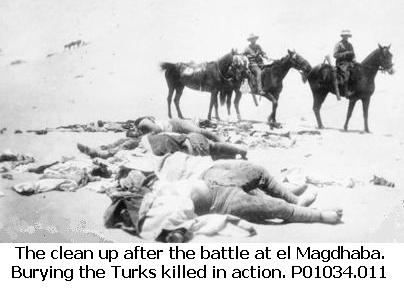
97 Turkish dead buried by the Allies
40 horses and 60 camels captured
4 Mountain Guns, and
1 broken Machine Gun5 Officers killed and 7 wounded
17 Other Ranks killed and 117 wounded
27 horses killed
In contrast, Kress was alarmed. The way to Jerusalem was opened as a consequence of this action. Had the light horse division moved to el Auja, the rail line to Jerusalem through Beersheba was wide open for exploitation. Jerusalem could have been in the hands of the British for Christmas 1916 rather than a year and 20,000 casualties later. The British were content with a local success rather than a strategic success. Anything more was not even within sight of the British command.
Nor in sight of the jubilant men celebrating their victory. Not even the torrential downpour could dampen their excitement. The men were pleased to have done their job well and more pleased to survive the experience.
Christmas Day, that year, may have been celebrated away from home among the flies and bully beef, but nothing could spoil their elation. They celebrated their good fortune by tucking into the contents of their Christmas Billies kindly provided by the grateful citizens of Australia.
It wouldn’t long before they would be given the opportunity to relive this experience. Rafa was just down the road.
Roll of Honour
179 L/Cpl Henry Richard Alfred Pix, 25: Killed in action, 23 December 1916.
Lest we forget
The wounded:
702 Pte Hugh George Adams, ‘B’ Sqn, wounded in right forearm.
1838 Pte Louis Brown, ‘A’ Sqn, wounded in right hand.
395 Pte George William Nelson Cox, ‘C’ Sqn, wounded in right leg.
1472 Pte Albert Henry Crack, ‘C’ Sqn, wounded in right leg.
785 Pte Colin Crossley, ‘C’ Sqn, wounded in right leg amputated.
1158 Pte John Finn, ‘C’ Sqn, wounded in right arm.
426 Pte Frederick Jordan, ‘C’ Sqn, wounded in finger.
146 Pte Frederick Thomas Keane, ‘A’ Sqn, wounded in right thigh.
442 Pte Thomas Leonard, ‘C’ Sqn, wounded in right shoulder.
1012 Pte Allen Lorimor Mounsey, ‘A’ Sqn, wounded in left arm
575 Pte George William Raven, ‘C’ Sqn, wounded in face.
1286 Pte Sydney Binfitt Riley, ? Sqn, wounded in right leg.
2822 Pte Eric Walter Sandland, ‘A’ Sqn, wounded in groin.
2830 Pte William Phillips Whittlesea, ‘C’ Sqn, wounded in right leg.
501 L/Cpl Robert Watmaugh Wishart, ‘C’ Sqn, wounded in left thigh.
504 L/Cpl Benjamin George Wuchatach, ‘C’ Sqn, wounded in right forearm.
Further Reading:
9th Australian Light Horse Regiment, Roll of Honour
The Battle of Magdhaba, Sinai, December 23, 1916, Roll of Honour, Australia and New Zealand
Battles where Australians fought, 1899-1920
Citation: The Battle of Magdhaba, Sinai, 23 December 1916, El Arish and El Magdhaba, 9th LHR, AIF, Commentary
