


Topic: AIF - 4B - 4 LHB
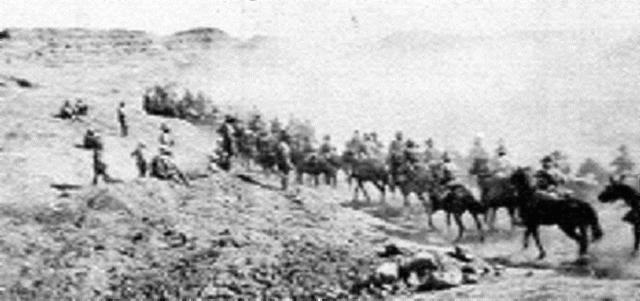
The Battle of Beersheba
Palestine, 31 October 1917
4th LH Bde, AIF, Unit History Account
Over the period of some four decades, Gerald William Nutting worked at producing his History of the Fourth Light Horse Brigade, Australian Imperial Forces, War 1914-1918 and Egyptian Rebellion 1919. When it was realised that the number of survivors was fast fading, with the help of Ernest W the book was completed and published in 1953. In the book there was included a section specifically related to the battle of Beersheba and is extracted below.
Nutting, GW, History of the Fourth Light Horse Brigade, Australian Imperial Forces, War 1914-1918 and Egyptian Rebellion 1919, 1953, pp. 25 - 29.
CHAPTER IVTHE FALL OF GAZA—BEERSHEBA DEFENCES
[25] In June 1917 General Sir Edmund Allenby succeeded Sir Archibald Murray and decided to take command of the troops in the field himself. This action was appreciated by all ranks.
At this period the enemy position extended from Beersheba to Gaza facing the Wadi Ghuzze.
The plan of attack provided for the turning of the Turkish left flank at Beersheba by the mounted troops. The main difficulty was lack of adequate water supplies.
A study of the Journal of the Palestine Exploration Fund, however,disclosed that Khalasa, thirteen miles south of Beersheba, had once been a large city and that Asluj (about the same distance from Beersheba) had maintained a considerable population.
Reconnaissance revealed that the wells had been used in modern times —a fortnight's work by Australian and New Zealand Engineers, assisted by men of the 2nd L.H. Brigade and Imperial Camel Corps, provided water for two cavalry divisions at Khalasa and one at Asluj, thus making projected operations possible.
On the 28th October the Brigade moved to Esani, bivouacking there until the evening of the 29th, when a move was made to Khalasa.
On the 30th the Brigade moved with the Australian Mounted Division via Asluj and arrived at Iswaiwin on the 31st.At 1600 on the 31st October 1917 the Anzac Mounted Division attacked to the east and north-east of Beersheba, and pushed the enemy down the Wadi el Saba. This division was operating dismounted, but, owing to stiff opposition, progress was slow, and it appeared as it the town would not be won from that direction before dark. It was essential that Beersheba be captured quickly, as the horses had been thirty-six hours without water, and had made a night march of over thirty miles. Failure to capture the town would have meant failure of the whole operations.
At 1615 orders were received from the G.O.C., Australian Mounted Division, and also direct instructions from the Corps Commander that the 4th L.H. Brigade should directly attack Beersheba and take the town before dusk. The Brigade was then in reserve about six miles east of Beersheba.
It was realised by the Brigadier that he would have to act quickly, as only a little over an hour of daylight remained. The Brigade was assembled in a valley about half a mile south of Hill 1390, with the exception of the 11th L.H. Regiment, which was on detached duty two miles south-west of that position.Orders were sent to the 11th L.H. Regiment to concentrate and follow the Brigade. The Brigade was ordered to saddle up and move when ready under the second in command of each regiment, the senior to command. The Brigadier and Brigade Major, accompanied by C.O.s of the 4th and [26] 12th Regiment, galloped to reconnoitre a covered way of approach for the Brigade to the point of deployment. This was necessary as the Brigade had just previously been heavily shelled in an attempt to cross exposed ground. The Brigade moved at 1630 at the trot. Shortly after two enemy planes passed over and dropped bombs, and, on return, one Hew low and machine-gunned the Brigade Headquarters personnel and signal troops which were moving in the rear of the Brigade, but no material damage was done.
The route taken was along the Wadi for about a quarter of a mile south and the Brigade deployed where the road crossed 1100 contour. The 4th Regiment advanced on the left of the Anzac Mounted Division and the 12th Regiment advanced on the left of the 4th L.H. Regiment, these two regiments attacking mounted in three successive waves each one squadron. The files were at about four yards' interval and three hundred yards' distance between squadrons. They charged with a drawn bayonet held in the hand and rifles slung as the troops were not issued with swords. The 11th Regiment followed in the rear and acted as a reserve. The leading squadron of the 4th Regiment was commanded by Major Lawson, and Major Harrison commanded the leading squadron of the 12th. "C" squadron of the 12th Regiment, under Captain Lane, was sent down the Wadi to protect the left rear of the advancing troops from machine gun and rifle fire. The 4th machine gun squadron (less one section), under Captain Harper, was ordered to cooperate with this squadron in protecting the left flank. The Notts Battery, R.H.A., under Major Harrison, which had then come up to the point of deployment, was ordered to open fire on the trenches. It was practically dark and impossible to take ranges, but Major Harrison opened fire and found the range with his second shot, speedily driving the enemy from their positions. The leading squadron of the 4th Regiment, with great dash, galloped to the Turkish trenches under heavy fire. The squadron dismounted and charged the trenches in front, and eventually, with the assistance of "B" squadron, commanded by Captain Reid, succeeded in capturing the main Turkish trenches which had been strongly held with machine guns. From this point the resistance slackened considerably until near the town it ended in a rout. "A" squadron of the 12th Regiment had not proceeded more than halfway to the enemy trenches when it encountered broken ground, thus enabling "B" squadron, under Major Fetherstone-Haugh, to come up to the right and keep in touch with the 4th Regiment which had now dismounted. This squadron galloped over the trenches as they pushed on. Major Fetherstone-Haugh and Lieutenant Haydon were both wounded. The charge by the leading squadron had been so rapid that the first rush of horsemen had poured across the trenches without accounting for the occupants. Major Hyman, seeing this, dismounted with part of his squadron and cleaned, up the trenches. The leading troops, now led by Captain J. R .C. Davis,' raced across the Wadi Saba and entered the town. On their approach building after building burst into flames. The enemy fled in disorder and the object of the charge was achieved, the water supply being in our hands.
Following is an extract from the History of the 11th Light Horse [27] Regiment relating to the charge at Beersheba, written by Sergeant Murray
Hammond."As the afternoon wore on the position became serious. The outer defences of Beersheba had not fallen to our attacks and the mounted troops could not endure another night without water. Occasionally, as we worked on to the high ground, we could see the town of Beersheba lying in a saucer-shaped dip at the foot of the Judean hills. A barren, treeless plain sloped easily down to the town four miles away. It was too far to permit an organised attack before darkness set in, and with every moment that passed the position became more critical. Earlier in the day General Chauvel had established his headquarters on a slight rise some distance in our rear, in the vicinity of Khashm Zanna, and here, as the afternoon waned, a tense military drama of tremendous importance was being enacted. General Chauvel had just made up his mind that a galloping charge was his only hope of saving the day. With him were General Hodgson, Brigadier-General Grant, of the 4th Australian Brigade, and Brigadier-General Fitzgerald, of the 5th Imperial Mounted Yeomanry Brigade. Generals Grant and Fitzgerald both pleaded with their leader for the honour of the charge. Those few brief moments, made tense by a desperate situation, must rightly occupy a place amongst the 'memorable moments in history.'
"General Chauvel had always tried to remain impartial in his treatment of the Australian and Imperial horsemen under his charge, and for an instant he remained silent, showing no outward sign of the conflict taking place within him. Turning quietly to General Hodgson, he settled the matter in one swift, crisp sentence, 'Put Grant straight at it,' he exclaimed.
"General Grant wasted no time in formalities, but running to his horse he mounted and galloped away to assemble his Brigade. The 11th Regiment was spread over a long line of outposts, and considerable time must elapse before they could be assembled, but the 4th and 12th Regiments were already assembled near at hand, and were soon drawn up in battle formation behind the crest of a ridge looking down upon the plain of Beersheba. At 4.30 the first line of Australian horsemen went over the ridge at a trot, which soon developed into a hand gallop as the troopers, with bayonets flashing in their hands, warmed to the occasion and spurred their mounts onward. A second and third line followed at intervals of 300 yards, and, ere long, the great plain echoed to the beat of a thousand horses.
' "A handful of picked horsemen, acting as ground scouts, raced ahead of the main body, eyes alert for the first signs of barbed wire, but, fortunately, the Turks had thrown up no wire entanglements around the trenches in that area.
"The enemy opened fire with shrapnel, which burst in white puffs over the galloping lines. As the horsemen neared the first line of trenches they came under the fire of machine guns and rifles, but, without checking their speed, they swept across the Turkish defences. Some of the men dismounted and went to work with rifle and bayonet, [28] while others raced on to the town, chasing the Turks into the hills beyond. In one brief, glorious hour the Turkish left flank was shattered, and Beersheba was ours. The spectacle of Light Horsemen, with bayonets in their hands, charging infantrymen in strongly entrenched positions was something quite unique in the history of warfare in any period, and the boldness of the charge and its unparalleled success fired the imagination of the British peoples. The newspapers in England, Australia, and America flashed the news around the world in bold headlines.
"For many nights 'Grant's Brigade' was the toast of honour in every officers' mess along Allenby's front. Its counterpart in the troopers' lines was an equally spontaneous cheer for 'Grant's mob' wherever the 4th Brigade colours were seen.
"The Commonwealth official historian relates that an intercepted wireless message sent by the Turkish Commander as he fled in the night from Beersheba stated in effect that his troops had broken because they were 'terrified of the Australian Cavalry.'
"The historian states further that a German Staff Officer captured in Beersheba said that, when the 4th Brigade was seen to move, its advance had been taken for a mere demonstration. 'We did not believe,' he said, 'that the charge would be pushed home. That seemed an impossible intention. I have heard a great deal of the fighting quality of Australian soldiers. They are not soldiers at all; they are madmen.'"
The 11th Regiment in Brigade reserve was pushed through the town, and, as night had fallen and they were unable to continue the pursuit, took up an outpost line for the night on the west of the town, linking up with the Anzac Mounted Division. The 4th and 12th Regiments withdrew to reorganise. When this was done the 4th Regiment occupied an outpost line from the Wadi Saba to the Mosque linking up with the 11th L.H. Regiment. The 12th Regiment was held in reserve.
Preparations were made for a counter-attack, and all night the troops were busy bringing in prisoners. The number of prisoners captured was fifty-nine officers and 1,090 other ranks, nine field guns and a large number of machine guns and automatic rifles. The rapidity of the attack seemed to demoralise the enemy as they mostly fired high, and it was found that the sights of their rifles had not been lowered below 800 yards. Their artillery, too, under-estimated the pace, and their shells mostly went over the heads of the advancing troops.
The fall of Beersheba commenced the rout which ended in driving the Turks out of Palestine. It was hurriedly conceived and apparently the mounted attack was initiated by Brigadier-General W. Grant, D.S.O., of the 4th L.H. Brigade, who was decorated on the field by General Allenby for this action with a bar to his Distinguished Service Order.
Actually the operation was a gigantic bluff, because the Light Horse units were not trained in the use of the sword and, in any case, the bayonet is not a suitable weapon for this class of action, being too short and not [29] sufficiently pointed for effective use. However, the bluff was effective, and the flank of the Turkish Army turned.
A comparison between the effect achieved by this mounted attack and the dismounted attack at Gaza supplies some interesting figures. On 19th April 1917 the Brigade made a long advance on foot with two Regiments, the 11th and 12th, and the machine gun squadron, and had 187 casualties without any satisfactory result. At Beersheba our casualties were thirty-two killed and thirty-two wounded—a small price for the capture of the town with its important water supply in addition to prisoners and material. The high percentage of killed in comparison to the number wounded was due to hand-to-hand fighting against superior numbers in the trenches.
Further Reading:
Citation: The Battle of Beersheba, Palestine, 31 October 1917, 4th LH Bde, AIF, Unit History Account
