


Topic: AIF - 4B - 4 LHR
4th LHR, AIF
4th Australian Light Horse Regiment
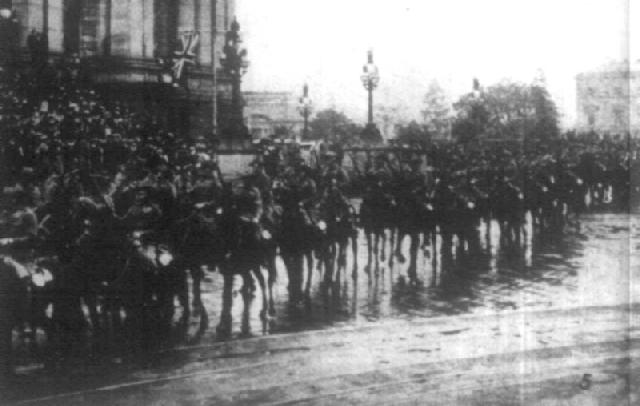
4th Light Horse taking the salute in Melbourne, September 1914
[From: The Australasian, 3 October 1914, p. 5.]
Formation
The 4th Light Horse Regiment was formed as Divisional Cavalry for the Australian Division. It was part of the 1st Contingent and raised at Broadmeadows Training Camp to the north of Melbourne, Victoria, on 11 August 1914. The recruits were drawn in large part from the Melbourne metropolitan area although the balance of men came from all seven Militia Regiments within the 3rd Military District which incorporated all of Victoria and part of Southern New South Wales. The men from New South Wales found themselves mainly in "C" Squadron. Many of the men went from the Light Horse Militia formation into the AIF Light Horse.
"A" Squadron recruited mainly from:
13th Light Horse Regiment (6 men).
20th Light Horse Regiment (13 men).
29th Light Horse Regiment (7 men).
"B" Squadron recruited mainly from:
15th Light Horse Regiment (5 men).
16th Light Horse Regiment (7 men)."C" Squadron recruited mainly from:
17th Light Horse Regiment (10 men).
19th Light Horse Regiment (5 men).
Training

[Note: This is the earliest surviving 4th LHR RO. Click on page for larger version.]
Training of the 4th Light Horse Regiment occurred at Broadmeadows Training Camp from August until October 1914.
Embarkation
Embarkation of the 4th Light Horse Regiment occurred by both the HMAT A18 Wiltshire and the HMAT A25 Anglo Egyptian, departing from Melbourne, Victoria, 19 October 1914.
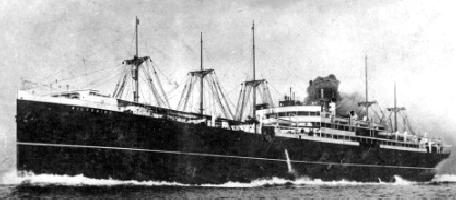
[See: His Majesty's Australian Transports [HMAT] Ships, A18.]
The bulk of the 4th Light Horse Regiment embarked on the HMAT A18 Wiltshire.
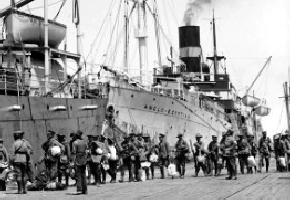
[See: His Majesty's Australian Transports [HMAT] Ships, A25.]
Twelve men selected from the Regiment were allotted to embark on the HMAT A25 Anglo Egyptian. On board the Anglo Egyptian was the Divisional Ammunition Column and the 2nd Light Horse Regiment which had embarked from Brisbane about a month before.
The 4th Light Horse Regiment sailed by convoy from Albany and passed by the action against the Emden at the Cocos Islands. The Wiltshire and Anglo Egyptian disembarked the 4th Light Horse Regiment in Egypt on 10 December 1914.
Colour Patch
Initially, the only colour separation of the various Australian mounted troops was by use of the pennant. The marker pennants were carried on poles to mark lines troop lines in camps in Egypt. They were not lance pennants as the Australian lancers had red over white pennants on their lances.

While this pennant was useful in distinguishing horse and troop lines, it failed to identify the individual with a unit. The AIF 1st Australian Division Standing Orders issued in December 1914 ordered the Australian Light Horse Regiments to wear a 4 inch wide [10.2cm] blue armband with the regiment name marked on the band in black lettering.
The earlier systems proved to be ineffective so to assist with identification of the men in the various units within the AIF, Divisional Order No 81 (A) Administration was issued at Mena on 8 March 1915 detailing the Colour Patch for the 4th Light Horse Regiment as others received their colours. The colour patch was made of cloth 1¼ inches wide and 2¾ inches long and worn on the sleeve one inch below the shoulder seam. The 4th Light Horse Regiment wore two different colour patches during the Great War.
The first colour patch for the 4th Light Horse Regiment reflected their role as Divisional Cavalry which was white over red with the triangles obverse to the brigaded regiments.
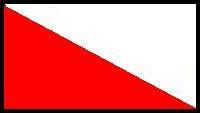
4th Light Horse Regiment Shoulder Patch for Divisional Cavalry and 3rd Camel Regiment.
After Gallipoli, the 4th Light Horse Regiment was split with "B" and "D" Squadrons going to France. These two squadrons retained the colour patch and became known as the II Anzac Corps Mounted Regiment. The 4th Light Horse Regiment remained as Divisional Cavalry until it was renamed as the 3rd Camel Regiment on 24 December 1916. It retained the colour patch as it was first awarded until allotted to the 4th Light Horse Brigade in February 1917.
The 4th Light Horse Regiment carried the dark blue Brigade colour as the lower triangle part of the colour patch, while the light blue unit colour was on the top. This is illustrated with the above presentation.
Gallipoli
As mounted troops, the Light Horse was considered to be unsuitable for work in Gallipoli. The mounted troops volunteered to operate as infantry and thus were sent to Gallipoli with the 4th Light Horse Regiment landing on 22 and 24 May. Initially the 4th Light Horse Regiment was broken up into its component squadrons which were distributed as reinforcements to the depleted infantry battalions. After 11 June 1915 the 4th Light Horse Regiment was reformed and was mainly deployed on defensive activities around Ryrie's Post. The 4th Light Horse Regiment left the peninsula on 11 December 1915.
Defence of Egypt
After the return to Egypt, the 4th Light Horse Regiment was reformed to include a forth squadron known as "D" Squadron.
Two squadrons from the 4th Light Horse Regiment, "B" and "D" Squadrons, were detailed to act as Divisional Cavalry 1st and 3rd Australian Divisions respectively and to embark with the Divisions to serve in France on the Western Front. Added to these two squadrons was a squadron from the New Zealand Regiment, the Otago Mounted Rifles. These three squadrons formed the composite regiment known as the II Anzac Corps Mounted Regiment. [See: Aus Units - 22nd Corps]
The two remaining squadrons, "A" and "C" Squadrons formed the nucleus of the 4th Light Horse Regiment which rebuilt itself with a new "B" Squadron. The 4th Light Horse Regiment moved to take part in the defence of the Suez Canal. The work was hot and monotonous. The Regiment remained in the area until after the Battle of Romani where it was involved in work related to securing the lines of communication.
On 24 December 1916, the 4th Light Horse Regiment was brigaded with the Imperial Camel Corps and received the new name of the 3rd Camel Regiment. It served in this role until the break up of the Anzac Mounted Division in February 1917. A new division was created called the Imperial Mounted Division. Included in this Division were two Australian mounted brigades, the 3rd and 4th Light Horse Brigades. The latter Brigade, the 4th Light Horse Brigade was formed with the 3rd Camel Regiment, renamed the 4th Light Horse Regiment and the 11th and 12th Light Horse Regiments. The Imperial Mounted Division was renamed the Australian Mounted Division soon after.
Palestine
The 4th Light Horse Brigade was assigned to protect the rail line and lines of communications for the first months of 1917. They missed the First Battle of Gaza but were back at the front by 6 April 1917 and took part in the Second Battle of Gaza on 19 April 1917. The 4th Light Horse Regiment took no part in this battle as they were the Brigade reserve.
In its first major battle as the 4th Light Horse Regiment, the Regiment took part in the Battle of Beersheba. Fame for the Regiment was achieved when, in conjunction with the 12th Light Horse Regiment, charged and took Beersheba, thereby sealing victory on that day for the Allied forces.
See: Men who possibly charged at Beersheba - 4th LHR
From this time onwards, for the next two months, the 4th Light Horse Regiment remained in continuous combat action until relieved for three months refit and training at Deir el Belah from early January 1918.
In early April 1918, the 4th Light Horse Regiment moved into the Jordan Valley and took part in the Es Salt Raid of 30 April – 4 May 1918 guarding the routes into Moab. This was a near disastrous situation where the Turkish forces almost cut off the Australian Mounted Division in the hills.
In a move that converted the Light Horse into full cavalry, the Australian Mounted Division was issued with swords during August and early September 1917. The Australian Mounted Division went to work training with swords and undertaking cavalry work.
On 19 September 1918 the Battle of Megiddo began. The infantry over ran the Turkish defensive trenches allowing the cavalry to debouch into the Turkish hinterland. The 4th Light Horse Regiment participated in the breakthrough which moved rapidly through the north of Palestine. At the end of the first week, it was obvious that the way to Damascus was open and so a second push occurred on the heels of the first assault. On 1 October 1918, Damascus was taken. There is contention as to whom was the first to reach inside the city. A 4th Light Horse Regiment patrol led by Sergeant Frank Organ claimed to be amongst the first allied troops to enter Damascus. However, while this patrol was entering, the 3rd Light Horse Brigade was receiving the surrender of the city at the Sarai.
After a rest in Damascus, the 4th Light Horse Regiment moved towards Homs when the Turks surrendered on 30 October 1918.
Return to Australia
After the conclusion of hostilities, the 4th Light Horse Regiment was awaited their return to Australia. During their wait, one of the saddest actions occurred for the Australian Lighthorsemen; they had to farewell their best friends, the horses. All the Light Horse unit horses' health was ascertained with the fit horses being transferred to the Indian Cavalry while those in poor condition were destroyed by the Veterinary units. On 8 March 1919 the 4th Light Horse Regiment embarked to Egypt. Here they remained to assist in suppressing the Egyptian Uprising. When the revolt collapsed, the 4th Light Horse Regiment embarked on the 15 June 1919 for the long voyage to Australia where the unit was disbanded.
Commanding Officers
Lieutenant Colonel John Kealty Forsyth
Lieutenant Colonel Leonard Long
Lieutenant Colonel Murray William James Bourchier
Lieutenant Colonel George James Rankin
Decorations earned by the 4th Light Horse Regiment
- 4 DSO and 1 Bar - Distinguished Service Orders
- 1 OBE - Order of the British Empire
- 6 MC and 1 Bar - Military Crosses
- 14 DCM - Distinguished Conduct Medals
- 46 MM and 1 Bar - Military Medals
- 1 MSM - Meritorious Service Medal
- 31 MID - Mentioned in Despatches
- 4 foreign awards
Campaigns
Gallipoli
- Anzac
- Defence at Anzac
- Suvla
- Sari Bair
- Gallipoli 1915-1916
Egypt
Palestine
- Defence of Egypt 1915-1917
- Third Battle of Gaza
- Beersheba
- El Mughar
- Nebi Samwill
- Jerusalem
- Es Salt
- Abu Tellul
- Megiddo
- Nablus
- Palestine 1917-1918
France
- Messines 1917
- Ypres 1917
- Broodseinde
- Passchendaele
- Lys
- Kemmel
- Marne 1918
- Tardenois
- France and Flanders 1916-1918
Casualties suffered by the 4th Light Horse Regiment
[Note: Gallipoli, Egypt, Sinai and Palestine only.]
- 105 killed
- 332 wounded
War Diary
The Australian War Memorial has put these on line and may be accessed here:
4th Light Horse Regiment War Diaries.
Embarkations:
The following list details all the embarkations in support of the 4th Light Horse Regiment, AIF, during the Great War. Each entry details the individual soldier's: rank on embarkation; full name; Declared age; last occupation held; last address as a civilian; enlistment Date; and, ultimate fate. Each man is linked to a brief military biography where ever possible. One interesting point is that many of the men listed in the embarkation roll for the 4th Light Horse Regiment ended up in a different unit altogether. This list details the men's starting point in the AIF.
| Melbourne, Victoria on board HMAT A18 Wiltshire 19 October 1914 Melbourne, Victoria on board HMAT A25 Anglo Egyptian 19 October 1914 | |
| Melbourne, Victoria on board HMAT A18 Wiltshire 19 October 1914 Melbourne, Victoria on board HMAT A25 Anglo Egyptian 19 October 1914 | |
| Melbourne, Victoria on board HMAT A18 Wiltshire 19 October 1914 Melbourne, Victoria on board HMAT A25 Anglo Egyptian 19 October 1914 | |
| Melbourne, Victoria on board HMAT A18 Wiltshire 19 October 1914 Melbourne, Victoria on board HMAT A25 Anglo Egyptian 19 October 1914 | |
| Machine Gun Section | Melbourne, Victoria on board HMAT A18 Wiltshire 19 October 1914 |
| 1st Reinforcement | Melbourne, Victoria on board HMAT A43 Barunga 22 December 1914 |
| 2nd Reinforcement | Melbourne, Victoria on board HMAT A13 Katuna 3 February 1915 |
| 3rd Reinforcement | Melbourne, Victoria on board HMAT A13 Katuna 3 February 1915 |
| 4th Reinforcement | Melbourne, Victoria on board HMAT A18 Wiltshire 13 April 1915 |
| 5th Reinforcement | Melbourne, Victoria on board HMAT A56 Palermo 7 May 1915 |
| 6th Reinforcement | Sydney, New South Wales on board HMAT A40 Ceramic 25 June 1915 |
| 7th Reinforcement | Melbourne, Victoria on board RMS Persia 10 August 1915 |
| 8th Reinforcement | Melbourne, Victoria on board HMAT A55 Kyarra 20 August 1915 |
| 9th Reinforcement | Melbourne, Victoria on board HMAT A20 Hororata 27 September 1915 |
| 10th Reinforcement | Melbourne, Victoria on board HMAT A70 Ballarat 9 September 1915 |
| 11th Reinforcement | Melbourne, Victoria on board HMAT A56 Palermo 29 October 1915 |
| 12th Reinforcement | Melbourne, Victoria on board HMAT A40 Ceramic 23 November 1915 |
| 13th Reinforcement | Sydney, New South Wales on board HMAT A54 Runic 20 January 1916 |
| 14th Reinforcement | Melbourne, Victoria on board HMAT A32 Themistocles 28 January 1916 |
| Melbourne, Victoria on board HMAT A13 Katuna 9 March 1916 Melbourne, Victoria on board HMAT A68 Anchises 14 March 1916 | |
| 16th Reinforcement | Melbourne, Victoria on board HMAT A53 Itria 18 April 1916 |
| 17th Reinforcement | Melbourne, Victoria on board HMAT A6 Clan Maccorquodale 6 May 1916 |
| 18th Reinforcement | Melbourne, Victoria on board RMS Mongolia 11 July 1916 |
| Melbourne, Victoria on board RMS Mongolia 11 June 1916 Melbourne, Victoria on board HMAT A32 Themistocles 28 July 1916 | |
| Melbourne, Victoria on board RMS Malwa 25 July 1916 Melbourne, Victoria on board HMAT A15 Port Sydney 7 September 1916 | |
21st Reinforcement - Clan Maccorquodale Group | Melbourne, Victoria on board HMAT A6 Clan Maccorquodale 19 September 1916 Melbourne, Victoria on board HMAT A71 Nestor 29 September 1916 Melbourne, Victoria on board HMAT A1 Hymettus 12 September 1916 |
| Melbourne, Victoria on board HMAT A6 Clan Maccorquodale 19 September 1916 Melbourne, Victoria on board HMAT A38 Ulysses 25 October 1916 | |
| 23rd Reinforcement | Melbourne, Victoria on board HMAT A34 Persic 22 December 1916 |
| 24th Reinforcement | Melbourne, Victoria on board HMAT A67 Orsova 6 December 1916 |
| 25th Reinforcement | Melbourne, Victoria on board RMS Omrah 17 January 1917 |
| 26th Reinforcement | Melbourne, Victoria on board HMAT A11 Ascanius 11 May 1917 |
| Melbourne, Victoria on board HMAT A29 Suevic 21 June 1917 Melbourne, Victoria on board HMAT A42 Boorara 10 May 1917 | |
28th Reinforcement - Port Lincoln Group | Melbourne, Victoria on board HMAT A17 Port Lincoln 22 June 1917 Melbourne, Victoria on board HMAT A32 Themistocles 4 August 1917 Melbourne, Victoria on board HMAT A55 Kyarra 7 September 1917 |
| Sydney, New South Wales on board HMAT A68 Anchises 8 August 1917 Melbourne, Victoria on board HMAT A55 Kyarra 7 September 1917 | |
| Melbourne, Victoria on board HMAT A73 Commonwealth 2 November 1917 Melbourne, Victoria on board HMAT A71 Nestor 21 November 1917 | |
| Melbourne, Victoria on board RMS Ormonde 7 March 1918 Melbourne, Victoria on board HMAT A38 Ulysses 22 December 1917 | |
| 32nd Reinforcement | Sydney, New South Wales on board HMAT A18 Wiltshire 2 February 1918 |
See: Troop transport ships for information and photographs about the various ships employed in transporting the troops to Egypt.
Acknowledgment: Many thanks to Steve Becker who has provided the raw material for the page Men who possibly charged at Beersheba - 4th LHR.
Further Reading:
4th Australian Light Horse Regiment, AIF
4th Australian Light Horse Regiment, Roll of Honour
Citation: 4th Australian Light Horse Regiment, AIF, Outline
