Topic: AIF - 2B - 6 LHR
6th LHR, AIF
6th Australian Light Horse Regiment, AIF
Outline

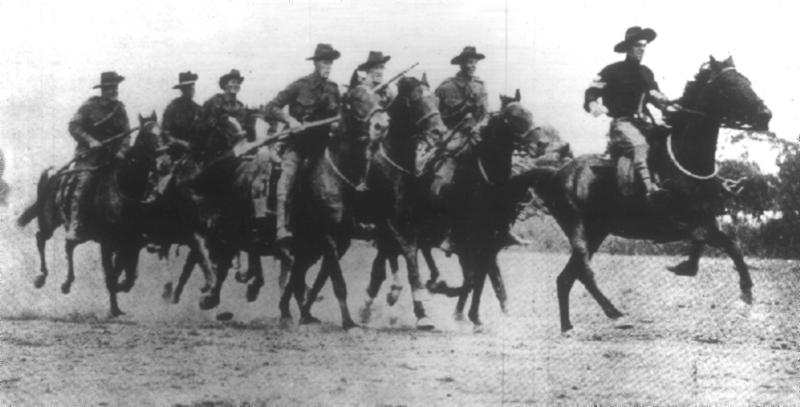
A troop of the 6th Light Horse at Liverpool Training Camp
[From: The Sydney Mail, 25 November 1914, p. 12.]
Formation
The 6th Light Horse Regiment was formed as part of the 2nd Light Horse Brigade, 2nd Contingent and attached to the Australian Division. Recruits went to the Liverpool Training Camp to the west of Sydney, New South Wales, during September 1914. The recruits were drawn from throughout New South Wales. Many of the men went from the Light Horse Militia formation into the AIF Light Horse.
"A" Squadron recruited mainly from:
7th Light Horse Regiment (5 men).
11th Light Horse Regiment (6 men).
"B" Squadron recruited mainly from:
9th Light Horse Regiment (6 men)
28th Light Horse Regiment (6 men)
"C" Squadron recruited mainly from:
5th Light Horse Regiment (7 men); and,
27th Light Horse Regiment (5 men).
Training
[Click on page for larger version.]
Training of the 6th Light Horse Regiment occurred at Liverpool Training Camp from September 1914.
Embarkation
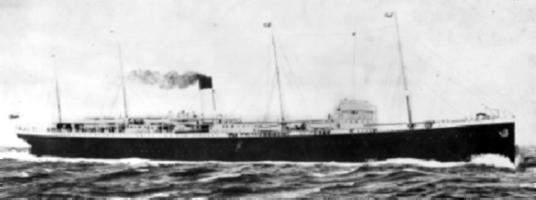
Embarkation of the 6th Light Horse Regiment occurred by the HMAT A34 Suevic from Sydney, New South Wales, on 21 December 1914.
[See: His Majesty's Australian Transports [HMAT] Ships, A29.]
The 6th Light Horse Regiment sailed to Egypt and disembarked on 1 February 1915.
Colour Patch
Initially, the only colour separation of the various Australian mounted troops was by use of the pennant. The marker pennants were carried on poles to mark lines troop lines in camps in Egypt. They were not lance pennants as the Australian lancers had red over white pennants on their lances.

While this pennant was useful in distinguishing horse and troop lines, it failed to identify the individual with a unit. The AIF 1st Australian Division Standing Orders issued in December 1914 ordered the Australian Light Horse Regiments to wear a 4 inch wide [10.2cm] blue armband with the regiment name marked on the band in black lettering.
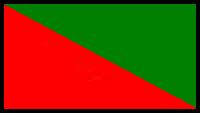
The earlier systems proved to be ineffective so to assist with identification of the men in the various units within the AIF, Divisional Order No 81 (A) Administration was issued at Mena on 8 March 1915 detailing the Colour Patch for the 6th Light Horse Regiment as others received their colours. The colour patch was made of cloth 1¼ inches wide and 2¾ inches long and worn on the sleeve one inch below the shoulder seam. The colour patch for the 6th Light Horse Regiment was green over red.

The 6th Light Horse Regiment carried the red Brigade colour as the lower triangle part of the colour patch, while the green unit colour was on the top. This is illustrated with the above presentation.
Puggaree
The 6th Light Horse Regiment distinguished itself from all other Light Horse Regiments with the use of the wallaby fur puggaree on the felt hat. The puggaree is the band around the felt hat, usually made of pleated cloth.
[See: Emu Plumes]
Gallipoli
As mounted troops, the Light Horse was considered to be unsuitable for work in Gallipoli. The mounted troops volunteered to operate as infantry and thus were sent to Gallipoli with the 6th Light Horse Regiment landing on 20 May 1915. The Regiment was only deployed on defensive activities on the far right of the front line [the southern regions of Anzac] throughout the stay at Gallipoli. The 6th Light Horse Regiment left the peninsula on 20 December 1915.
Defence of Egypt
After the return to Egypt, the 6th Light Horse Regiment reformed and re-equipped. The reorganisation of the Light Horse led to the formation of the ANZAC Mounted Division to which the 6th Light Horse Regiment became a foundation member.
On 28 February 1916, the 6th Light Horse Regiment moved to join its parent brigade, the 2nd Light Horse Brigade, which was taking part in the defence of the Suez Canal. The work was hot and monotonous. They remained here until moved to the Romani region to bolster the defence of that area.
Sinai
The 2nd Light Horse Brigade played an important role in beating back the Turkish invasion of the Suez Canal zone at Romani. Now known as the Battle of Romani which lasted from 4-6 August which was quickly followed by the Battle of Katia and then Bir el Abd on 9 August. All the actions in which the 6th Light Horse Regiment finally led to the defeat of the Ottoman Canal Expeditionary force and its retreat to Bir el Mazar.
Over the next few months, the 6th Light Horse Regiment took part in the Allied advance over the Sinai leading to the fall of Bir el Mazar, then El Arish followed by Bir el Magdhaba and finally Rafa in January 1917. The Ottoman forces were expelled from the Sinai and were poised to be tackled in Palestine.
Palestine
On 27 March 1917, the 6th Light Horse Regiment took an adventurous role during the First Battle of Gaza. While involved in the encirclement of the city as a prelude to its capture, the 6th Light Horse Regiment received the order to withdraw and return to the starting line. Grudgingly they did so but realised the Turks had snatched victory out of the jaws of defeat.
The 6th Light Horse Regiment took part in the Second Battle of Gaza on 19 April 1917 and suffered the heaviest casualties since Gallipoli.
The 6th Light Horse Regiment took part in the Battle of Beersheba and then the follow up actions that lasted until early January 1918. After the fall of Jerusalem the 6th Light Horse Regiment moved to the Jordan Valley and took parts in operations in this region. This included the taking of Jericho, the attack on Amman during 27 March - 2 April 1918 and Es Salt Raid of 30 April – 4 May 1918.
Amman
At the opening of the final Allied offensive on 19 September 1918, the 6th Light Horse Regiment took part in the invasion of the Moab hills for the third time. This time Amman was captured with the participation of the 6th Light Horse Regiment. Finally, the Ottomans called for an Armistice on 30 October 1918.
Return to Australia
After the conclusion of hostilities, the 6th Light Horse Regiment was marked to return to Australia. Prior to that action, one of the saddest actions occurred for the Australian Lighthorsemen, they had to farewell their best friends, the horses. All the Light Horse unit horses' health was ascertained with the fit horses being transferred to the Indian Cavalry while those in poor condition were destroyed by the Veterinary units.
On 13 March 1919 the 6th Light Horse Regiment was deployed to assist in suppressing the Egyptian Uprising. When the revolt collapsed, the 6th Light Horse Regiment embarked on the 28 June 1919 for the long voyage to Australia where the unit was disbanded.
Commanding Officers
Lieutenant Colonel Charles Frederick Cox
Lieutenant Colonel Colin Dunmore Fuller
Lieutenant Colonel Harold Albert Duckett White
Lieutenant Colonel Donald Gordon Cross
Decorations earned by the 6th Light Horse Regiment
- 7 DSO - Distinguished Service Orders
- 6 MC - Military Crosses
- 7 DCM - Distinguished Conduct Medals
- 15 MM- Military Medals
- 1 MSM - Meritorious Service Medal
- 37 MID - Mentioned in Despatches
- 4 foreign awards
Campaigns
Gallipoli
- Anzac
- Defence at Anzac
- Suvla
- Sari Bair
- Gallipoli 1915-1916
Egypt
- Defence of Egypt
Sinai
- Romani
- Magdhaba
- Rafa
Palestine
- First Battle of Gaza
- Third Battle of Gaza
- Beersheba
- El Mughar
- Nebi Samwill
- Jerusalem
- Jericho
- Amman
- Es Salt
- Megiddo
- Nablus
- Palestine 1917-1918
Casualties suffered by the 6th Light Horse Regiment
- 111 killed
- 461 wounded
War Diary
The Australian War Memorial has put these on line and may be accessed here:
6th Light Horse Regiment War Diaries.
Embarkations:
The following list details all the embarkations in support of the 6th Light Horse Regiment, AIF, during the Great War. Each entry details the individual soldier's: rank on embarkation; full name; Declared age; last occupation held; last address as a civilian; enlistment Date; and, ultimate fate. Each man is linked to a brief military biography where ever possible. One interesting point is that many of the men listed in the embarkation roll for the 5th Light Horse Regiment ended up in a different unit altogether. This list details the men's starting point in the AIF.
| Regimental Headquarters Section | Sydney, New South Wales on board HMAT A29 Suevic 21 December 1914 |
| "A" Squadron | Sydney, New South Wales on board HMAT A29 Suevic 21 December 1914 |
| "B" Squadron | Sydney, New South Wales on board HMAT A29 Suevic 21 December 1914 |
| "C" Squadron | Sydney, New South Wales on board HMAT A29 Suevic 21 December 1914 |
| Machine Gun Section | Sydney, New South Wales on board HMAT A29 Suevic 21 December 1914 |
| 1st Reinforcement | Sydney, New South Wales on board HMAT A41 Bakara 22 December 1914 |
| 2nd Reinforcement | Sydney, New South Wales on board HMAT A21 Marere 20 February 1915 |
| 3rd Reinforcement | Sydney, New South Wales on board HMAT A6 Clan Mccorquodale 6 February 1915 |
| 4th Reinforcement | Sydney, New South Wales on board HMAT A9 Shropshire 17 March 1915 |
Newcastle, New South Wales on board HMAT A41 Bakara 22 May 1915 Newcastle, New South Wales on board HMAT A58 Kabinga 21 May 1915 | |
| 6th Reinforcement | Sydney, New South Wales on board HMAT A65 Clan Mcewen 28 June 1915 |
| 7th Reinforcement | Sydney, New South Wales on board HMAT A51 Chilka 7 June 1915 |
| 8th Reinforcement | Sydney, New South Wales on board HMAT A23 Suffolk 28 July 1915 |
| 9th Reinforcement | Sydney, New South Wales on board HMAT A8 Argyllshire 30 September 1915 |
Sydney, New South Wales on board HMAT A32 Themistocles 5 October 1915 Sydney, New South Wales on board HMAT A4 Pera 12 October 1915 | |
Sydney, New South Wales on board HMAT A14 Euripides 2 November 1915 Sydney, New South Wales on board SS Hawkes Bay 23 October 1915 | |
Sydney, New South Wales on board SS Hawkes Bay 23 October 1915 Sydney, New South Wales on board HMAT A34 Persic 18 November 1915 | |
| 13th Reinforcement | Sydney, New South Wales on board HMAT A60 Aeneas 20 December 1915 |
| 14th Reinforcement | Sydney, New South Wales on board HMAT A62 Wandilla 3 February 1916 |
Sydney, New South Wales on board HMAT A4 Pera 22 March 1916 Sydney, New South Wales on board HMAT A67 Orsova 11 March 1916 | |
| 16th Reinforcement | Sydney, New South Wales on board HMAT A1 Hymettus 3 May 1916 |
| 17th Reinforcement | Sydney, New South Wales on board HMAT A39 Port Macquarie 26 April 1916 |
| 18th Reinforcement | Sydney, New South Wales on board HMAT A20 Hororata 2 May 1916 |
| 19th Reinforcement | Sydney, New South Wales on board RMS Mongolia 8 July 1916 |
| 20th Reinforcement | Sydney, New South Wales on board HMAT A25 Anglo Egyptian 19 September 1916 |
Sydney, New South Wales on board HMAT A58 Kabinga 12 September 1916 Sydney, New South Wales on board HMAT A25 Anglo Egytian 19 September 1916 | |
| 22nd Reinforcement | Sydney, New South Wales on board HMAT A13 Katuna 23 November 1916 |
| 23rd Reinforcement | Sydney, New South Wales on board RMS Karmala 3 February 1917 |
| 24th Reinforcement | Melbourne, Victoria on board HMAT A42 Boorara 10 May 1917 |
| 25th Reinforcement | Melbourne, Victoria on board HMAT A42 Boorara 10 May 1917 |
| 26th Reinforcement | Melbourne, Victoria on board HMAT A42 Boorara 10 May 1917 |
| 27th Reinforcement | Sydney, New South Wales on board HMAT A15 Port Sydney 9 May 1917 |
Sydney, New South Wales on board HMAT A15 Port Sydney 11 June 1917 Melbourne, Victoria on board HMAT A55 Kyarra 7 September 1917 | |
| 29th Reinforcement | Sydney, New South Wales on board HMAT A55 Kyarra 3 September 1917 |
| 30th Reinforcement | Melbourne, Victoria on board HMAT A73 Commonwealth 2 November 1917 |
| 31st Reinforcement | Melbourne, Victoria on board HMAT A73 Commonwealth 2 November 1917 |
| 32nd Reinforcement | Melbourne, Victoria on board HMAT A73 Commonwealth 2 November 1917 |
| 33rd Reinforcement | Sydney, New South Wales on board SS Canberra 16 November 1917 |
| 34th Reinforcement | Sydney, New South Wales on board RMS Ormonde 2 March 1918 |
See: Troop transport ships for information and photographs about the various ships employed in transporting the troops to Egypt.
Further Reading:
6th Australian Light Horse Regiment, Roll of Honour
Battles where Australians fought, 1899-1920
Citation: 6th Australian Light Horse Regiment, AIF, Outline


