« February 2009 »
S M T W T F S
1 2 3 4 5 6 7
8 9 10 11 12 13 14
15 16 17 18 19 20 21
22 23 24 25 26 27 28
You are not logged in. Log in


Search the site:


powered by FreeFind
Volunteer with us.

Entries by Topic All topics  
A Latest Site News
A - Using the Site
AAA Volunteers
AAB-Education Centre
AAC-Film Clips
AAC-Photo Albums
AIF & MEF & EEF
AIF - Lighthorse
AIF - ALH - A to Z
AIF - DMC
AIF - DMC - Or Bat
AIF - DMC - Anzac MD
AIF - DMC - Aus MD
AIF - DMC - British
AIF - DMC - BWI
AIF - DMC - French
AIF - DMC - Indian
AIF - DMC - Italian
AIF - DMC - Medical
AIF - DMC - Remounts
AIF - DMC - Scouts
AIF - DMC - Sigs
AIF - DMC - Sigs AirlnS
AIF - DMC - 1 Sig Sqn
AIF - DMC - 2 Sig Sqn
AIF - DMC - Eng
AIF - DMC - Eng 1FSE
AIF - DMC - Eng 2FSE
AIF - DMC - GSR
AIF - 1B - 1 LHB
AIF - 1B - 6 MVS
AIF - 1B - 1 LHMGS
AIF - 1B - 1 Sig Trp
AIF - 1B - 1 LHFA
AIF - 1B - 1 LHR
AIF - 1B - 2 LHR
AIF - 1B - 3 LHR
AIF - 2B - 2 LHB
AIF - 2B - 7 MVS
AIF - 2B - 2 LHFA
AIF - 2B - 2 LHMGS
AIF - 2B - 2 Sig Trp
AIF - 2B - 5 LHR
AIF - 2B - 6 LHR
AIF - 2B - 7 LHR
AIF - 3B - 3 LHB
AIF - 3B - 8 MVS
AIF - 3B - 3 LHB Sigs
AIF - 3B - 3 LHFA
AIF - 3B - 3 LHMGS
AIF - 3B - 3 Sig Trp
AIF - 3B - 8 LHR
AIF - 3B - 9 LHR
AIF - 3B - 10 LHR
AIF - 4B - 4 LHB
AIF - 4B - 4 Sig Trp
AIF - 4B - 9 MVS
AIF - 4B - 4 LHFA
AIF - 4B - 4 LHMGS
AIF - 4B - 4 LHR
AIF - 4B - 11 LHR
AIF - 4B - 12 LHR
AIF - 5B - 5 LHB
AIF - 5B - 10 MVS
AIF - 5B - 5 LHFA
AIF - 5B - 5 Sig Trp
AIF - 5B - ICC
AIF - 5B - 14 LHR
AIF - 5B - 15 LHR
AIF - 5B - 1er Regt
AIF - 5B - 2 NZMGS
AIF - AASC
AIF - Aboriginal LH
AIF - Badges
AIF - Cars
AIF - Chinese LH
AIF - Double Sqns
AIF - Engineers
AIF - Fr - 22 Corps
AIF - Fr - 13 LHR
AIF - Honour Roll
AIF - HQ - 3rd Echelon
AIF - Marching Songs
AIF - Misc Topics
AIF - NZMRB
AIF - NZMRB - AMR
AIF - NZMRB - CMR
AIF - NZMRB - EFT
AIF - NZMRB - NZMFA
AIF - NZMRB - NZMGS
AIF - NZMRB - OMR
AIF - NZMRB - Sig-Trp
AIF - NZMRB - WMR
AIF - Ships
AIF - Ships - Encountr
AIF - Ships - Una
AIF - WFF
AIF - Wireless Sqn
Battles
BatzA - Australia
BatzA - Broken Hill
BatzA - Liverpool
BatzA - Merivale
BatzB - Boer War
BatzB - Bakenlaagte
BatzB - Belmont
BatzB - Bothaville
BatzB - Buffels Hoek
BatzB - Coetzees Drift
BatzB - Diamond Hill
BatzB - Driefontein
BatzB - Elands
BatzB - Graspan
BatzB - Grobelaar
BatzB - Grootvallier
BatzB - Hartebestfontn
BatzB - Houtnek
BatzB - Karee Siding
BatzB - Kimberley
BatzB - Koster River
BatzB - Leeuw Kop
BatzB - Mafeking
BatzB - Magersfontein
BatzB - Modder River
BatzB - Onverwacht
BatzB - Paardeberg
BatzB - Palmietfontein
BatzB - Pink Hill
BatzB - Poplar Grove
BatzB - Rhenoster
BatzB - Sannahs Post
BatzB - Slingersfontn
BatzB - Stinkhoutbm
BatzB - Sunnyside
BatzB - Wilmansrust
BatzB - Wolvekuil
BatzB - Zand River
BatzG - Gallipoli
BatzG - Anzac
BatzG - Aug 1915
BatzG - Baby 700
BatzG - Evacuation
BatzG - Hill 60
BatzG - Hill 971
BatzG - Krithia
BatzG - Lone Pine
BatzG - Nek
BatzJ - Jordan Valley
BatzJ - 1st Amman
BatzJ - 2nd Amman
BatzJ - Abu Tellul
BatzJ - Es Salt
BatzJ - JV Maps
BatzJ - Ziza
BatzM - Mespot
BatzM - Baghdad
BatzM - Ctesiphon
BatzM - Daur
BatzM - Kurna
BatzM - Kut el Amara
BatzM - Ramadi
BatzN - Naval
BatzN - AE1
BatzN - Cocos Is
BatzN - Heligoland
BatzN - Marmara
BatzN - Zeebrugge
BatzN - Zeppelin L43
BatzNG - Bitapaka
BatzO - Other
BatzO - Baku
BatzO - Egypt 1919
BatzO - Emptsa
BatzO - Karawaran
BatzO - Peitang
BatzO - Wassa
BatzP - Palestine
BatzP - 1st Gaza
BatzP - 2nd Gaza
BatzP - 3rd Gaza
BatzP - Aleppo
BatzP - Amwas
BatzP - Ayun Kara
BatzP - Bald Hill
BatzP - Balin
BatzP - Beersheba
BatzP - Berkusieh
BatzP - Damascus
BatzP - El Auja
BatzP - El Buggar
BatzP - El Burj
BatzP - Haifa
BatzP - Huj
BatzP - JB Yakub
BatzP - Kaukab
BatzP - Khan Kusseir
BatzP - Khuweilfe
BatzP - Kuneitra
BatzP - Megiddo
BatzP - Nablus
BatzP - Rafa
BatzP - Sasa
BatzP - Semakh
BatzP - Sheria
BatzP - Surafend
BatzP - Wadi Fara
BatzS - Sinai
BatzS - Bir el Abd
BatzS - El Arish
BatzS - El Mazar
BatzS - El Qatiya
BatzS - Jifjafa
BatzS - Magdhaba
BatzS - Maghara
BatzS - Romani
BatzS - Suez 1915
BatzSe - Senussi
BatzWF - Westn Front
BW - Boer War
BW - NSW
BW - NSW - 1ACH
BW - NSW - 1NSWMR
BW - NSW - 2NSWMR
BW - NSW - 3ACH
BW - NSW - 3NSWIB
BW - NSW - 3NSWMR
BW - NSW - 5ACH
BW - NSW - A Bty RAA
BW - NSW - AAMC
BW - NSW - Aust H
BW - NSW - Lancers
BW - NSW - NSW Inf
BW - NSW - NSWCBC
BW - NSW - NSWIB
BW - NSW - NSWMR_A
BW - NZ
BW - Qld
BW - Qld - 1ACH
BW - Qld - 1QMI
BW - Qld - 2QMI
BW - Qld - 3ACH
BW - Qld - 3QMI
BW - Qld - 4QIB
BW - Qld - 5QIB
BW - Qld - 6QIB
BW - Qld - 7ACH
BW - QLD - AAMC
BW - SA
BW - SA - 1SAMR
BW - SA - 2ACH
BW - SA - 2SAMR
BW - SA - 3SACB
BW - SA - 4ACH
BW - SA - 4SAIB
BW - SA - 5SAIB
BW - SA - 6SAIB
BW - SA - 8ACH
BW - SA - AAMC
BW - Tas
BW - Tas - 1ACH
BW - Tas - 1TIB
BW - Tas - 1TMI
BW - Tas - 2TB
BW - Tas - 2TIB
BW - Tas - 3ACH
BW - Tas - 8ACH
BW - Vic
BW - Vic - 1VMI
BW - Vic - 2ACH
BW - Vic - 2VMR
BW - Vic - 3VB
BW - Vic - 4ACH
BW - Vic - 4VIB
BW - Vic - 5VMR
BW - Vic - 6ACH
BW - Vic - AAMC
BW - Vic - Scot H
BW - WA
BW - WA - 1WAMI
BW - WA - 2ACH
BW - WA - 2WAMI
BW - WA - 3WAB
BW - WA - 4ACH
BW - WA - 4WAMI
BW - WA - 5WAMI
BW - WA - 6WAMI
BW - WA - 8ACH
BW Gen - Campaign
BW Gen - Soldiers
BW General
Cavalry - General
Diary - Schramm
Egypt - Heliopolis
Egypt - Mena
Gen - Ataturk Pk, CNB
Gen - Australia
Gen - Legends
Gen - Query Club
Gen - St - NSW
Gen - St - Qld
Gen - St - SA
Gen - St - Tas
Gen - St - Vic
Gen - St - WA
Gm - German Items
Gm - Bk - 605 MGC
GW - 11 Nov 1918
GW - Atrocities
GW - August 1914
GW - Biographies
GW - Propaganda
GW - Spies
GW - We forgot
Militia 1899-1920
Militia - Area Officers
Militia - Inf - Infantry
Militia - Inf - 1IB
Militia - Inf - 2IB
Militia - Inf - 3IB
Militia - Inf - NSW
Militia - Inf - Qld
Militia - Inf - SA
Militia - Inf - Tas
Militia - Inf - Vic
Militia - Inf - WA
Militia - K.E.Horse
Militia - LH
Militia - LH - Regts
Militia - LH - 1LHB
Militia - LH - 2LHB
Militia - LH - 3LHB
Militia - LH - 4LHB
Militia - LH - 5LHB
Militia - LH - 6LHB
Militia - LHN - NSW
Militia - LHN - 1/7/1
Militia - LHN - 2/9/6
Militia - LHN - 3/11/7
Militia - LHN - 4/6/16
Militia - LHN - 5/4/15
Militia - LHN - 6/5/12
Militia - LHN - 28
Militia - LHQ - Qld
Militia - LHQ - 13/2
Militia - LHQ - 14/3/11
Militia - LHQ - 15/1/5
Militia - LHQ - 27/14
Militia - LHS - SA
Militia - LHS - 16/22/3
Militia - LHS - 17/23/18
Militia - LHS - 24/9
Militia - LHT - Tas
Militia - LHT - 12/26
Militia - LHV - Vic
Militia - LHV - 7/15/20
Militia - LHV - 8/16/8
Militia - LHV - 9/19
Militia - LHV - 10/13
Militia - LHV - 11/20/4
Militia - LHV - 19/17
Militia - LHV - 29
Militia - LHW - WA
Militia - LHW-18/25/10
Militia - Military Orders
Militia - Misc
MilitiaRC - Rifle Clubs
MilitiaRC - NSW
MilitiaRC - NT
MilitiaRC - Qld
MilitiaRC - SA
MilitiaRC - Tas
MilitiaRC - Vic
MilitiaRC - WA
Militiaz - New Zealand
Tk - Turkish Items
Tk - Army
Tk - Bks - Books
Tk - Bks - 1/33IR
Tk - Bks - 27th IR
Tk - Bks - Air Force
Tk - Bks - Yildirim
Tk - POWs
Wp - Weapons
Wp - Hotchkiss Cav
Wp - Hotchkiss PMG
Blog Tools
Edit your Blog
Build a Blog
RSS Feed
View Profile
Open Community
Post to this Blog
Site Index
Education Centre
LH Militia
Boer War
Transport Ships
LH Battles
ALH - Units
ALH - General
Aboriginal Light H
Weapons
Ottoman Sources

"At a mile distant their thousand hooves were stuttering thunder, coming at a rate that frightened a man - they were an awe inspiring sight, galloping through the red haze - knee to knee and horse to horse - the dying sun glinting on bayonet points..." Trooper Ion Idriess

The Australian Light Horse Studies Centre aims to present an accurate history as chroniclers of early Australian military developments from 1899 to 1920.

The Australian Light Horse Studies Centre site holds over 12,000 entries and is growing daily.

Contact: Australian Light Horse Studies Centre

Let us hear your story: You can tell your story, make a comment or ask for help on our Australian Light Horse Studies Centre Forum called:

Desert Column Forum

WARNING: This site contains: names, information and images of deceased people; and, language which may be considered inappropriate today.

Sunday, 15 February 2009
Cocos Islands, Indian Ocean, November 9, 1914
Topic: BatzN - Cocos Is

Cocos Islands

Indian Ocean, 9 November 1914


Battle at the Cocos Islands


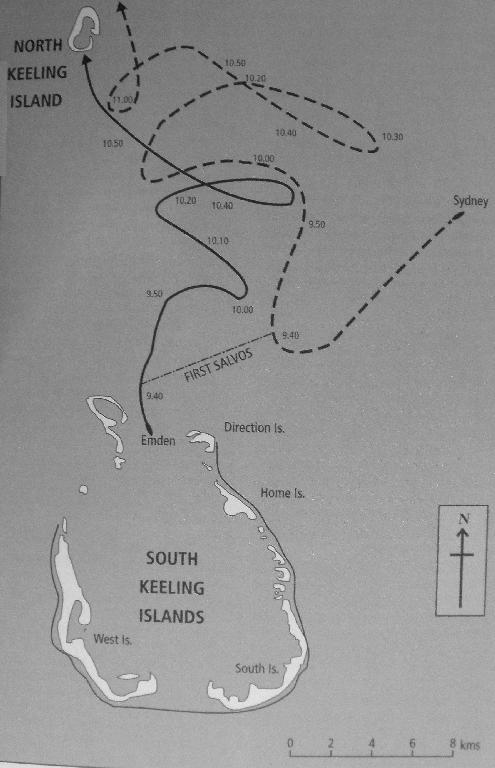
Cocos Islands, the first engagement fought by a warship of the Royal Australian Navy, occurred on 9 November 1914 off this British-ruled group of 27 small coral islands situated in the Indian Ocean 2,800 kilometres north-west of Perth, Western Australia. The action came about after the light cruiser Emden (3,600 tonnes), a unit of the German Pacific Squadron then enjoying a highly successful career raiding Allied shipping, anchored off Direction Island early on 9 November and sent ashore 43 officers and men to destroy the vital radio and cable station there which connected the Australian, African and Indian telegraph systems. Before this aim could be achieved, the staff of the station managed to send off warning messages of the presence of a `strange warship'.

Unknown to the Emden's commander, Captain Karl von Müller, a convoy of 38 transports carrying the first contingents of Australian and New Zealand troops overseas was at that moment passing just 80 kilometres to the east, escorted by the Australian light cruisers Melbourne and Sydney (5,400 tonnes) and the powerful Japanese battle-cruiser Ibuki (10,000 tonnes). Until the previous day the convoy had been led by the British armoured cruiser Minotaur, but, after that vessel was called away to Mauritius, Melbourne (under Captain Mortimer Silver, RN) had taken over this role. On receipt of the signals from Corns, Silver's first instinct was to himself go and investigate. Appreciating his wider responsibility, however, at 7 a.m. he detached Sydney-which was, in any event, then posted on the convoy's port side nearest to the reported trouble. He had to restrain Ibuki's captain, Vice-Admiral Kato Kanji, who wished to accompany Sydney.

As Sydney steamed westward at 20 knots, her smoke was spotted on the horizon by Emden soon after 9 a.m. At first von Muffler thought this came from the collier, Buresk, which was supporting his operations, but less than fifteen minutes later he realised his mistake as what was plainly a British cruiser bore down on him from the north-east. Without waiting to collect the landing party ashore, he moved out to sea to gain room to manoeuvre and prepared for combat. On identifying the class of the enemy ship he had discovered, the commander of Sydney (Captain John Glossop, RN) consulted standard references on board and decided to close to 9,500 yards (8.7 kilometres) before engaging. lie believed that this would place him just outside the range of his opponent's 4.1 inch guns while bringing Emden fully under the fire of his own 6-inch armament. Unknown to him, however, was the fact that the mountings of the German's guns had undergone elevation modifications which increased their range.

No sooner had Glossop closed to 10,500 yards (9.6 kilometres) and swung onto a parallel course at 9.-10 a.m. than Emden opened fire at extreme range. The five shells of this first salvo passed over the top of Sydney but still splashed down within 200 metres of their target, and a hail of further rounds quickly followed. Von Müller had ordered rapid fire so that Emden was reportedly sending off a salvo every six seconds. At least fifteen shells thus found their mark on Sydney-al though fortunately no more than five of these actually exploded. All the Australian cruiser's casualties of four men killed and twelve wounded occurred during these first ten minutes of the action, before Glossop moved back out beyond his opponent's reach.

Initially hampered in returning effective fire through having both range-finders put out of action, Glossop used his superior speed of 27 knots (compared with Emden's seventeen) to thwart any attempt to get close enough to torpedo him. Once Sydney's shells began to find their mark, moreover, their effect was decisive, since each 6-inch shell weighed 45 kg (compared with the 17 kg of Emden's shells) and Sydney eventually succeeded in landing about 100 of these hammer blows upon her lighter adversary. Soon the German vessel was totally wrecked, with its hull holed at numerous points, its superstructure a blazing shambles, half the crew disabled, and steering only possible using the screws. But the Emden continued to fight, with at least one gun still firing at 11 a.m.

Realising the hopelessness of his position, von Müller chose to run his ship onto the reef at North Keeling Island to prevent it sinking with so many wounded on hoard. Once Emden was aground by 11.15 a.m., Glossop decided to go after the enemy's supply ship, Buresk, which had been hovering on the edge of the action apparently looking for an opportunity to ram him. When the collier was eventually overtaken shortly after noon, a prize crew put on hoard discovered that the German crew had already taken measures to sink the ship and it was beyond saving.

On returning to Emden's shattered remains at 4 p.m., Glossop found the enemy ship still flying its battle ensign. After demands to surrender were ignored, he considered that von Müller was declaring an intention to continue resistance by whatever means was still open to him; he accordingly ordered a further two salvos fired into the wreck. Only then was the white flag raised and the German colours hauled down. There was later some criticism of Glossop's action at this point, which inevitably caused needless casualties, but there was no doubting that he behaved correctly according to the usages of naval warfare.

Even now, Sydney was unable to move directly to the aid of Emden's surviving crew, since there was still the group of Germans ashore on Direction Island to be dealt with. It was subsequently discovered that this party had commandeered a schooner during the action and managed to sail away in the dusk; after an adventurous journey, they managed to reach Arabia and eventually made their way back to Germany. Not until late on 10 November was Sydney finally able to render medical assistance to the 190 of Emden's officers and men who had survived the fight. 65 of whom were wounded; eight officers and 126 other ranks had been killed, twenty of them during the final two salvos. After transhipping the survivors into Sydney, Glossop made for Colombo to rejoin the convoy.

Despite the immense and widespread jubilation at news of Emden's destruction, and especially the fact that this had been achieved by a warship of Australia's new navy it had been a markedly one-sided contest. Interviewed shortly after the action, Glossop expressed his horror at what he saw of the effects of his fire on his opponent, declaring

My God, what a sight! Her captain had been out of action ten minutes after the fight started from lydite fumes, and everybody on hoard was demented ... by shock, and fumes, and the roar of shells bursting among them. She was a shambles. Blood, guts, flesh, and uniforms were all scattered about. One of our shells had landed behind a gun shield, and had blown the whole gun-crew into one pulp. You couldn't even tell how many men there had been. They must have had forte minutes of hell on that ship.... and the survivors were practically madmen.


In reality, Emden's fate at Sydney's hands was almost comparable to that which befell HMAS Yarra in a clash with Japanese cruisers 28 years later (see South of Java).

The Casualty List


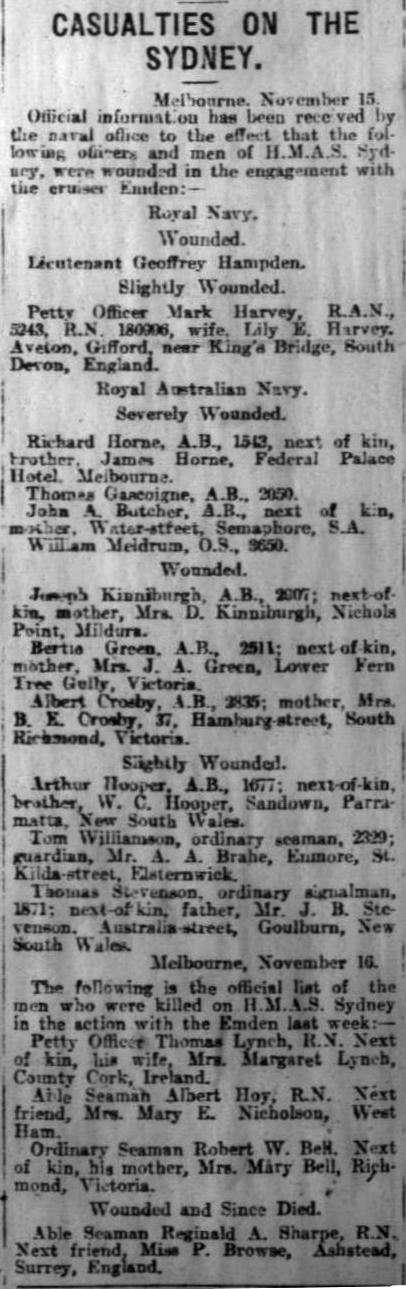
 The details of casualties from the HMAS Sydney

[From: Adelaide Chronicle, 21 November 1914, p. 42.]


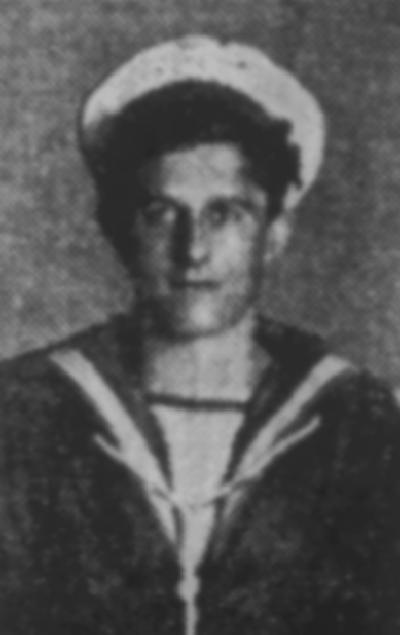
One of the severely wounded, James Arthur Butcher.

20 year old James Arthur Butcher who was severely wounded on the HMAS Sydney was born at Birkenhead, South Australia. He was the son of Captain Butcher, master of the coastal ship Echunga. His brother, William Butcher was the master of a trading boat in the Solomon Islands. James Butcher joined the Royal Navy and first sailed in the HMS Drake but transferred to the HMAS Sydney in February, 1914. 


James Arthur Butcher

[From: Adelaide Chronicle, 21 November 1914, p. 45.]


Extracted from the book produced by Chris Coulthard-Clark, Where Australians Fought - The Encyclopaedia of Australia's Battles, Allen and Unwin, Sydney, 1998, pp. 97-100.


Additional References cited by Chris Coulthard-Clark:

Arthur W. Jose, (1928), The Royal Australian Navy, 1914-1918, Sydney Angus & Robertson.

A. B. Paterson, (1934), Happy Dispatches, Sydney: Angus & Robertson.


Further Reading:

Battles where Australians fought, 1899-1920


Citation: Cocos Islands, Indian Ocean, November 9, 1914

Posted by Project Leader at 5:47 PM EAST
Updated: Tuesday, 14 April 2009 11:36 PM EADT

View Latest Entries

Full Site Index


powered by FreeFind
Let us hear your story: You can tell your story, make a comment or ask for help on our forum.

Desert Column Forum

A note on copyright

The Australian Light Horse Studies Centre is a not for profit and non profit group whose sole aim is to write the early history of the Australian Light Horse from 1900 - 1920. It is privately funded and the information is provided by the individuals within the group and while permission for the use of the material has been given for this site for these items by various donors, the residual and actual copyright for these items, should there be any, resides exclusively with the donors. The information on this site is freely available for private research use only and if used as such, should be appropriately acknowledged. To assist in this process, each item has a citation attached at the bottom for referencing purposes.

Please Note: No express or implied permission is given for commercial use of the information contained within this site.

A note to copyright holders

The Australian Light Horse Studies Centre has made every endeavour to contact copyright holders of material digitised for this blog and website and where appropriate, permission is still being sought for these items. Where replies were not received, or where the copyright owner has not been able to be traced, or where the permission is still being sought, the Australian Light Horse Studies Centre has decided, in good faith, to proceed with digitisation and publication. Australian Light Horse Studies Centre would be happy to hear from copyright owners at any time to discuss usage of this item.

Contact

Australian Light Horse Studies Centre

eXTReMe Tracker