« February 2009 »
S M T W T F S
1 2 3 4 5 6 7
8 9 10 11 12 13 14
15 16 17 18 19 20 21
22 23 24 25 26 27 28
You are not logged in. Log in


Search the site:


powered by FreeFind
Volunteer with us.

Entries by Topic All topics  
A Latest Site News
A - Using the Site
AAA Volunteers
AAB-Education Centre
AAC-Film Clips
AAC-Photo Albums
AIF & MEF & EEF
AIF - Lighthorse
AIF - ALH - A to Z
AIF - DMC
AIF - DMC - Or Bat
AIF - DMC - Anzac MD
AIF - DMC - Aus MD
AIF - DMC - British
AIF - DMC - BWI
AIF - DMC - French
AIF - DMC - Indian
AIF - DMC - Italian
AIF - DMC - Medical
AIF - DMC - Remounts
AIF - DMC - Scouts
AIF - DMC - Sigs
AIF - DMC - Sigs AirlnS
AIF - DMC - 1 Sig Sqn
AIF - DMC - 2 Sig Sqn
AIF - DMC - Eng
AIF - DMC - Eng 1FSE
AIF - DMC - Eng 2FSE
AIF - DMC - GSR
AIF - 1B - 1 LHB
AIF - 1B - 6 MVS
AIF - 1B - 1 LHMGS
AIF - 1B - 1 Sig Trp
AIF - 1B - 1 LHFA
AIF - 1B - 1 LHR
AIF - 1B - 2 LHR
AIF - 1B - 3 LHR
AIF - 2B - 2 LHB
AIF - 2B - 7 MVS
AIF - 2B - 2 LHFA
AIF - 2B - 2 LHMGS
AIF - 2B - 2 Sig Trp
AIF - 2B - 5 LHR
AIF - 2B - 6 LHR
AIF - 2B - 7 LHR
AIF - 3B - 3 LHB
AIF - 3B - 8 MVS
AIF - 3B - 3 LHB Sigs
AIF - 3B - 3 LHFA
AIF - 3B - 3 LHMGS
AIF - 3B - 3 Sig Trp
AIF - 3B - 8 LHR
AIF - 3B - 9 LHR
AIF - 3B - 10 LHR
AIF - 4B - 4 LHB
AIF - 4B - 4 Sig Trp
AIF - 4B - 9 MVS
AIF - 4B - 4 LHFA
AIF - 4B - 4 LHMGS
AIF - 4B - 4 LHR
AIF - 4B - 11 LHR
AIF - 4B - 12 LHR
AIF - 5B - 5 LHB
AIF - 5B - 10 MVS
AIF - 5B - 5 LHFA
AIF - 5B - 5 Sig Trp
AIF - 5B - ICC
AIF - 5B - 14 LHR
AIF - 5B - 15 LHR
AIF - 5B - 1er Regt
AIF - 5B - 2 NZMGS
AIF - AASC
AIF - Aboriginal LH
AIF - Badges
AIF - Cars
AIF - Chinese LH
AIF - Double Sqns
AIF - Engineers
AIF - Fr - 22 Corps
AIF - Fr - 13 LHR
AIF - Honour Roll
AIF - HQ - 3rd Echelon
AIF - Marching Songs
AIF - Misc Topics
AIF - NZMRB
AIF - NZMRB - AMR
AIF - NZMRB - CMR
AIF - NZMRB - EFT
AIF - NZMRB - NZMFA
AIF - NZMRB - NZMGS
AIF - NZMRB - OMR
AIF - NZMRB - Sig-Trp
AIF - NZMRB - WMR
AIF - Ships
AIF - Ships - Encountr
AIF - Ships - Una
AIF - WFF
AIF - Wireless Sqn
Battles
BatzA - Australia
BatzA - Broken Hill
BatzA - Liverpool
BatzA - Merivale
BatzB - Boer War
BatzB - Bakenlaagte
BatzB - Belmont
BatzB - Bothaville
BatzB - Buffels Hoek
BatzB - Coetzees Drift
BatzB - Diamond Hill
BatzB - Driefontein
BatzB - Elands
BatzB - Graspan
BatzB - Grobelaar
BatzB - Grootvallier
BatzB - Hartebestfontn
BatzB - Houtnek
BatzB - Karee Siding
BatzB - Kimberley
BatzB - Koster River
BatzB - Leeuw Kop
BatzB - Mafeking
BatzB - Magersfontein
BatzB - Modder River
BatzB - Onverwacht
BatzB - Paardeberg
BatzB - Palmietfontein
BatzB - Pink Hill
BatzB - Poplar Grove
BatzB - Rhenoster
BatzB - Sannahs Post
BatzB - Slingersfontn
BatzB - Stinkhoutbm
BatzB - Sunnyside
BatzB - Wilmansrust
BatzB - Wolvekuil
BatzB - Zand River
BatzG - Gallipoli
BatzG - Anzac
BatzG - Aug 1915
BatzG - Baby 700
BatzG - Evacuation
BatzG - Hill 60
BatzG - Hill 971
BatzG - Krithia
BatzG - Lone Pine
BatzG - Nek
BatzJ - Jordan Valley
BatzJ - 1st Amman
BatzJ - 2nd Amman
BatzJ - Abu Tellul
BatzJ - Es Salt
BatzJ - JV Maps
BatzJ - Ziza
BatzM - Mespot
BatzM - Baghdad
BatzM - Ctesiphon
BatzM - Daur
BatzM - Kurna
BatzM - Kut el Amara
BatzM - Ramadi
BatzN - Naval
BatzN - AE1
BatzN - Cocos Is
BatzN - Heligoland
BatzN - Marmara
BatzN - Zeebrugge
BatzN - Zeppelin L43
BatzNG - Bitapaka
BatzO - Other
BatzO - Baku
BatzO - Egypt 1919
BatzO - Emptsa
BatzO - Karawaran
BatzO - Peitang
BatzO - Wassa
BatzP - Palestine
BatzP - 1st Gaza
BatzP - 2nd Gaza
BatzP - 3rd Gaza
BatzP - Aleppo
BatzP - Amwas
BatzP - Ayun Kara
BatzP - Bald Hill
BatzP - Balin
BatzP - Beersheba
BatzP - Berkusieh
BatzP - Damascus
BatzP - El Auja
BatzP - El Buggar
BatzP - El Burj
BatzP - Haifa
BatzP - Huj
BatzP - JB Yakub
BatzP - Kaukab
BatzP - Khan Kusseir
BatzP - Khuweilfe
BatzP - Kuneitra
BatzP - Megiddo
BatzP - Nablus
BatzP - Rafa
BatzP - Sasa
BatzP - Semakh
BatzP - Sheria
BatzP - Surafend
BatzP - Wadi Fara
BatzS - Sinai
BatzS - Bir el Abd
BatzS - El Arish
BatzS - El Mazar
BatzS - El Qatiya
BatzS - Jifjafa
BatzS - Magdhaba
BatzS - Maghara
BatzS - Romani
BatzS - Suez 1915
BatzSe - Senussi
BatzWF - Westn Front
BW - Boer War
BW - NSW
BW - NSW - 1ACH
BW - NSW - 1NSWMR
BW - NSW - 2NSWMR
BW - NSW - 3ACH
BW - NSW - 3NSWIB
BW - NSW - 3NSWMR
BW - NSW - 5ACH
BW - NSW - A Bty RAA
BW - NSW - AAMC
BW - NSW - Aust H
BW - NSW - Lancers
BW - NSW - NSW Inf
BW - NSW - NSWCBC
BW - NSW - NSWIB
BW - NSW - NSWMR_A
BW - NZ
BW - Qld
BW - Qld - 1ACH
BW - Qld - 1QMI
BW - Qld - 2QMI
BW - Qld - 3ACH
BW - Qld - 3QMI
BW - Qld - 4QIB
BW - Qld - 5QIB
BW - Qld - 6QIB
BW - Qld - 7ACH
BW - QLD - AAMC
BW - SA
BW - SA - 1SAMR
BW - SA - 2ACH
BW - SA - 2SAMR
BW - SA - 3SACB
BW - SA - 4ACH
BW - SA - 4SAIB
BW - SA - 5SAIB
BW - SA - 6SAIB
BW - SA - 8ACH
BW - SA - AAMC
BW - Tas
BW - Tas - 1ACH
BW - Tas - 1TIB
BW - Tas - 1TMI
BW - Tas - 2TB
BW - Tas - 2TIB
BW - Tas - 3ACH
BW - Tas - 8ACH
BW - Vic
BW - Vic - 1VMI
BW - Vic - 2ACH
BW - Vic - 2VMR
BW - Vic - 3VB
BW - Vic - 4ACH
BW - Vic - 4VIB
BW - Vic - 5VMR
BW - Vic - 6ACH
BW - Vic - AAMC
BW - Vic - Scot H
BW - WA
BW - WA - 1WAMI
BW - WA - 2ACH
BW - WA - 2WAMI
BW - WA - 3WAB
BW - WA - 4ACH
BW - WA - 4WAMI
BW - WA - 5WAMI
BW - WA - 6WAMI
BW - WA - 8ACH
BW Gen - Campaign
BW Gen - Soldiers
BW General
Cavalry - General
Diary - Schramm
Egypt - Heliopolis
Egypt - Mena
Gen - Ataturk Pk, CNB
Gen - Australia
Gen - Legends
Gen - Query Club
Gen - St - NSW
Gen - St - Qld
Gen - St - SA
Gen - St - Tas
Gen - St - Vic
Gen - St - WA
Gm - German Items
Gm - Bk - 605 MGC
GW - 11 Nov 1918
GW - Atrocities
GW - August 1914
GW - Biographies
GW - Propaganda
GW - Spies
GW - We forgot
Militia 1899-1920
Militia - Area Officers
Militia - Inf - Infantry
Militia - Inf - 1IB
Militia - Inf - 2IB
Militia - Inf - 3IB
Militia - Inf - NSW
Militia - Inf - Qld
Militia - Inf - SA
Militia - Inf - Tas
Militia - Inf - Vic
Militia - Inf - WA
Militia - K.E.Horse
Militia - LH
Militia - LH - Regts
Militia - LH - 1LHB
Militia - LH - 2LHB
Militia - LH - 3LHB
Militia - LH - 4LHB
Militia - LH - 5LHB
Militia - LH - 6LHB
Militia - LHN - NSW
Militia - LHN - 1/7/1
Militia - LHN - 2/9/6
Militia - LHN - 3/11/7
Militia - LHN - 4/6/16
Militia - LHN - 5/4/15
Militia - LHN - 6/5/12
Militia - LHN - 28
Militia - LHQ - Qld
Militia - LHQ - 13/2
Militia - LHQ - 14/3/11
Militia - LHQ - 15/1/5
Militia - LHQ - 27/14
Militia - LHS - SA
Militia - LHS - 16/22/3
Militia - LHS - 17/23/18
Militia - LHS - 24/9
Militia - LHT - Tas
Militia - LHT - 12/26
Militia - LHV - Vic
Militia - LHV - 7/15/20
Militia - LHV - 8/16/8
Militia - LHV - 9/19
Militia - LHV - 10/13
Militia - LHV - 11/20/4
Militia - LHV - 19/17
Militia - LHV - 29
Militia - LHW - WA
Militia - LHW-18/25/10
Militia - Military Orders
Militia - Misc
MilitiaRC - Rifle Clubs
MilitiaRC - NSW
MilitiaRC - NT
MilitiaRC - Qld
MilitiaRC - SA
MilitiaRC - Tas
MilitiaRC - Vic
MilitiaRC - WA
Militiaz - New Zealand
Tk - Turkish Items
Tk - Army
Tk - Bks - Books
Tk - Bks - 1/33IR
Tk - Bks - 27th IR
Tk - Bks - Air Force
Tk - Bks - Yildirim
Tk - POWs
Wp - Weapons
Wp - Hotchkiss Cav
Wp - Hotchkiss PMG
Blog Tools
Edit your Blog
Build a Blog
RSS Feed
View Profile
Open Community
Post to this Blog
Site Index
Education Centre
LH Militia
Boer War
Transport Ships
LH Battles
ALH - Units
ALH - General
Aboriginal Light H
Weapons
Ottoman Sources

"At a mile distant their thousand hooves were stuttering thunder, coming at a rate that frightened a man - they were an awe inspiring sight, galloping through the red haze - knee to knee and horse to horse - the dying sun glinting on bayonet points..." Trooper Ion Idriess

The Australian Light Horse Studies Centre aims to present an accurate history as chroniclers of early Australian military developments from 1899 to 1920.

The Australian Light Horse Studies Centre site holds over 12,000 entries and is growing daily.

Contact: Australian Light Horse Studies Centre

Let us hear your story: You can tell your story, make a comment or ask for help on our Australian Light Horse Studies Centre Forum called:

Desert Column Forum

WARNING: This site contains: names, information and images of deceased people; and, language which may be considered inappropriate today.

Monday, 16 February 2009
Sea of Marmara, Turkey, April 25 to 30, 1915
Topic: BatzN - Marmara

Sea of Marmara

Turkey,  25 - 30 April 1915


The AE2 on escort duty, Indian Ocean, 1915.


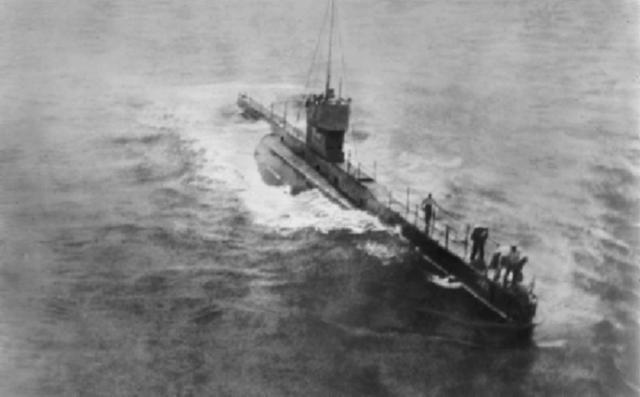
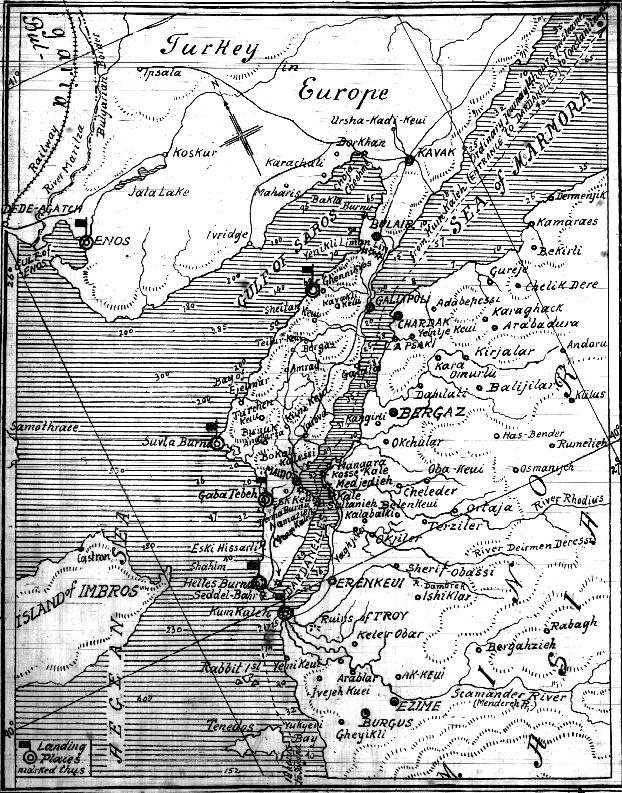
Sea of Marmara, a naval episode on 25-30 April 1915 in which the Australian submarine AE2 succeeded in penetrating Turkish defences and passing the length of the Dardanelles, the 60-kilometre channel linking the Sea of Marmara with the Aegean Sea, at the same time that an Allied expeditionary force was attempting to seize the Turkish land forts controlling the southern entrance to this strategic waterway (see Anzac). Two submarines (one French, one British) had previously been lost to the strait's hazards which----apart. from natural obstacles such as an unpredictable outward current which could render a submarine almost uncontrollable-included minefields, searchlights, shore batteries and naval patrols. If able to reach Chanak, on the eastern shore of the stretch known as the Narrows, the boat's captain, Lieut.-Commander Henry Stoker, RN, was ordered to 'run amok generally' by interfering with enemy shipping moving to support Turkish forces on the Gallipoli Peninsula.

An initial attempt made during the early morning hours of 24 April turned into a false start, after damage sustained to a hydroplane shaft during a hurried dive forced the submarine to return to base at Tenedos (an island near the mouth of the Dardanelles). Repairs were carried out in time to enable a second attempt to be made at the same time the next day. Cruising slowly on the surface under cover of darkness, AE2 made its way into the entrance of the strait at 2.30 a.m. Two hours later, after about nine kilometres had been covered, the boat's wash was spotted in the flat calm water by enemy lookouts on the north bank, a gun opened fire and it became necessary to dive.

Stoker proceeded through the enemy minefields while still submerged, with tethering wires constantly scraping against the submarine's hull. By 6 a.m., while approaching the Narrows off Chanak at periscope depth, the boat was engaged by gunfire from forts on both sides of the waterway, and by warships which attempted to ram it. AE2 sank a gunboat with a torpedo before again being forced to submerge during the rest of this critical part of the passage. Twice the vessel hit bottom and slid up on the bank, exposing part of its conning tower to enemy observation and fire, but the crew was able to extricate it on each occasion.


A 1915 map of the Dardanelles tracing out the possible route from Tendos to Constantinople.
[From: Sydney Mail, 5 May 1915, p. 13.]


When Stoker rose to periscope depth to check position a short time after the second grounding episode, he discovered that the Narrows were well behind but that AE2 was now at the centre of a flotilla of enemy craft which included destroyers and gunboats. At 8.30 a.m. he attempted to throw off his pursuers by lying submerged on the bottom, staying thus concealed until the movement of searching vessels overhead ceased during the early hours of the evening. After surfacing during the night to recharge batteries, by 9 a.m. the next day, 26 April, AE2 was able to complete its passage of the Dardanelles and gained the wider spaces of the Sea of Marmara.

For the next four days AE2 remained at large within waters which then formed vital lines of internal communication for the Turks. It several times made torpedo attacks on vessels-both warships and freighters -which were encountered, although without succeeding in sinking any of these. The submarine was itself frequently forced to take evasive action against small enemy craft which attacked it, since it lacked a gun with which to defend itself. On the morning of 29 April AE2 was joined off Kara Burnu (at the western end of Artaki Bay) by E14, a British submarine commanded by Lieut.-Commander Edward Boyle, which had followed the Australian boat in making the difficult passage. An arrangement was made to rendezvous again at 10 a.m. the next day, before Stoker took his vessel to a bay north of Marmara Island where the night was spent resting on the bottom.

When AE2 arrived at the rendezvous point the next morning, 30 April, it was approached by a torpedo-boat (Sultan Hissar) and forced to dive. At about 10.30 a.m. the submarine inexplicably lost trim, its nose suddenly rising to break the surface about 1.5 kilometres from its original pursuer and a gunboat which had come to its assistance. An attempt to dive became uncontrollable, and efforts to arrest what had become an alarming plummet only led to the submarine again bursting to the surface stern first. Enemy fire quickly holed the engine room, and with no ability to either resist or escape Stoker considered that he had no choice but to scuttle the vessel. After ordering his men onto the deck to be taken off by the Turkish torpedo-boat, he took action to flood AE2's tanks and send it to the bottom in 55 fathoms some 5.5 kilometres north of Kara Burnu at 10.45 a.m. The twenty-man crew became prisoners of the Turks for the next three years.

Although AE2 had caused little real damage before being sunk, its penetration of the Dardanelles was of immense psychological importance both for the Turks and the Allies-and notwithstanding that the feat was quickly duplicated by Boyle's boat, and also E11 commanded by Lieut.-Commander Martin Nasmith. Although the next two submarines were far more effective in disrupting Turkish maritime traffic, the fact is that Stoker's presence in the Sea of Marmara undoubtedly began that process. Strangely, though, while Boyle and Nasmith were both immediately awarded the Victoria Cross and promoted for their exploits, Stoker's achievement was recognised with only the Distinguished Service Order, belatedly awarded in 1919.

The success of AE2 in getting through had also played an indirect part in influencing the army operation at Gallipoli, being specifically mentioned on 26 April by General Sir Ian Hamilton, the commander of the army expedition, in refusing to countenance proposals from subordinates that his force should be immediately taken back off the peninsula. Although Hamilton had already made his decision to stay, the news of the Australian boat's success helped to lighten the gloom of events immediately following the Gallipoli landing.


The crew of the AE2 as POWs in Turkey, 1915.


Extracted from the book produced by Chris Coulthard-Clark, Where Australians Fought - The Encyclopaedia of Australia's Battles, Allen and Unwin, Sydney, 1998, pp. 103-104.


Additional References cited by Chris Coulthard-Clark:

Robert Rhodes James, (1974), Gallipoli, London: Pan Books.

T.R. Frame & G.J. Swinden (1990), First In, Last Out: The Navy at Gallipoli, Kenthurst, NSW: Kangaroo Press.


Further Reading:

Battles where Australians fought, 1899-1920


Citation: Sea of Marmara, Turkey, April 25 to 30, 1915

Posted by Project Leader at 12:02 PM EAST
Updated: Tuesday, 14 April 2009 11:35 PM EADT

View Latest Entries

Full Site Index


powered by FreeFind
Let us hear your story: You can tell your story, make a comment or ask for help on our forum.

Desert Column Forum

A note on copyright

The Australian Light Horse Studies Centre is a not for profit and non profit group whose sole aim is to write the early history of the Australian Light Horse from 1900 - 1920. It is privately funded and the information is provided by the individuals within the group and while permission for the use of the material has been given for this site for these items by various donors, the residual and actual copyright for these items, should there be any, resides exclusively with the donors. The information on this site is freely available for private research use only and if used as such, should be appropriately acknowledged. To assist in this process, each item has a citation attached at the bottom for referencing purposes.

Please Note: No express or implied permission is given for commercial use of the information contained within this site.

A note to copyright holders

The Australian Light Horse Studies Centre has made every endeavour to contact copyright holders of material digitised for this blog and website and where appropriate, permission is still being sought for these items. Where replies were not received, or where the copyright owner has not been able to be traced, or where the permission is still being sought, the Australian Light Horse Studies Centre has decided, in good faith, to proceed with digitisation and publication. Australian Light Horse Studies Centre would be happy to hear from copyright owners at any time to discuss usage of this item.

Contact

Australian Light Horse Studies Centre

eXTReMe Tracker