« October 2009 »
S M T W T F S
1 2 3
4 5 6 7 8 9 10
11 12 13 14 15 16 17
18 19 20 21 22 23 24
25 26 27 28 29 30 31
You are not logged in. Log in


Search the site:


powered by FreeFind
Volunteer with us.

Entries by Topic All topics  
A Latest Site News
A - Using the Site
AAA Volunteers
AAB-Education Centre
AAC-Film Clips
AAC-Photo Albums
AIF & MEF & EEF
AIF - Lighthorse
AIF - ALH - A to Z
AIF - DMC
AIF - DMC - Or Bat
AIF - DMC - Anzac MD
AIF - DMC - Aus MD
AIF - DMC - British
AIF - DMC - BWI
AIF - DMC - French
AIF - DMC - Indian
AIF - DMC - Italian
AIF - DMC - Medical
AIF - DMC - Remounts
AIF - DMC - Scouts
AIF - DMC - Sigs
AIF - DMC - Sigs AirlnS
AIF - DMC - 1 Sig Sqn
AIF - DMC - 2 Sig Sqn
AIF - DMC - Eng
AIF - DMC - Eng 1FSE
AIF - DMC - Eng 2FSE
AIF - DMC - GSR
AIF - 1B - 1 LHB
AIF - 1B - 6 MVS
AIF - 1B - 1 LHMGS
AIF - 1B - 1 Sig Trp
AIF - 1B - 1 LHFA
AIF - 1B - 1 LHR
AIF - 1B - 2 LHR
AIF - 1B - 3 LHR
AIF - 2B - 2 LHB
AIF - 2B - 7 MVS
AIF - 2B - 2 LHFA
AIF - 2B - 2 LHMGS
AIF - 2B - 2 Sig Trp
AIF - 2B - 5 LHR
AIF - 2B - 6 LHR
AIF - 2B - 7 LHR
AIF - 3B - 3 LHB
AIF - 3B - 8 MVS
AIF - 3B - 3 LHB Sigs
AIF - 3B - 3 LHFA
AIF - 3B - 3 LHMGS
AIF - 3B - 3 Sig Trp
AIF - 3B - 8 LHR
AIF - 3B - 9 LHR
AIF - 3B - 10 LHR
AIF - 4B - 4 LHB
AIF - 4B - 4 Sig Trp
AIF - 4B - 9 MVS
AIF - 4B - 4 LHFA
AIF - 4B - 4 LHMGS
AIF - 4B - 4 LHR
AIF - 4B - 11 LHR
AIF - 4B - 12 LHR
AIF - 5B - 5 LHB
AIF - 5B - 10 MVS
AIF - 5B - 5 LHFA
AIF - 5B - 5 Sig Trp
AIF - 5B - ICC
AIF - 5B - 14 LHR
AIF - 5B - 15 LHR
AIF - 5B - 1er Regt
AIF - 5B - 2 NZMGS
AIF - AASC
AIF - Aboriginal LH
AIF - Badges
AIF - Cars
AIF - Chinese LH
AIF - Double Sqns
AIF - Engineers
AIF - Fr - 22 Corps
AIF - Fr - 13 LHR
AIF - Honour Roll
AIF - HQ - 3rd Echelon
AIF - Marching Songs
AIF - Misc Topics
AIF - NZMRB
AIF - NZMRB - AMR
AIF - NZMRB - CMR
AIF - NZMRB - EFT
AIF - NZMRB - NZMFA
AIF - NZMRB - NZMGS
AIF - NZMRB - OMR
AIF - NZMRB - Sig-Trp
AIF - NZMRB - WMR
AIF - Ships
AIF - Ships - Encountr
AIF - Ships - Una
AIF - WFF
AIF - Wireless Sqn
Battles
BatzA - Australia
BatzA - Broken Hill
BatzA - Liverpool
BatzA - Merivale
BatzB - Boer War
BatzB - Bakenlaagte
BatzB - Belmont
BatzB - Bothaville
BatzB - Buffels Hoek
BatzB - Coetzees Drift
BatzB - Diamond Hill
BatzB - Driefontein
BatzB - Elands
BatzB - Graspan
BatzB - Grobelaar
BatzB - Grootvallier
BatzB - Hartebestfontn
BatzB - Houtnek
BatzB - Karee Siding
BatzB - Kimberley
BatzB - Koster River
BatzB - Leeuw Kop
BatzB - Mafeking
BatzB - Magersfontein
BatzB - Modder River
BatzB - Onverwacht
BatzB - Paardeberg
BatzB - Palmietfontein
BatzB - Pink Hill
BatzB - Poplar Grove
BatzB - Rhenoster
BatzB - Sannahs Post
BatzB - Slingersfontn
BatzB - Stinkhoutbm
BatzB - Sunnyside
BatzB - Wilmansrust
BatzB - Wolvekuil
BatzB - Zand River
BatzG - Gallipoli
BatzG - Anzac
BatzG - Aug 1915
BatzG - Baby 700
BatzG - Evacuation
BatzG - Hill 60
BatzG - Hill 971
BatzG - Krithia
BatzG - Lone Pine
BatzG - Nek
BatzJ - Jordan Valley
BatzJ - 1st Amman
BatzJ - 2nd Amman
BatzJ - Abu Tellul
BatzJ - Es Salt
BatzJ - JV Maps
BatzJ - Ziza
BatzM - Mespot
BatzM - Baghdad
BatzM - Ctesiphon
BatzM - Daur
BatzM - Kurna
BatzM - Kut el Amara
BatzM - Ramadi
BatzN - Naval
BatzN - AE1
BatzN - Cocos Is
BatzN - Heligoland
BatzN - Marmara
BatzN - Zeebrugge
BatzN - Zeppelin L43
BatzNG - Bitapaka
BatzO - Other
BatzO - Baku
BatzO - Egypt 1919
BatzO - Emptsa
BatzO - Karawaran
BatzO - Peitang
BatzO - Wassa
BatzP - Palestine
BatzP - 1st Gaza
BatzP - 2nd Gaza
BatzP - 3rd Gaza
BatzP - Aleppo
BatzP - Amwas
BatzP - Ayun Kara
BatzP - Bald Hill
BatzP - Balin
BatzP - Beersheba
BatzP - Berkusieh
BatzP - Damascus
BatzP - El Auja
BatzP - El Buggar
BatzP - El Burj
BatzP - Haifa
BatzP - Huj
BatzP - JB Yakub
BatzP - Kaukab
BatzP - Khan Kusseir
BatzP - Khuweilfe
BatzP - Kuneitra
BatzP - Megiddo
BatzP - Nablus
BatzP - Rafa
BatzP - Sasa
BatzP - Semakh
BatzP - Sheria
BatzP - Surafend
BatzP - Wadi Fara
BatzS - Sinai
BatzS - Bir el Abd
BatzS - El Arish
BatzS - El Mazar
BatzS - El Qatiya
BatzS - Jifjafa
BatzS - Magdhaba
BatzS - Maghara
BatzS - Romani
BatzS - Suez 1915
BatzSe - Senussi
BatzWF - Westn Front
BW - Boer War
BW - NSW
BW - NSW - 1ACH
BW - NSW - 1NSWMR
BW - NSW - 2NSWMR
BW - NSW - 3ACH
BW - NSW - 3NSWIB
BW - NSW - 3NSWMR
BW - NSW - 5ACH
BW - NSW - A Bty RAA
BW - NSW - AAMC
BW - NSW - Aust H
BW - NSW - Lancers
BW - NSW - NSW Inf
BW - NSW - NSWCBC
BW - NSW - NSWIB
BW - NSW - NSWMR_A
BW - NZ
BW - Qld
BW - Qld - 1ACH
BW - Qld - 1QMI
BW - Qld - 2QMI
BW - Qld - 3ACH
BW - Qld - 3QMI
BW - Qld - 4QIB
BW - Qld - 5QIB
BW - Qld - 6QIB
BW - Qld - 7ACH
BW - QLD - AAMC
BW - SA
BW - SA - 1SAMR
BW - SA - 2ACH
BW - SA - 2SAMR
BW - SA - 3SACB
BW - SA - 4ACH
BW - SA - 4SAIB
BW - SA - 5SAIB
BW - SA - 6SAIB
BW - SA - 8ACH
BW - SA - AAMC
BW - Tas
BW - Tas - 1ACH
BW - Tas - 1TIB
BW - Tas - 1TMI
BW - Tas - 2TB
BW - Tas - 2TIB
BW - Tas - 3ACH
BW - Tas - 8ACH
BW - Vic
BW - Vic - 1VMI
BW - Vic - 2ACH
BW - Vic - 2VMR
BW - Vic - 3VB
BW - Vic - 4ACH
BW - Vic - 4VIB
BW - Vic - 5VMR
BW - Vic - 6ACH
BW - Vic - AAMC
BW - Vic - Scot H
BW - WA
BW - WA - 1WAMI
BW - WA - 2ACH
BW - WA - 2WAMI
BW - WA - 3WAB
BW - WA - 4ACH
BW - WA - 4WAMI
BW - WA - 5WAMI
BW - WA - 6WAMI
BW - WA - 8ACH
BW Gen - Campaign
BW Gen - Soldiers
BW General
Cavalry - General
Diary - Schramm
Egypt - Heliopolis
Egypt - Mena
Gen - Ataturk Pk, CNB
Gen - Australia
Gen - Legends
Gen - Query Club
Gen - St - NSW
Gen - St - Qld
Gen - St - SA
Gen - St - Tas
Gen - St - Vic
Gen - St - WA
Gm - German Items
Gm - Bk - 605 MGC
GW - 11 Nov 1918
GW - Atrocities
GW - August 1914
GW - Biographies
GW - Propaganda
GW - Spies
GW - We forgot
Militia 1899-1920
Militia - Area Officers
Militia - Inf - Infantry
Militia - Inf - 1IB
Militia - Inf - 2IB
Militia - Inf - 3IB
Militia - Inf - NSW
Militia - Inf - Qld
Militia - Inf - SA
Militia - Inf - Tas
Militia - Inf - Vic
Militia - Inf - WA
Militia - K.E.Horse
Militia - LH
Militia - LH - Regts
Militia - LH - 1LHB
Militia - LH - 2LHB
Militia - LH - 3LHB
Militia - LH - 4LHB
Militia - LH - 5LHB
Militia - LH - 6LHB
Militia - LHN - NSW
Militia - LHN - 1/7/1
Militia - LHN - 2/9/6
Militia - LHN - 3/11/7
Militia - LHN - 4/6/16
Militia - LHN - 5/4/15
Militia - LHN - 6/5/12
Militia - LHN - 28
Militia - LHQ - Qld
Militia - LHQ - 13/2
Militia - LHQ - 14/3/11
Militia - LHQ - 15/1/5
Militia - LHQ - 27/14
Militia - LHS - SA
Militia - LHS - 16/22/3
Militia - LHS - 17/23/18
Militia - LHS - 24/9
Militia - LHT - Tas
Militia - LHT - 12/26
Militia - LHV - Vic
Militia - LHV - 7/15/20
Militia - LHV - 8/16/8
Militia - LHV - 9/19
Militia - LHV - 10/13
Militia - LHV - 11/20/4
Militia - LHV - 19/17
Militia - LHV - 29
Militia - LHW - WA
Militia - LHW-18/25/10
Militia - Military Orders
Militia - Misc
MilitiaRC - Rifle Clubs
MilitiaRC - NSW
MilitiaRC - NT
MilitiaRC - Qld
MilitiaRC - SA
MilitiaRC - Tas
MilitiaRC - Vic
MilitiaRC - WA
Militiaz - New Zealand
Tk - Turkish Items
Tk - Army
Tk - Bks - Books
Tk - Bks - 1/33IR
Tk - Bks - 27th IR
Tk - Bks - Air Force
Tk - Bks - Yildirim
Tk - POWs
Wp - Weapons
Wp - Hotchkiss Cav
Wp - Hotchkiss PMG
Blog Tools
Edit your Blog
Build a Blog
RSS Feed
View Profile
Open Community
Post to this Blog
Site Index
Education Centre
LH Militia
Boer War
Transport Ships
LH Battles
ALH - Units
ALH - General
Aboriginal Light H
Weapons
Ottoman Sources

"At a mile distant their thousand hooves were stuttering thunder, coming at a rate that frightened a man - they were an awe inspiring sight, galloping through the red haze - knee to knee and horse to horse - the dying sun glinting on bayonet points..." Trooper Ion Idriess

The Australian Light Horse Studies Centre aims to present an accurate history as chroniclers of early Australian military developments from 1899 to 1920.

The Australian Light Horse Studies Centre site holds over 12,000 entries and is growing daily.

Contact: Australian Light Horse Studies Centre

Let us hear your story: You can tell your story, make a comment or ask for help on our Australian Light Horse Studies Centre Forum called:

Desert Column Forum

WARNING: This site contains: names, information and images of deceased people; and, language which may be considered inappropriate today.

Monday, 26 October 2009
The Battle of El Buqqar (Buggar) Ridge, Palestine, 27 October 1917, Outline
Topic: BatzP - El Buggar

The Battle of El Buggar Ridge

Palestine, 27 October 1917

Outline


The scene from El Buggar Ridge, Hill 720, facing north west
 
[Photograph by Gal Shaine.]


The Battle of El Buggar Ridge took place on 27 October 1917. It began as a reconnaissance in force by the Ottoman forces to test the resolve of the Allied defensive perimeter around the newly opened supply station of Karm. It ended in a battle which progressively drew in more Allied forces until they were able to eject the Ottoman forces from the trenches on El Buggar Ridge.

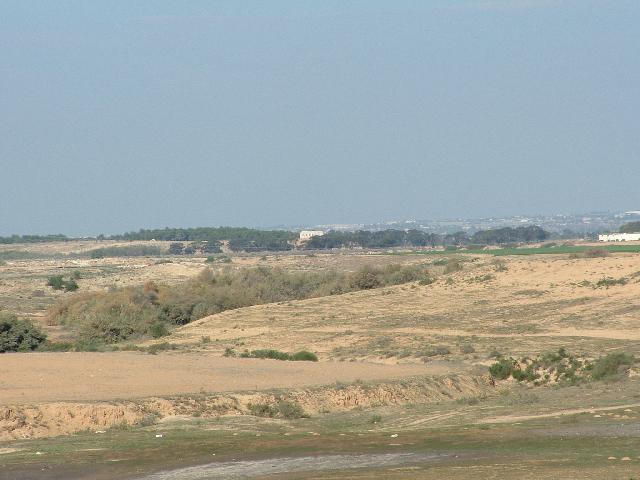
With the completion of the rail link and water pipe from Tel el Fara to Karm, the final logistic preparations for the oncoming battle at Beersheba had been completed. To protect this vital supply depot from artillery harassment from the Ottoman forces at Abu Hareira, Henry Chauvel, the General Officer in Command of the Desert Mounted Corps decided to transform a ring of temporary outposts into a permanent defensive line. To that effect, on 22 October, he ordered the seizure of the outpost line and conversion into a permanent defensive line. The line traversed west to east from "Two Tree Farm", Point 510, Point 550, Point 630 and then south to Point 720 and crossing the Beersheba Road at El Buggar.


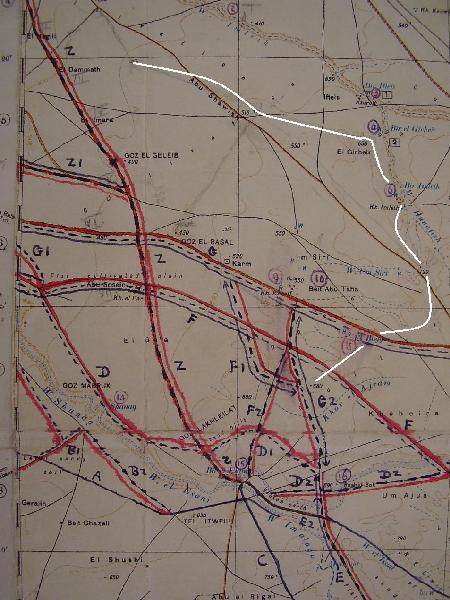
El Buggar Ridge defensive line.

[Click on map for larger version.]


The Allied Defence Perimeter consisted of minor trench works built after the 8th Mounted Brigade took possession of the outpost line when they relieved the Australian 4th Light Horse Brigade. By 27 October, the line was still disorganised with only weak redoubts constructed at Points 720 and 630.

For the Ottoman forces, the occupation of Karm created a major point of supply and water for the Allied troops in the immediate area. The placement of the station at Karm placed under threat the defensive positions known as the Hureira Redoubt and Rushdie System which formed a powerful bulwark against any Allied action. Karm Station pointed right to the heart of this system.
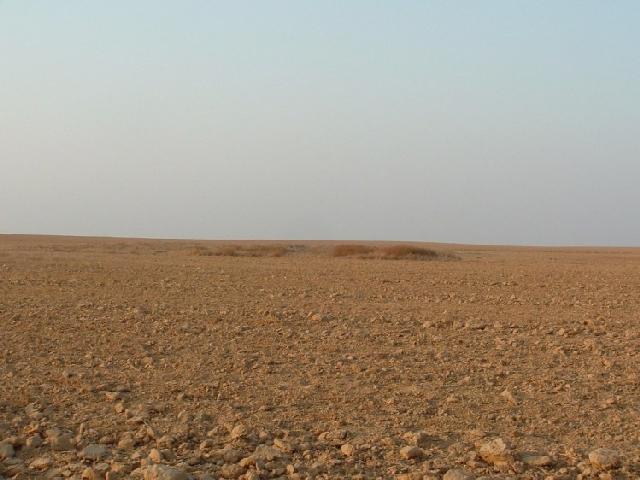
 

Karm Station today

 [Photograph by Gal Shaine.]


To overcome this, General Erich von Falkenhayn, the Commander of the Yildirim Group, proposed a two phase attack. Firstly the plan called for a reconnaissance in force from Beersheba for 27 October which was to be followed by an all out attack launched by the 8th Army from Hureira, ironically scheduled to occur on the morning of 31 October 1917, the day when the Battle of Beersheba began.

At four o'clock on the morning of 27 October, the outpost at El Buggar was fired upon by a Troop of Ottoman cavalry. An hour later the attack developed across a wide front employing some 2,000 Ottoman infantry, 1,200 cavalry, supported by a three batteries of Mountain Guns, some twelve guns in all. The advancing Ottoman forces debouched from the Kauwukah defensive system to attack the Allied forces occupying the ridge.

The initial battle occurred around Point 630. The Ottoman infantry, the 125th Infantry Regiment, worked its way around both flanks of the redoubt and brought heavy machine-gun and artillery fire to bear on the squadron holding it. Flying overhead on the day, the Royal Flying Corps estimated that a force of about 2,000 men had attacked the garrison, which was at that time cut off from any support.

In response, the 1/1 City of London Yeomanry sent a squadron to reinforce the surrounded 1/1 County of London Yeomanry squadron at Point 630. The relieving force was held up by an effective machine gun barrage and after several attempts at entering the redoubt, was compelled to withdraw. In further assistance, two squadrons from the 10th Light Horse Regiment were despatched but they too were held up. Despite these set backs, the garrison held out in a support trench close behind the crest of El Buggar Ridge. Here they repeatedly fought off Ottoman attempts to rush them. The garrison held out until relieved later that evening.

In contrast, the assault on Point 720 against "B" Squadron, 1/1 County of London Yeomanry was far more determined. The attacking force was composed of 1,200 men from the Ottoman 3rd Cavalry Division supported by an under-strength battalion from the 27th Infantry Division. Following a heavy volume of shell and machine gun fire the Ottoman force launched two charges which were beaten off. After regrouping, a third charge pressed home the attack and gained possession of the hill. "B" Squadron had held out for six hours. Except for three men, all the defenders were either killed or wounded.

In support of the beleaguered garrison, at noon, the 9th Light Horse Regiment despatched two squadrons to relieve the 1/1 County of London Yeomanry at Point 720. By 3pm, two infantry brigades of the 53rd Division were moving towards the ridge. A officer's patrol from the 9th Light Horse Regiment at 7 pm established that the Ottoman forces had withdrawn from their positions on Point 720 which allowed the Allied forces to re-occupy El Buggar Ridge without further casualties. That night 229th Infantry Brigade took over the defensive perimeter and re-established Allied control over the area.

The recapture of El Buggar Ridge had two strategic effects.

In the first instance it gave the Ottoman forces the wrong message as to where the projected Allied offensive might strike. Subsequent Turkish air reconnaissance indicated that nothing had changed with the Allied forces dispositions. Falkenhayn drew the inference that he needed to act first with a pre-emptive strike at the heart of the Allied logistic system and thus set in motion the planned attack by the 8th Army scheduled for 31 October, and by doing so, inadvertently unbalanced the Ottoman defensive system.

By diverting the attention of the Ottoman forces, Allenby was able to direct the movement of some 40,000 men from two corps (the XX Corps and the Desert Mounted Corps) to the Beersheba perimeter in complete secrecy. This was possibly one of the most brilliant pieces of staff work in the Allied forces at that time. When the two corps debouched from the hinterland onto the Beersheba defences, the Ottoman forces were taken by complete surprise.


Major Alexander Malins "Laffy" Lafone, the Commander at Point 720 redoubt was awarded a posthumous Victoria Cross for this action.


References cited:

AWM 253, 455-5-705, 3rd Light Horse Brigade Routine Orders, 1917.

Falls, Cyril, Palestine, Official British War History, (London 1929).

Massey, W.T., How Jerusalem was Won, (London 1918).

Major General Hüseyin Hüsnü Emir (Erkilet), Yildirim, (Ankara 1922).

Olden, ACN, The Westralian Cavalry in the War - 10th Light Horse AIF, (Melbourne 1921)


Further Reading:

The Battle of El Buqqar (Buggar) Ridge, Palestine, 27 October 1917

The Third Battle of Gaza, Palestine, 26 October 1917 - 2 January 1918

The Third Battle of Gaza, Palestine, Z - 4, 27 October 1917, Roll of Honour

Battles where Australians fought, 1899-1920


Citation: The Battle of El Buqqar (Buggar) Ridge, Palestine, 27 October 1917, Outline

Posted by Project Leader at 12:01 AM EADT
Updated: Sunday, 17 October 2010 11:23 AM EADT

View Latest Entries

Full Site Index


powered by FreeFind
Let us hear your story: You can tell your story, make a comment or ask for help on our forum.

Desert Column Forum

A note on copyright

The Australian Light Horse Studies Centre is a not for profit and non profit group whose sole aim is to write the early history of the Australian Light Horse from 1900 - 1920. It is privately funded and the information is provided by the individuals within the group and while permission for the use of the material has been given for this site for these items by various donors, the residual and actual copyright for these items, should there be any, resides exclusively with the donors. The information on this site is freely available for private research use only and if used as such, should be appropriately acknowledged. To assist in this process, each item has a citation attached at the bottom for referencing purposes.

Please Note: No express or implied permission is given for commercial use of the information contained within this site.

A note to copyright holders

The Australian Light Horse Studies Centre has made every endeavour to contact copyright holders of material digitised for this blog and website and where appropriate, permission is still being sought for these items. Where replies were not received, or where the copyright owner has not been able to be traced, or where the permission is still being sought, the Australian Light Horse Studies Centre has decided, in good faith, to proceed with digitisation and publication. Australian Light Horse Studies Centre would be happy to hear from copyright owners at any time to discuss usage of this item.

Contact

Australian Light Horse Studies Centre

eXTReMe Tracker