« March 2009 »
S M T W T F S
1 2 3 4 5 6 7
8 9 10 11 12 13 14
15 16 17 18 19 20 21
22 23 24 25 26 27 28
29 30 31
You are not logged in. Log in


Search the site:


powered by FreeFind
Volunteer with us.

Entries by Topic All topics  
A Latest Site News
A - Using the Site
AAA Volunteers
AAB-Education Centre
AAC-Film Clips
AAC-Photo Albums
AIF & MEF & EEF
AIF - Lighthorse
AIF - ALH - A to Z
AIF - DMC
AIF - DMC - Or Bat
AIF - DMC - Anzac MD
AIF - DMC - Aus MD
AIF - DMC - British
AIF - DMC - BWI
AIF - DMC - French
AIF - DMC - Indian
AIF - DMC - Italian
AIF - DMC - Medical
AIF - DMC - Remounts
AIF - DMC - Scouts
AIF - DMC - Sigs
AIF - DMC - Sigs AirlnS
AIF - DMC - 1 Sig Sqn
AIF - DMC - 2 Sig Sqn
AIF - DMC - Eng
AIF - DMC - Eng 1FSE
AIF - DMC - Eng 2FSE
AIF - DMC - GSR
AIF - 1B - 1 LHB
AIF - 1B - 6 MVS
AIF - 1B - 1 LHMGS
AIF - 1B - 1 Sig Trp
AIF - 1B - 1 LHFA
AIF - 1B - 1 LHR
AIF - 1B - 2 LHR
AIF - 1B - 3 LHR
AIF - 2B - 2 LHB
AIF - 2B - 7 MVS
AIF - 2B - 2 LHFA
AIF - 2B - 2 LHMGS
AIF - 2B - 2 Sig Trp
AIF - 2B - 5 LHR
AIF - 2B - 6 LHR
AIF - 2B - 7 LHR
AIF - 3B - 3 LHB
AIF - 3B - 8 MVS
AIF - 3B - 3 LHB Sigs
AIF - 3B - 3 LHFA
AIF - 3B - 3 LHMGS
AIF - 3B - 3 Sig Trp
AIF - 3B - 8 LHR
AIF - 3B - 9 LHR
AIF - 3B - 10 LHR
AIF - 4B - 4 LHB
AIF - 4B - 4 Sig Trp
AIF - 4B - 9 MVS
AIF - 4B - 4 LHFA
AIF - 4B - 4 LHMGS
AIF - 4B - 4 LHR
AIF - 4B - 11 LHR
AIF - 4B - 12 LHR
AIF - 5B - 5 LHB
AIF - 5B - 10 MVS
AIF - 5B - 5 LHFA
AIF - 5B - 5 Sig Trp
AIF - 5B - ICC
AIF - 5B - 14 LHR
AIF - 5B - 15 LHR
AIF - 5B - 1er Regt
AIF - 5B - 2 NZMGS
AIF - AASC
AIF - Aboriginal LH
AIF - Badges
AIF - Cars
AIF - Chinese LH
AIF - Double Sqns
AIF - Engineers
AIF - Fr - 22 Corps
AIF - Fr - 13 LHR
AIF - Honour Roll
AIF - HQ - 3rd Echelon
AIF - Marching Songs
AIF - Misc Topics
AIF - NZMRB
AIF - NZMRB - AMR
AIF - NZMRB - CMR
AIF - NZMRB - EFT
AIF - NZMRB - NZMFA
AIF - NZMRB - NZMGS
AIF - NZMRB - OMR
AIF - NZMRB - Sig-Trp
AIF - NZMRB - WMR
AIF - Ships
AIF - Ships - Encountr
AIF - Ships - Una
AIF - WFF
AIF - Wireless Sqn
Battles
BatzA - Australia
BatzA - Broken Hill
BatzA - Liverpool
BatzA - Merivale
BatzB - Boer War
BatzB - Bakenlaagte
BatzB - Belmont
BatzB - Bothaville
BatzB - Buffels Hoek
BatzB - Coetzees Drift
BatzB - Diamond Hill
BatzB - Driefontein
BatzB - Elands
BatzB - Graspan
BatzB - Grobelaar
BatzB - Grootvallier
BatzB - Hartebestfontn
BatzB - Houtnek
BatzB - Karee Siding
BatzB - Kimberley
BatzB - Koster River
BatzB - Leeuw Kop
BatzB - Mafeking
BatzB - Magersfontein
BatzB - Modder River
BatzB - Onverwacht
BatzB - Paardeberg
BatzB - Palmietfontein
BatzB - Pink Hill
BatzB - Poplar Grove
BatzB - Rhenoster
BatzB - Sannahs Post
BatzB - Slingersfontn
BatzB - Stinkhoutbm
BatzB - Sunnyside
BatzB - Wilmansrust
BatzB - Wolvekuil
BatzB - Zand River
BatzG - Gallipoli
BatzG - Anzac
BatzG - Aug 1915
BatzG - Baby 700
BatzG - Evacuation
BatzG - Hill 60
BatzG - Hill 971
BatzG - Krithia
BatzG - Lone Pine
BatzG - Nek
BatzJ - Jordan Valley
BatzJ - 1st Amman
BatzJ - 2nd Amman
BatzJ - Abu Tellul
BatzJ - Es Salt
BatzJ - JV Maps
BatzJ - Ziza
BatzM - Mespot
BatzM - Baghdad
BatzM - Ctesiphon
BatzM - Daur
BatzM - Kurna
BatzM - Kut el Amara
BatzM - Ramadi
BatzN - Naval
BatzN - AE1
BatzN - Cocos Is
BatzN - Heligoland
BatzN - Marmara
BatzN - Zeebrugge
BatzN - Zeppelin L43
BatzNG - Bitapaka
BatzO - Other
BatzO - Baku
BatzO - Egypt 1919
BatzO - Emptsa
BatzO - Karawaran
BatzO - Peitang
BatzO - Wassa
BatzP - Palestine
BatzP - 1st Gaza
BatzP - 2nd Gaza
BatzP - 3rd Gaza
BatzP - Aleppo
BatzP - Amwas
BatzP - Ayun Kara
BatzP - Bald Hill
BatzP - Balin
BatzP - Beersheba
BatzP - Berkusieh
BatzP - Damascus
BatzP - El Auja
BatzP - El Buggar
BatzP - El Burj
BatzP - Haifa
BatzP - Huj
BatzP - JB Yakub
BatzP - Kaukab
BatzP - Khan Kusseir
BatzP - Khuweilfe
BatzP - Kuneitra
BatzP - Megiddo
BatzP - Nablus
BatzP - Rafa
BatzP - Sasa
BatzP - Semakh
BatzP - Sheria
BatzP - Surafend
BatzP - Wadi Fara
BatzS - Sinai
BatzS - Bir el Abd
BatzS - El Arish
BatzS - El Mazar
BatzS - El Qatiya
BatzS - Jifjafa
BatzS - Magdhaba
BatzS - Maghara
BatzS - Romani
BatzS - Suez 1915
BatzSe - Senussi
BatzWF - Westn Front
BW - Boer War
BW - NSW
BW - NSW - 1ACH
BW - NSW - 1NSWMR
BW - NSW - 2NSWMR
BW - NSW - 3ACH
BW - NSW - 3NSWIB
BW - NSW - 3NSWMR
BW - NSW - 5ACH
BW - NSW - A Bty RAA
BW - NSW - AAMC
BW - NSW - Aust H
BW - NSW - Lancers
BW - NSW - NSW Inf
BW - NSW - NSWCBC
BW - NSW - NSWIB
BW - NSW - NSWMR_A
BW - NZ
BW - Qld
BW - Qld - 1ACH
BW - Qld - 1QMI
BW - Qld - 2QMI
BW - Qld - 3ACH
BW - Qld - 3QMI
BW - Qld - 4QIB
BW - Qld - 5QIB
BW - Qld - 6QIB
BW - Qld - 7ACH
BW - QLD - AAMC
BW - SA
BW - SA - 1SAMR
BW - SA - 2ACH
BW - SA - 2SAMR
BW - SA - 3SACB
BW - SA - 4ACH
BW - SA - 4SAIB
BW - SA - 5SAIB
BW - SA - 6SAIB
BW - SA - 8ACH
BW - SA - AAMC
BW - Tas
BW - Tas - 1ACH
BW - Tas - 1TIB
BW - Tas - 1TMI
BW - Tas - 2TB
BW - Tas - 2TIB
BW - Tas - 3ACH
BW - Tas - 8ACH
BW - Vic
BW - Vic - 1VMI
BW - Vic - 2ACH
BW - Vic - 2VMR
BW - Vic - 3VB
BW - Vic - 4ACH
BW - Vic - 4VIB
BW - Vic - 5VMR
BW - Vic - 6ACH
BW - Vic - AAMC
BW - Vic - Scot H
BW - WA
BW - WA - 1WAMI
BW - WA - 2ACH
BW - WA - 2WAMI
BW - WA - 3WAB
BW - WA - 4ACH
BW - WA - 4WAMI
BW - WA - 5WAMI
BW - WA - 6WAMI
BW - WA - 8ACH
BW Gen - Campaign
BW Gen - Soldiers
BW General
Cavalry - General
Diary - Schramm
Egypt - Heliopolis
Egypt - Mena
Gen - Ataturk Pk, CNB
Gen - Australia
Gen - Legends
Gen - Query Club
Gen - St - NSW
Gen - St - Qld
Gen - St - SA
Gen - St - Tas
Gen - St - Vic
Gen - St - WA
Gm - German Items
Gm - Bk - 605 MGC
GW - 11 Nov 1918
GW - Atrocities
GW - August 1914
GW - Biographies
GW - Propaganda
GW - Spies
GW - We forgot
Militia 1899-1920
Militia - Area Officers
Militia - Inf - Infantry
Militia - Inf - 1IB
Militia - Inf - 2IB
Militia - Inf - 3IB
Militia - Inf - NSW
Militia - Inf - Qld
Militia - Inf - SA
Militia - Inf - Tas
Militia - Inf - Vic
Militia - Inf - WA
Militia - K.E.Horse
Militia - LH
Militia - LH - Regts
Militia - LH - 1LHB
Militia - LH - 2LHB
Militia - LH - 3LHB
Militia - LH - 4LHB
Militia - LH - 5LHB
Militia - LH - 6LHB
Militia - LHN - NSW
Militia - LHN - 1/7/1
Militia - LHN - 2/9/6
Militia - LHN - 3/11/7
Militia - LHN - 4/6/16
Militia - LHN - 5/4/15
Militia - LHN - 6/5/12
Militia - LHN - 28
Militia - LHQ - Qld
Militia - LHQ - 13/2
Militia - LHQ - 14/3/11
Militia - LHQ - 15/1/5
Militia - LHQ - 27/14
Militia - LHS - SA
Militia - LHS - 16/22/3
Militia - LHS - 17/23/18
Militia - LHS - 24/9
Militia - LHT - Tas
Militia - LHT - 12/26
Militia - LHV - Vic
Militia - LHV - 7/15/20
Militia - LHV - 8/16/8
Militia - LHV - 9/19
Militia - LHV - 10/13
Militia - LHV - 11/20/4
Militia - LHV - 19/17
Militia - LHV - 29
Militia - LHW - WA
Militia - LHW-18/25/10
Militia - Military Orders
Militia - Misc
MilitiaRC - Rifle Clubs
MilitiaRC - NSW
MilitiaRC - NT
MilitiaRC - Qld
MilitiaRC - SA
MilitiaRC - Tas
MilitiaRC - Vic
MilitiaRC - WA
Militiaz - New Zealand
Tk - Turkish Items
Tk - Army
Tk - Bks - Books
Tk - Bks - 1/33IR
Tk - Bks - 27th IR
Tk - Bks - Air Force
Tk - Bks - Yildirim
Tk - POWs
Wp - Weapons
Wp - Hotchkiss Cav
Wp - Hotchkiss PMG
Blog Tools
Edit your Blog
Build a Blog
RSS Feed
View Profile
Open Community
Post to this Blog
Site Index
Education Centre
LH Militia
Boer War
Transport Ships
LH Battles
ALH - Units
ALH - General
Aboriginal Light H
Weapons
Ottoman Sources

"At a mile distant their thousand hooves were stuttering thunder, coming at a rate that frightened a man - they were an awe inspiring sight, galloping through the red haze - knee to knee and horse to horse - the dying sun glinting on bayonet points..." Trooper Ion Idriess

The Australian Light Horse Studies Centre aims to present an accurate history as chroniclers of early Australian military developments from 1899 to 1920.

The Australian Light Horse Studies Centre site holds over 12,000 entries and is growing daily.

Contact: Australian Light Horse Studies Centre

Let us hear your story: You can tell your story, make a comment or ask for help on our Australian Light Horse Studies Centre Forum called:

Desert Column Forum

WARNING: This site contains: names, information and images of deceased people; and, language which may be considered inappropriate today.

Tuesday, 31 March 2009
Great War, Military Biographies, Frank Dudley Beaumont, His Story
Topic: GW - Biographies

Great War

Military Biographies

Frank Dudley Beaumont, His Story


Toowong Cemetery


At the turn of the century, Frank Dudley Beaumont was a rising star in the cavalry. During the Second Anglo Boer War, 1899 - 1902, he served successively with:

  • The Cape Mounted Rifles;
  • The Roberts Colonial Horse; and,
  • The Cape Coloured Forces as a Lieutenant.


The next record of Beaumont is in the 1913 electoral roll where he was registered in the Federal seat of Oxley.

Beaumont then enlisted in the 9th Infantry Battalion at Enoggera on 17 September 1914 as 1095 Private Frank Dudley Beaumont. He was allotted to "D" Company. Despite being 47, being born in 1867, he stated his age as 44 to fall under the 45 year age ceiling. The place of birth was recorded as Brighton, Sussex. His next of kin was stated to be Mrs Verschoyle, Dunsford, Surrey.

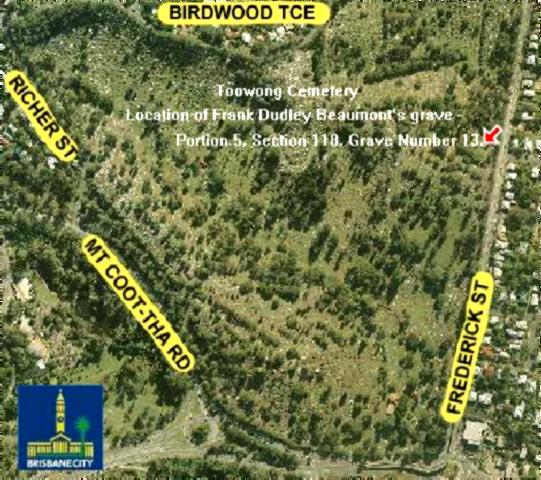
The last record of this life was a burial on 30 September 1914 at Toowong Cemetery on the corner of Frederick Street and Mt Coot-tha Road, Toowong. The location of  Beaumont's grave was at Portion 5, Section 118, Grave Number 13.

It is known that he had one sister called May Elizabeth Beaumont who was born in 1869 who appears to be his next of kin, Mrs Verschoyle. He has a brother, Harold Beaumont whose address is unknown and a former girlfriend Dell whom he possibly met in South Africa for she was in Transvaal in 1914.

In relation to known friends, there was John Charles Browne, a journalist and former officer who had known him for some three years. Browne enlisted as 414 Colour Sergeant John Charles Browne who served with the 15th Battalion, C Company. His other friend was Herbert Mark Meadows Maddock, a public servant working for the Commissioner of Public Health in Brisbane. Later Maddock enlisted as a Captain in 9th Battalion, 6th Reinforcement.

Beaumont wrote a succession of letters to different people explaining his circumstances and his intentions.


Letter 1 - to his sister May Elizabeth Beaumont.

Brisbane, 31/7/'l4.

Good-bye, dear old May.

Things have got beyond my control, so there is nothing to do but end it. Good-bye, and God bless you. It is terrible for Dell but things are quite hopeless.

Your heart-broken brother,

Frank.


Letter 2 - to Captain Alexander Clifford Vernon Melbourne, OC, 9th Battalion, D Company.

Brisbane, 22/9/'14.

Dear Melbourne,

Sorry not is have been able to "play the game," but circumstances over which I have no control have been too strong for me, so when you receive this I will be is the land of shade. I wish I could have gone there by an easier route, and have died as a man should: but it was not to be. My apologies to you and your officers, and the best of luck to you all.

Yours truly,

Frank D. Beaumont.


Letter 3 - to his brother, Harold Beaumont. 

26/9/'14.

My dear Harold,

The end has come at last. Fate been been too strong for me to fight against, and in sporting parlance I have got to "throw up the sponge"! What I want you to do is this: Supposing that anything really good eventuates from those bonds, please divide the money between Dell and yourself. It might come after my death; it would be just lay luck. Thank God she is at present in the Transvaal staying with her brother; so the shock, I hope and pray, may not be so great. I only hope Uncle Somerset will pay my debts, for I would like to leave my name clear.  Good-bye and good luck to you, love to dear old May and the girls. 

Your unfortunate brother,

Frank D Beaumont.

P.S. I enlisted in the Expeditionary Force for the war a week ago, and if I had some money to pay certain obligations I would been gladly gone intend of taking this step. - Frank.


Letter 4 - to his friend Tom.

Brisbane, Sept. 27th, 1914.

My dear Tom,

I am so seriously involved (and this last silly escapade has put a finish to it) that I am going to end my useless life. Many thanks to you all for your kindness to me. Should, at any time in the next few months, you have any spare cash, there is a gold chain and sovereign case pawned for 35/- with M. Harris, Edward Street, which I would like you to send to my girl. Maddock would give you her address, and I know Harris would let you have them on showing this. There is also a silver wristlet watch pawned for 5/- (it cost £2/10/- seven months ago), and a silver cigarette case pawned for 30/-, which if you care to take out, I would like you to keep. My love to Harry. Good-bye old chap, and good luck.

Yours sincerely,

Frank D Beaumont.


Letter 5 - to the Secretary of the United Services Institute of Queensland.

Brisbane, Sept. 27th, 1914.

The Hon. Secretary, U.S.I. of Q.

Dear Sir,

I wish to apologise to you and the committee for the non-payment of my wine account. My affairs are so frightfully involved that I am about to terminate my worthless life. Good-bye, and good luck to you and the members.

Yours truly.

Frank D. Beaumont.


The letters map out a steady decline in the mental health of Beaumont. From the last two letters, it was obvious that he had pawned all his goods and still was largely in debt, especially to the United Services Institute where he received wine on credit. It looks like the financial loss from the "last escapade" and the wine bill together brought about his decision to end his life.

Just after 4 pm on the afternoon of 28 September 1914, near the Hamilton Hotel, by Racecourse Road, Beaumont decided to take his last breaths. To accomplish the deed, he had acquired a bottle of strichnine poison. Beaumont put the bottle to his lips and drank the contents.

Death was slow and painful. At about 4.30 Frederick Ernest Grimley, a motorman, employed by the Tram Company, and residing in Ann Stree, Valley, noticed Beaumont lying near the Hamilton retaining wall and moaning. Grimley asked Beaumont what he thought had happened. In response Beaumont asked for a drink of water, and said he had taken a fit. Grimley replied, "You have taken no fit. What have you done to yourself ?" The reply from Beaumont was, "I had some strychnine in my pocket, and took it to see how it would act."

Grimley left Beaumont to fetch an Ambulance and the police and on returning found him dead.

What really drove Beaumont to take his life is unknown. It appears that he had already made that decision in July 1914, possibly after the collapse of his relationship with his companion Dell and her departure to the Transvaal. After the elapse of more time and financial trouble, it seems as though it became all too much for him. It appears as though his friends urged him to enlist as a way to get himself back onto a positive track. This seems to have failed as Beaumont still considered that his life was "worthless". Ten days later he was dead.


National Archives Service File: 1095 Private Frank Dudley Beaumont


Further Reading:

Great War, Military Biographies

Great War, August 1914

Battles where Australians fought, 1899-1920


Citation: Great War, Military Biographies, Frank Dudley Beaumont, His Story

Posted by Project Leader at 10:17 PM EADT
Updated: Tuesday, 27 July 2010 6:55 PM EADT

View Latest Entries

Full Site Index


powered by FreeFind
Let us hear your story: You can tell your story, make a comment or ask for help on our forum.

Desert Column Forum

A note on copyright

The Australian Light Horse Studies Centre is a not for profit and non profit group whose sole aim is to write the early history of the Australian Light Horse from 1900 - 1920. It is privately funded and the information is provided by the individuals within the group and while permission for the use of the material has been given for this site for these items by various donors, the residual and actual copyright for these items, should there be any, resides exclusively with the donors. The information on this site is freely available for private research use only and if used as such, should be appropriately acknowledged. To assist in this process, each item has a citation attached at the bottom for referencing purposes.

Please Note: No express or implied permission is given for commercial use of the information contained within this site.

A note to copyright holders

The Australian Light Horse Studies Centre has made every endeavour to contact copyright holders of material digitised for this blog and website and where appropriate, permission is still being sought for these items. Where replies were not received, or where the copyright owner has not been able to be traced, or where the permission is still being sought, the Australian Light Horse Studies Centre has decided, in good faith, to proceed with digitisation and publication. Australian Light Horse Studies Centre would be happy to hear from copyright owners at any time to discuss usage of this item.

Contact

Australian Light Horse Studies Centre

eXTReMe Tracker