


Topic: BatzB - Belmont
Belmont
South Africa, 23 November 1899
Louis Creswicke, South Africa and the Transvaal War, Vol. 2, Belmont Account
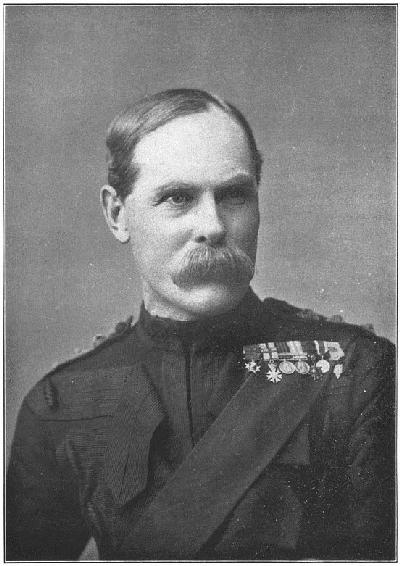
LIEUTENANT GENERAL LORD METHUEN, C.B.
THE BATTLE OF BELMONT
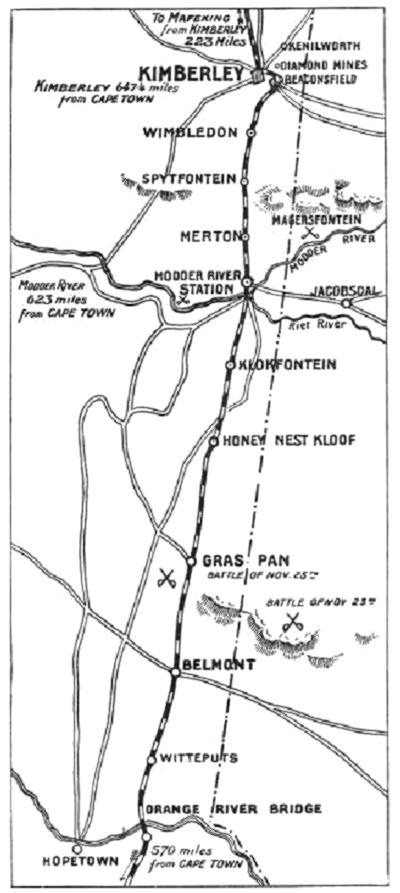
On the morning of Tuesday, the 21st of November, at three o'clock, Lord Methuen's march to the relief of Kimberley definitely began. The force consisted of the Naval Brigade, the 9th Brigade under Colonel Featherstonhaugh, the Guards Brigade under General Sir H. Colvile, two batteries of Field Artillery, Rimington's Guides, and the 9th Lancers. The first halt was made at Fincham's Farm, some twelve miles off, where the troops breakfasted, and whence the 9th Lancers and Rimington's Guides started on a reconnoitring expedition, which was not without its excitement. The Boers were reported to be somewhere in the vicinity, and soon they were espied, some three hundred of them, climbing a kopje with the evident intention of firing down on the party. This they did, and with such rapidity that only by sheer luck the men escaped. They went on to the farm of one Thomas, a supposed loyalist, for the purpose of watering their horses. This person had declared that there were no Boers in the neighbourhood; but no sooner had the tired beasts begun to dip their dusty noses in the cool and longed-for draught than a brisk fire was opened on them from all sides, and the troops had hurriedly to return to the main body at Fincham's. But they lost three horses.
On the following day the division moved on to the said Thomas's Farm. The advance party again came under fire—"Just by way of salute," as Tommy said—but the enemy was promptly silenced. Here the troops bivouacked.
On the night of the 22nd coffee was served out about twelve o'clock, and after this the whole force prepared to move.
The general orders were as follows: "At three a.m. Guards Brigade to advance from small white house near railway on Gun Kopje, supported by battery on right plus Naval Brigade; 9th Brigade on west side of Table Mountain; at same hour, bearing already taken, supported by battery on left, 9th Lancers, two [Pg 87] squadrons, one company Mounted Infantry, marching north of Belmont Station, keeping one to two miles on left flank and advanced; Rimington's Guides, one squadron Lancers, one company Mounted Infantry from Witte Putt to east of Sugar Loaf; one company Mounted Infantry on right of Naval Brigade, protecting right; the force having got over open ground should arrive at daybreak on enemy; 9th Brigade having secured Table Mountain to swing round left and keep on high ground, and then advance east to west on A (on plan; not printed); Guards Brigade conform, being pivot; then Guards advance on east edge of Mount Blanc, guns clearing entire advance with shrapnel; cavalry to get round rear of enemy, securing horses and laager."
This carefully-arranged programme, however, was not followed in its entirety. In the grim blackness of the small hours the Grenadiers lost direction, and Lord Methuen was committed to a frontal attack. But still the attack was a brilliant success. The Boers were caught napping, for they were in the happy belief that the troops were still at Witte Putt at the very hour when they were marching steadily upon them.
The infantry tramped four miles in pitch darkness and took up their position on a long low hill facing the enemy. The Boers occupied a magnificent horseshoe-shaped position on a series of kopjes and ridges eastward of Belmont railway station. As usual, they had utilised the boulders as screens, behind which they could [Pg 88] safely blaze away at the advancing ranks. Near daybreak—the hot summer morning dawned about four o'clock—firing began. The Guards had opened out for the attack, and the Boers, suddenly espying them from the heights, thereupon commenced to pelt and batter them. The Scots and Grenadiers nevertheless proceeded. Their position was far from comfortable, as it was necessary to cross some hundred yards of arid open veldt with no cover at all, while the enemy, ensconced behind tremendous rocks some 500 feet above their level, had nothing to do but to point their rifles and send their bullets whizzing at the advancing mass. But the Guards stoutly held their own, lying down and returning volley after volley for a full half-hour. Meanwhile the 9th Brigade advanced across the plain in extended order, and at half-past four two batteries posted near the railway commenced shelling the enemy's position.
Now the Guards began to proceed. Steadily forward they went—the thin, extended line moved as on parade, no supports being behind them.
Scarcely had they reached the base of the hill than a fierce storm of lead poured like a cascade from guns and rifles. It was useless now to attempt to return the fire—the Boers were invisible. There was no help for it; the men had only to move on and trust to their best "cold Sheffield" and their warm, gallant hearts. They fixed bayonets. Major Kinloch gave the word to his men to advance. "Now, boys, as hard as you can go!" he sang out. The other officers shouted their orders; all were dashing along like lions loosened from a cage. Cheers rent the air, bullets buzzed, cannons roared, blood streamed and spouted, plucky men and brave boys dropped dead on every side. Yet on went the infantry brigades! The first kopje was stormed! The Boers had vanished!
It was a sight to thrill the blood, to make the heart leap to the throat—so grand, so awful, so reminiscent of all the great traditions of British history. The enemy went helter-skelter to their second kopje on the right, where another force was strongly intrenched. Here they were sheltered by a number of "schantz," or trenches built of boulders and arranged in gallery form, and here our men mounted after them—Coldstreams, Grenadiers, Scots Guards, Northumberlands, Northamptons, and 2nd King's Own Yorkshires, now steadily advancing without excitement and with stern determination, and through a horrible cross-fire from the death-dealing rifles of the enemy.
Their advance was grand—a feat of heroism—with the Boer missiles flying about their heads and the track of blood seeming to tinge the very atmosphere with red. On and on they pushed, cheering loudly up the steep incline and over the boulders, nimble as goats, determined as giants, on and on, and, with a mighty roar, [Pg 89] took the position. Dead men lay at their feet, but honour, with its laurel crown, wreathed their heads!
Again the Boers made a hasty, a desperate retreat; again they sought a strongly-fortified position; again, our cavalry being too far off to reach them, the infantry combat was renewed.
A hurricane of bullets poured down. Death for the third time stared and gibbered; for the third time our gallant fellows, all in mass, again advanced to the attack. The Naval Brigade brought up four guns, and Captain Prothero got his cannon in position of 1800 yards and blazed out a chorus of distraction.
The enemy fled. The rout was now complete. Away went the 9th Lancers, away went the Mounted Infantry, both pursuing the fugitives for a good five miles. Thus the battle of Belmont was won. The whole of the camp waggons, filled with boxes of clothing, hundreds of horses and bullocks, were captured, and tons of ammunition were destroyed.
But this fight, that has taken so short a time to describe, and which was over in less than four hours, was hardly won. Forms all bloodily dashed lay here and there and everywhere, and the Scots Guards, who had stormed the kopje to inspiriting strains of drums and pipes, were doomed later on to hear the wail of the pibroch for many comrades mourned and buried. In all, our losses—about 200—were comparatively small considering that the engagement was a series of three battles, during which the Boers were constantly carrying off dead and wounded. Very many of our officers were wounded and three were killed. One—Lieutenant Fryer of the Grenadier Guards—was slain while gallantly leading his men and creeping along the bed of a stream in the enemy's rear. After the battle Lord Methuen made the following address to the troops: "Comrades, I congratulate you on the complete success achieved by you this morning. The ground over which we had to fight presented exceptional difficulties, and we had as an enemy a past-master in the tactics of mounted infantry. With troops such as you are, a commander can have no fear of the result. There is a sad side, and you and I are thinking as much of those who have died for the honour of their country and of those who are suffering as we are thinking of our victory."
Three instances were reported of the despicable treachery of the Boers. Lieutenant Willoughby was shot at from an ambush under cover of the white flag; a Boer holding a white flag in his left hand murdered Lieutenant Brine with his right, and Lieutenant Blundell-Hollinshead-Blundell (3rd Batt. Grenadier Guards) was shot in the merciful act of tending a wounded Boer. Lord Methuen after the fight sent a remonstrance to the Boer commander, saying, "Acting quite fairly with you, I decline to take Kimberley men [Pg 90] who know the country, because their parole cannot be accepted. I must ask you to warn your wounded not to shoot our officers. I must warn you not to use Dum-Dum bullets, or use the flag of truce treacherously. Such action is cowardly in the extreme, and I cannot countenance it."
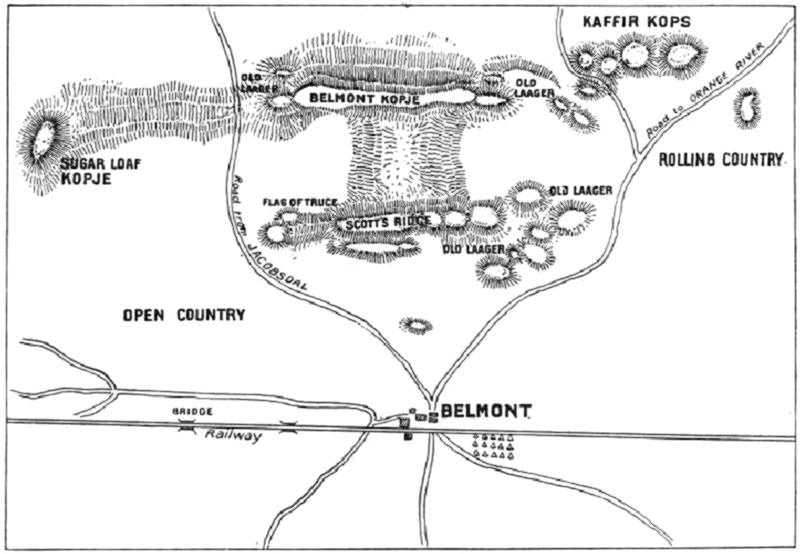
Plan of the Battle of Belmont.
The Boer losses were reported as very small, but no credence can be placed on their statements, for the very good reason that it has been President Kruger's policy to conceal from outsiders, and even from his own country, the extent of his losses. Whenever the Boer dies in battle, his body is weighted and cast into a river, or into a trench as quickly as possible. His family are left in ignorance as to his fate, and their only conclusion is to assume that he is dead. But Mr. Kruger's methods and his ruthless military oligarchy were disapproved even by his own countrymen, and more especially by his own countrywomen, who now began to mistrust the continual story of Boer victory, and asked pitifully for permission themselves to seek for fathers, sons, and brothers from whom they never heard. In some cases many of these were lying not an inch below their feet, for a British search party came upon a portion of the veldt that was literally mosaicked with dead Dutchmen whose bodies were scarcely more than peppered with earth!
Mr. Knight, the correspondent of the Morning Post, who was a [Pg 91] general favourite, was wounded in a singularly treacherous manner. He was in the firing line of the Northamptons, who were then attacking the Boers. Some of the enemy suddenly emerged from behind rocks and displayed a handkerchief attached to a rifle. On this sign Mr. Knight with two others rose, and all three were instantly shot with Dum-Dum bullets. Mr. Knight's sufferings were great, and the arm was amputated. The use of Dum-Dum bullets had been proscribed, as, after hitting the mark, they expand and cause wounds as large as a five-shilling piece. The Boers, besides using them on occasion, so manœuvred the Mauser bullets that they could act in identical fashion. Another treacherous Boer device was the wearing of the red cross upon their sleeves—an action on a par with the display of the white flag—for convenience' sake. However, it must always be remembered that the Boer armies were commandeered and cosmopolitan armies, and not disciplined troops.
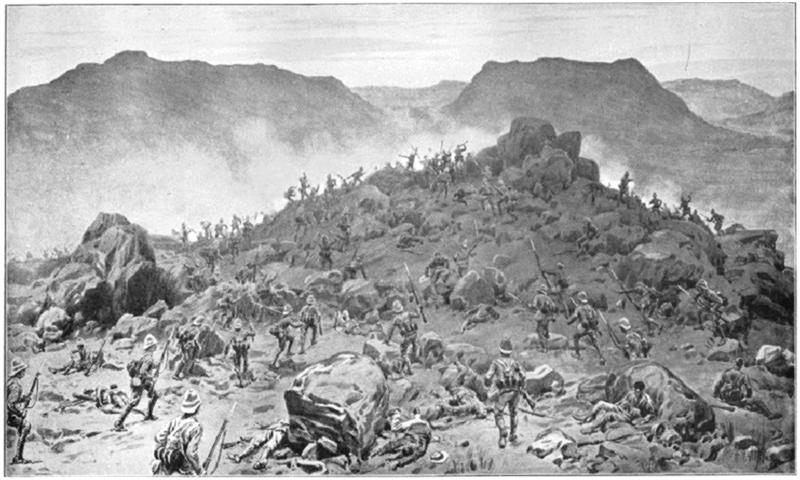
THE BATTLE OF BELMONT, 23rd November 1899—BAYONET ATTACK BY THE SCOTS AND GRENADIER GUARDS.
During the heat of the fray Colonel Crabbe, commanding the Grenadier Guards, became detached from his regiment. He was instantly surrounded by Boers, and being wounded, might probably have been killed had not a private suddenly rushed to the rescue. The plucky fellow shot two of the enemy, silenced a third with his bayonet, and finally, amid a shower of bullets, carried off the Colonel to the shelter of an ambulance waggon. Colonel Crabbe sustained injuries to wrist and thigh, but was not dangerously wounded.
A curious experience befell the Hon. George Peel, who was trying to reach Kimberley, where his sister, the Hon. Mrs. Rochfort Maguire, was imprisoned. Roaming about after the battle of Belmont, he came by accident on a Boer camp. A Dutchman promptly emerged, and when he was preparing to meet a grim fate, deciding that all hope was lost, he found himself accosted and handed a Bible. He was in the very act of congratulating himself on his lucky escape when on the scene came two grenadiers, who seeing his battered condition and his Bible, mistook him for a Boer spy and carried him off as a prize. Fortunately he was recognised by a member of Lord Methuen's camp and liberated.
Very interesting are the following official particulars given by the General Officer Commanding the 9th Brigade to the Chief Staff Officer of the 1st Division:—
"Belmont, Nov. 23, 1899.
'Sir,—I have the honour to submit the following report of the part taken by the brigade under my command in the action which took place to-day. The rendezvous was left at 3.7 a.m. in the following formation: Northumberland Fusiliers, in column of companies, on the left, directing, and fifty paces from them moved the Northamptonshire Regiment in similar formation, and parallel [Pg 92] to them. In rear of both these battalions was the 2nd Battalion King's Own Yorkshire Light Infantry and two companies Munster Fusiliers." (Having described the operations which ended in the occupation of a ridge south of Table Mountain, Major-General Featherstonhaugh continues:) "This party of the enemy was finally dislodged at the point of the bayonet, and 'independent fire' poured into them at a distance of fifty yards, when a white flag was hoisted by the party. On our men ceasing fire, the white flag still being displayed, a shot was fired by this party at our men; but the actual bearer of the flag of truce, followed by some eleven or twelve unarmed Boers, surrendered themselves to Colonel Money and were made prisoners.—
Signed for Major-General Featherstonhaugh,
Edward S. Bulfin,
Captain, Brigade Major, 9th Brigade."
The following is the list of officers killed and wounded at the battle of Belmont:—
3rd Grenadier Guards.—Lieutenant Fryer, killed; Lieutenant Blundell-Hollinshead-Blundell, dangerously wounded; Second Lieutenants Leslie and Vaughan, wounded; Lieutenants Gurdon Rebow and Russell, slightly wounded; and in addition the following officers reported as wounded: Lieutenants Lygon and Cameron, and Lieutenant-Colonel Crabbe. 1st Battalion Coldstream Guards.—Lieutenant Grant, wounded. 2nd Battalion Coldstream Guards.—Lieutenant the Hon. Claude Willoughby, slightly wounded; Second Lieutenant Burton, severely wounded. 1st Battalion Scots Guards.—Major the Hon. North Dalrymple Hamilton, severely wounded; Second Lieutenants Bulkley and Alexander, wounded. 1st Battalion Northumberland Fusiliers.—Captain Eagar and Lieutenant Brine, killed; Major Dashwood and Lieutenant Festing, dangerously wounded; Captain Sapte and Lieutenant Fishbourne, Brigadier-General Featherstonhaugh, Captain Freeland, 2nd Northampton, Lieutenant Barton, 2nd Northampton, severely wounded.
Further Reading:
Battles where Australians fought, 1899-1920
Citation: South Africa and the Transvaal War - Account of Belmont
