


Topic: BatzG - Gallipoli
Gallipoli Campaign - 1915-16
At the urging of Winston Churchill, First Lord of the Admiralty, the Allies decided on a campaign to seize the strategic Dardanelles. A fleet commanded first by Vice Admiral Sackville Carden and then, after his physical breakdown, by Rear Admiral John de Robeck, began a blockade and bombardment of the forts guarding the entrance to and passage of the Dardanelles in February 1915. These Dardanelles defences included 176 medium and heavy guns, 11 mine belts containing 373 mines, and an antisubmarine net. Long-range bombardments on February 19 and 25 succeeded in silencing the Turkish outer works. On March 18 the Allied fleet tackled the main forts along the Narrows of the Dardanelles.
Twelve British and 4 French battle ships made the assault. The most powerful of the battleships was the super dreadnought Queen Elizabeth, carrying eight 15-inch guns. The Turkish batteries included 42 guns of 8-inch bore or more, 6 of which were 14-inch guns. The Allied battlewagons succeeded in largely silencing the Ottoman guns, but then 3 of the capital ships struck mines and sank. The French battleship Bouvet went under with all but 66 of her crew of 630 and the British battleships Ocean and Irresistible met the same fate. Two more battleships were damaged by mines and a third by Turkish coastal batteries and under with all but 66 of her crew of 630 and the British battleships Ocean and Irresistible met the same fate. Two more battleships were damaged by mines and a third by Turkish coastal batteries and 47 more Allied sailors were killed. The Allied naval command decided to with draw, unaware that the Turks had nearly exhausted their ammunition stocks, having fired about 1,600 rounds, and that the enemy's fire direction control, their communications, and many of their batteries had been demolished, aware only that they were suffering appalling and crippling losses from the mines. Turkish personnel losses in repulsing the Allied naval attack were 40 killed and 70 wounded.
On the western end of the Sea of Marmora, the Russian Black Sea Fleet of 5 battleships, 2 cruisers, and 10 destroyers attacked the Bosphorus forts on March. 28. The German battle cruiser Goeben defended Istanbul by sinking 2 Russian destroyers, thus forcing the rest of the Russian fleet to withdraw The battleships having failed, the Allies decided on an amphibious attack on Gallipoli, the small peninsula on the :north side of the Narrows. Turkey at the time of its declaration of war in October 1914 had 36 divisions, deployed thus: 12 around Constantinople, 1 on Gallipoli, 1 on the Asian side of the Dardanelles, 5 along the rest of the Asia Minor coast, 11 in the Caucasus, 2 in Yemen, 2 in the Hejaz, 2 in Mesopotamia. During the course of the conflict another 70 divisions would be raised by the Ottoman Empire. By the time that the Allied amphibious expedition, long delayed by logistical difficulties, approached Gallipoli, the Turkish Fifth Army, commanded by German General Liman von Sanders, deployed 84,000 men in 6 divisions on or near the peninsula.
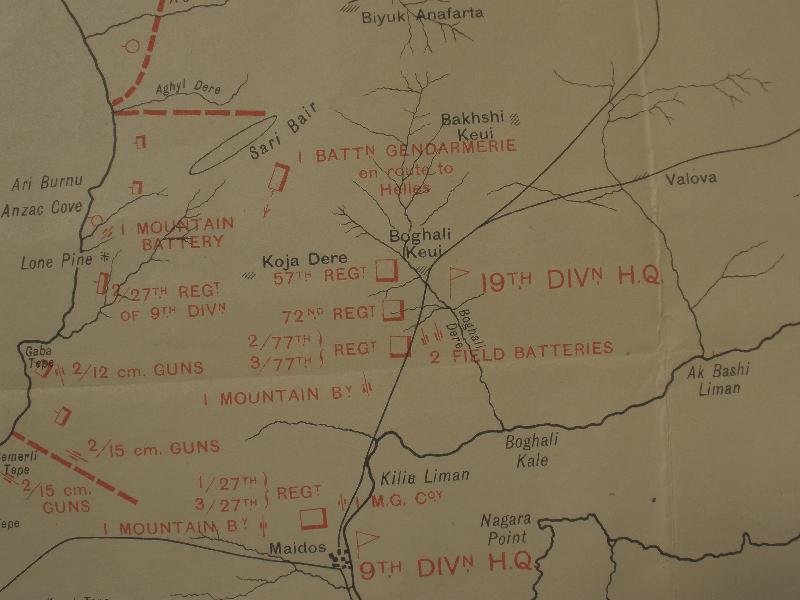
The Allied expeditionary force, commanded by General Ian Hamilton, consisted of 84 ships, 75,056 troops, including 30,638 ANZACs (Australian and New Zealand Army Corps), commanded by General William Birdwood, and the men of 1 French division, 16,481 animals, and 3,104 vehicles. While the French division made a diversionary landing on the Asian side of the Narrows, the main landings were made on Gallipoli on April 25. The ANZACs landed at Ari Burnu, 15 miles north of the peninsula's tip on the west side. They then attempted to seize the Chunuk Bair height dominating the peninsula, but the Turkish 19th Division, commanded by General Mustafa Kemal (Atatürk), the future father of the Turkish Republics, drove the ANZACs back to the beach. In six days of fighting that cost the men from "down under" 1,252 killed and 4,302 wounded.
At Cape Helles on the tip of the peninsula the 29th Division, commanded by General Alymer Hunter-Weston, came ashore in a poorly managed landing on five beaches. At W Beach 950 men of the Lancaster Fusiliers (who won six Victoria Crosses that day) landed from the steamer Euryalus and ran into murderous Turkish fire that killed 189 British soldiers, wounded 283, and left 61 more missing in action. At V Beach over 1,000 of the 2,000 men disgorged from the collier River Clyde were killed or wounded.
The landings at the other beaches were more successful, but on their way to occupy the commanding height of Achi Baba the men of the 29th Division stopped to brew tea. That teatime cost the British dearly, for the Turks beat them to the height and, as a consequence, kept the landing force pinned to a narrow beach perimeter through all the miserable months ahead. Total British Empire losses for the day were 2,000 at Cape Helles and 2,000 at what was thereafter called ANZAC Cove.
The French landed at Kum Kale on the Asian side of the Dardanelles across from Gallipoli. They killed or wounded 1,700 Turks and captured 500 at a cost of 800 casualties of their own, but were then withdrawn on April 26.
There followed three months of at tack and counterattack, of attrition and stalemate. Allied attempts to break out of their beachheads failed utterly. Their losses in the first four days after the landings were 8,900, including 2,650 killed.
The litany of loss went on. The First Battle of Krithia (also called the Battle of Achi Baba Hill), April 28-30, cost the Allies 3,000 casualties out of 14,000 engaged. The Second Battle of Krithia, May 6-8, added another 6,500 casualties (from 25,000 engaged to the attackers' toll. The Australian 2nd Brigade alone lost 1,056 out of 2,900 engaged. The third battle, June 4, cost the British 4,500 killed or wounded out of 16,000 initiating the attack, including 1,600 lost out of a naval brigade of 2,850 (2 battalions from that brigade lost 60 of its 70 officers). French losses (from 14,000 engaged) in this Third Battle of Krithia added 2,000 more names to this bloody measurement of Allied failure and frustration. (Between April 25-May 12 the French had already lost 12,610 of 22,450 men landed.) Other attacks at Cape Helles on June 21, June 28, and July 12-13 cost 7,700 British and 4,600 French casualties. Turkish counterattacks were no more successful. The Ottoman army lost 10,000 men of 40,000 engaged in attacks on May 1 and May 19, compared to only 600 ANZAC casualties out of 17,000 engaged. Another Ottoman counterattack, June 6, also failed, with total Turkish losses from June 4-6 numbering 9,000.
At sea the situation was no more favourable for the Allies as they lost 3 more battleships to enemy destroyers or subs.
The Goliath was put under on the night of May 12 by torpedoes from a Turkish destroyer, with 570 crewmen dying. The Triumph was sunk on May 25 by U-21, with 73 deaths. And the Majestic fell victim to another U-boat on May 27 and sank with 40 of its crew. The Allies got in a few blows at sea. On May 1 a British sub sank the Turkish troopship Guj Djemal, drowning 2,000 soldiers.
The Allied influx of troops onto the peninsula continued, but some attempts at reinforcement met with disaster. Far from Gallipoli, the 7th Battalion, Royal Scots was shattered before it left En gland. In the worst railroad disaster in British history, the troop train carrying the battalion for eventual service on Gallipoli crashed at Gretna Green on May 22, 1915, killing 214 soldiers and 12 other people, and injuring 246. In the Aegean, on September 17, a U-boat sank the troop transport Ramazan and 311 Indian soldiers drowned.
Reinforced by 3 more divisions, Hamilton determined to break the stale mate by outflanking the Turks with a landing at Suvla Bay farther to the north.
To hold the enemy's attention, Hamilton attacked at Cape Helles on August 6, sending 4 British divisions, totalling 26,000 men, and 13,000 French soldiers against 40,000 Turks. British losses at Cape Helles, Krithia, and Achi Baba on the first day numbered 3,480; the Turks lost 7,510. By August 22 Allied losses surpassed 6,000.
The ANZACs also attacked, one Australian unit of 1,250 losing 650 in an assault on a position called The Nek on August 7. The 600 men of the 8th and 10th Light Horsemen lost 234 killed and 141 wounded. Another 1,700 Aussies fell and seven Victoria Crosses were won on August 6 in fighting around Lone Pine, where 5,000 Turks were also killed or wounded. The general ANZAC assault on Chunuk Bair and Sari Bair Ridge (of which the actions at The Nek and Lone Pine were a part) ended in failure and cumulative casualties of 14,000 by August 22.
The landings at Suvla Bay, August 6-8, commanded by general Frederick Stopford, were at first successful, but the 22,000 attackers in 25 battalions failed to exploit their initial success and were soon bogged down before Chocolate Hill. On August 12, 267 men of the 1st Battalion of the 5th Norfolk Regiment (mostly men from the king's staff at Sandringham Palace) disappeared in the mist during an attack at Suvla. Their fate was unknown for more than 70 years, before evidence was discovered that those who did not die in the attack were executed after capture by the Turks.
A resumption of the Suvla offensive on August 15 went nowhere. On August 21, 14,300 Allied troops assaulted Turkish positions at Hill 60 and Scimitar Hill. One Australian unit of 150 men lost 110 killed or wounded on the slopes of Hill 60. Lord Longford, commanding the attack on Scimitar Hill, fell fatally wounded. Total Allied losses in the Suvla attacks on August 21 were 0 the Turks lost 2,500. Total Allied losses on all the Gallipoli battlegrounds, August 6-29, were 29,000 out of 126,700 engaged. The 37,000 ANZACs taking part in the battles accounted for 7,000 of the Allied toll. The 76,000 Ottoman soldiers engaged suffered 10,000 casualties.
The Gallipoli campaign ground on through the fall of 1915, becoming a smaller version of the Western Front, with all its trenches and torment and a day-to day terror so common that it became al most mundane. A thunderstorm accompanied by hail, for example, drowned 100 men on November 27. General Charles Monro replaced Hamilton on October 15 and, together with General William Birdwood, made plans for an evacuation from the peninsula. That evacuation was carried out in stages from December 10 to the night of January 8-9, 1916, with the Turks successfully deceived and the last 35,268 troops pulled out without loss.
The statistics of the Gallipoli side show are appalling. Of 410,000 soldiers of the British Empire who served on that peninsula in purgatory, 31,389 were killed in battle, 9,708 were reported missing most of whom were believed to have died and 78,749 were wounded. Including the sick, British casualties totalled 198,340. The 29th Infantry Division alone suffered 34,012 casualties - 9,042 KIA and MIA, 10,993 WIA, 13,977 sick. (In all of the Great War the 29th Division suffered cumulative casualties seven times its original strength.) Out of the British Empire and Commonwealth total, Australian casualties totalled 26,094, including 7,594 battle deaths. New Zealand losses were 7,571, including 2,431 battle deaths. The 79,000 French troops who served in Gallipoli suffered 27,000 combat casualties, including 9,000 dead, and 20,000 illnesses. Altogether, including the sick, Allied losses in the Dardanelles endeavour were about 252,000, including 46,000 battle deaths.
Of some 500,000 Turks in 14 divisions who fought in the campaign, 251,309 became casualties - 55,127 KIA, 100,177 WIA, 10,067 MIA, 21,498 dead of disease, 64,440 sick who recovered.
[From: Michael Clodfelter, Warfare and Armed Conflicts, 2nd Edition, pp. 464-5.]
Further Reading:
Battles where Australians fought, 1899-1920
Citation: Gallipoli Campaign - 1915-16, Outline
