


Topic: AIF - DMC - Anzac MD
Bir el Mazar
Sinai, 17 September 1916
General Staff HQ, Anzac MD, AIF, War Diary Account
War Diary account of the General Staff Headquarters, Anzac Mounted Division, AIF.
The transcription:
10 September 1916
2100 - A & NZ Mounted Division Order No. 41 and other instructions for expedition to Bir el Mazar issued. Date 14th to 16th September. Troops 2nd Light Horse Brigade, 3rd Light Horse Brigade, 2 Batteries Royal Horse Artillery, No. 1 Imperial Camel Battalion from No. 2 Section. Enemy's total force estimated at 2,800 men with 10 guns, in an entrenched position.
11 September 1916
In accordance with A & NZ Mounted Division Order No. 40 the following moves took place:
0500 - 2nd Light Horse Brigade less 5th Light Horse Regiment left Et Maler for Hod el Hassaniya.
0930 - 3rd Light Horse Brigade left Hod el Hassaniya for Hod Amara arriving 1225.
1200 - New Zealand Mounted Rifles Brigade less Machine Gun Squadron, Wellington Mounted Rifles and Field Ambulance, arrived at Et Maler from Hod Amara.
12 September 1916
1600 - General Officer Commanding A & NZ Mounted Division visited New Zealand Mounted Rifles Brigade. No. 7 Company, No. 1 Imperial Camel Battalion arrived Romani.
13 September 1916
Ayrshire and Inverness Batteries left Romani for Hod Amara.
1000 - Hong Kong and Singapore Camel Mountain Battery less one Section, arrived at Romani and came under orders of General Officer Commanding A & NZ Mounted Division.
1030 - Lieutenant General Lawrence, Commanding No. 3 Section, Canal Defences, visited General Officer Commanding A & NZ Mounted Division at Divisional Headquarters.
1100 - Order received from No. 3 Section that operation were to be postponed for 24 hours, and instructions to that effect issued to units.
1615 - Orders issued for Hong Kong and Singapore Battery to leave Romani at 1000 tomorrow, and march via Hod Amara to Willegha, where it will come under orders of No.1 Battalion, Imperial Camel Corps.
2035 - Orders for march of No. 7 Company, No.1 Battalion, Imperial Camel Corps to Hod Amara issued.
14 September 1916
0600 - No. 7 Company, No.1 Battalion, Imperial Camel Corps left for Hod Willegha via Hod Amara.
1000 - Hong Kong and Singapore Camel Mountain Battery left Romani for Willegha.
1200 - Instructions from No. 3 Section that after the operations, Nos. 4 and 7 Camel Companies will remain attached to A & NZ Mounted Division; Nos. 5 and 6 Companies will return to Mageibra. Hong Kong and Singapore Camel Mountain Battery will return to Railhead.
2110 - Instructions issued that 2nd Light Horse Brigade will water at Hod el Ge'eila instead of Ganadil as detailed in Operation No. 41 paragraph 4.
15 September 1916
0100 - Information received from No. 3 Section that Bir el Mazar will be reconnoitred and bombed from the air on morning of 16th September.
0900 - A & NZ Mounted Division Order No. 42 issued containing timings and instructions for march to and attack on Bir el Mazar, also special instructions to Brigadier Generals Commanding Brigades and Officer Commanding No.1 Battalion, Imperial Camel Corps.
1100 - General Officer Commanding A & NZ Mounted Division and Staff left Romani for Hod Amara.
1530 - General Officer Commanding A & NZ Mounted Division and Staff arrived at Hod Amara.
2355 - Divisional Headquarters A & NZ Mounted Division, 3rd Light Horse Brigade, Ayrshire and Inverness Batteries, Royal Horse Artillery, left Hod Amara for Salmana. No. 7 Company, No.1 Battalion, Imperial Camel Corps had left an hour previously.
1900 - 1st Light Horse Brigade left Romani for Bir el Abd.
2000 - No.1 Battalion, Imperial Camel Corps left Bir Bayud for Willegha. 2nd Light Horse Brigade left Hassaniya for Ge'eila.
16 September 1916
0315 - Divisional Headquarters A & NZ Mounted Division, 3rd Light Horse Brigade, Ayrshire and Inverness Batteries, Royal Horse Artillery, arrived at Salmana.
0500 - 1st Light Horse Brigade reached Bir el Abd.
0535 - 2nd Light Horse Brigade reached Ge'eila.
0600 - One deserter from 8th Machine Gun Company, at Mazar rode in to 10th Light Horse Regiment. He stated that all guns but two Anti-Aircraft had gone to El Arish.
0745 - Hostile aeroplane reconnoitred Salmana; it opened machine gun fire, one man in 10th Light Horse Regiment being killed.
0900 - General Officer Commanding A & NZ Mounted Division visited 2nd Light Horse Brigade at Ge'eila and No.1 Battalion, Imperial Camel Corps at Willegha.
0910 - Message from No. 3 Section that New Zealand Mounted Rifles Brigade had been ordered to hold itself in readiness to move if required.
1445 - Report received from Royal Flying Corps that an aeroplane was down in El Sugra. One troop, 1st Light Horse Brigade was sent to assist in saving the machine.
1500 - Aeroplane reports camp at Bir el Mazar very quiet and no troops seen to south or east.
1550 - Orders for concentration of force at rendezvous 3½ miles east of Salmana issued.
2030 - Head of column passed starting point about 3½ miles east of Salmana.
17 September 1916
0100 - Column arrived at point of deployment, i.e., western end of first march east of longitude 33 degrees 15 minutes.
0115 - Despatch received from Imperial Camel Corps stating that country was clear for 9 miles east of Bir el Geisi. "Did not strike Kasseiba but scoured country containing many tracks, am moving on."
0350 - Divisional Headquarters arrived at point 3½ miles east of Point of Deployment. From here 3rd Light Horse Brigade moved off to attack from South-East. 2nd Light Horse Brigade less 6th Light Horse Regiment with 5th Light Horse Regiment well in advance, moved direct on Bir el Mazar. The 7th Light Horse Regiment less 1 Squadron (reserve) were on the right of the 5th Light Horse Regiment, the point of junction being the caravan route.
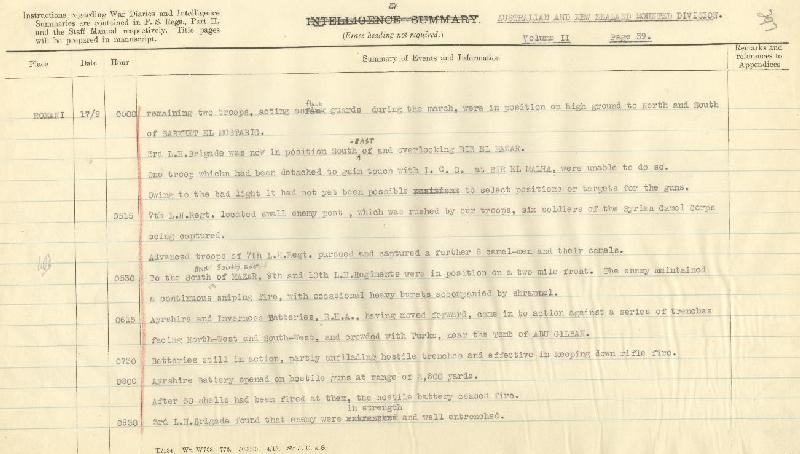
0500 - Two Troops and Lewis Gun from 6th Light Horse Regiment moved forward on left of 5th Light Horse Regiment. One Squadron 6th Light Horse Regiment was escort with guns, one Squadron holding high ground on wither side of defile north of Hill 157, and the remaining two Troops, acting as flank guards during the march, were in position on high ground to north and south of Sabkhet el Mustabig.
3rd Light Horse Brigade was now in position south east of and overlooking Bir el Mazar.
One Troop which had been attached to gain touch with Imperial Camel Corps at Bir el Malha, were unable to do so.
Owing to the bad light it had not yet been possible to select positions or targets for the guns.
0515 - 7th Light Horse Regiment located small enemy post which was rushed by our troops, six soldiers of the Syrian Camel Corps being captured.
Advanced Troops of 7th Light Horse Regiment pursued and captured a further 8 camel men and their camels.
0530 - To the south and south east of Mazar, 9th and 10th Light Horse Regiment were in position on a two mile front. The enemy maintained a continuous sniping fire, with occasional heavy bursts accompanied by shrapnel.
0615 - Ayrshire and Inverness Batteries, Royal Horse Artillery, having moved forward, came into action against a series of trenches facing north west and south west and crowded with Turks near the tomb of Abu Gilban.
0730 - Batteries still in action, partly enfilading hostile trenches and effective in keeping down rifle fire.
0800 - Ayrshire Battery opened on hostile guns at rang of 2,800 yards.
After 30 shells had been fired at them, the hostile battery ceased fire.
0930 - 3rd Light Horse Brigade found that enemy were in strength and well entrenched.
Retirement was therefore decided upon, in accordance with previous instructions. As soon as the withdrawal began, the enemy opened a brisk fire. The No.1 Battalion, Imperial Camel Corps and Hong Kong and Singapore Camel Mountain Battery did not arrive at allotted point in time, owing to exceedingly heavy going and condition of camels. When withdrawal was ordered they were three miles to the south. The 8th Light Horse Regiment covered their withdrawal.
0945 - Word having been received by 2nd Light Horse Brigade that 3rd Light Horse Brigade were withdrawing, they commenced to retire.
1130 - After the 3rd Light Horse Brigade and No.1 Battalion, Imperial Camel Corps had cleared the area covered by the 2nd Light Horse Brigade about 1100.
Orders given for Ayrshire and Inverness Batteries, Royal Horse Artillery to withdraw. they retired by alternate batteries being covered by 5th Light Horse Regiment which later acted as rear guard during the march back to Salmana.
1215 - Column started for Salmana, horses were watered on the way back at a pint 9 miles east of Salmana, the water having been brought up to that point by camels, the convoy being escorted from Bir el Abd by the 1st Light Horse Brigade.
The ammunition columns had also remained at this point.
Before withdrawing, the 3rd Light Horse Brigade picked up four Turkish stragglers, and four more were also caught by the Imperial Camel Corps. Altogether 22 soldiers, including 1 Officer, 15 camels, 1 donkey and 8 Bedouins belonging to a hostile tribe (Ayayda) were captured. Our casualties totalled 1 Officer and 3 Other Ranks killed and 19 Other Ranks wounded.
2000 - All troops back at Salmana where they bivouacked for the night, 1st Light Horse Brigade less 1 Squadron moving to Bir el Abd. Divisional Headquarters at Salmana.
Orders issued for return of all troops to their former station.
18 September 1916
0315 - 2nd Light Horse Brigade left Salmana for Hassaniya.
0330 - 3rd Light Horse Brigade and Machine Gun Squadron New Zealand Mounted Rifles Brigade left Salmana for Hod Amara.
0530 - Ayrshire and Inverness Batteries, Royal Horse Artillery left Salmana for Hod Amara.
0600 - 2nd Light Horse Brigade arrived at Hassaniya.
0630 - General Officer Commanding A & NZ Mounted Division and Divisional Headquarters left Salmana for Romani.
0730 - No. 7 Company, No.1 Battalion, Imperial Camel Corps left Salmana for Hod Amara, acting as rear guard to the retiring columns.
0830 - Ayrshire and Inverness Batteries, Royal Horse Artillery arrived at Hod Amara.
1000 - 1st Light Horse Brigade left Bir el Abd for Romani. No.1 Battalion, Imperial Camel Corps less No. 7 Company moved back via Bayud to rejoin No. 2 Section Mobile Column. Hong Kong and Singapore Camel Mountain Battery moved in to Railhead at Negiliat, where instructions were received that they were to move on to Romani.
1445 - General Officer Commanding A & NZ Mounted Division reached Romani where Divisional Headquarters was opened.
1745 - 1st Light Horse Brigade arrived at Romani.
19 September 1916
0530 - Salmana patrol, 3rd Light Horse Brigade report capture three Syrian camel men deserters from Bir el Mazar with their camels. They reported that Bir el Mazar was being evacuated when they left at 0100.
Additional Reading:
Bir el Mazar, Sinai, 17 September 1916
Bir el Mazar, Sinai, 17 September 1916, Roll of Honour
Battles where Australians fought, 1899-1919
Citation: Bir el Mazar, Sinai, 17 September 1916, Anzac MD, AIF, War Diary Account
Posted by Project Leader
at 12:01 AM EADT
Updated: Tuesday, 24 November 2009 6:17 AM EAST
