


Topic: BatzG - Anzac
The Battle of Anzac Cove
Gallipoli, 25 April 1915
Bean's Account, Part 4
The following is an extract from Bean, CEW, The Story of Anzac: the first phase, (11th edition, 1941), pp. 322 - 335.
CHAPTER XV
THE EXTREME LEFT
The northernmost tows from the battleships had landed only a few hundred yards north of Ari Burnu Knoll. A few minutes later the northernmost destroyer had sent her men ashore about a quarter of a mile still further to the left. The most northerly landing party was Tulloch’s, which had climbed up Walker’s Ridge. Any Turkish outposts, therefore, further north than Walker’s Ridge had been left intact by the first landing.
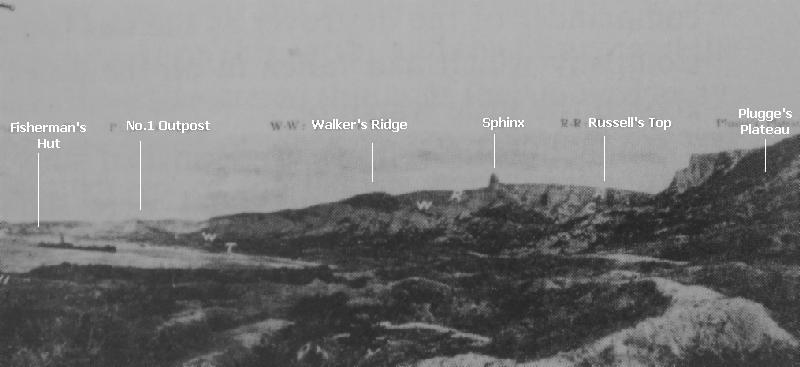
The country north of Walker’s Ridge consists entirely of other steep ridges, similar to Walker’s, which descend from the main ridge to the sea. These ridges follow one another like the bones which spread from the spine of a fish, each one being longer and steeper than the last. The scrub-covered valleys between them-scored out by four small mountain streams are almost impenetrable even in peace time. Before reaching the shore, these valleys open into small comparatively level flats, some of which had been cultivated with patches of poppy or cotton or used as pasture. In several instances the spurs end in a knoll rather higher than the portion of the spur immediately inland of them, their appearance thus being that of a dragon’s foreleg ending in a heavy claw. The knolls in question rise above the small flats in curious isolated hills. The southern side of most of the ridges has by some natural agency been worn and scored into precipices of gravel. The northern slope, which is not actually precipitous, is generally covered with low scrub.
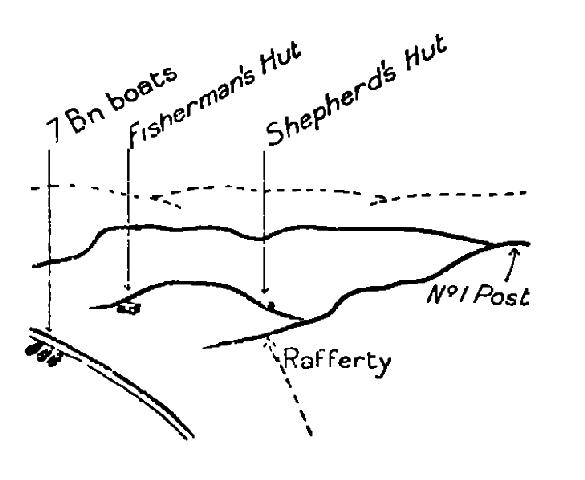
Immediately north of Walker’s Ridge is one such knoll, 150 feet in height, which, when it was afterwards held by the New Zealanders as an outpost, became known as “No. 1 Post.’’ It is in reality the end of the first spur which leaves the main ridge beyond The Nek - the very spur on the higher part of which, far up against the skyline, Lalor, Patterson, and the parties upon the seaward slope of Baby 700 began during the morning their bitter struggle. Detached from No. 1 Post, 300 yards north of it, is an isolated hillock only sixty feet high, a miniature of the other knolls. but standing by itself from the level which fringes the beach. On its sea- ward side was a long low hut of rough stones cemented with mud-a shelter for fishermen who at some time had worked upon this beach. This was known as “Fisherman’s Hut.” On the inland slope of the same knoll was a smaller hut, facing upon a narrow flat interposed between the mountains and two enclosing spurs. Not many of those who fought at Anzac were aware of the existence of this second hut. As it looked out over a small paddock, and was on the in- land side of the knoll, it was eventually named the “Shepherd’s Hut.” Between these knolls and the beach –which gradually receded from the foothills as it swept northward – there were small rectangular patches of open pasture or cultivation.
When the battleship tows landed, they were fired on from the direction of No. 1 Post and Fisherman’s Hut. But the darkness, the surprise, and the fact that the tows landed half a mile distant from the Turkish posts, diminished the effect of this fire. The northernmost destroyer tows, coming in to land only 500 yards away, with the light growing and the Turkish outposts thoroughly awakened, had suffered more heavily. More southerly tows, moving in at the same time, had watched the 12th Battalion, as they said, “getting a hell of a time of it.” One of the first steps taken by Colonel Clarke of the 12th, when he landed under that fire, was to send Lieutenant Rafferty and his platoon straight to the north with orders to do his best to subdue it. Lieutenant Strickland with a platoon of the 11th worked along the beach itself; Rafferty made his way across the flats beside the beach.
Rafferty had with him twenty-three men of his own platoon and twenty stray men from other tows. His party opened into extended order and moved northwards through the scrub until they struck the mouth of a creek which had scored its channel about six feet deep through the sand to the beach. In front of them was a patch of pasture with a solitary olive tree. To their right front rose the high knoll of No. I Post. Ahead, about 300 yards distant across the open, was the smaller sandy knoll, with the Fisherman’s Hut low down on its seaward slope.
It was impossible to remain in the creek. Bullets whipped down it from some height on the inland side, and men began to fall. Rafferty, scrambling up the creek side, endeavoured to use his field-glasses and find the enemy against whom he had been sent. But the glasses had been drenched in the landing, and both his handkerchief and his shirt were soaked. He scanned the beach, but could see no one. The fire which swept the creek was probably coming from the top of No. 1 Post high on the right front, where, as daylight grew, trenches could be discerned. Ahead there were certainly Turks in trenches on the small knoll above Fisherman’s Hut. Rafferty was wondering what he ought to do next, when he noticed four white boats full of troops rowing across the sea on his left. They were coming directly towards Fisherman’s Hut. He decided to push on to the next rise-the foot of No. 1 Post-in order to assist their landing.
To do this he had to cross the field before mentioned. His men, and also Strickland’s from the beach, began to double over the level. A very heavy fire was opened on them. Of Rafferty’s party twenty fell in crossing it; twelve lay there dead. But Rafferty, Sergeant Skinner, and six others reached the low rise on the far side. Here they were fairly sheltered. If any Turks remained in the trenches on top of No. 1 Post, the hill was too steep for them to see this party at its foot. The rise obscured the boats from Rafferty, and he moved to the crest in order to obtain a view of them.
On climbing the rise, he found that the boats had reached the shore, and were aground on the beach. In front of them, lying down on the sand in a rough line, were the men who had landed in them. But not one of these moved. Anxious to know what they were doing and what were their intentions, Rafferty sought to attract their attention, but could get no response.
A Hobart man, Private Stubbings who was beside him, said: “I’ll go, sir.” He put down his rifle and equipment and ran across the open to the nearest boat. He discovered that all the men round him were either dead or so grievously wounded that they made no reply. Eventually he found, sheltering behind the boat, four who were able to speak to him. These could tell him no more than he could see for himself - that most of the men from the boats were dead. He ran back to Rafferty with his information.
What had happened was this. As dawn was breaking, the four transports carrying the greater part of the 2nd Brigade had crept in abreast of one another between the battleships to their berths opposite the landing-place. The plan was for the 2nd Brigade to land immediately after the 3rd Brigade, and to extend the line along the main ridge for two miles northwards to the summit of Hill 971. It had also to fling back a left flank from that point to the sea.
As the 2nd Brigade was to move to the left of the 3rd, its point of landing was to be immediately north of that of the latter; and its troops were therefore carried on the two northernmost transports of the four which moved inside the battleships and anchored at 4.45 a.m.
In the northernmost ship, the Galeka, were the 6th and 7th Battalions. The commander of the Galeka, Captain Bernard Burt, was typical of the merchant-captains whom Great Britain has continually produced since the days of Drake. His appearance and speech were those of the “Captain Kettle” of current romance. His one desire in the war was to strike a blow at the Germans. The irony of circumstance afterwards placed him in charge of the hospital ship Glenart Castle, in which he was sunk and drowned by a German submarine. On the morning of the landing his ship was to have been met at dawn by tows which, after setting ashore the 3rd Brigade, were to return and take the infantry from the transports of the 2nd.
The officers in these boats would know where the 3rd had landed, and would transport the 2nd to a suitable landing place presumably to the north of it. As they came ashore, the battalions were to be met by Staff officers and guided to a rendezvous.
The Galeka arrived punctually. There being no sign of the tows, Captain Burt held on his course and took the ship close in to the shore, 600 yards ahead of any other. There he anchored. Still no boats approached. The Gaba Tepe guns opened, and five minutes later shrapnel began to burst very close to the Galeka. It appeared dangerous for the ship to stay in that position indefinitely: one of her boats was hit by a shell as it lay beside her. The 6th and 7th Battalions of infantry were crowded on her decks, and Commander Sommerville, the naval officer on board responsible for the safety of the men and the ship, decided that the troops must land themselves at once, as best they could, in the ship’s own boats. Colonel Elliott of the 7th, who commanded the troops, was strongly opposed to this course, inasmuch as his men had been told off in numbers suitable for the tows. If they used the ship’s boats, which were smaller, the arrangements would be disorganised from the start. Moreover the landing-place was to have been communicated to them by the tows returning from the shore. Elliott and Sommerville could only tell the companies to land “on the left of the 3rd Brigade.” Neither they nor anyone else knew where the left of the 3rd Brigade was. Commander Sommerville, however, decided that a start must be made. Accordingly, at 5 a.m., Elliott told off three platoons of the leading company of the 7th Battalion. These were sent off in four of the ship’s boats under their company commander, Major Jackson, and were told to land about a mile north of the 3rd Brigade. As they moved away in the dim light, they could see the flashes of shells or rifles on their left front, apparently about half-way along the skyline of the mountain. This was the only sign of “the left of the 3rd Brigade” by which Jackson and the officers in the other boats could at first guide themselves.
The four boats moved together, carrying 140 men. Captain Layh, second-in-command of Jackson's company, was with them. As they neared the land, they saw ahead of them, immediately north of Ari Burnu Knoll, the Red Cross flag of the ambulance which had landed with the 3rd Brigade. They therefore headed to the north of this. The officers knew from the written orders that the 7th Battalion was to guard the flank about the Fisherman's Hut. Before them as they came in was a low sandy knoll, towards which they made, since it appeared likely to give thein cover. They did not know that at the foot of it stood the Fisherman's Hut itself. Approaching the shore, the men in the boats caught the sound of rifle firing. Away on their right were other boats, bringing troops of their battalion to land, and over these they could see shrapnel bursting. Jackson's own boats were not advancing into shrapnel but into rifle fire. They saw it cutting up the water ahead. There appeared to be two machine-guns and many rifles at work. After what seemed an endless time in approaching it, they gradually rowed into the field of fire. In the boat with Captain Layh were Lieutenant Heighway and part of his platoon. Five out of six of their rowers were shot, but others took the oars, and the boat did not stop. Layh was in the bows trying to cheer the men, Heighway at the tiller. The boat was scraping on the shingle when Heighway slid forward, wounded. The boat grounded, and, as Layh threw himself into the water beside it, he was shot through the hip. He turned to see if the men had landed, and was again shot through the leg. With the survivors he scrambled towards the little grass-tufted sand hummocks which here fringed the beach, and lay low behind them.
From where he crouched Layh could see others of his men lying under cover. He called to them. Only six answered. Heavy fire was sweeping over their heads. They guessed that it came from the Fisherman's Hut, which they had seen as they landed. They answered it with as heavy a fusillade as they could, Layh believing that the Turks would almost certainly come down and attack them. He ordered his men to fix bayonets, and to show them above the sand hummocks as if they were about to charge. Hardly was this done when the fire ceased, and at last they were able to move freely. It was found that, of the 140 souls in the boats, there were left Major Jackson, Captain Layh, Lieutenant Scanlan, and about thirty-five unhurt or lightly-wounded men. The rest lay in the boats or on the beach dead, dying, or grievously wounded.
Immediately before landing they had seen a line of men trying to advance towards them across a large open patch of green grass. They had seen these men shot down, and never realised that any had crossed the green. It was Rafferty's and Strickland's party coming to help them.
When Private Stubbings returned to him, Rafferty noticed that the fire from the knoll in front suddenly died away. Rafferty had by this time received three messages from the rear ordering him to retire. These messages had been shouted and signalled to him. He could not tell who sent them, and acting on a sound rule which all officers had been warned to observe, he had stayed where he was. Now, looking to the skyline of the main ridge far above him on the right, he saw Australians advancing there. Some slipped or lay down or were shot-it was impossible to say which. But at any rate they were there. and others could be seen on Walker's Ridge and the spurs to his right rear. There thus appeared to be plenty of troops now on the left of the landing. Rafferty therefore decided to go off with the survivors of his party and carry out the work which had been allotted to them in the plan of the landing-to escort the Indian Mountain Battery. About the same time at which the survivors with Jackson mustered below Fisherman's Hut, Rafferty with his remnant withdrew. Neither knew that the other party had survived.
Major Jackson proceeded towards the ambulance which he had seen when approaching the land. Layh and Scanlan, with their party, moved up past the Fisherman's Hut onto the small knoll behind the hut. Overlooking the beach, on top of the knoll, was a deserted trench. Probably it had been dug there in the Balkan Wars, for bushes had since sprung up on its parapet. The party occupied this trench, and also a trench which they found at the inland end of the knoll overlooking the Shepherd’s Hut and the small cultivation between that and the mountains.
Meanwhile Jackson had reached the 3rd Field Ambulance, and asked it to send stretcher-bearers to carry the wounded from the boats and the beach.
This was done. The ambulance asked that the party on the knoll should hold the position until the wounded were cleared. Layh and Scanlan promised to do so. In order to let Colonel Elliott know why this part of his battalion did not join him, Layh scribbled a message:
7th Battalion, 2 officers and 30 men are holding knoll above landing-place until wounded removed. Will then join battalion.
H. T. C. Layh, Captain,
B Company.
This message eventually reached his battalion.
For most of the day the party held on. Two of the boats being able to float, wounded were put into them, and a trawler came in and towed them away. Meanwhile the Turks had been strangely quiet in the foothills. About 2.30 p.m., however, before the work of removing the wounded was completed, Turkish troops began to reappear in the spurs northward and inland of the knoll, and a formidable attack was developing from the spurs between the main ridge and the beach.
There is some evidence that fragments of Tulloch’s and other companies, which had been fighting on Baby 700, found their way from The Nek down Malone’s Gully to the beach ; and that some of these men, or possibly of Rafferty’s party, at one time held No. 1 Post. If that be so, when this Turkish counter-attack developed towards the end of the afternoon, these parties were driven back to the lower slopes of Walker’s Ridge.
It was this advance of the Turks from the north-cast which was beginning to be felt all over the northern half of the battlefield at this juncture. Here, on the extreme left, Layh and Scanlan and the thirty survivors above Fisherman’s Hut found that the enemy was driving towards the sea between them and Walker’s Ridge, threatening to cut them off. Since the Turks were in the rear of him, Layh withdrew his men to the beach through the gully bed - the mouth of the Sazli Beit-north of his position. A Turkish machine-gun kept them pinned down among the sand hummocks as they endeavoured to slip back along the shore; but the Turks could never by day come to the shore itself on account of the guns of the warships, and the party gradually crept along the beach. By dark it reached the dressing station, and thence reported to General Bridges’ headquarters. It was now eighteen strong. At once it was sent up to another part of the line by Major Glasfurd as reinforcement for the 3rd Brigade.
Watchers on the warships could see three boats lying upon the beach where Jackson’s party had landed. Two of these were boats of the 7th Battalion, and a third had landed part of the 12th a certain distance to the south. They lay there idly, as if some fishermen had beached them at their work. Men had been moving near them for most of the day, and to all appearance this beach was as much part of the Australian position as the Ari Burnu Knoll itself. In the ships nothing was known of the real position. But here the Navy witnessed a brave deed of which much has been written. On Monday, April 26th. when the landing was well established, and when, so far as those in the ships knew, the beach was firmly occupied, two men carrying a stretcher were seen to start out from the left of the Australian lines. They went along the beach to the boats. Here they picked up a man and began to carry him back. Presently they started to run. Fire had evidently been opened on them. They were observed to put down the stretcher, change ends, and start to run again. Suddenly both fell. They were not seen to move again. Men and officers of the Canopus, watching at intervals through the day, saw another party, which they took to be a burial party, go out armed to the figures which lay bunched in front of the boats. Behind the party rose the white sandy knoll and the Fisherman’s Hut, with its three empty silent windows staring at them. In front of them were the boats with their freight of dead, the naval coxswain still sitting at the tiller. The rest of the dead lay grouped upon the beach. No sooner had the burial party begun to work than fire was opened upon it, not from the hut, but apparently from the top of the knoll. Two men with a stretcher managed to return along the shore.
Exactly how many efforts were made to save these wounded will never be known. Such tasks, undertaken as a matter of course all over the Australian and New Zealand line, were never recorded. Only a few disconnected details have been preserved. Of the rescue of these men from the boats, where they had lain for thirty hours, the following details only are clear.
On the afternoon of the landing a party of New Zealanders and Australians was holding a trench on the edge of Walker's Ridge looking out over the long sweep of the beach far below. One of the party, Lance-Corporal Noel Ross, a son of the Official War Correspondent for New Zealand, had a range-finder which contained a powerful telescope. He was watching the deserted boats. In the nearer one a dead man sat with an arm thrown over the gunwale. In the other boat, half a mile from Ross, were a number of men-Australians. Ross counted about thirty. One man, a sailor, was lying in a lifelike attitude, his chin on his hand, gazing up at Walker’s Ridge. Ross thought no more of it until about 3 p.m. the following day, when lie happened to look at them again. Then he noticed that the sailor had changed his position, and was lying with his white cap still on his head but with his face turned up to the sky. As Ross watched, he was astonished to see a figure detach itself from the dreadful heap and begin to hobble along the beach. After a few yards it collapsed. A Turkish sniper had opened. The splash of his bullets could be seen in the water just beyond the man.
Ross went out with four men along the beach to bring him in. When they had gone a hundred yards, the sand and stones about them began to be whipped by Turkish bullets. They dropped behind the bank of the beach, and, dodging from shelter to shelter, reached a point within hail of the wounded man. He was lying out in the open. But, little by little, crawled to cover. He had been shot through both legs and nearly collapsed, but his spirit was high, and they brought him back. There were four others in the heap, he said, still alive. There had been eight, but four had died before the dawn.
The remaining survivors appear to have been rescued by stretcher-bearers of the 2nd Battalion. From his position on Walker’s Ridge Lieutenant Westbrook of this battalion had noticed, like Ross, some movement of one of the figures lying before Fisherman’s Hut. He asked two stretcher- bearers of his battalion, by name Carpenter and Roberts, if they would try to bring this man in. The two men went at once, taking their stretcher. As they neared the boats, fire was opened upon them. They found several of the men still alive, and made the journey four times, each time bringing in a wounded man. Some New Zealanders then went out with an improvised stretcher and picked up a fifth, but the task of carrying him on the makeshift bed was almost impossible. The two Australians with their stretcher therefore went out again and helped them to finish the journey. So far as is known, the last of the wounded from the boats were removed on Monday evening after dark. It is said that nine were saved who had lain there since the dawn of Sunday.
About 3 o’clock on the afternoon of April 25th the Turks who forced Layh to leave the Fisherman’s Hut began to work over or around the four seaward fingers of Baby 700 towards Walker’s Ridge itself. General Bridges was aware of the importance of this Ridge-the only possible position for his left flank-and he had decided to reinforce it with the remaining New Zealand battalions. But the landing of the New Zealanders had been interrupted, and the Turkish attack which developed against Walker’s Ridge about nightfall \vas faced by a few scattered handfuls of men.
The slender garrison may be thus enumerated. The beach at the foot of the ridge was empty until Lieutenant Shout of the 1st Battalion, after taking reinforcements up to Braund on the Top, garrisoned it with a few men collected by himself and Lance-Corporal Freame. Above them the razorback crest of the spur was occupied by a party of Australians and New Zealanders under Captain Critchley-Salmonson of the Canterbury Battalion. Salmonson, with some of the Canterburys, had been in reserve on Plugge’s at about 2 p.m., when a note reached him from Major Stuckey of the Auckland Battalion, who was near The Nek, to the effect that the Turks were moving round the left and that ammunition was running out. Salmonson took his platoon of New Zealanders and reached a point about half-way up Walker’s Ridge, below the knoll and the gap, which were then its chief features. He had with him here a few men of the 9th, 11th, and 12th Australian Battalions, who had retired towards the beach from the fighting on Baby 700. His party did not amount to fifty.
It has been related how, during the earlier hours of the afternoon, Colonel Braund-taking with him Burke’s and Concanon’s companies of the 2nd Battalion-climbed up Walker’s Ridge past the gap onto Russell’s Top. The gap, which was then passable at the cost of many casualties, became almost impassable at a later stage. When the remnants of the two companies of the Auckland Battalion which had been holding the support line on Baby 700 retired over Russell’s Top to the head of Walker’s Ridge, they found the Turkish fire upon this gap so heavy that they were checked. Two scouts were sent ahead to find the way, but they never returned. The party therefore stayed on Walker’s Ridge above the gap. With the Aucklanders were some survivors of the 1st and 3rd Australian Brigades under Lieutenant Jackson of the 11th and other officers. During the night there reached these Australians a message - based on a countermanded order - stating that the 3rd Australian Brigade was to be relieved, and that its men were to concentrate on the beach. But so heavy was the tire at this point in the ridge, that Jackson’s party remained on the spot all night with the Aucklanders.
In the expanse of scrub beyond the head of Walker’s Ridge, on Russell’s Top, was Colonel Braund with his two companies of the 2nd Battalion. Near him in the scrub lay the remnants of Colonel Stewart’s two companies of the Canterburys. Lieutenant Shout had brought to him from the beach some 200 stray men of all battalions. And with Braund, weary to death, was also a handful of the mixed remnants of the Australian and New Zealand companies which had been fighting on Baby 700.
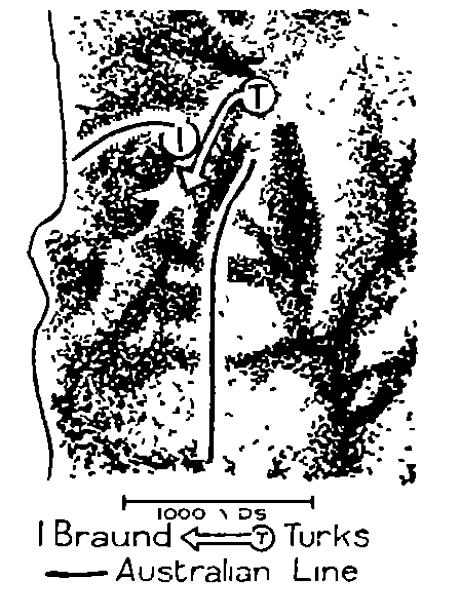
Such was the position at nightfall on Walker’s Ridge and the part of Russell’s Top immediately above it. Braund’s right ended in the scrub on the Top, and of what troops or country were beyond it, or of what was passing there, he had no idea. The scrub in which his right lay was swept by Turkish machine-guns. Braund knew that Australians and New Zealanders had been holding ground on his right front before dusk. But they had retired-some upon his line, others else- where. Never at any time was he in touch with troops on his right. Neither friend or enemy held the head of Monash Valley and Pope’s Hill, was unknown to him. There was a gap to his right, and no one could stir upon Russell’s Top to find how wide that gap was. The line along Walker‘s Ridge was thus an isolated flank, disconnected from the main front of the Australian position which faced inland along the other side of Monash Valley. Actually, whether Braund knew it or not, a party of Turks, following Howe, had penetrated far along the inland edge of Russell’s Top, between the two sections of the Australian and New Zealand line.
In headquarters, on the beach, Braund’s difficulties were well realised. Notions as to the nature of the gap between the head of Monash Valley and Walker's Ridge were very vague. But it was known that the left of the line had been driven in, and that the main danger was that the Turks would penetrate from Baby 700 behind the back of the line which was holding the edge of Monash Valley. As has been related, a promise was sent to Braund that he would he strengthened with two battalions of New Zealanders to help him dig in and hold his position. Into the other side of the gap, at the head of Monash Valley, were hurried the first troops, now landing, of the 4th Australian Infantry Brigade.
Further Reading:
The Battle of Anzac Cove, Gallipoli, 25 April 1915
The Battle of Anzac Cove, Gallipoli, 25 April 1915, AIF, Roll of Honour
Battles where Australians fought, 1899-1920
Citation: The Battle of Anzac Cove, Gallipoli, 25 April 1915, Bean's Account, Part 4
