


Topic: AIF - DMC - Anzac MD
The First Battle of Gaza
Palestine, 26 to 27 March 1917
Anzac Mounted Division War Diary Account
The following is a transcription of Report on the attack from the War Diary of the Anzac Mounted Division detailing their role at the First Battle of Gaza, Palestine, 26 to 27 March 1917.
Anzac Mounted Division War Diary Account.
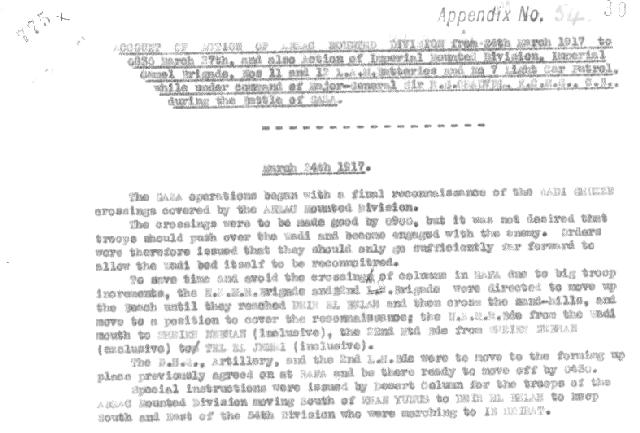
Account of action of Anzac Mounted Division from 24th March 1917 to 0830 March 27th, and also Action of Imperial Mounted Division, Imperial Camel Brigade, Nos. 11 and 12 LAM Batteries and No 7 Light Car Patrol, while under command of Major-General Sir HG Chauvel, KCMG, CB, during the Battle of Gaza.
24 March 1917
The Gaza operations began with a final reconnaissance of the Wadi Ghuzze crossings covered by the Anzac Mounted Division.
The crossings were to be made good by 0900, but it was not desire that troops should push over the Wadi and become engaged with the enemy. Orders were therefore issued that they should only go sufficiently far forward to allow the Wadi bed itself to be reconnoitred.
To save time and avoid the crossing of columns in Rafa due to big troop movements, the New Zealand Mounted Rifles Brigade and 22nd Mounted Brigade were directed to move up the Beach until they reached Deir el Belah and then cross the sand hills, and move to a position to cover the reconnaissance, the New Zealand Mounted Rifles Brigade from the Wadi Mouth to Sheikh Nebhan (inclusive), the 22nd Mounted Brigade from Sheikh Nebhan (exclusive) to Tel el Jemmi (inclusive).
The Divisional Headquarters, Artillery and the 2nd Light Horse Brigade were to move to the forming up place previously agreed on at Rafa and there ready to move off by 0430.
Special Instructions were issued by Desert Column for the troops of the Anzac Mounted Division moving south of Khan Yunis to Deir el Belah to keep south and east of the 54th Division who were marching to In Seirat.
25 March 1917
0230 At 0230 Divisional Headquarters, Signal Squadron and Field Squadron left camp at Bir Abu Shunnah and reached the forming up place. The 2nd Light Horse Brigade were a little late owing to the march of an infantry brigade across its front at the Railway crossing; but the Column left the starting point at 0440.
0840 At 0840, the head of the Column arrived at the cross roads ¾ mile south east of Deir el Belah, where orders were given to the Artillery and the 2nd Light Horse Brigade to go to water and bivouac in Deir el Belah being ready to turn out, if required, at short notice.
0850 General Chauvel arrived at 0850 and Divisional Headquarters were fixed on Hill 310 by 0925.
0925 The crossing of the Wadi had been made good and communication was got at once with the New Zealand Mounted Rifles Brigade; but owing to the 22nd Mounted Brigade having fixed their Headquarters on a low ridge out of view of Hill 310, some little time was lost in getting into communication with them.
1000 The General Officer Commanding Desert Column arrived on Hill 310 at 1000 and arrangements were made for Divisional Commanders to meet him at Desert column Headquarters at 1700.
1032 The only sign of any enemy was at 1032 when the New Zealand Mounted Rifles Brigade reported a patrol of 10 men 3 miles east of Tel el Jemmi moving west. Aeroplanes reported some slight movement in Gaza and enemy at work on Ali Muntar.
1440 At 1440, an order was received from Desert Column for the Artillery to provide an NCO to guide the Divisional Artillery Column from Deir el Belah to Sheikh Nebhan. The reconnoitring to be done at once. Though rather late in the day, this was done.
Orders were also received that on withdrawal, the 22nd Mounted Brigade were to take up the outpost line which was to be held by the 54th Division, until a Regiment of that Division, the 5th Essex, marched in from Khan Yunis and relieved them. The General Service Officer of the 54th Division, who was on Hill 310, indicated this outpost line which ran in a semi-circle round Hill 310 including east and south east.
The crossing of the Wadi were carefully reconnoitred by the Anzac and Imperial Mounted Division Staffs and Commanders Royal Artillery. A crossing was finally shown close to the Wadi Ghuzze and marked. The road leading to it was also marked with a pole and other roads leading off the right track blocked. Two officers of the 2nd Light Horse Brigade, which was to be the leading brigade for the march, were taken on the reconnaissance, and given the duty of noting the road and being prepared to guide the Column.
1455 At 1455, General Chauvel gave orders to withdraw and the 22nd Mounted Brigade took up the outpost line. they were to be relieved as soon after 1900 as possible but they were not finally relieved until 2300 that night.
1700 At 1700, the Divisional Commanders met at Desert Column Headquarters where orders were handed to them for the next day's operations.
1915 The orders to units were got out by 1915. Considerable difficulty in getting the order out being occasioned by the order prohibiting any lights.
1930 The Imperial Mounted Division was concentrated north of the lagoon by 1930.
26 March 1917
0230 At 0230 the Anzac Mounted Division began the march from Deir el Belah. As there was a continual passing and re-passing of units and transport on the flat south of Deir el Belah, and it was not known how many new camps had be formed since dark, no forming up place or starting point were fixed; but units were formed up in their lines and marched straight off from them, falling into their place in the Column.
Just after leaving the rough ground close to Deir el Belah, the leading Brigade, which had been marching in sections, formed column of troops. The result was a break in the column, and in the darkness considerable danger of part of it missing the other half and getting lost, which in fact nearly occurred. The Artillery had been ordered to meed to Column some 5 miles out, and there was also a possibility of things going wrong here, because so many new roads had been made by the incoming bodies of troops, that the leading Brigade deviated a great deal to the right and only regained the track after half an hours marching.
The Imperial Mounted Division left their camp at 0300 and were following the Anzac Mounted Division.
0350 A thick fog began to come on soon after the start and by 0350 when the head of the Column with 7th Light Horse Regiment leading, had reached Hill 310, it was very thick. Colonel Onslow, Commanding the 7th Light Horse Regiment, halted the Regiment at the Hill and sent on a squadron to make the Wadi good before moving down to it.
0450 This having been done, the Column moved on and began to cross the Wadi at 0450, or only 20 minutes later than was expected, in spite of the fog. The guiding of the Column had up to this point been carried out by Captain Tooth, 6th Light Horse Regiment and Captain Maderell, 7th Light Horse Regiment, and the greatest credit is due to these officers that no mistake was made or time lost, particularly since some of the poles marking the road had been removed.
0615 After crossing the Wadi, the Column moved on a bearing of 137 degrees, passing south east of El Kutshan, and reached El Mendur at 0615. Here the Camel Brigade was met with, moving off to reconnoitre to the east. The fog was still very thick, and advanced guard and flankers had to be kept close in.
0755 The fog now began to lift. At 0755 Sheikh Abbas was reached. The advanced guard met the first enemy, some camel men, on the Gaza - Beersheba Road about the “KH” in Kh er Reseim. They were driven off after a little shooting and the march continued. As the helio could now be used, a message was sent to Desert Column giving the situation.
At 0815, 0836 and 0855, hostile aeroplanes flew over the Column and attacked it with Machine Gun fire. They were answered with rifle fire. No casualties were caused.
0930 The Imperial Mounted Division had reached El Mendur by 0930 and had sent out 4 officers patrols, one via Khirbit el Baha towards Abu Hannisa to observe it from the south, one to go round Khirbit el Baha and get near Tel el Sheria and observe roads leading north and west from there, one to the railway about Khirbit Zuheilika and observe and railway movements and destroy telegraph lines, and one towards Huj. They were to report back to the Imperial Mounted Division by 1600. Of these, the first three were hung up by parties of hostile cavalry and infantry.
Two Squadrons, 5th Mounted Brigade were pushed towards Khirbit el Baha astride the Gaza - Beersheba Road, and a squadron was sent towards Huj to get in touch with the Anzac Mounted Division.
At 0930, the Anzac Mounted Division were close to Beit Durdis and the 2nd Light Horse Brigade were ordered to move off to the north in the direction of Jeballye. The Brigadier was instructed to make a detachment to reconnoitre through Beit Hanun towards Sineid. It particularly asked that a report on water at Beit Hanun should be given. A patrol of the Brigade had captured a small convoy of supply wagons, containing grain, and 30 prisoners, to the south west of Khirbit Kufieh.
1010 The situation was sent in to Desert Column. At 1010, the Division was established at Beit Durdis. Communication was established with Desert Column, Imperial Mounted Division and 2nd Light Horse Brigade by cable. Helio stations were also set up, and wireless established. This latter was kept out of action by a more powerful enemy apparatus in Gaza.
1020 The following reconnoitring detachments were sent out. One Squadron towards Huj. One Squadron Auckland Mounted Rifles Regiment towards Nejed. The orders to these detachments were - to reconnoitre towards their respective objectives. If the enemy advanced, to delay his advance, sending back news at once to Divisional Headquarters; to make provisions for any enemy action against their own flanks. Information on water was urgently needed. The only water discovered so far was in the Wadi el Halib, where a few pools were found; in this, Divisional Headquarters, and Artillery and some of the New Zealand Mounted Rifles Brigade were watered.
1034 At 1034 the 2nd Light Horse Brigade reported that they had made Jeballye good, and that the 7th Light Horse Regiment had moved on towards the sea. A Squadron had been detached to reconnoitre toward Beit Hanun and report on water there, and thence move on Deir Sineid.
1035 The enemy now opened a gun on the Column and about half a dozen shells were fired.
1100 At 1100, enemy aeroplanes appeared over Beit Durdis and rifle fire was opened on them.
To the south, the 5th Mounted Brigade opened on small bodies of enemy infantry with their guns. The enemy replied with a long range gun on the Battery and led horses, and caused a few casualties, making the Battery change position.
1130 A message was received from the 2nd Light horse Brigade that the 7th Light Horse Regiment had now made the country good as far as the sea. The Brigade had also captured a Turkish Colonel and Staff on their way into Gaza, where he was to take command.
A patrol of the 5th Light Horse Regiment which pushed forward to Sheikh Redwan captured a Turkish observation stations and two prisoners in it. From other parts of the field, the reports at this time were, an enemy patrol of 10 west of Huj, some 40 tents, and a small mounted party in the direction of Hareira. News of our own infantry was received from Desert Column. This state that at 0750, one Brigade 53rd Division was approaching Sheluf and one Brigade 53rd Division approaching el Mansura, and the leading troops of the 54th Division were approaching Sheikh Nebhan. No touch yet with the enemy.
1230 At 1230, a Turkish company moving north east from Gaza was caught by the 5th Light Horse Regiment and half the Machine Gun Squadron in the road, suffered many casualties, and scattered into the cactus hedges.
1310 At 1310, the Squadron reconnoitring towards Huj encountered a party of 10 men, who made off. They reported considerable activity on the roads leading north and east from Tel el Sheria.
1315 At 1315, a troop of enemy and a machine gun encountered this patrol and pushed back his advanced parties.
1322 At 1322 the 2nd Light Horse Brigade reported parties of enemy trying to escape north east from Gaza. They were scattered among the cactus and working up through it. The Brigade were taking steps to oppose this move.
The Imperial Mounted Division were now established north of the Gaza - Beersheba Road near Khirbit Er Reseim. The 5th Mounted Brigade on their right reported enemy patrols visible from Hum to Tel el Sheria. Enemy infantry about 150 strong were holding the ridge along the 400 contour north east and south west through Khirbit el Jindy extending south of the Gaza - Beersheba Road. There was a column of smoke towards Abu Hareira, and dust moving south from Tel el Sheria. The enemy appeared to be evacuating there along the Gaza - Beersheba Road.
1333 At 1333, orders were received from Desert Column for both Divisions to reconnoitre towards Gaza with a view to closing in on the place to assist the Infantry. One Brigade from each Division only to be employed and two Brigades would continue the observation. At this time, aeroplanes reported no signes of enemy movement from any direction. The 22nd Mounted Brigade was available for closing in on Gaza and the Brigadier was ordered to report to Divisional Headquarters at once.
1345 At 1345, the Somerset Battery was sent to report to General Ryrie and assist in his operations north east of Gaza. This Battery was successful in silencing two of the enemy's guns.
1400 At 1400, orders were received from Desert Column for the whole of the Anzac Mounted Division to push on Gaza. The Imperial Mounted Division to take over all observation, and so release the Anzac Mounted Division for this purpose. General Chauvel was placed in command of both Divisions for these operations. To assist the Imperial Mounted Division in taking over the large area of observation, the Imperial Camel Brigade was ordered up from Khirbit er Reseim. Nos. 11 and 12th Light Armoured Motor Batteries and No 7 Light Car Patrol had already reported for duty to the Imperial Mounted Division. The aeroplanes still reported no activity in the Akra and Hareira areas.
1402 General Chauvel issued orders to the Imperial Mounted Division to take over Beit Durdis and all observation. East and north now carried out by both Divisional parties of the Anzac Mounted Division to rejoin their Brigades on relief.
1435 Divisional Headquarters moved to a position slightly north of east Gaza and 3½ miles from it, all Brigadiers being summoned to meed General Chauvel at that place.
1515 On their arrival, the objective and line of attack were pointed out and orders issued at 1515. The 2nd Light Horse Brigade were to attack on a front from the sea to the Gaza - Jeballye Road (Inclusive). The New Zealand Mounted Rifles Brigade from Gaza - Jeballye Road (exclusive) to the top of the ridge running north east from "A" of Gaza inclusive. The 22nd Mounted Brigade (less one Regiment) from the right of the New Zealand Mounted Rifles Brigade to the track leading to Deir Durdis. The attack to start at 1600.
1520 The General Officer Commanding Imperial Mounted Division issued orders to take over observation duties from Anzac Mounted Division, Headquarters moved to hill ½ mile west of Beit Durdis, 6th Mounted Brigade to relieve Anzac Mounted Division detachments, 5th Mounted Brigade to leave a protective detachment keeping touch with Imperial Camel Brigade on right and the detachment of the 6th Mounted Brigade which was observing Huj on the left.
An enemy deserter who had just been caught, confirmed the number of guns and Machine Guns in Gaza, but put infantry at 3 Battalions and 500 Austrians and 200 cavalry or Camelry with 4 big calibre guns. He said that support had been asked for Jemmama at 1000 that morning. There were only 24 hours supply in Gaza and all wells except three had been blown up.
While the Imperial Mounted Division were carrying out the relief of the Anzac Mounted Division observation parties, the enemy advance from Jemmama became more pronounced, and forced these detachments back from Hill 405. Lieutenant Colonel Wigan DSO with two squadrons and one troop of Berkshire Yeomanry took command of the section at this front. It was impossible to relieve the detachments at the moment, so Lieutenant Colonel Wigan brought his own Regiment into the line and assisted to delay the enemy, at the same time sending back information as to their strength and line of advance. So far the enemy had consisted of infantry and mounted troops with some machine guns. The situation on this front was, however, becoming critical, and the General Officer Commanding, Imperial Mounted Division ordered up all the 6th Mounted Brigade with Berks Battery. As it happened, this Brigade was just then watering and there was a small delay in starting. Before they could come to Colonel Wigan's support, the enemy pushed the detachments over the crest of 405 and occupied it by 1715.
1540 The Anzac Mounted Division began the attack on Gaza supported by the Leicester and Ayrshire Batteries who came into action at 1540 at 3,000 and 4,500 yards respectively.
A message was received from Desert Column urging the great importance of taking Gaza and telling General Chauvel that if necessary he was to send for another Brigade from Imperial Mounted Division. The Nos. 11 and 12 Light Armoured Motor Battery and No. 7 Light Car Patrol were proceeding to assist. The message also warned General Chauvel that the line north west of Gaza between El Meshahera and El Mineh was strong.
1550 On receipt of this message, General Chauvel asked for another Brigade from the Imperial Mounted Division. Meantime, news came that some 300 enemy infantry had been seen marching from the north towards Gaza. A little later it was reported that 3 enemy columns were moving from that direction and that some 300 infantry had moved into the sand hills west of Deir Sineid. A squadron of the 22nd Mounted Brigade was sent to oppose this advance.
1615 At 1615, the attack of the 2nd Light Horse Brigade, supported by the Somerset Battery began to develop. The New Zealand Mounted Rifles Brigade also moved forward, the Canterbury Mounted Rifles Regiment in advance with the Wellington Mounted Rifles Regiment in support and to extend their right. Only three troops of the Auckland Mounted Rifles Regiment were available, the rest being still in observation towards Huj and Nejed, and now owing to the strength of the enemy advance they could not be expected in time to take part in the attack. The Brigade carried the redoubt on the high ridge east of Gaza, and the 22nd Mounted Brigade on their left captured the knoll running west from the ridge. The advance of the New Zealand Mounted Rifles Brigade continued through very enclosed country intersected with cactus, buildings and pits occupied by Turkish riflemen. There was considerable opposition. The Wellington Mounted Rifles Regiment captured two guns and held them in spite of enemy counter attacks. They pushed on to the outskirts of the town and finding some houses occupied by enemy turned the captured guns on to them, firing four rounds point blank, causing the surrender of 20 Turks.
1700 The Canterbury Mounted Rifles Regiment pushed on to assist in the attack on Ali Muntar. One squadron entered the hostile trenches just after the infantry. The Brigade eventually effected lodgement in the outer houses of Gaza. The 2nd Light Horse Brigade on the right were delayed among the sand hills, the 7th Light Horse Regiment on the extreme right meeting considerable opposition. They had close fighting with Turks among the cactus and in the lanes amongst it and eventually were established close up to the town and north and west of it.
1623 Meantime the patrols observing Deir Sineid reported that the enemy cavalry were camping there and that those who were among the sand hills were also moving into camp.
1630 At 1630 the Light Armoured Motor Batteries and No. 7 Light Car Patrol reported to Divisional Headquarters.
1700 At 1700, at the request of the Imperial Mounted Division, General Chauvel sent back the 3rd Light Horse Brigade less 1 Regiment (10th Light Horse Regiment) to co-operate against the enemy on the left of the 6th Mounted Brigade. General Royston moved back is Brigade quickly and seized a high hill north west of Hill 405, which action enabled the 6th Mounted Brigade to hold on where they were. The 3rd Light Horse Brigade had the 8th and 9th Light Horse Regiments in action, the 8th being in touch with the 1/1st Dorset Yeomanry on their right. The 1/1st Nottinghamshire Battery were in action on the left of the 6th Mounted Brigade and 1/1st Berkshire Battery in the centre. The fire of the 1/1st Nottinghamshire Battery enfiladed the advancing enemy and did considerable damage. The enemy however brought more guns in addition to 6 already in action, and enfilading the 1/1st Berkshire Battery forced it to withdraw.
1630 It was nearly dark however, 1630, when this occurred, and the enemy made not attempt to follow up. A gap had occurred in the line between 6th Mounted Brigade and 1st Camel Brigade owing partly to units naturally drawing in towards the firing and partly because no communication could be got with the 5th Mounted Brigade. To fill this General Hodgson asked General Chauvel to send back the 10th Light Horse Regiment which was still in reserve at Divisional Headquarters. This request was complied with.
1700 Meantime at 1700 order had been received from Desert Column for all slow moving wheels and camels to move back to Hill 310 via Sheikh Abbas. First line camels to conform to this movement. orders were accordingly issued.
1715 At 1715 orders were sent to the No. 7 Light Car Patrol to move up the road toward Deir Sineid and reconnoitre enemy there, and the Nos. 11 and 12 Light Armoured Motor Batteries to join the force opposing the enemy's advance from Huj where the enemy were now reported to be 4,000 strong. The cars reported to General Royston and engaged the enemy until dark.
1830 No. 7 Light Car Patrol reported to Headquarters Anzac Mounted Division on return and ordered to return to their base. Nos. 11 and 12 Light Armoured Motor Batteries failed to report, and as subsequently appeared, camped in the vicinity of Khirbit er Reseim.
1810 At 1810, owing to the lateness of the hour and the strength and position of the enemy forces pressing in from the north and east, and the difficulty of continuing the attack in the town of Gaza in the dark the General Officer Commanding, Desert Column, decided to withdraw the Mounted Troops and orders were received to break off the action after dark and withdraw the two Mounted Divisions to Deir el Belah and the Imperial Camel Corps Brigade to a position extending from the right of the 54th Division to the Wadi Ghuzze. General Chauvel to meet General Chetwode on Hill 310.
1835 At 1835 orders for the withdrawal were issued, the artillery which was by now were at Divisional Headquarters to go at once under escort. The Batteries left at 1905. The Brigades in Gaza had already ceased to advance and were engaged in collecting wounded etc.. Much sniping went on in the town and outskirts and made this slow. The great difficulty was to get the 2nd Light Horse Brigade back, part of which, the 7th Light Horse Regiment were some four miles from their horses.
1930 At 1930 a message was sent was sent to hasten the withdrawal of the New Zealand Mounted Rifles Brigade and 2nd Light Horse Brigade as it became necessary to keep the Imperial Mounted Division in position to cover the withdrawal of the Anzac Mounted Division and it was desired to withdraw this Division also before daylight. The 22nd Mounted Brigade had already re-assembled and was moving towards Divisional Headquarters. Under cover of the darkness the 6th Mounted Brigade drew back its left for ½ mile to a better position. In this area the enemy were reported to be digging in on Hill 405.
2200 At 2200 the New Zealand Mounted Rifles Brigade re-assembled and sent in the captured guns to Divisional Headquarters having to abandon 3 limbers to do so. The guns arrived at Divisional Headquarters but the Brigade missed Divisional Headquarters in the dark but struck the Headquarters of the Imperial Mounted Division where it reported and moved on slowly until caught up by the remainder of the column.
Just after 2200, the enemy in the town shot up three Verey's Lights, probably a signal to those outside that the town was still untaken.
2215 At 2215, the 2nd Light Horse Brigade reported at Divisional Headquarters, the 22nd Mounted Brigade having already joined, and the Column moved off at 2255 marching via Beit Durdis and Sheikh Abbas.
27 March 1917
0200 By 0200, the guns of the Anzac Mounted Division had reached Deir el Belah, the Division itself having just passed Beit Durdis, and General Hodgson gave orders for concentration of the 5th and 6th Mounted Brigades and 3rd Light Horse Brigade. The Camel Brigade had meantime been brought back and took up a line from Wadi to the left of the 54th Division, Headquarters being at Um Jerrar.
0430 At 0430, the Light Armoured Motor Batteries broke up camp and moved south. Here they got among the enemy, and fought for some two hours, eventually getting away with the loss of one box car, having inflicted considerable casualties on the enemy.
0450 The No. 7 Light Car Patrol moved along the Gaza - Beersheba Road.
0530 At 0530 they met the 3rd Light Horse Brigade. This Brigade which was in rear became heavily engaged with the Turks advancing from Huj. They also appeared near Tel el Jemmi. Their attack on the 3rd Light Horse Brigade was however beaten off and the armoured cars were asked by General Royston to cover his retirement, which was done. The cars withdrew to the position of the Camel Brigade at 0700.
0600 At 0600, the 6th Mounted Brigade and 3rd Light Horse Brigade came under long range fire as they crossed the Wadi, causing a few casualties.
0610 By 0610, the Imperial Mounted division was collected at Deir el Belah. The Anzac Mounted Division marched via the Abu Teibig crossing past Hill 310, where General Chauvel met General Chetwode, who gave orders that horses were to be watered and both Divisions to return at once to a position about El Demeita. This was done, and both Divisions were collected at that place by 0830, being held in a position in readiness during the Infantry attack on Ali Muntar.
0830 General Chetwode took over command of the two Divisions and Armoured Cars again from 0830, and General Chauvel returned to command the Anzac Mounted Division.
0915 At 0915, the 22nd Mounted Brigade were sent to relieve on Regiment of the Imperial Mounted Division which had been detached on the 25th March to operate on left of 54th Division at the mouth of the Wadi Ghuzze in the sand hills. This Brigade remained detached until the morning of March 29th, when it returned to the Division.
The Anzac Mounted Division remained about El Demeita until 1600 when orders were sent to take up an outpost line along the Goz el Taire. The Anzac Mounted Division took from the right of the 54th Division about In Seirat village inclusive up to but excluding Hill 320 at the "T" of "Taire" where the Imperial Mounted Division continued the line. Outposts were finally in position at 1830, and the Division bivouacked on the north west slopes of the Goz el Taire, one mile south west of In Seirat.
During the operations the Anzac Mounted Division captured:-462 Prisoners (including a Divisional Commander)
2 Austrian Krupp 77 Field Guns complete
1 Artillery Observation Station complete with instruments
1 Convoy of 6 wagons loaded with stores
6 camels, 16 horses, 12 mules.
The casualties in the Division were as follows:-Killed - 6 Other Ranks
Wounded - 6 Officers 40 Other Ranks
Missing - 2 Other Ranks
Casualties of Horses - Killed 23, Wounded 30, Missing 3.
The expenditure of ammunition was as follows:-ShellsAyrshire Battery - 57Small Arms Ammunition - Total expenditure 150,000 rounds.
Inverness Battery - 12
Somerset Battery - 125
Leicester Battery - 112
I wish to draw special attention to the excellent service rendered by the Imperial Mounted Division under Major General HW Hodgson, CB, CVO, in holding off greatly superior forces of the enemy during the afternoon of the 26th and the night of 26/27th thus enabling the Australian and New Zealand Mounted Division to assist in the Infantry attack on Gaza and subsequently to withdraw after dark. Had the work of this Division been less efficiently carried out it would have been quite impossible to extricate the Australian and New Zealand Mounted Division without very serious losses.
Chauvel
Major General
Commanding Australian and New Zealand Mounted Division
4 April 1917
War Diaries
All War Diaries cited on this site should be read in conjunction with the Australian Light Horse Studies Centre, AIF War Diaries of the Great War, Site Transcription Policy which may be accessed at:
Australian Light Horse Studies Centre, AIF War Diaries of the Great War, Site Transcription Policy
Further Reading:
Australian and New Zealand Mounted Division, Anzac MD, Roll of Honour
The First Battle of Gaza, Palestine, 26 to 27 March 1917
The First Battle of Gaza, Palestine, 26 to 27 March 1917, Allied Forces, Roll of Honour
The Palestine Campaign, 1917 - 1918
Battles where Australians fought, 1899-1920
Citation: The First Battle of Gaza, Palestine, 26 to 27 March 1917, Anzac Mounted Division War Diary Account
