


Topic: AIF - DMC - Aus MD
The First Battle of Gaza
Palestine, 26 to 27 March 1917
Imperial Mounted Division, Report on Operations
Imperial Mounted Division, Report on Operations.
The following is the Report on Operations from the War Diary of the Imperial Mounted Division detailing its role at the First Battle of Gaza, Palestine, 26 to 27 March 1917.
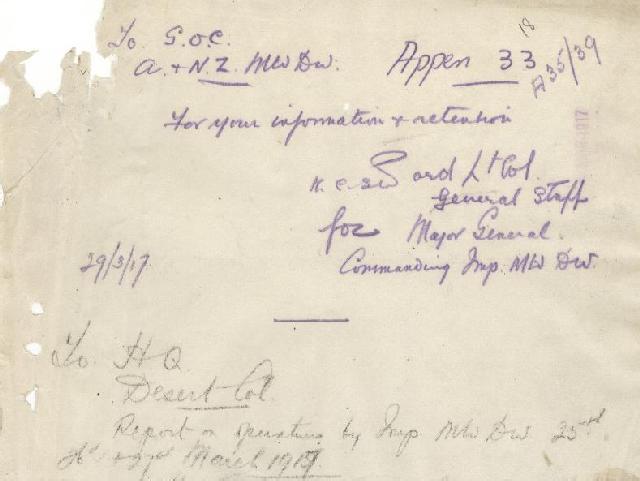
Desert Column
Report on operations by Imperial Mounted Division 25th, 26th and 27th March 1917.
The Division concentrated on the North West of Deir el Belah about 1930 night 25th-26th March.
Orders for following days operations were issued to preparations of Units at 2000. The Division bivouacked north west of Deir el Belah and left the bivouac at 0300 via the western outskirts of Deir el Belah.
Owing to late arrival of the Division it was impossible to reconnoitre this route by daylight and some difficulty was experienced in getting clear of the cultivated enclosures in the vicinity of the village.
The Division passed across the Wadi Ghuzze in rear of the Australian and New Zealand Mounted Division and on reaching El Mendur about 0930 it passed through the main body of the Imperial Camel Corps Brigade.
From El Mendur the following dispositions were ordered:-
4 Officers Patrols were sent out as follows:(a) to reconnoitre the Turkish line about Khirbit El Baha and if found unoccupied to go as close to Abu Hareira and observe the south. The patrol to remain there and return to Divisional Headquarters by 1500.
(b) To turn the Khirbit el Baha to Tel el Sheria as possible, to observe the roads leading north and west from that place. To return to Divisional Headquarters and report at 1600.
(c) A patrol to the railway about Abu Zuheilika to observe any railway movement, destroy and telephone lines or telegraph lines he might come across. To report to Divisional Headquarters at 1600.
(d) An Officer's Patrol to Huj to report on any movements from that place. To return and report about 1600.
The first 3 patrols were all by parties of mounted troops supported by bodies of Infantry.
The 4th Patrol did excellent work keeping close touch with the enemy column from Huj from 1310 till he drew back in action at 1600.
After crossing the head of the Wadi el Mendur, 2 Squadrons of the 5th Brigade pushed out towards Khirbit el Baha astride the Gaza - Saba Road and one Squadron pushed up towards Huj to gain contact with the right of teh Australian and New Zealand Mounted Division. This Regiment was in action with enemy mounted troops supported by small bodies of Infantry throughout the day.
A successful little mounted action was carried out during the morning when one troop galloped up to a small Turkish post and took 67 prisoners without loss. Of these 45 were unarmed.
General Officer Commanding 5th Mounted Brigade at 1100 considered the Infantry before him were becoming more active so brought his guns into action against the Infantry on the Khirbit el Jhindy ridge. The guns fired slowly and the infantry showed no intention of advancing further but a large calibre gun firing at long range opened an accurate fire on our guns and led horses. The battery was forced to change its position and a few casualties were inflicted on horses and men.
The mistake of opening fire with guns on a small target at this point was soon made apparent, as the enemy continued shelling the ridges where the 5th Brigade were operating throughout the day at regular intervals and the movement of enemy troops was considerably more active. The role of observation only which was particularly impressed on all commanders at the Divisional Commanders Conference the previous evening did not appear to have been appreciated by the General Officer Commanding 5th Mounted Brigade.
At 1200 a deserter from Gaza gave himself up in our lines and gave a considerable amount of information regarding the enemy troops there, including the fact that help had been wirelessed for from Jemmama at 1000. At 1310 a message was received from Huj patrol stating that considerable activity was apparent on the roads leading north and east from Tel el Sheria. At this time 1400 orders were received from Desert Column for the Australian and New Zealand Mounted Division to assist the Infantry in the attack on Gaza while the Imperial Mounted Division took over the covering screen.
The Imperial Camel Corps Brigade moving to its left to support the right of the Imperial Mounted Division. The Imperial Mounted Division was then placed under orders of the Australian and New Zealand Mounted Division Commander.
At 1430 orders were received from General Officer Commanding Anzac Mounted Division to take over the following posts:-1 Troop 2 miles east of Beit Durdis watching Huj.1 Squadron watched Nejed.1 Squadron at Deir Sineid.
The 3rd Light horse Brigade was also ordered to join the Anzac Mounted Division. Orders were issued to General Officer Commanding 6th Mounted Brigade to send out the necessary detachments to a relief of the above mentioned posts.
To the 5th Mounted Brigade to leave a protective detachment keeping touch with the Camel Corps Brigade on his right and the 6th Mounted Brigade Huj detail on his left.
To General Officer Commanding 3rd Light Horse Brigade to join the Anzac Mounted Division.
Divisional Headquarters moved to a ridge about ½ mile west of Beit Durdis. While the above detachments were proceeding between 1445 and 1515 to take up their positions and relief the respective detachments from Anzac Mounted Division messages were received from Huj. Officers Patrol reporting the presence of enemy columns advancing rapidly in the direction of Gaza. These messages had had to be sent in by mounted orderly it being impossible to send a signalling detachment with a small patrol whose mission was to observe without attracting attention, but information and the manner in which the Officer Commanding handled his patrol was both all that could be done and the conduct of this officer as worthy of special notice.
While the relief of the Anzac Mounted Divisional Patrols was being effected the enemy advances from Jemmama became suddenly pronounced and before the detachments could get into position they were in action with the advancing forces who were forcing back the Anzac Mounted Divisional Posts from the crest of Hill 405 which they were holding.
Lieutenant Colonel Wigan, DSO, with two Squadrons and 1 Troop 1/1st Berkshire Yeomanry then took over command of the action on this front. It was impossible to relieve the detachments of the New Zealand Mounted Rifles Brigade at that time so Colonel Wiggan placed his own troops in the line and assisted in their delaying action, at the same time sending back detailed information regarding the strength and line of advance of the enemy who had up to then shown only Infantry and Mounted troops with Machine Guns.
Seeing the situation at this point was becoming critical the General Officer Commanding ordered up the whole of the 6th Mounted Brigade including the Berkshire Battery.
Unfortunately, a good supply of water had just been discovered and the Brigade were watering. So there was some small delay i the start and before they could come to Colonel Wiggan's support the enemy had pushed back his detachments over the crest of Hill 405 and occupied it. This was about 1715.
The action with the 6th Mounted Brigade developed very quickly and the General Officer Commanding Anzac Mounted Division sent the 3rd Light Horse Brigade less the 10th Australian Light Horse Regiment to operate on General Pitt's left between Hill 405 and the Deir Sineid Road.
The handling of this Brigade was notable for its quickness and also for the manner in which the General Officer Commanding seized on to the salient features of the country and utilized them to excellent advantage. There was no doubt that General Royston's quickness in preparing the value of the high hill north west of Hill 405 enabled the 6th Mounted Brigade to hold on to the line to which he was forced back and which would otherwise have been untenable. This movement brought the Nottinghamshire Battery into action on the left of the 6th Mounted Brigade and the Berkshire Battery was in action in the centre. Both these batteries did excellent work, the Nottinghamshire Battery being able to enfilade the Infantry advancing directly against the 6th Mounted Brigade and doing considerable damage. The situation became serious when more enemy guns (6 were already in action) arrived and enfiladed the Berkshire Battery whose position became untenable and they were forced to withdraw.
It was, however, nearly dark (1830) so their withdrawal was not perceived by the enemy who made no attempt to push on, but remained in possession of Hill 405. The 3rd Light Horse Brigade less 10th Australian Light Horse Regiment, were on the left with the Nottinghamshire Battery covering the Deir Sineid - Gaza Road.
The 6th Mounted Brigade was in a hollow in the centre about 1½ miles north from Beit Durdis, the 5th Mounted Brigade echeloned back on their right. This at the time was unknown to the Divisional Commander who had ordered back the 5th Mounted Brigade to Headquarters leaving Squadrons out to link up with the Imperial Camel Corps Brigade on the right and the 6th Mounted Brigade on the left. This order was apparently not received.
Unfortunately touch with the 5th Mounted Brigade had been lost during the move of Divisional Headquarters from Khirbit er Reseim to Beit Durdis and was never regained till about 2000. This loss of touch with the 5th Mounted Brigade and the withdrawal of the 3rd Light Horse Brigade together with the natural inclination of all the protective detachments to meet the enemy's main attack, left a considerable gap between the right of the 6th Mounted Brigade and the left of the 5th Mounted Brigade.
At 1800 when it was becoming dusk efforts were made by mounted orderlies and officers to meet the General Officer Commanding 5th Mounted Brigade, which were, however of no avail and an appeal was consequently directed to General Officer Commanding Anzac Mounted Division to allow the 3rd Regiment of General Royston’s Brigade, previously detached to the other Division to rejoin the imperial Mounted Division in order to fill that gap on the right which was done and much praise due to the 10th Australian Light Horse Regiment for the manner in which they found the Divisional Headquarters in the dark and also gained their places in the line, in the dark, in an unknown bit of country, seamed with deep and difficult wadi beds.
The Division was at this time about 2030 ordered to hold its ground and to remain in its present position pending further orders. The 6th Mounted Brigade however, had to withdraw their line half a mile, though enemy activity had practically ceased and there were apparent signs that they were digging themselves in quite close to the Brigade. A new line was taken up without incident that the Brigade was then in a better position.
At 0020 news was received from the Anzac Mounted Division that they were withdrawing and the order for the concentration and withdrawal of the 6th Mounted Brigade and 3rd Light Horse Brigade were then ordered. Messengers and lamp signals being used, cable connection being interrupted by the passage of troops over the lines. The withdrawal of the 5th Mounted Brigade was ordered through the Brigade Major who came into Divisional Headquarters to ask for orders at 2330. Touch had previously been regained with this Brigade and they had been allotted a position on our right flank protecting the return route of the Division slightly south of Khirbit Reseim. Divisional Headquarters moved off when it was ascertained that the 6th Mounted Brigade and 3rd Light Horse Brigade had received and were carrying out their orders. The artillery and all spare transport and wheeled vehicles were sent off earlier in the night as soon as the orders for subsequent withdrawal were received. The 6th Mounted Brigade and 3rd Light Horse Brigade came under long range artillery and rifle fires when crossing the Wadi Ghuzze but only 3 slight casualties were incurred during this phase of the action and the Division was intact in Deir el Belah at 0810 on the 27th.
The total casualties of the Division during the day were under 40 of all descriptions.
I would like to send my appreciation of the work of the 6th Mounted Brigade, the Berkshire and Nottinghamshire Batteries, the handling of his Brigade by Brigadier General Royston and the work of all units of the 3rd Light Horse Brigade.
The communications of the Division were weak but the Signal Squadron was an entirely new formation and the breakdown of inter communication between the Headquarters and Brigades at various times can be accounted for by the sudden strain on this new unit.
Water was discovered in small quantities at various points, a separate report on which will be submitted. It was entirely surface water from recent rainfalls.
I wish to bring to special notice the work of Second Lieutenant J Edwards, Worcestershire Yeomanry who handling of an Officer's Patrol in the direction of Huj was of the utmost value.
Signed HW Hodgson, Major General
Commanding Imperial Mounted Division
29th March 1917
War Diaries
All War Diaries cited on this site should be read in conjunction with the Australian Light Horse Studies Centre, AIF War Diaries of the Great War, Site Transcription Policy which may be accessed at:
Australian Light Horse Studies Centre, AIF War Diaries of the Great War, Site Transcription Policy
Further Reading:
Australian Mounted Division, AMD, AIF
Australian Mounted Division, AMD, Australian and British Forces Roll of Honour
The First Battle of Gaza, Palestine, 26 to 27 March 1917
The First Battle of Gaza, Palestine, 26 to 27 March 1917, Allied Forces, Roll of Honour
The Palestine Campaign, 1917 - 1918
Battles where Australians fought, 1899-1920
