"At a mile distant their thousand hooves were stuttering thunder, coming at a rate that frightened a man - they were an awe inspiring sight, galloping through the red haze - knee to knee and horse to horse - the dying sun glinting on bayonet points..." Trooper Ion Idriess
The Australian Light Horse Studies Centre aims to present an accurate history as chroniclers of early Australian military developments from 1899 to 1920.
The Australian Light Horse Studies Centre site holds over 12,000 entries and is growing daily.
Contact:Australian Light Horse Studies CentreLet us hear your story:
You can tell your story, make a comment or ask for help on our Australian Light Horse Studies Centre Forum called:
WARNING: This site contains: names, information and images of deceased people; and, language which may be considered inappropriate today.
Monday, 1 November 2010
Australian Movie Productions, Film Clips, Beyond Beersheba: Anzacs in the Holy Land Topic: AAC-Film Clips
Australian Movie Productions
Film Clips
Beyond Beersheba: Anzacs in the Holy Land
Anzac Connection has placed a documentary on Youtube creating a visual history of the Light Horse as they moved from Beersheba towards the conclusion of the war in Palestine in October 1918. The movie is presented and narrated by Gary 'Tex' Houston. It is a 90 minute film divided into 16 parts to allow easy viewing.
The Battle of Beersheba, Palestine, 31 October 1917, Contents Topic: BatzP - Beersheba
The Battle of Beersheba
Palestine, 31 October 1917
Contents
The taking of the wells at Beersheba on 31 October 1917 formed the single most thrilling image from the Great War. The Charge of the Light Horse is the lingering memory. Many legends have arisen about the Charge which have become embedded within the national story and now seem to have replaced the facts, both officially and unofficially. These legends are addressed. The Battle of Beersheba was not only the famous charge but many other actions all of which culminated in the victory.
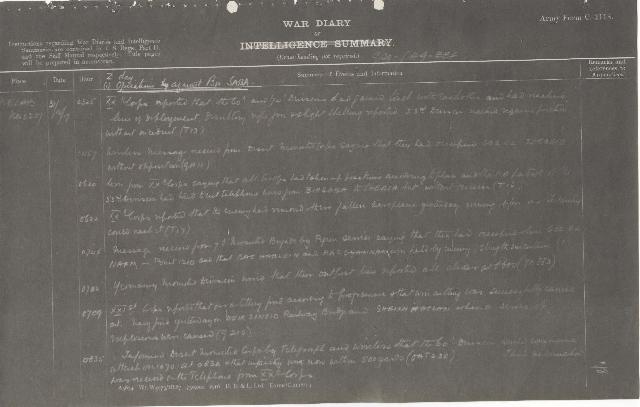
The Third Battle of Gaza, Palestine, Z Day, 31 October 1917, Egyptian Expeditionary Force War Diary Account Topic: BatzP - 3rd Gaza
The Third Battle of Gaza
Palestine, Z Day, 31 October 1917
Egyptian Expeditionary Force War Diary Account
War Diary account of the Egyptian Expeditionary Force, Z Day, 31 October 1917.
The transcription:
Kelab Kilo 207
31 October 1917
0325 - XX Corps reported that the 60th and 74th Divisions had gained touch with each other and had reached line of deployment. Desultory rifle fire and slight shelling reported. 53rd Division reached required position without incident.
0457 - Wireless message received from Desert Mounted Corps saying that they had occupied Goz el Shebbib without opposition.
0620 - Wire from XX Corps saying that all troops had taken up positions according to plan and that a patrol of the 53rd Division had tried to cut telephone lines from Bir Saba to Sheria but without success.
0622 - XX Corps reported that the enemy had moved their fallen aeroplane yesterday evening before our Infantry could reach it.
0702 - Yeomanry Mounted Division wired that their outpost line reported all clear at 0600.
0709 - XXI Corps reported that our artillery fired according to programme and that wire cutting was successfully carried out. Navy fired yesterday on Deir Sineid Railway Bridge and Sheikh Hassan when a series of explosions were caused.
0745 - Message received from 7th Mounted Brigade by Pigeon Service saying that they had occupied 602 El Naim - Point 1210 and that Ras Hablein and Ras Ghannam were held by enemy. Strength uncertain.
0835 - Informed Desert Mounted Corps by telegraph and wireless that the 60th Division would commence attack on 1070 at 0830 and that infantry was now within 500 yards. This information was received on the telephone from XX Corps.
0856 - XX Corps wired that the left brigade of the 60th Division were within 500 yards of the advanced works in H.29.c and H.35 at 0835 and that an intense bombardment on this position began at 0830.
0948 - Wire from XX Corps reporting that 181st Brigade of 60th Division had captured enemy works from Z19 to Z16 inclusive at 0845 and that guns were now moving forward. (XXI Corps informed by our OAT24)
1030 - Sent a wireless message to Desert Mounted Corps telling them to report to General Headquarters and to XX Corps.
1212 Desert Mounted Corps wired giving the situation at 0915 - Bir el Haman occupied and advanced detachments half way to Bir es Sakaty. New Zealand Mounted Rifles Brigade at Bir Salim abu Irgeig and remainder of Australian and New Zealand Division at Point 1390. Head of Australian Mounted Division should arrive at Iswaiwin 0920. 7th Mounted Brigade in position. Tel el Saba thought to be held by enemy. Very little opposition so far.
Telephoned Desert Mounted Corps that XX Corps attack on main position would begin at 1215. Note: This information was received by telephone.
1235 - Yeomanry Mounted Division report situation unchanged at 1200.
1241 - XX Corps reported that 60th Division had gained all their objectives namely advanced works at H29c and H35 at 0845 and that they are now bombarding enemy's line for 2nd phase of attack which will take place at 1215.
1251 - XXI Corps report that artillery was firing according to programme, and that 1 Arab Officer and 3 Other Ranks have deserted and come in. They report enemy shell fire on Hereford Ridge and line from sea to Jones Post, also that Samson's Ridge and Dumbell Hill were shelled. No damage was done.
1315 - Informed Desert Mounted Corps and XXI Corps by wire that XX Corps captured objectives between Khalasa - Saba Road and Wadi Saba. Note: Information re above received by telephone from XX Corps.
1405 - XX Corps report that 60th Division captured all their objectives, and 74th Division believed to have captured theirs.
1409 - Informed Desert Mounted Corps that XX Corps had taken all their objectives, and that they saw indications of Turks retiring. Desert Mounted Corps were therefore instructed to press on quickly to Beersheba and north of the town. This wire was also repeated by wireless.
1415 - Report received from Desert Mounted Corps that Tel el Sakati and Tel el Saba were fairly strongly held by enemy, and have not yet been occupied by us. They also gave a report as regards the water supply already found.
1505 - XX Corps wire that 60th Division are concentrating east of their objective, and that 74th division report capture of all their objectives.
1511 - Desert Mounted Corps reported that attack on Tel el Saba was still held up, and that they would attack again about 1530 with reinforcements of one brigade and two batteries. Tel el Sakati has been captured, but high ground to the north of it is still giving trouble.
1542 - Wire received from Desert Mounted Corps say that the water situation in Wadi Malah is not hopeful, and saying that, if Commander-in-Chief approved, it was proposed to send back all troops which had not watered to Bir Arara and Wadi el Imshash, if Bir Saba is not in our possession by nightfall.
When this message arrived, the Commander-in-Chief was away on a visit to the XX Corps at El Buggar. The above message was telephoned to him, and as a result the following message was sent to the Desert Mounted Corps: 1700 "Chief orders you to capture Beersheba today in order to secure water and take prisoners."
1715 - Issued instructions to Yeomanry Mounted Division and XX Corps that the Yeomanry Mounted Division would take over from the 10th Division at 0600 1st November the line Point 550 Wadi el Girheir - Point 510 on Abu Shawish Road to Hiseia, all inclusive; and for the Yeomanry Mounted Division to send escort to Cross Roads west of Toweil el Habairi to take over prisoners destined for Karm.
1746 - Information received from the Liaison Officer with the Desert Mounted Corps that Tel el Saba had been taken, and that the Australian and New Zealand Mounted Division were now advancing upon their third objective, and that the Australian Mounted Division, less two brigades but plus the 7th mounted Brigade, had been ordered to take Bir Saba.
1828 - Liaison Officer with the Desert Mounted Corps wired that the attack on Bir Saba had taken place at 1630, and it was thought that the village had been taken, but confirmation was awaited.
1831 - Royal Flying Corps tactical reconnaissance which landed at 1715 reports no concentration or movement between Gaza and Sheria or on any roads leading eastwards from Gaza.
1847 - Situation report received from XX Corps. 60th Division concentrating on line arranged with Corps Cavalry Regiment on right flank. 74th Division attacking the works north of Wadi Saba at 1900. 53rd Division, with one Brigade 10th Division, on their original line. Remainder of 10th Division at Goz el Basal.
1848 - XXI Corps reported that their artillery had fired according to programme, and that enemy artillery had been active on Lees Hill, Queens Hill, Balzed Hill, Mansura and Kurd Hill. No damage had been done.
1908 - Dispositions for the night were sent by XX Corps as follows:
Smith Group remains under command of 74th Division.
53rd Division and one brigade 10th Division, holds line Hill 765 - Point 810 - Kh Imleih - Point 630 - Point 510.
10th Division (less one brigade) remains at Goz el Bazal.
Yeomanry Mounted Division watches area between Wadi Ghuzze and Wadi Sheria, and north of a line from Shellal to Imara.
1936 - Wire received from Liaison Officer with Desert Mounted Corps saying that the attack on Bir Saba failed to penetrate, being stopped ¾ mile from village, and that orders had been issued for a further attack, and for the capture of Bir Saba to be undertaken during the night.
2001 - Desert Mounted Corps wired giving the situation at 1800 viz:
Australian and New Zealand Mounted Division from north of Bir es Sakati to Point 1040 to Point 960.
Australian Mounted Division holding a line 1,200 yards south east of Bir Saba, supported by 5th and 7th Mounted Brigades.
The Corps had been ordered to capture Bir Saba tonight. Ras Ghannah apparently still held by enemy.
2045 - Information received from Desert Mounted Corps that Bir Saba had been occupied at 1940 by 4th Light Horse Brigade, who had galloped it; that estimated captures include 250 prisoners, 9 field guns and a machine gun, and that water was reported plentiful in Bir Saba. The information contained in this wire was sent to XX Corps, XXI Corps and to the Yeomanry Mounted Division under our OA693.
2110 - Wire received from Rear Admiral saying that the railway bridge at Deir Sineid had been completely destroyed, and the Wadi Bridge damaged. This information was passed on to the XXI Corps at 2145 by our CA694.
2215 - The above dispositions of the 53rd Division were wired to Desert Mounted Corps who were instructed to cooperate with a sufficient force to cover and assist their right from Ain Kohleh to Hebron Road. Remainder of Desert Mounted Corps to be disposed as water requirements demand. Desert Mounted Corps to wire General headquarters and XX Corps dispositions for the night, and details of movements arranged to comply with the above order.
2222 - XX Corps were asked to indicate before noon tomorrow as to possibilities of date of the second phase. This information is urgently required so as to coordinate operations of XXI Corps.
2230 - Evening report to London, Baghdad, Salonica, the High Commissioner, and to the Rear Admiral Egypt, setting out the salient points of the day, and saying that Bir Saba had been captured, together with some few guns and prisoners.
2240 - Rear Admiral wired that it had been arranged that seaplane raid should be carried out on Jil Julie railway bridge, the oil factory east of Haifa, and on the stores at Tul Keram.
Wires were sent to XX Corps, and to Desert Mounted Corps, congratulating them on their splendid successes, which were due to brilliant staff work and the bravery of troops.
2244 - Desert Mounted Corps wired that the captures were now estimated at 800 prisoners, 9 Field Guns, and 3 machine Guns; and that most of the Corps had now been watered once.
2256 - XX Corps sent further dispositions, viz:
266th Brigade Royal Field Artillery, Imperial Camel Corps Brigade, and the two battalions 53rd Division will revert from Smith's Group to command of the 53rd Division at 2400.
The 53rd Division, less one Brigade, plus the Imperial Camel Corps Brigade, will advance at 0530 tomorrow to seize high ground north of Bir Saba, along the ridge running westwards from Towal abu Jerwal, towards the "T" in Arab el Teiaha. Imperial Camel Corps Brigade to be on right and to gain touch with the Desert Mounted Corps.
10th Division to take over front from the Gaza - Beersheba Road, south of Irgeig, to Point 550 west of El Girheir by 6am tomorrow morning, and thus relieve brigade of 53rd division to follow the remainder fo their Division.
Yeomanry Mounted Division to take over from Point 550 to Hiseia, all inclusive by 6am.
2259 - XX Corps Deputy Assistant Adjutant and Quartermaster General wired that total prisoners were now estimated at 600, and asked that escort might be sent to Cross Roads west of "T" in Toweil el Habari at 6 o'clock tomorrow morning.
2317 - Information received from XX Corps that 74th Division had captured all their objectives north of Wadi Saba at 2125, and that 60th Division reported a big fire in Bir Saba and a big explosion east of the town.
A summary of Situation Reports, Telephone messages, and Royal Flying Corps reconnaissances, for the day, is shown as an Appendix.
Maps showing the position of troops:
1. From dawn to 0900 2. At 0930 3. At 1305 4. At 1600 5. At 1800.
are shown as an Appendix
The Commander-in-Chief left General Headquarters at 1500, and visited XX Corps Headquarters at El Buggar, in order to discuss the situation with General Officer Commanding XX Corps.
The Australian Light Horse Studies Centre is a not for profit and non profit group whose sole aim is to write the early history of the Australian Light Horse from 1900
- 1920. It is privately funded and the information is provided by the individuals within the group and while permission for the use of the material has been given for this
site for these items by various donors, the residual and actual copyright for these items, should there be any, resides exclusively with the donors. The information on
this site is freely available for private research use only and if used as such, should be appropriately acknowledged. To assist in this process, each item has a citation
attached at the bottom for referencing purposes.
Please Note: No express or implied permission is given for commercial use of the information contained within this site.
A note to copyright holders
The Australian Light Horse Studies Centre has made every endeavour to contact copyright holders of material digitised for this blog and website and where
appropriate, permission is still being sought for these items. Where replies were not received, or where the copyright owner has not been able to be traced, or where
the permission is still being sought, the Australian Light Horse Studies Centre has decided, in good faith, to proceed with digitisation and publication. Australian Light
Horse Studies Centre would be happy to hear from copyright owners at any time to discuss usage of this item.