« April 2003 »
S M T W T F S
1 2 3 4 5
6 7 8 9 10 11 12
13 14 15 16 17 18 19
20 21 22 23 24 25 26
27 28 29 30
You are not logged in. Log in


Search the site:


powered by FreeFind
Volunteer with us.

Entries by Topic All topics  
A Latest Site News
A - Using the Site
AAA Volunteers
AAB-Education Centre
AAC-Film Clips
AAC-Photo Albums
AIF & MEF & EEF
AIF - Lighthorse
AIF - ALH - A to Z
AIF - DMC
AIF - DMC - Or Bat
AIF - DMC - Anzac MD
AIF - DMC - Aus MD
AIF - DMC - British
AIF - DMC - BWI
AIF - DMC - French
AIF - DMC - Indian
AIF - DMC - Italian
AIF - DMC - Medical
AIF - DMC - Remounts
AIF - DMC - Scouts
AIF - DMC - Sigs
AIF - DMC - Sigs AirlnS
AIF - DMC - 1 Sig Sqn
AIF - DMC - 2 Sig Sqn
AIF - DMC - Eng
AIF - DMC - Eng 1FSE
AIF - DMC - Eng 2FSE
AIF - DMC - GSR
AIF - 1B - 1 LHB
AIF - 1B - 6 MVS
AIF - 1B - 1 LHMGS
AIF - 1B - 1 Sig Trp
AIF - 1B - 1 LHFA
AIF - 1B - 1 LHR
AIF - 1B - 2 LHR
AIF - 1B - 3 LHR
AIF - 2B - 2 LHB
AIF - 2B - 7 MVS
AIF - 2B - 2 LHFA
AIF - 2B - 2 LHMGS
AIF - 2B - 2 Sig Trp
AIF - 2B - 5 LHR
AIF - 2B - 6 LHR
AIF - 2B - 7 LHR
AIF - 3B - 3 LHB
AIF - 3B - 8 MVS
AIF - 3B - 3 LHB Sigs
AIF - 3B - 3 LHFA
AIF - 3B - 3 LHMGS
AIF - 3B - 3 Sig Trp
AIF - 3B - 8 LHR
AIF - 3B - 9 LHR
AIF - 3B - 10 LHR
AIF - 4B - 4 LHB
AIF - 4B - 4 Sig Trp
AIF - 4B - 9 MVS
AIF - 4B - 4 LHFA
AIF - 4B - 4 LHMGS
AIF - 4B - 4 LHR
AIF - 4B - 11 LHR
AIF - 4B - 12 LHR
AIF - 5B - 5 LHB
AIF - 5B - 10 MVS
AIF - 5B - 5 LHFA
AIF - 5B - 5 Sig Trp
AIF - 5B - ICC
AIF - 5B - 14 LHR
AIF - 5B - 15 LHR
AIF - 5B - 1er Regt
AIF - 5B - 2 NZMGS
AIF - AASC
AIF - Aboriginal LH
AIF - Badges
AIF - Cars
AIF - Chinese LH
AIF - Double Sqns
AIF - Engineers
AIF - Fr - 22 Corps
AIF - Fr - 13 LHR
AIF - Honour Roll
AIF - HQ - 3rd Echelon
AIF - Marching Songs
AIF - Misc Topics
AIF - NZMRB
AIF - NZMRB - AMR
AIF - NZMRB - CMR
AIF - NZMRB - EFT
AIF - NZMRB - NZMFA
AIF - NZMRB - NZMGS
AIF - NZMRB - OMR
AIF - NZMRB - Sig-Trp
AIF - NZMRB - WMR
AIF - Ships
AIF - Ships - Encountr
AIF - Ships - Una
AIF - WFF
AIF - Wireless Sqn
Battles
BatzA - Australia
BatzA - Broken Hill
BatzA - Liverpool
BatzA - Merivale
BatzB - Boer War
BatzB - Bakenlaagte
BatzB - Belmont
BatzB - Bothaville
BatzB - Buffels Hoek
BatzB - Coetzees Drift
BatzB - Diamond Hill
BatzB - Driefontein
BatzB - Elands
BatzB - Graspan
BatzB - Grobelaar
BatzB - Grootvallier
BatzB - Hartebestfontn
BatzB - Houtnek
BatzB - Karee Siding
BatzB - Kimberley
BatzB - Koster River
BatzB - Leeuw Kop
BatzB - Mafeking
BatzB - Magersfontein
BatzB - Modder River
BatzB - Onverwacht
BatzB - Paardeberg
BatzB - Palmietfontein
BatzB - Pink Hill
BatzB - Poplar Grove
BatzB - Rhenoster
BatzB - Sannahs Post
BatzB - Slingersfontn
BatzB - Stinkhoutbm
BatzB - Sunnyside
BatzB - Wilmansrust
BatzB - Wolvekuil
BatzB - Zand River
BatzG - Gallipoli
BatzG - Anzac
BatzG - Aug 1915
BatzG - Baby 700
BatzG - Evacuation
BatzG - Hill 60
BatzG - Hill 971
BatzG - Krithia
BatzG - Lone Pine
BatzG - Nek
BatzJ - Jordan Valley
BatzJ - 1st Amman
BatzJ - 2nd Amman
BatzJ - Abu Tellul
BatzJ - Es Salt
BatzJ - JV Maps
BatzJ - Ziza
BatzM - Mespot
BatzM - Baghdad
BatzM - Ctesiphon
BatzM - Daur
BatzM - Kurna
BatzM - Kut el Amara
BatzM - Ramadi
BatzN - Naval
BatzN - AE1
BatzN - Cocos Is
BatzN - Heligoland
BatzN - Marmara
BatzN - Zeebrugge
BatzN - Zeppelin L43
BatzNG - Bitapaka
BatzO - Other
BatzO - Baku
BatzO - Egypt 1919
BatzO - Emptsa
BatzO - Karawaran
BatzO - Peitang
BatzO - Wassa
BatzP - Palestine
BatzP - 1st Gaza
BatzP - 2nd Gaza
BatzP - 3rd Gaza
BatzP - Aleppo
BatzP - Amwas
BatzP - Ayun Kara
BatzP - Bald Hill
BatzP - Balin
BatzP - Beersheba
BatzP - Berkusieh
BatzP - Damascus
BatzP - El Auja
BatzP - El Buggar
BatzP - El Burj
BatzP - Haifa
BatzP - Huj
BatzP - JB Yakub
BatzP - Kaukab
BatzP - Khan Kusseir
BatzP - Khuweilfe
BatzP - Kuneitra
BatzP - Megiddo
BatzP - Nablus
BatzP - Rafa
BatzP - Sasa
BatzP - Semakh
BatzP - Sheria
BatzP - Surafend
BatzP - Wadi Fara
BatzS - Sinai
BatzS - Bir el Abd
BatzS - El Arish
BatzS - El Mazar
BatzS - El Qatiya
BatzS - Jifjafa
BatzS - Magdhaba
BatzS - Maghara
BatzS - Romani
BatzS - Suez 1915
BatzSe - Senussi
BatzWF - Westn Front
BW - Boer War
BW - NSW
BW - NSW - 1ACH
BW - NSW - 1NSWMR
BW - NSW - 2NSWMR
BW - NSW - 3ACH
BW - NSW - 3NSWIB
BW - NSW - 3NSWMR
BW - NSW - 5ACH
BW - NSW - A Bty RAA
BW - NSW - AAMC
BW - NSW - Aust H
BW - NSW - Lancers
BW - NSW - NSW Inf
BW - NSW - NSWCBC
BW - NSW - NSWIB
BW - NSW - NSWMR_A
BW - NZ
BW - Qld
BW - Qld - 1ACH
BW - Qld - 1QMI
BW - Qld - 2QMI
BW - Qld - 3ACH
BW - Qld - 3QMI
BW - Qld - 4QIB
BW - Qld - 5QIB
BW - Qld - 6QIB
BW - Qld - 7ACH
BW - QLD - AAMC
BW - SA
BW - SA - 1SAMR
BW - SA - 2ACH
BW - SA - 2SAMR
BW - SA - 3SACB
BW - SA - 4ACH
BW - SA - 4SAIB
BW - SA - 5SAIB
BW - SA - 6SAIB
BW - SA - 8ACH
BW - SA - AAMC
BW - Tas
BW - Tas - 1ACH
BW - Tas - 1TIB
BW - Tas - 1TMI
BW - Tas - 2TB
BW - Tas - 2TIB
BW - Tas - 3ACH
BW - Tas - 8ACH
BW - Vic
BW - Vic - 1VMI
BW - Vic - 2ACH
BW - Vic - 2VMR
BW - Vic - 3VB
BW - Vic - 4ACH
BW - Vic - 4VIB
BW - Vic - 5VMR
BW - Vic - 6ACH
BW - Vic - AAMC
BW - Vic - Scot H
BW - WA
BW - WA - 1WAMI
BW - WA - 2ACH
BW - WA - 2WAMI
BW - WA - 3WAB
BW - WA - 4ACH
BW - WA - 4WAMI
BW - WA - 5WAMI
BW - WA - 6WAMI
BW - WA - 8ACH
BW Gen - Campaign
BW Gen - Soldiers
BW General
Cavalry - General
Diary - Schramm
Egypt - Heliopolis
Egypt - Mena
Gen - Ataturk Pk, CNB
Gen - Australia
Gen - Legends
Gen - Query Club
Gen - St - NSW
Gen - St - Qld
Gen - St - SA
Gen - St - Tas
Gen - St - Vic
Gen - St - WA
Gm - German Items
Gm - Bk - 605 MGC
GW - 11 Nov 1918
GW - Atrocities
GW - August 1914
GW - Biographies
GW - Propaganda
GW - Spies
GW - We forgot
Militia 1899-1920
Militia - Area Officers
Militia - Inf - Infantry
Militia - Inf - 1IB
Militia - Inf - 2IB
Militia - Inf - 3IB
Militia - Inf - NSW
Militia - Inf - Qld
Militia - Inf - SA
Militia - Inf - Tas
Militia - Inf - Vic
Militia - Inf - WA
Militia - K.E.Horse
Militia - LH
Militia - LH - Regts
Militia - LH - 1LHB
Militia - LH - 2LHB
Militia - LH - 3LHB
Militia - LH - 4LHB
Militia - LH - 5LHB
Militia - LH - 6LHB
Militia - LHN - NSW
Militia - LHN - 1/7/1
Militia - LHN - 2/9/6
Militia - LHN - 3/11/7
Militia - LHN - 4/6/16
Militia - LHN - 5/4/15
Militia - LHN - 6/5/12
Militia - LHN - 28
Militia - LHQ - Qld
Militia - LHQ - 13/2
Militia - LHQ - 14/3/11
Militia - LHQ - 15/1/5
Militia - LHQ - 27/14
Militia - LHS - SA
Militia - LHS - 16/22/3
Militia - LHS - 17/23/18
Militia - LHS - 24/9
Militia - LHT - Tas
Militia - LHT - 12/26
Militia - LHV - Vic
Militia - LHV - 7/15/20
Militia - LHV - 8/16/8
Militia - LHV - 9/19
Militia - LHV - 10/13
Militia - LHV - 11/20/4
Militia - LHV - 19/17
Militia - LHV - 29
Militia - LHW - WA
Militia - LHW-18/25/10
Militia - Military Orders
Militia - Misc
MilitiaRC - Rifle Clubs
MilitiaRC - NSW
MilitiaRC - NT
MilitiaRC - Qld
MilitiaRC - SA
MilitiaRC - Tas
MilitiaRC - Vic
MilitiaRC - WA
Militiaz - New Zealand
Tk - Turkish Items
Tk - Army
Tk - Bks - Books
Tk - Bks - 1/33IR
Tk - Bks - 27th IR
Tk - Bks - Air Force
Tk - Bks - Yildirim
Tk - POWs
Wp - Weapons
Wp - Hotchkiss Cav
Wp - Hotchkiss PMG
Blog Tools
Edit your Blog
Build a Blog
RSS Feed
View Profile
Open Community
Post to this Blog
Site Index
Education Centre
LH Militia
Boer War
Transport Ships
LH Battles
ALH - Units
ALH - General
Aboriginal Light H
Weapons
Ottoman Sources

"At a mile distant their thousand hooves were stuttering thunder, coming at a rate that frightened a man - they were an awe inspiring sight, galloping through the red haze - knee to knee and horse to horse - the dying sun glinting on bayonet points..." Trooper Ion Idriess

The Australian Light Horse Studies Centre aims to present an accurate history as chroniclers of early Australian military developments from 1899 to 1920.

The Australian Light Horse Studies Centre site holds over 12,000 entries and is growing daily.

Contact: Australian Light Horse Studies Centre

Let us hear your story: You can tell your story, make a comment or ask for help on our Australian Light Horse Studies Centre Forum called:

Desert Column Forum

WARNING: This site contains: names, information and images of deceased people; and, language which may be considered inappropriate today.

Wednesday, 9 April 2003
3rd West Australian Bushmen, Outline
Topic: BW - WA - 3WAB

3rd WAB

3rd West Australian Bushmen

Outline


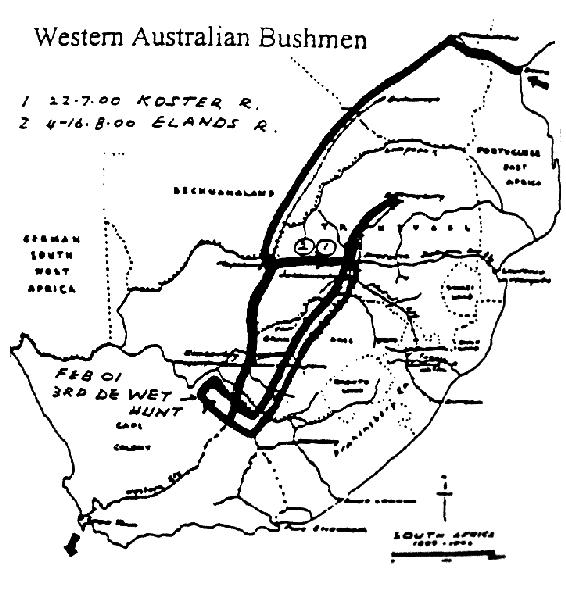
Map illustrating the activities of the 3rd West Australian Bushmen in South Africa, 1900-1901.

[From: Chamberlain, M., The Australians in the South African War 1899-1902, Canberra, 1999.]


In 1911, Lieutenant-Colonel P. L. Murray, produced a marvellous Boer War reference detailing all the contingents sent from Australia to South Africa, giving a brief history of the formation and finally, listing all the soldiers who saw service in South Africa with that unit. The book was called, Official Records of the Australian Military Contingents to the War in South Africa. It is now the standard reference and starting place for any person interested in pursuing information about Australian involvement in the Boer War.

Murray, P. L., Official Records of the Australian Military Contingents to the War in South Africa, pp. 408 - 410.


Third (Bushmen’s) Contingent.

Western Australian Government Gazette, of 16th February, 1900, contained

a General Order to the effect that the Government had sanctioned a further increase in the establishment of the Mounted Infantry Corps by 125 of all ranks. Pay, clothing, equipment, &c., as for previous Contingents.

It was notified that members of the Bushmen's Company who might provide their own horses and saddles, if passed fit for service by the military authorities, would be granted a sum of £16 as compensation, and a refund of any rail freight that might have been paid in bringing such horses to Perth. At the termination of hostilities, if the horses were sold, any excess over £15 obtained by such sale, would be given to the owner.

The same announcement was made in regard to pensions, etc., as previously (aide tad contingent).

Each man enlisted was required to be in possession of a certificate from a Committee appointed by the government as expert judges of the qualifications of an Australian bushman.


Departure and Return

The Contingent left on 13th March, 1900, with 7 officers, 109 others, and 397 horses. Four died or ware killed ; 6 officers, 13 others, were struck off in South Africa ; 2 officers, 91 others returned to Australia (1 officer promoted from ranks); 2 man died after return) ; 2 officers appointed to Imperial service.


Promotions, Etc.

Captain H. G. Vialls, to Major, 13th February, 1900; to Lieut.-Colonel (local rank in South Africa).

Lieutenant A. F. Thunder, to Captain, 8th May, 1901; posted to 6th Contingent.

Captain (Medical Staff) F. J. Ingoldby, to Major, 12th December, 1900. Company Sergeant-Major S. J. Chipper, to Lieutenant and Quartermaster, 18th June, 1900.

Private B. H. Andrews became Lieutenant and Quartermaster, 2nd Australian Commonwealth Horse, 11th February, 1902.

Private P. P. Strickland, to Lieutenant, 4th Australian Commonwealth Horse, 27th March, 1902.

Lieutenant R, R. C. Vernon accepted commission in City of London Regiment, 19th May, 1900.

Lieutenant M. R, P. Gledhill was commissioned in Lancashire Fusiliers, 39th May, 1900.

For promotions of N.C.O.'s and men, vide nominal roll.


Service.

The 3rd Company of Western Australian Mounted Infantry for the war, left Fremantle on 13th March, I900, in the transport Maplemore, and arrived at Beira on the 18th April. The Contingents which landed at Beira were divided into regiments as follows:- 1st Regiment, New South Wales; 2nd Regiment, Victorians sad Western Australians; 3rd Regiment, Queenslanders. But the Victorian and Western Australian Regiment was more generally designated the “3rd Bushmen." The different corps were very much mixed up before they had gone far into the Transvaal.

The 3rd Western Australians formed part of the force-of Bushmen which, under General Carrington, crossed Rhodesia and entered the Transvaal from Mafeking. They wowed in the first instance with General Carrington's Column through Rhodesia, until after the relief of Eland's River; afterwards with lord Methuen's Column, and subsequently with General Plumer's Force,

The Contingent, small as it was, was split up; but saw a great deal of fighting throughout July, August, and September, 1900, in the district between Mafeking in the west, and Warmbad, north of Pretoria, in the east. At Kostsr's River (19th, 21st, 22nd July) there was a prolonged engagement in which parties from the different Australian Colonies took a large share. The 3rd Western Australians, with a strength of about 70, had Captain (Medical Staff) F. T. lngoldby, and several others wounded. They were associated with the 3rd Victorians ; and, as before stated, formed the 3rd (sometimes called the 2nd) Regiment of Australian Bushmen.

A few Western Australians, acting under Captain Ham, 3rd Victorians, were in the Australian garrison which made a stiff defence at Eland's River in the Rustenburg district, 4th to 16th August. (Vide Now South Wales Citizen’s Bushmen, p. 73, and 3rd Queensland Contingent.) Another small detachment were with General Carrington, when he attempted to effect Hore's relief from the west; while the first troops to march into the place as the advanced scouts of Lord Kitchener's force, which relieved the garrison from the south-east, were men of the 1st Western Australians.

During the last few months of 1900, and up to April, 1901, the 3rd, as part of the 3rd Australian Bushmen with General Plumer's Force, saw much fighting in many parts of the seat of war; and, under the fine leadership of Major Vialls, always did well.

Received from Lord Roberts, 3rd December, 1900:

“Lord Kitchener informs me that General Paget has brought to his notice the great gallantry of Major Vialls, 3rd Western Australians, and of the magnificent behaviour of that regiment in a recent engagement. I offer to their relations and to the colony generally, my most hearty congratulations."


Captain Hurst remained in South Africa after the return of his Contingent to Australia. While attached to “G" Battery Royal Horse Artillery, then converted into Mounted Rifles, he was severely wounded in action at Boochbult, Western Transvaal, Slat March, 1902.

The 3rd left Cape Town on 9th May, 1901, in the transport Morayshire, and arrived in Fremantle on the 28th,

Disbanded, 18th August, 1901.


War Services and Honours.

Vialls, Lieut.-Colonel HG.- Operations in Rhodesia, Transvaal, orange River Colony, and Cape Colony, between April, 1900, and April, 1901. Despatches, London Gazette, 19th April, 1901. C.B. Queen's Medal with four clasps.

Hurst, Captain H. R.-Operations as stated. Served until the end of war. Action at Rhenoster Kop, special mention in Commanding Officer's despatches, 19th November, 1900. Queen's Medal with four clasps, Kings Medal with two clasps.

Vernon, Lieutenant R. R. C.-Operations as stated. Despatches, London Gazette, 19th April, 1901. D.S.O. Queen's Medal with four clasps.

Chipper, Lieut.-Quartermaster S. J. - Was present during operations in Rhodesia, and renewed Queen's Medal with two clasps.

Ingoldby, Major (Medical Staff) F. J. - Operations in Rhodesia and Transvaal. Despatches, London Gazette, 17th June, 1902. Queen's Medal with two clasps.

Lieutenants C. H. Ord, A. F. Thunder, and M. R. P. W: Gledhill were present during all, or portions of, operations stated, and received Queen's Medal with clasps. Lieutenant Ord was mentioned in despatches, London Gazette 10th September,1901.


Further Reading:

3rd West Australian Bushmen

3rd West Australian Bushmen, Roll of Honour 

Boer War, 1899 - 1902

Battles where Australians fought, 1899-1920


Citation: 3rd West Australian Bushmen, Outline

Posted by Project Leader at 12:01 AM EADT
Updated: Saturday, 1 May 2010 1:41 PM EADT
Tuesday, 8 April 2003
3rd West Australian Bushmen, Nominal Roll
Topic: BW - WA - 3WAB

3rd WAB

3rd West Australian Bushmen

Nominal Roll


In 1911, Lieutenant-Colonel P. L. Murray, produced a marvellous Boer War reference detailing all the contingents sent from Australia to South Africa, giving a brief history of the formation and finally, listing all the soldiers who saw service in South Africa with that unit. The book was called, Official Records of the Australian Military Contingents to the War in South Africa. It is now the standard reference and starting place for any person interested in pursuing information about Australian involvement in the Boer War.

Murray, P. L., Official Records of the Australian Military Contingents to the War in South Africa, pp. 410 - 412.


3rd West Australian Bushmen


17 Corporal Frank Gustavus ALNUTT

45 Private William ANDERSON

100 Private Benjamin Henry ANDREWS

105 Private Thomas Hotspur ANGEL

 
24 Private Alfred Warner BISHOP

53 Corporal Alexander BLACK

93 Private Richard BOLITHO

92 Private William E BUCKNELL

21 Lance Corporal Arthur Benjamin BUNNING

58 Private Charles BURROWS

66 Private Thomas George BURROWS

40 Private William BUSHBY

109 Private Thomas James BYRNE

 
71 Private Charles James CARROLL

Sergeant Major Stephen James CHIPPER

43 Private William Alfred CLAIR

108 Private George Henry COATMAN

57 Private James Edward COFFIN

47 Private John Patrick COTTER

7 Private Robert COWAN

5 Private William David COWLEY

15 Private Edmund COX

33 Private Philip CRAGG

74 Private William Henry CROSS

 
37 Private Alfred DAVIDSON

38 Farrier Sergeant George DAY

9 Corporal Arthur Robert DEIGHTON

18 Private Gilbert DEVENEY

23 Lance Corporal Alexander DRUMMOND

102 Trumpeter Ernest Frederick DYMOCK

 
44 Corporal Bertram James FORBES

39 Private Allen FULLARTON

 
66 Corporal William Augustus GEORGE

97 Private Edward William GILLILAND

Lieutenant Major Reginald Percy William GLEDHILL

76 Private George Augustus GLEN

68 Corporal Lionel GOULY

72 Private Arthur Ellis Wrixon GREESON

19 Private Richard A GRIFFITH

 
62 Private Ernest William HALL

95 Private Henry HALL

76 Private Edgar Anthony HAMBLY

31 Private Edward James HARDY

Private CR HASSELL

104 Private Charles Richard HAZELL

61 Private Joseph Hatchell HOGARTH

88 Private Hubert Edward HOOLEY

82 Private James HUME

Captain Howard Edwin HURST

 
Captain Frederick John INGOLDBY

 
96 Private Frederick JACKSON

107 Private Arthur Thomas JONES

73 Private George JONES

6 Private William Oliver JONES

99 Private Edward KEENAN

 
11 Private William LAIDLOW

12 Private Sydney LEE

52 Private Joseph LEESON

59 Private de Courcy Gerald LEFROY

83 Private Dugald LEITCH

90 Private Robert Clarke LESLIE

106 Private John LINDSAY

85 Private Charles Allen LYON

 
77 Private William MAHOOD

3 Sergeant Norman Maxwell MALCOLM

70 Private John MANNERS

63 Farrier Frederick Gibson MANNING

49 Private Albert Edward MARTIN

60 Private John Fowley MCDONALD

91 Private Arthur MCKAY

10 Lance Corporal John Alexander Nicholl MCLEOD

22 Private Michael MCMAHON

41 Private Robert John MCMANUS

30 Private Robert H MCMURTRIE

28 Private Hector H MCPHEE

67 Private William John MCPHEE

26 Corporal William Wigmore MONGER

103 Trumpeter Wilfred MORTON

13 Private James MUIRHEAD

 
35 Sergeant Edward NAIRN

84 Private Hedley Tresawna NICHOLLS

93 Private Robert NUGENT

 
8 Private Frank James O'DONNELL

51 Private George William O'HERN

Lieutenant Craven Harry ORD

80 Private Michael Joseph O'SULLIVAN

 
42 Private Frederick George PARTRIDGE

24 Sergeant Richard Henry PILMER

27 Private Richard Lionel PREENE

 
16 Private John RALPH

64 Corporal Arthur RICHARDSON

89 Corporal John Hamilton ROLLINGS

81 Private John ROSCOE

 
14 Private George Albert SAUNDERS

20 Private Jeremiah SCOTT

4 Corporal Michael James SHEA

69 Private Sydney Howard SINCLAIR

32 Private Alexander Robert SMITH

46 Private Walter Jackson SMITH

29 Private Ernest Hubert STEPHENS

55 Private Tom STIRLING

79 Private Frederick Philip STRICKLAND

 
2 Private Alfred A THOMAS

94 Private William Morris THOMAS

78 Private William THOMPSON

Lieutenant AF THUNDER

86 Private Mark TRAVERS

48 Private Harry Edward Moore TULLY

 
Lieutenant Rupert R Charles VERNON

Captain Harry George VIALLS

 
101 Trumpeter William WALLIS

87 Private Herbert WARE

50 Private Edmund Hebblewhite WATKIN

110 Private Alexander Patrick WHITE

34 Private Henry WHITE

25 Private Richard Corke WILD

36 Private James Henry WILSON


Further Reading:

3rd West Australian Bushmen

3rd West Australian Bushmen, Roll of Honour 

Boer War, 1899 - 1902

Battles where Australians fought, 1899-1920


Citation: 3rd West Australian Bushmen, Nominal Roll

Posted by Project Leader at 12:01 AM EADT
Updated: Saturday, 1 May 2010 9:14 AM EADT
Monday, 7 April 2003
Boer War, 1899 - 1902, Australian Forces, 3rd West Australian Bushmen, Roll of Honour
Topic: BW - WA - 3WAB

Boer War, 1899 - 1902

Australian Forces

Roll of Honour

3rd West Australian Bushmen


Poppies on the Roll of Honour, Australian War Memorial, Canberra


The Roll of Honour contains the names of all the men known to have served at one time with the 3rd West Australian Imperial Bushmen and gave their lives in service of Australia, whether as part of the 3rd West Australian Imperial Bushmen or another unit during the Boer War.


Roll of Honour


Thomas Hotspur ANGEL


Edgar Anthony HAMBLY

James HUME


William John MCPHEE


John ROSCOE


Henry WHITE


Lest we forget


Further Reading:

3rd West Australian Bushmen

Boer War, 1899 - 1902

Battles where Australians fought, 1899-1920


Citation: Boer War, 1899 - 1902, Australian Forces, 3rd West Australian Bushmen, Roll of Honour

Posted by Project Leader at 12:01 AM EADT
Updated: Saturday, 1 May 2010 1:58 PM EADT
Sunday, 30 March 2003
4th Australian Commonwealth Horse, West Australia, Contents
Topic: BW - WA - 4ACH

4th ACH (WA)

4th Australian Commonwealth Horse, West Australia

Contents


Items

Outline

4th Australian Commonwealth Horse, West Australia, Outline

Nominal Roll

4th Australian Commonwealth Horse, West Australia, Nominal Roll


Roll of Honour

No 4th Australian Commonwealth Horse, West Australia, casualties.

Lest we forget


Further Reading:

4th Australian Commonwealth Horse, West Australia

Boer War, 1899 - 1902

Battles where Australians fought, 1899-1920


Citation: 4th Australian Commonwealth Horse, West Australia, Contents

Posted by Project Leader at 12:01 AM EAST
Updated: Sunday, 2 May 2010 4:57 PM EADT
Saturday, 29 March 2003
4th Australian Commonwealth Horse, West Australia, Outline
Topic: BW - WA - 4ACH

4th ACH (WA)

4th Australian Commonwealth Horse, West Australia

Outline


Map illustrating the activities of the Australian Commonwealth Horse in South Africa, 1902.

[From: Chamberlain, M., The Australians in the South African War 1899-1902, Canberra, 1999.]


In 1911, Lieutenant-Colonel P. L. Murray, produced a marvellous Boer War reference detailing all the contingents sent from Australia to South Africa, giving a brief history of the formation and finally, listing all the soldiers who saw service in South Africa with that unit. The book was called, Official Records of the Australian Military Contingents to the War in South Africa. It is now the standard reference and starting place for any person interested in pursuing information about Australian involvement in the Boer War.

Murray, P. L., Official Records of the Australian Military Contingents to the War in South Africa, p. 434.


Fourth Battalion Australian Commonwealth Horse. 
 
Western Australian Unit.

Constituted “D” Company of the 4th Battalion Australian Commonwealth Horse; "A”, and “B" Companies being Victorians, and “C" Company, South Australians.

For details of pay, establishment, clothing, equipment, &c., vide 2nd Battalion, Australian Commonwealth Horse, Victoria.


Pay.

Up to date of embarkation, this was at Imperial cavalry rates. After embarkation as follows:

Colonel or lieut.-colonel, £1 5s. per diem, with 4s. field allowance; major, £1 3s., and 4s.; captain, £1 1s., and 3s.; lieutenant, 15s., and 2s. 6d.; adjutant, as for captain or lieutenant, according to rank; quartermaster, as for captain; paymaster, if captain, same; medical officer, £1, and 3s., veterinary officer, £l, and 3s.; chaplain, £1 1s., and 3s.; regimental sergeant-major, 9s.; quartermaster-sergeant, 8s. 8d.; farrier-sergeant, 8s. 6d.; farrier staff sergeant, 8s. 8d.; company sergeant major, 8s.; company quartermaster-sergeant, 8s; sergeants, 7s.; corporals (if paid lance-sergeants), 6s. 6d.; corporals and paid lance-corporals, 6s.; buglers, 6s.; privates, 5s. N.C. officers not above the rank of sergeant, acting as farrier sergeant, or farrier staff-sergeant, and privates, acting as buglers, saddlers, or shoeing-smiths, 1s. per diem extra.

Officers were allowed £30 to provide equipment, &c.

For service, vide 4th Battalion, Australian Commonwealth Horse, Victoria. Two of the Company officers had served previously (vide nominal roll); the others obtained the Queen's Medal with two clasps.

There were no casualties. For promotions, vide nominal roll. A proportion of N.C.O.'s and men had had previous service.

 
Departure and Return.

The Company was divided and embarked in two transports, the Templemore (which carried the Victorian and South Australian units and staff), and the Englishman. Strength - 5 officers and 115 others, with 122 horses. Embarked on 7th April at Fremantle. One officer, 47 others were struck off in South Africa; 4 officers, 69 others returned to Australia. Embarked on 11th July, in the transport, Drayton Grange, and arrived at Albany on 30th July.


Further Reading:

4th Australian Commonwealth Horse, West Australia

Boer War, 1899 - 1902


Posted by Project Leader at 12:01 AM EAST
Updated: Sunday, 2 May 2010 4:10 PM EADT

Newer | Latest | Older

Full Site Index


powered by FreeFind
Let us hear your story: You can tell your story, make a comment or ask for help on our forum.

Desert Column Forum

A note on copyright

The Australian Light Horse Studies Centre is a not for profit and non profit group whose sole aim is to write the early history of the Australian Light Horse from 1900 - 1920. It is privately funded and the information is provided by the individuals within the group and while permission for the use of the material has been given for this site for these items by various donors, the residual and actual copyright for these items, should there be any, resides exclusively with the donors. The information on this site is freely available for private research use only and if used as such, should be appropriately acknowledged. To assist in this process, each item has a citation attached at the bottom for referencing purposes.

Please Note: No express or implied permission is given for commercial use of the information contained within this site.

A note to copyright holders

The Australian Light Horse Studies Centre has made every endeavour to contact copyright holders of material digitised for this blog and website and where appropriate, permission is still being sought for these items. Where replies were not received, or where the copyright owner has not been able to be traced, or where the permission is still being sought, the Australian Light Horse Studies Centre has decided, in good faith, to proceed with digitisation and publication. Australian Light Horse Studies Centre would be happy to hear from copyright owners at any time to discuss usage of this item.

Contact

Australian Light Horse Studies Centre

eXTReMe Tracker