« July 2004 »
S M T W T F S
1 2 3
4 5 6 7 8 9 10
11 12 13 14 15 16 17
18 19 20 21 22 23 24
25 26 27 28 29 30 31
You are not logged in. Log in


Search the site:


powered by FreeFind
Volunteer with us.

Entries by Topic All topics
A Latest Site News
A - Using the Site
AAA Volunteers
AAB-Education Centre
AAC-Film Clips
AAC-Photo Albums
AIF & MEF & EEF
AIF - Lighthorse
AIF - ALH - A to Z
AIF - DMC
AIF - DMC - Or Bat
AIF - DMC - Anzac MD
AIF - DMC - Aus MD
AIF - DMC - British
AIF - DMC - BWI
AIF - DMC - French
AIF - DMC - Indian
AIF - DMC - Italian
AIF - DMC - Medical
AIF - DMC - Remounts
AIF - DMC - Scouts
AIF - DMC - Sigs
AIF - DMC - Sigs AirlnS
AIF - DMC - 1 Sig Sqn
AIF - DMC - 2 Sig Sqn
AIF - DMC - Eng
AIF - DMC - Eng 1FSE
AIF - DMC - Eng 2FSE
AIF - DMC - GSR
AIF - 1B - 1 LHB
AIF - 1B - 6 MVS
AIF - 1B - 1 LHMGS
AIF - 1B - 1 Sig Trp
AIF - 1B - 1 LHFA
AIF - 1B - 1 LHR
AIF - 1B - 2 LHR
AIF - 1B - 3 LHR
AIF - 2B - 2 LHB
AIF - 2B - 7 MVS
AIF - 2B - 2 LHFA
AIF - 2B - 2 LHMGS
AIF - 2B - 2 Sig Trp
AIF - 2B - 5 LHR
AIF - 2B - 6 LHR
AIF - 2B - 7 LHR
AIF - 3B - 3 LHB
AIF - 3B - 8 MVS
AIF - 3B - 3 LHB Sigs
AIF - 3B - 3 LHFA
AIF - 3B - 3 LHMGS
AIF - 3B - 3 Sig Trp
AIF - 3B - 8 LHR
AIF - 3B - 9 LHR
AIF - 3B - 10 LHR
AIF - 4B - 4 LHB
AIF - 4B - 4 Sig Trp
AIF - 4B - 9 MVS
AIF - 4B - 4 LHFA
AIF - 4B - 4 LHMGS
AIF - 4B - 4 LHR
AIF - 4B - 11 LHR
AIF - 4B - 12 LHR
AIF - 5B - 5 LHB
AIF - 5B - 10 MVS
AIF - 5B - 5 LHFA
AIF - 5B - 5 Sig Trp
AIF - 5B - ICC
AIF - 5B - 14 LHR
AIF - 5B - 15 LHR
AIF - 5B - 1er Regt
AIF - 5B - 2 NZMGS
AIF - AASC
AIF - Aboriginal LH
AIF - Badges
AIF - Cars
AIF - Chinese LH
AIF - Double Sqns
AIF - Engineers
AIF - Fr - 22 Corps
AIF - Fr - 13 LHR
AIF - Honour Roll
AIF - HQ - 3rd Echelon
AIF - Marching Songs
AIF - Misc Topics
AIF - NZMRB
AIF - NZMRB - AMR
AIF - NZMRB - CMR
AIF - NZMRB - EFT
AIF - NZMRB - NZMFA
AIF - NZMRB - NZMGS
AIF - NZMRB - OMR
AIF - NZMRB - Sig-Trp
AIF - NZMRB - WMR
AIF - Ships
AIF - Ships - Encountr
AIF - Ships - Una
AIF - WFF
AIF - Wireless Sqn
Battles
BatzA - Australia
BatzA - Broken Hill
BatzA - Liverpool
BatzA - Merivale
BatzB - Boer War
BatzB - Bakenlaagte
BatzB - Belmont
BatzB - Bothaville
BatzB - Buffels Hoek
BatzB - Coetzees Drift
BatzB - Diamond Hill
BatzB - Driefontein
BatzB - Elands
BatzB - Graspan
BatzB - Grobelaar
BatzB - Grootvallier
BatzB - Hartebestfontn
BatzB - Houtnek
BatzB - Karee Siding
BatzB - Kimberley
BatzB - Koster River
BatzB - Leeuw Kop
BatzB - Mafeking
BatzB - Magersfontein
BatzB - Modder River
BatzB - Onverwacht
BatzB - Paardeberg
BatzB - Palmietfontein
BatzB - Pink Hill
BatzB - Poplar Grove
BatzB - Rhenoster
BatzB - Sannahs Post
BatzB - Slingersfontn
BatzB - Stinkhoutbm
BatzB - Sunnyside
BatzB - Wilmansrust
BatzB - Wolvekuil
BatzB - Zand River
BatzG - Gallipoli
BatzG - Anzac
BatzG - Aug 1915
BatzG - Baby 700
BatzG - Evacuation
BatzG - Hill 60
BatzG - Hill 971
BatzG - Krithia
BatzG - Lone Pine
BatzG - Nek
BatzJ - Jordan Valley
BatzJ - 1st Amman
BatzJ - 2nd Amman
BatzJ - Abu Tellul
BatzJ - Es Salt
BatzJ - JV Maps
BatzJ - Ziza
BatzM - Mespot
BatzM - Baghdad
BatzM - Ctesiphon
BatzM - Daur
BatzM - Kurna
BatzM - Kut el Amara
BatzM - Ramadi
BatzN - Naval
BatzN - AE1
BatzN - Cocos Is
BatzN - Heligoland
BatzN - Marmara
BatzN - Zeebrugge
BatzN - Zeppelin L43
BatzNG - Bitapaka
BatzO - Other
BatzO - Baku
BatzO - Egypt 1919
BatzO - Emptsa
BatzO - Karawaran
BatzO - Peitang
BatzO - Wassa
BatzP - Palestine
BatzP - 1st Gaza
BatzP - 2nd Gaza
BatzP - 3rd Gaza
BatzP - Aleppo
BatzP - Amwas
BatzP - Ayun Kara
BatzP - Bald Hill
BatzP - Balin
BatzP - Beersheba
BatzP - Berkusieh
BatzP - Damascus
BatzP - El Auja
BatzP - El Buggar
BatzP - El Burj
BatzP - Haifa
BatzP - Huj
BatzP - JB Yakub
BatzP - Kaukab
BatzP - Khan Kusseir
BatzP - Khuweilfe
BatzP - Kuneitra
BatzP - Megiddo
BatzP - Nablus
BatzP - Rafa
BatzP - Sasa
BatzP - Semakh
BatzP - Sheria
BatzP - Surafend
BatzP - Wadi Fara
BatzS - Sinai
BatzS - Bir el Abd
BatzS - El Arish
BatzS - El Mazar
BatzS - El Qatiya
BatzS - Jifjafa
BatzS - Magdhaba
BatzS - Maghara
BatzS - Romani
BatzS - Suez 1915
BatzSe - Senussi
BatzWF - Westn Front
BW - Boer War
BW - NSW
BW - NSW - 1ACH
BW - NSW - 1NSWMR
BW - NSW - 2NSWMR
BW - NSW - 3ACH
BW - NSW - 3NSWIB
BW - NSW - 3NSWMR
BW - NSW - 5ACH
BW - NSW - A Bty RAA
BW - NSW - AAMC
BW - NSW - Aust H
BW - NSW - Lancers
BW - NSW - NSW Inf
BW - NSW - NSWCBC
BW - NSW - NSWIB
BW - NSW - NSWMR_A
BW - NZ
BW - Qld
BW - Qld - 1ACH
BW - Qld - 1QMI
BW - Qld - 2QMI
BW - Qld - 3ACH
BW - Qld - 3QMI
BW - Qld - 4QIB
BW - Qld - 5QIB
BW - Qld - 6QIB
BW - Qld - 7ACH
BW - QLD - AAMC
BW - SA
BW - SA - 1SAMR
BW - SA - 2ACH
BW - SA - 2SAMR
BW - SA - 3SACB
BW - SA - 4ACH
BW - SA - 4SAIB
BW - SA - 5SAIB
BW - SA - 6SAIB
BW - SA - 8ACH
BW - SA - AAMC
BW - Tas
BW - Tas - 1ACH
BW - Tas - 1TIB
BW - Tas - 1TMI
BW - Tas - 2TB
BW - Tas - 2TIB
BW - Tas - 3ACH
BW - Tas - 8ACH
BW - Vic
BW - Vic - 1VMI
BW - Vic - 2ACH
BW - Vic - 2VMR
BW - Vic - 3VB
BW - Vic - 4ACH
BW - Vic - 4VIB
BW - Vic - 5VMR
BW - Vic - 6ACH
BW - Vic - AAMC
BW - Vic - Scot H
BW - WA
BW - WA - 1WAMI
BW - WA - 2ACH
BW - WA - 2WAMI
BW - WA - 3WAB
BW - WA - 4ACH
BW - WA - 4WAMI
BW - WA - 5WAMI
BW - WA - 6WAMI
BW - WA - 8ACH
BW Gen - Campaign
BW Gen - Soldiers
BW General
Cavalry - General
Diary - Schramm
Egypt - Heliopolis
Egypt - Mena
Gen - Ataturk Pk, CNB
Gen - Australia
Gen - Legends
Gen - Query Club
Gen - St - NSW
Gen - St - Qld
Gen - St - SA
Gen - St - Tas
Gen - St - Vic
Gen - St - WA
Gm - German Items
Gm - Bk - 605 MGC
GW - 11 Nov 1918
GW - Atrocities
GW - August 1914
GW - Biographies
GW - Propaganda
GW - Spies
GW - We forgot
Militia 1899-1920
Militia - Area Officers
Militia - Inf - Infantry
Militia - Inf - 1IB
Militia - Inf - 2IB
Militia - Inf - 3IB
Militia - Inf - NSW
Militia - Inf - Qld
Militia - Inf - SA
Militia - Inf - Tas
Militia - Inf - Vic
Militia - Inf - WA
Militia - K.E.Horse
Militia - LH
Militia - LH - Regts
Militia - LH - 1LHB
Militia - LH - 2LHB
Militia - LH - 3LHB
Militia - LH - 4LHB
Militia - LH - 5LHB
Militia - LH - 6LHB
Militia - LHN - NSW
Militia - LHN - 1/7/1
Militia - LHN - 2/9/6
Militia - LHN - 3/11/7
Militia - LHN - 4/6/16
Militia - LHN - 5/4/15
Militia - LHN - 6/5/12
Militia - LHN - 28
Militia - LHQ - Qld  
Militia - LHQ - 13/2
Militia - LHQ - 14/3/11
Militia - LHQ - 15/1/5
Militia - LHQ - 27/14
Militia - LHS - SA
Militia - LHS - 16/22/3
Militia - LHS - 17/23/18
Militia - LHS - 24/9
Militia - LHT - Tas
Militia - LHT - 12/26
Militia - LHV - Vic
Militia - LHV - 7/15/20
Militia - LHV - 8/16/8
Militia - LHV - 9/19
Militia - LHV - 10/13
Militia - LHV - 11/20/4
Militia - LHV - 19/17
Militia - LHV - 29
Militia - LHW - WA
Militia - LHW-18/25/10
Militia - Military Orders
Militia - Misc
MilitiaRC - Rifle Clubs
MilitiaRC - NSW
MilitiaRC - NT
MilitiaRC - Qld
MilitiaRC - SA
MilitiaRC - Tas
MilitiaRC - Vic
MilitiaRC - WA
Militiaz - New Zealand
Tk - Turkish Items
Tk - Army
Tk - Bks - Books
Tk - Bks - 1/33IR
Tk - Bks - 27th IR
Tk - Bks - Air Force
Tk - Bks - Yildirim
Tk - POWs
Wp - Weapons
Wp - Hotchkiss Cav
Wp - Hotchkiss PMG
Blog Tools
Edit your Blog
Build a Blog
RSS Feed
View Profile
Open Community
Post to this Blog
Site Index
Education Centre
LH Militia
Boer War
Transport Ships
LH Battles
ALH - Units
ALH - General
Aboriginal Light H
Weapons
Ottoman Sources

"At a mile distant their thousand hooves were stuttering thunder, coming at a rate that frightened a man - they were an awe inspiring sight, galloping through the red haze - knee to knee and horse to horse - the dying sun glinting on bayonet points..." Trooper Ion Idriess

The Australian Light Horse Studies Centre aims to present an accurate history as chroniclers of early Australian military developments from 1899 to 1920.

The Australian Light Horse Studies Centre site holds over 12,000 entries and is growing daily.

Contact: Australian Light Horse Studies Centre

Let us hear your story: You can tell your story, make a comment or ask for help on our Australian Light Horse Studies Centre Forum called:

Desert Column Forum

WARNING: This site contains: names, information and images of deceased people; and, language which may be considered inappropriate today.

Saturday, 24 July 2004
Queensland Mounted Infantry, Outline, Part 2
Topic: Militia - LHQ - Qld

QMI

Queensland Mounted Infantry

Outline, Part 2

Forward

March: Soldiers of the Queen

 South Africa 1899 - 1902

Allied with: King Edward's Horse (The King's Oversea Dominions Regiment).


The following outline of the Queensland Mounted Infantry is extracted from a book written by Joan Starr called Forward: the history of the 2nd / 14th Light Horse (Queensland Mounted Infantry), published Queensland, 1989. This section comes from pp. 4 - 9:


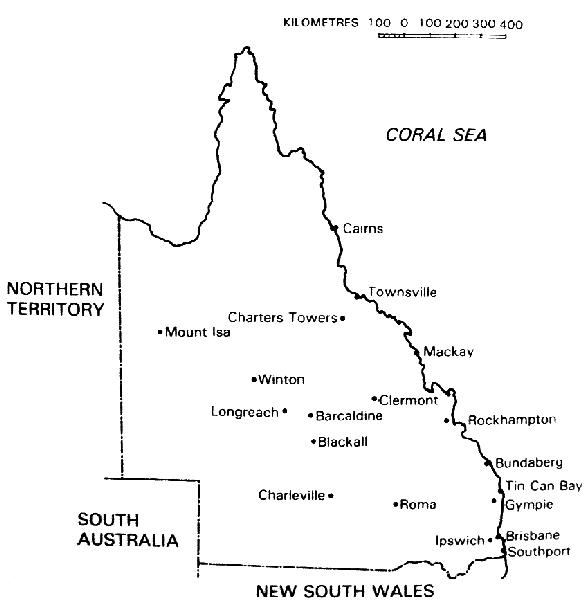
Towns in Queensland affected by the Shearers' Strike, 1890.


The Shearers' Strike

The first "action" for the Queensland Defence Force occurred in 1891 in the Western District of the Colony in what was to become known as the "Shearers' Strike". The confrontation began in the late 1880s when leading pastoralists, feeling the pinch of lower wool prices announced they would reduce the pay of the shearers. The shearers were already seething at their unjust conditions, they were paid as low as eight shillings per hundred sheep and then had to pay unusually high prices for the goods provided by the squatters, often leaving the shearers as little as fifteen shillings per week. For this they worked eleven hours per day and were accommodated in the roughest of conditions - earth-floored huts without ventilation or lights. They could not quit for fear of forfeiting accumulated pay, but the squatter on the other hand could withhold payment if he considered a sheep not properly shorn, and he could dismiss a worker without reason and not pay a penny for work already completed. To counter these unfair conditions, the shearers formed unions and between 1886-89 staged more than three hundred minor strikes and walk outs.

In 1890, the Queensland Shearers' Union was strong enough for a full-scale showdown. The crisis came to a head when the union demanded that only union labour be used in the sheds. Initially the pastoralists refused, but they backed down when wharf labourers refused to handle wool shorn by non-unionists. However, in late 1890, the pastoralists held a conference in Melbourne where they decided to levy members in proportion to the number of sheep to create a fighting fund to defeat the shearers. The squatters were preparing to fight the shearers once again and they nominated Queensland as the battlefield.

The 1891 season was off to a fiery start when the squatters refused to observe the closed shop principle they had conceded the previous year. Union passions were further inflamed by reports that under a new agreement shearer's pay would be slashed thirteen to thirty-three per cent, and penalty clauses decreed that defiant shearers could be fined or jailed. Union representatives tried to negotiate, but the squatters declared that they would only employ on their terms. Thus rebuffed, hundreds of Queensland shearers walked out of the shearing sheds. With their wives and children they gathered in a dozen strike camps and prepared to battle the thousand strike breakers imported from New South Wales and Victoria. In early February 1891, the first of the contracted labourers arrived in Rockhampton from the southern states and were quickly despatched to properties in the Western Districts. Violence flared as strikers clashed with strike breakers, wool and storage sheds went up in flames on properties where "black" labour was employed.

Large camps were established by the unionists at Barcaldine 6 Forward
(1,000 men), two near Clermont (350 and 150 men), and Capella (80 men). Inflammatory speeches were made with threats of kidnapping squatters and their families, and burning properties. At this juncture the Queensland government ordered additional police to the troubled areas and police magistrates were instructed to enrol all available men as special constables. There was a fear that the trouble could spread and erupt into civil war.

By 20 February the situation had reached such a serious stage that the government decided to call out the Defence Force in aid of the civil power. That morning the Officer Commanding the Defence Force, Major Jackson, was warned to prepare for immediate embarkation. At 5.00 p.m., a force of sixty-one men complete with weapons, a machine-gun and a 9 pounder field gun, sailed for Rockhampton. Three hours later orders were issued to call out the Moreton Mounted Infantry. The Commanding Officer, Major Percy Ricardo, took immediate steps to secure the attendance of all members of the units resulting in four officers and fifty-five men being selected for active duty.

They embarked on the SS Wondonga and sailed for Rockhampton the following day. No horses were despatched as the Pastoralists' Association had arranged to provide mounts, but every member took his own saddle and bridle in addition to kit, accoutrements and ammunition. That same day, 21 February, the Rockhampton Mounted Infantry was called out by the local Police Magistrate. On arrival at Rockhampton the entire force came under the command of Major Jackson. The force travelled by train to Clermont and thence despatched to farms to protect the free labourers and property.

As the situation continued to deteriorate the government called out additional volunteer units including the Wide Bay Mounted Infantry, Mackay Mounted Infantry, Darling Downs Mounted Infantry, Charters Towers Mounted Infantry, and Townsville Mounted Infantry, in addition to units of the Defence Force. The task of aid to the civil power is one that most soldiers dislike. It was work that neither commanders nor men had been trained for and which demanded a level of discipline to be found only among the regulars. Nevertheless the men performed the duty admirably as evidenced by Lieutenant Harry Chauvel's action at Charleville.

Chauvel received a warning order on 24 March to be ready to move to Charleville with twenty men and their horses. The men of the Darling Downs Mounted Infantry were issued with fifty rounds of ammunition each, and were on their way by rail the following morning. By this time there were reports of the burning of pasture and fences by the unionists, while at Blackall a non-unionist's bullocks had been shot.

Chauvel was sent to escort a party of free labourers through the bush to a property north of Charleville. A few police were added to his command. It was a miserable journey across black soil in pouring rain so that after twenty miles the men and horses were exhausted. When barely a mile from their destination, the party ran into a crowd of about two hundred shearers streaming down the track. Several of them were wanted by the police and the inspector in charge quickly arrested four of them.

The shearers closed around the party, some waving iron bars and clubs, shouting in their excitement. One of the four men arrested began inciting the shearers and the situation became dangerous. Chauvel gave the order to load; the inspector told him to force his way through the crowd with his troops and free labourers. The raised rifles of the Mounted Infantry had a cooling effect on the tempers as they shepherded the non-unionists and four prisoners along the road. The inspector thwarted an attempt by the angry shearers to follow up and Chauvel reached Oakwood where another detachment of Mounted Infantry was waiting; these set off after the shearers and more arrests were made. Although minor, the incident impressed on Chauvel the power of discipline and the importance of a cool head in a crisis. Had he not kept his Mounted Infantry under strict control, and they were after all mainly station hands with little military training, there may have been a tragedy.

The Mounted Infantry units were employed principally on patrol and escort duty and to keep communications open between detachments, the police and headquarters. Strong detachments were posted at stations where free labourers were shearing and small detachments were posted as sentries at woolsheds and station buildings. The infantry and artillery were responsible for the security of public buildings, jails, railway stations, and goods sheds.

The tension reached its peak when 200 troops swooped on the strike committee's headquarters at Barcaldine and arrested twelve of the leaders, charging them with conspiracy. The strikers were outraged, some men calling for revolution. At Gympie soldiers fixed bayonets to disperse a menacing crowd, while at Rockhampton 200 strikers heckled police guarding the twelve arrested at Barcaldine, when they came to trial. During the trial, the judge Mr Justice Harding was scarcely impartial, stating that he would have shot the strikers if he had been one of the police. He sentenced the twelve including George Taylor and William Hamilton, who later became members of the Queensland Parliament, to three years hard labour each. These severe sentences provoked another outburst of violence.

Although the strikers voted to stay out on strike, signs of weakness began to appear. The first crack came when threats of long-term sanctions by the squatters forced wool carriers back to work. They really had no alternative, for with whole families subsisting on ten shillings a week, men, women and children were on the verge of starvation. Furthermore, rain had turned the strikers' camps into quagmires of stinking mud. On 11 June 1891, union leaders announced that the strike fund was exhausted. The strike was over. Although the shearers had lost their fight, many claimed that in the long term it had led to victory, as the bitter defeat convinced the unions of a need for a political Labor Party to fight their cause in Parliament.

The strike had proven to be an expensive affair, costing the government £170,000, the pastoralists £41,000 and the unions £60,000, huge sums in 1891.

At times the work of the Defence Forces had been arduous, each district being in a state of flood for a considerable period. Colonel French noted:

Long and trying marches, by day and night, over boggy country (swimming rivers several times a day), were constantly made by the Mounted Infantry, notably so by a detachment of the Moreton Mounted Infantry, under Lieutenant R.S. Browne, which marched 109 miles in thirty-two hours, and by a detachment of Darling Downs Mounted Infantry, under Captain King, which marched sixty-five miles in one day on grass-fed horses.


Colonel Drury reported,

"The general conduct of the troops called out has been reported by all Commanding Officers to have been good.... To the discretion and judgment shown by officers in command, and the patience exhibited by all ranks under provocation and insult, must be credited the fact that bloodshed, or injury to life or limb, has been happily obviated".


As the strike wore on, the men were out on patrol for about five months, and for most of their service endured the boredom that is so often the lot of soldiers. On the plains of Western Queensland emu were plentiful and the men could not resist the excitement of riding after a quarry that could give them a chase at speed. Emu feathers, tucked into the men's felt hats began to appear and soon became widespread among the soldiers. Bill Lieshman of the Gympie Mounted Rifles claimed to be with the group who started the practice. Writing many years later Bill said:

I was in a patrol under Lieutenant Vivian Tozer of the Gympie Mounted Infantry, at Coreena Woolshed. On the way we met another Gympie Mounted Infantry patrol under Captain W. Shanahan and they were chasing an emu, which came toward us. When it was shot, some of us dismounted and Terry Rogers and myself were the first to pull the tail feathers out and place them in our hats. Then all in the patrols got the feathers and placed them in their hats.


When they returned home the Queensland Government allowed the Mounted Infantry to wear the emu plume in recognition of its service during the strike. At first it was solely a Queensland decoration, but in 1903 the privilege was extended to Tasmanian and South Australian regiments and finally, in 1915, to all regiments of the Light Horse.
 

Previous: Queensland Mounted Infantry, Outline, Part 1

Next: Queensland Mounted Infantry, Outline, Part 3


Further Reading:

Queensland Mounted Infantry

Boer War - Queensland Mounted Infantry

Australian Militia Light Horse


Citation: Queensland Mounted Infantry, Outline, Part 2

Posted by Project Leader at 12:01 AM EADT
Updated: Friday, 9 July 2010 1:44 PM EADT
Friday, 23 July 2004
Queensland Mounted Infantry, Outline, Part 3
Topic: Militia - LHQ - Qld

QMI

Queensland Mounted Infantry

Outline, Part 3

Forward

March: Soldiers of the Queen

 South Africa 1899 - 1902

Allied with: King Edward's Horse (The King's Oversea Dominions Regiment).


The following outline of the Queensland Mounted Infantry is extracted from a book written by Joan Starr called Forward: the history of the 2nd / 14th Light Horse (Queensland Mounted Infantry), published Queensland, 1989. This section comes from pp. 14 - 17:


War

The situation was inflamed when the British South Africa Company mobilised its private army of eight hundred men and held them on standby at Mafeking ready to ride to Johannesburg in the Republic of South Africa. On New Year's Day 1896, a shocked would learned that this force was riding into Transvaal to take armed support to the Uitlanders who, it was claimed, had asked for assistance. It was a weak display as the force of eight hundred surrendered to the first Boer troops which confronted them.

The British continued to threaten the Republic by moving troops from the Cape to the Transvaal border and ordering reinforcements from India. On 2 October 1899 President Kruger of the Boer Republic issued an ultimatum to the British, accusing Britain of interfering in the internal affairs of Transvaal and of massing troops to threaten the state. The statement concluded, "That unless Her Majesty's Government complies within 48 hours the Government of the South African Republic (Transvaal) would with great regret be compelled to regard the action as a formal declaration of war."

War began on 14 October 1899 when the Boers swept out of the Transvaal and the Orange Free State on three fronts in an effort to deliver the most telling blows before the arrival of more British troops. In the west they besieged the towns of Mafeking and Kimberley, at the same time severing the road to Rhodesia. In the east they seized the northern Natal towns of Dundee and Newcastle and encircled Ladysmith. The third thrust took place in the centre. There they occupied the railway town of Colesburg, severing the rail system from the Cape Colony. The early battles took place on British territory and it was to be several months before fighting occurred in the republics. The war was only a month old and the Boers had drawn first blood and had laid siege to Mafeking in the north, Kimberley to the west and Ladysmith to the east. Britain was outgunned, outmanned and outclassed!


Mobilisation

It is not possible to determine the exact number of men in the irregular Boer forces. Approximately 50,000 men from the two Boer republics, augmented by 10,000 rebels from the Cape Colony and Natal and about 2,500 foreign sympathisers were pitted against the British. They were not all in the field at the one time, the greatest number being about forty-five thousand in December 1899 after which the number gradually declined. Following the fall of Pretoria in June 1900 the number on active service never rose above twenty thousand. After the first ten months of the war, the Boers fought in a purely guerrilla fashion. In the end it was to take 448,000 British and Empire troops to subdue the Boers.

Britain was generally out of favour with the rest of the world because of its bullying tactics against the independent states of South Africa. There had been unfavourable comment both in America and much of Europe (Germany in particular), about Britain's actions in South Africa, but it still had the Empire's colonies and dominions on which to call. Even as early as July 1899, when it first appeared that hostilities would break out, an overeager government of Queensland, acting on a recommendation of the Commandant of Queensland Defence Forces, offered a contingent of mounted infantry with a machine-gun section. The offer was matched at once by the governments of New South Wales and Victoria.

The British War Office had no understanding of the value of these so readily offered colonial troops. The soldiers were assessed as less than first-class and certainly not as skilled or as reliable as British regulars. While the War Office was inclined to send a carefully worded polite refusal, the British government's demand for a show of Empire unity took precedence. Under Cabinet pressure, the War Office accepted the offer from the Australian colonies.

Patriotic Response

The Queensland Legislative Assembly debated the whole matter of the offer of troops for South Africa, during a four-day sitting from 11 October 1899. Finally it was decided that the contingent would comprise 250 mounted infantry and one machine-gun section and that the cost to raise, equip and transport the force for a six-month expedition, would be £32,000. On 12 October, during the Legislative Assembly debate, it was learnt that war had been declared by the Boers. On the following day the Boers crossed the Natal border. The British Empire was at war. The Queensland contingent was enrolled, organised and equipped with arms, clothing, horses, saddlery, transport wagons with fittings, and stores between October 13 and October 28 - a praiseworthy record of the indefatigable way in which the staff, the Comptroller of Stores, the medical and veterinary authorities, and the government, strove to equip the contingent for war.

The Queensland Government also paid for another two contingents, the 2nd Queensland Mounted Infantry commanded by Lieutenant Colonel K. Hutchison, and the 3rd Queensland Mounted Infantry commanded by Major W. H. Tunbridge. In addition the Imperial Government paid the expenses of three contingents, the 4th, 5th and 6th Queensland Imperial Bushmen, largely consisting of volunteers from the Queensland Mounted Infantry and other units of the Queensland Defence Force. Following Federation the Commonwealth Government despatched eight battalions of the Australian Commonwealth Horse Regiment. The 7th Battalion of this regiment was raised entirely in Queensland in 1902, and was commanded by Lieutenant Colonel Harry Chauvel. Queensland also provided a company for the 1st and 3rd Battalions of the Commonwealth Horse.

The government decided it was necessary to insure the lives of the men who were about to go to war, and on November 1899, the Queenslander reported "The Government has definitely decided to accept the offer of the Mutual Life Association of Australasia to insure the lives of the members of the Queensland contingent for £250 each. The risk is to commence from the date of arrival in South Africa and to continue for a period of 12 months, or until the termination of the war or the departure of the contingent from South Africa."

Privately subscribed funds were raised by citizens throughout Australia, who felt that by authorising despatch of the contingents, the government and people of this country had incurred a moral obligation to the men, their wives and families. It was considered in the event of death or permanent disability of any man in the contingents, his wife and children should be entitled to receive an allowance from what was known as the National Patriotic Fund. To establish the fund, meetings were held in the various capital cities, and as enthusiasm for the cause raced across the country almost every town and settlement took part in fund-raising. The Patriotic Fund was to continue in existence until the 1980s, helping families of servicemen who had suffered as a result of war or natural disaster.

As well as arranging insurance for the men, the government made provision for families during the absence of the breadwinners, by arranging for married men to assign their pay in favour of their wives before leaving for South Africa. Because of these provisions, the men were able to leave their families with the knowledge that they would be well-cared for, should the need arise, by the government and their fellow Australians.


Previous: Queensland Mounted Infantry, Outline, Part 2

Next: Queensland Mounted Infantry, Outline, Part 4


Further Reading:

Queensland Mounted Infantry

Boer War - Queensland Mounted Infantry

Australian Militia Light Horse


Citation: Queensland Mounted Infantry, Outline, Part 3

Posted by Project Leader at 12:01 AM EADT
Updated: Friday, 9 July 2010 1:46 PM EADT
Thursday, 22 July 2004
Queensland Mounted Infantry, Outline, Part 4
Topic: Militia - LHQ - Qld

QMI

Queensland Mounted Infantry

Outline, Part 4

Forward

March: Soldiers of the Queen

 South Africa 1899 - 1902

Allied with: King Edward's Horse (The King's Oversea Dominions Regiment).


The following outline of the Queensland Mounted Infantry is extracted from a book written by Joan Starr called Forward: the history of the 2nd / 14th Light Horse (Queensland Mounted Infantry), published Queensland, 1989. This section comes from pp. 18 - 17:


Off to War

Departure of the troops on the Cornwall in November drew vast crowds to the wharf area, and the whole event blossomed into a gala occasion with the bands, bunting, garlands, refreshment booths, and bright sunshades.

Almost every craft capable of floating, large and small, and gaily decked-out with flags and bunting, gathered not far from the Cornwall. The contingent commander, Major Ricardo, led his men onto the wharf where he dismounted. First to march on the wharf was the machinegun section (a detachment of the Queensland Royal Australian Artillery followed by A and B Companies of the Mounted Infantry under Captain Harry Chauvel and Captain Philip Pinnock respectively. Lieutenant Alfred Adie carried the handmade flag presented to the contingent by the women of Brisbane. The men embarked on the Cornwall to the tune of "Soldiers of the Queen", played by the Headquarters Band. The words and music were "catchy" and easy to remember:

It's the soldiers of the Queen, my lads,
Who’ve been, my lads, who've seen, my lads,
In the fight for England's glory lads,
Of its world-wide glory let us sing.

And when we say we've always won,
And when they ask us how it’s done,
Well proudly point to every one
Of England's soldiers of the Queen!


By 11 December the Cornwall reached Port Elizabeth, South Africa. The forty-three day voyage had not been very pleasant for the men, many of whom were ill with influenza during the trip. Ordered by the British Commander on to Cape Town, the Cornwall arrived at Table Bay on 12 December, and troops landed at Cape Town the following day. Major Ricardo was promoted to Lieutenant Colonel on the day he landed at Cape Town.

The man who the Queenslanders and other colonists were to serve under was General Sir Redvers Buller, recently appointed Commander-in-Chief. Buller was a veteran soldier who had fought in five wars, the first Boer War from 1880 to 1881, and against the Zulu, for which he was awarded the Victoria Cross. He was a hearty, jovial commander, popular with the troops but unfortunately, not only had he never commanded large formations of troops in the field; he had assumed command after ten years of desk service.

Buller scrapped the War Office plan of an advance on the Boer republics and decided to split his force into three columns, leaving the Cape undefended. The tragic result of this blunder was "Black Week", when in December 1899 the Boers soundly defeated the British at Stormberg, Magersfontein and Colenso. The noted British historian Arthur Conan Doyle wrote:

The week ... was the blackest one known during our generation, and the most disastrous for British arms during the century. We had in a short space of seven days lost, beyond all extenuation or excuse, three separate actions. The total loss amounted to about three thousand men and twelve guns, while the indirect effects in the way of loss of prestige to ourselves and increased confidence and more numerous recruits to our enemy were incalculable.


The pride of the British Army had been dragged in the dust of the veldt by Boer farmers, who were no longer considered simply "native rebels". In addition Kimberley, Mafeking and Ladysmith were still under siege. Buller was subsequently replaced by Lord Roberts.

The British were out of their depth as they were confronted by an enemy which used unconventional tactics. The Boers had no standing army and wore no standard uniform. Every farmer between sixteen and sixty was prepared to fight, providing his own horse, rifle and ammunition, and provisions for eight days on the open plain (veldt). These citizen-soldiers were organised into highly mobile guerrilla units called "commandos" varying in size from several hundred to many thousands, appearing and vanishing as required.

One war correspondent described them as a "motley-looking" group of fighters, a "crowd one is apt to see in a far inland shearing shed in Australia". However there was nothing unsophisticated about the Boer force. The artillery was trained by German officers and equipped with the most modern German and French guns, outranging their British counterparts. The mounted infantrymen favoured the German Mauser rifle and the Maxim machine-gun. The Boer was a skilled marksman, having gained much experience from years of living and hunting on the veldt. He would hide behind boulders or rocky hills (kopjes), picking off advancing infantrymen with ease, often using small white stones left on the plain as target-markers. As the infantry closed in, the Boers would leap on their ponies and disappear in a cloud of dust.

When Lord Roberts assumed command of all troops he found an army extended over a front of 500 miles. The task of the new Commander-in-Chief was to take the offensive by carrying the war across the borders and into the republics and, in doing so, force the Boers to loosen their grip on the besieged British towns.

The Queensland contingents, together with those from other colonies never fought as one Australian division. They were divided up, as were the Canadian and New Zealand contingents, and attached to British regiments, thus fighting in what was an Empire army. They learnt much soldiering from the British, while the British learnt a great deal from the colonials who were well-suited to guerrilla warfare, and to the country itself.

After arriving in Cape Town the Queensland Mounted Infantry went immediately by train to Orange River providing some badly needed mounted troops to the Kimberley Relief Force. They saw no action for two and a half weeks, but this was still far too short a time for the horses to be acclimatised and recover from the sea voyage. On first arrival in Africa the horses developed a kind of influenza and a regiment on the march sounded like a veterinary hospital with the sneezing and wheezing of the wretched animals.

The loss in horses from starvation, disease and sheer exhaustion was terrible. Captain Chauvel was to write home early in the campaign that they were losing five horses a day. The situation only became worse; it was unlikely that a man would ride the same horse for very long, there was therefore little opportunity of building the extraordinary sympathy between rider and horse that later existed in the Middle East in 1916-18, when well-cared for horses displayed enormous stamina and great heart.

The turnover in animals was so great that by the end of the war no fewer than two hundred thousand horses and mules were lost, the carcasses lying the length and breadth of South Africa. When the war concluded there were 264,000 horses and mules and 19,000 oxen listed on army service.

A day on the march was very much as follows - At grey dawn the soldier gave his horse a meagre (very meagre) supply of hard uncrushed Indian corn to eat. No hay, nor bran, nor any other fodder was supplied to assist the animal to chew and digest the unattractive maize. While eating his feed, a saddle, loaded with accoutrements up to a weight of six stone was hoisted onto the horse and left there while the trooper went to get his own scanty breakfast. At midday again a very small meal (about a handful) of maize or raw oats would be given to the horse. Such water as they got to drink was hurriedly snatched at intervals of marching, and on many occasions the horses went all day without water.

At night the troopers would be out on outpost duty, and this meant the horses were kept standing all night with their saddles on, unable to rest. Many a time the horses went 48 hours without having their saddles off; and there was no chance for them to recuperate. Day after day they had to plod on under the blazing sun all day, and in the freezing wind at night.'

The few cavalry charges that were attempted during the war were sorry spectacles; a long drawn out string of weak and weary horses, plodding hopelessly across the veldt at a canter, urged to further exertions by blows from the riders, and with no hope of closing on the enemy. All of the combat was of the nature of mounted infantry in which the men dismounted to fight.
 

A note by the Editor on the comments made by J. Starr in the above text regarding General Sir Redvers Buller

For the purposes of clarity and ensuring that the otherwise excellent summary of J. Starr is not undermined by some poorly researched comments, the following is inserted to give the reader an insight into the problems of balance and the nature of those who write history.

The problem of making comments about the ability of Buller through the prism of history written to exult General "Bobs" Roberts and by default, Kitchener, leads the unwary commentator to miss the outstanding ability of Buller. History has vilified the man for being in charge of the British forces in South Africa during Black Week. Because Buller was the man in charge, he is also the convenient public scapegoat whose history has been tarnished by many authors who describe him as some type of bungling fool and Colonel Blimp like character.

The facts are quite different. Buller was an immensely popular General with his troops. He cared for their welfare and ensure that they were well looked after despite the incompetence of the War Office which was not up to the task of supplying such a vast army with the basic means let alone with the tools to provide victory. In addition, the valuable intelligence assessments were not circulated to him. It took the Times in 1900 to publish this report which was readily available in England but not to the people who needed it the most.

After the three disasters that constituted the Black Week, the men under Buller's command never lost another battle. Buller learned the lessons of these defeats and applied them well. The change in strategy involved the creation of such an innovative infantry practice that it took until 1916 for it to be fully understood and appreciated. Then his methods became standard practice during the Great War for the British Army. Buller mapped out two basic ideas: limited objectives and creeping barrages. The limited objective ensured that the troops knew exactly the nature of their specific task and objective. Each section knew the task they were meant to achieve in the battle. The assistance was then given to the infantry by artillery co-ordination, a novelty as it had never occurred on a mass scale before and something very difficult to arrange bearing in mind that there was not the luxury of immediate communication between the infantry and artillery on the battlefield. Buller's thinking was far beyond his time. Regardless of his ability, the Roberts followers wanted something to alow Roberts to shine which basically meant damning Buller. As is often the case, the wrong person received all the credit. This was not the first time this happened in history and nor was it and will it be the last time.

When presenting an analysis of a situation, it is essential for historians or critical readers to understand the nature of the circumstance rather than iterate "common" wisdom.


Previous: Queensland Mounted Infantry, Outline, Part 3

Next: Queensland Mounted Infantry


Further Reading:

Queensland Mounted Infantry

Boer War - Queensland Mounted Infantry

Australian Militia Light Horse


Citation: Queensland Mounted Infantry, Outline, Part 4

Posted by Project Leader at 12:01 AM EADT
Updated: Friday, 9 July 2010 2:05 PM EADT
Saturday, 17 July 2004
Queensland Mounted Infantry, 1860 - 1866
Topic: Militia - LHQ - Qld
QMI

Queensland Mounted Infantry

1860 - 1866

Queensland Mounted Infantry [1860 - 1866]
Queensland Mounted Infantry [1885 - 1900]

Forward

March: Soldiers of the Queen


Tracing the roots of the Queensland Mounted Infantry requires a journey back to 1860 with the formation of the first mounted units in Queensland, in this case, the Queensland Mounted Rifles. This initial item deals with the fledgling movement as different pressures are applied from all sectors of the community dooming this short lived manifestation to fail.  


1860   

 Queensland Mounted Rifles   
   

Brisbane Troop

Captain John Bramston, 30 March 1860


Ipswich Troop

Captain Alfred Delves Brooughten, 26 May 1860


Port Curtis Troop

Captain Alfred H. Brown, 1 December 1860


1861  

Queensland Mounted Rifles   
   

Brisbane Troop

Captain John Bramston, 30 March 1860


Ipswich Troop

Captain Alfred Delves Brooughten, 26 May 1860


Port Curtis Troop

Captain Alfred H. Brown, 1 December 1860


1862   

Queensland Mounted Rifles   
   

Brisbane Troop

Captain John Bramston, 30 March 1860


Ipswich Troop

Captain Alfred Delves Brooughten, 26 May 1860


1863   

Queensland Mounted Rifles   

Ipswich Troop

Captain Alfred Delves Brooughten, 26 May 1860


1864   

Queensland Light Horse

Ipswich Troop

Captain James Leith Hay, 10 March 1864


1865   

Queensland Light Horse

Ipswich Troop

Captain James Leith Hay, 10 March 1864


1866  

Queensland Light Horse

Ipswich Troop

Captain James Leith Hay, 10 March 1864


Disbanded 25 April 1866.


Previous: Queensland Mounted Infantry

NextQueensland Mounted Infantry, 1885


Sources:

See: Queensland Mounted Infantry, Contents


Further Reading:

Queensland Mounted Infantry

Boer War - Queensland Mounted Infantry

Australian Militia Light Horse


Citation: Queensland Mounted Infantry, 1860 - 1866

Posted by Project Leader at 12:01 AM EADT
Updated: Friday, 9 July 2010 2:05 PM EADT
Friday, 16 July 2004
Queensland Mounted Infantry, 1885
Topic: Militia - LHQ - Qld
QMI

Queensland Mounted Infantry

1885

Queensland Mounted Infantry [1860 - 1866]
Queensland Mounted Infantry [1885 - 1900]

Forward

March: Soldiers of the Queen


Moreton Mounted Infantry   

Brisbane Troop

Captain Percy Ralph Ricardo, 2 April 1884.


Beenleigh Troop

Vacant.  


Bundaberg Mounted Infantry

Bundaberg Troop
Lieutenant Frederick Schofield, 11 June 1885.


Gympie Mounted Infantry

Gympie Troop

Captain George Patterson, 11 June 1885.  


Mackay Mounted Infantry

Mackay Troop

Captain Henry William Antill, 14 December 1885.


Townsville Volunteer Mounted Rifles

Townsville Troop

Vacant.


Previous: Queensland Mounted Infantry, 1860 - 1866

NextQueensland Mounted Infantry, 1886


Sources:

See: Queensland Mounted Infantry, Contents


Further Reading:

Queensland Mounted Infantry

Boer War - Queensland Mounted Infantry

Australian Militia Light Horse

 
Citation: Queensland Mounted Infantry, 1885

Posted by Project Leader at 12:01 AM EADT
Updated: Friday, 9 July 2010 2:14 PM EADT

Newer | Latest | Older

Full Site Index


powered by FreeFind
Let us hear your story: You can tell your story, make a comment or ask for help on our forum.

Desert Column Forum

A note on copyright

The Australian Light Horse Studies Centre is a not for profit and non profit group whose sole aim is to write the early history of the Australian Light Horse from 1900 - 1920. It is privately funded and the information is provided by the individuals within the group and while permission for the use of the material has been given for this site for these items by various donors, the residual and actual copyright for these items, should there be any, resides exclusively with the donors. The information on this site is freely available for private research use only and if used as such, should be appropriately acknowledged. To assist in this process, each item has a citation attached at the bottom for referencing purposes.

Please Note: No express or implied permission is given for commercial use of the information contained within this site.

A note to copyright holders

The Australian Light Horse Studies Centre has made every endeavour to contact copyright holders of material digitised for this blog and website and where appropriate, permission is still being sought for these items. Where replies were not received, or where the copyright owner has not been able to be traced, or where the permission is still being sought, the Australian Light Horse Studies Centre has decided, in good faith, to proceed with digitisation and publication. Australian Light Horse Studies Centre would be happy to hear from copyright owners at any time to discuss usage of this item.

Contact

Australian Light Horse Studies Centre

eXTReMe Tracker