« October 2008 »
S M T W T F S
1 2 3 4
5 6 7 8 9 10 11
12 13 14 15 16 17 18
19 20 21 22 23 24 25
26 27 28 29 30 31
You are not logged in. Log in


Search the site:


powered by FreeFind
Volunteer with us.

Entries by Topic All topics  
A Latest Site News
A - Using the Site
AAA Volunteers
AAB-Education Centre
AAC-Film Clips
AAC-Photo Albums
AIF & MEF & EEF
AIF - Lighthorse
AIF - ALH - A to Z
AIF - DMC
AIF - DMC - Or Bat
AIF - DMC - Anzac MD
AIF - DMC - Aus MD
AIF - DMC - British
AIF - DMC - BWI
AIF - DMC - French
AIF - DMC - Indian
AIF - DMC - Italian
AIF - DMC - Medical
AIF - DMC - Remounts
AIF - DMC - Scouts
AIF - DMC - Sigs
AIF - DMC - Sigs AirlnS
AIF - DMC - 1 Sig Sqn
AIF - DMC - 2 Sig Sqn
AIF - DMC - Eng
AIF - DMC - Eng 1FSE
AIF - DMC - Eng 2FSE
AIF - DMC - GSR
AIF - 1B - 1 LHB
AIF - 1B - 6 MVS
AIF - 1B - 1 LHMGS
AIF - 1B - 1 Sig Trp
AIF - 1B - 1 LHFA
AIF - 1B - 1 LHR
AIF - 1B - 2 LHR
AIF - 1B - 3 LHR
AIF - 2B - 2 LHB
AIF - 2B - 7 MVS
AIF - 2B - 2 LHFA
AIF - 2B - 2 LHMGS
AIF - 2B - 2 Sig Trp
AIF - 2B - 5 LHR
AIF - 2B - 6 LHR
AIF - 2B - 7 LHR
AIF - 3B - 3 LHB
AIF - 3B - 8 MVS
AIF - 3B - 3 LHB Sigs
AIF - 3B - 3 LHFA
AIF - 3B - 3 LHMGS
AIF - 3B - 3 Sig Trp
AIF - 3B - 8 LHR
AIF - 3B - 9 LHR
AIF - 3B - 10 LHR
AIF - 4B - 4 LHB
AIF - 4B - 4 Sig Trp
AIF - 4B - 9 MVS
AIF - 4B - 4 LHFA
AIF - 4B - 4 LHMGS
AIF - 4B - 4 LHR
AIF - 4B - 11 LHR
AIF - 4B - 12 LHR
AIF - 5B - 5 LHB
AIF - 5B - 10 MVS
AIF - 5B - 5 LHFA
AIF - 5B - 5 Sig Trp
AIF - 5B - ICC
AIF - 5B - 14 LHR
AIF - 5B - 15 LHR
AIF - 5B - 1er Regt
AIF - 5B - 2 NZMGS
AIF - AASC
AIF - Aboriginal LH
AIF - Badges
AIF - Cars
AIF - Chinese LH
AIF - Double Sqns
AIF - Engineers
AIF - Fr - 22 Corps
AIF - Fr - 13 LHR
AIF - Honour Roll
AIF - HQ - 3rd Echelon
AIF - Marching Songs
AIF - Misc Topics
AIF - NZMRB
AIF - NZMRB - AMR
AIF - NZMRB - CMR
AIF - NZMRB - EFT
AIF - NZMRB - NZMFA
AIF - NZMRB - NZMGS
AIF - NZMRB - OMR
AIF - NZMRB - Sig-Trp
AIF - NZMRB - WMR
AIF - Ships
AIF - Ships - Encountr
AIF - Ships - Una
AIF - WFF
AIF - Wireless Sqn
Battles
BatzA - Australia
BatzA - Broken Hill
BatzA - Liverpool
BatzA - Merivale
BatzB - Boer War
BatzB - Bakenlaagte
BatzB - Belmont
BatzB - Bothaville
BatzB - Buffels Hoek
BatzB - Coetzees Drift
BatzB - Diamond Hill
BatzB - Driefontein
BatzB - Elands
BatzB - Graspan
BatzB - Grobelaar
BatzB - Grootvallier
BatzB - Hartebestfontn
BatzB - Houtnek
BatzB - Karee Siding
BatzB - Kimberley
BatzB - Koster River
BatzB - Leeuw Kop
BatzB - Mafeking
BatzB - Magersfontein
BatzB - Modder River
BatzB - Onverwacht
BatzB - Paardeberg
BatzB - Palmietfontein
BatzB - Pink Hill
BatzB - Poplar Grove
BatzB - Rhenoster
BatzB - Sannahs Post
BatzB - Slingersfontn
BatzB - Stinkhoutbm
BatzB - Sunnyside
BatzB - Wilmansrust
BatzB - Wolvekuil
BatzB - Zand River
BatzG - Gallipoli
BatzG - Anzac
BatzG - Aug 1915
BatzG - Baby 700
BatzG - Evacuation
BatzG - Hill 60
BatzG - Hill 971
BatzG - Krithia
BatzG - Lone Pine
BatzG - Nek
BatzJ - Jordan Valley
BatzJ - 1st Amman
BatzJ - 2nd Amman
BatzJ - Abu Tellul
BatzJ - Es Salt
BatzJ - JV Maps
BatzJ - Ziza
BatzM - Mespot
BatzM - Baghdad
BatzM - Ctesiphon
BatzM - Daur
BatzM - Kurna
BatzM - Kut el Amara
BatzM - Ramadi
BatzN - Naval
BatzN - AE1
BatzN - Cocos Is
BatzN - Heligoland
BatzN - Marmara
BatzN - Zeebrugge
BatzN - Zeppelin L43
BatzNG - Bitapaka
BatzO - Other
BatzO - Baku
BatzO - Egypt 1919
BatzO - Emptsa
BatzO - Karawaran
BatzO - Peitang
BatzO - Wassa
BatzP - Palestine
BatzP - 1st Gaza
BatzP - 2nd Gaza
BatzP - 3rd Gaza
BatzP - Aleppo
BatzP - Amwas
BatzP - Ayun Kara
BatzP - Bald Hill
BatzP - Balin
BatzP - Beersheba
BatzP - Berkusieh
BatzP - Damascus
BatzP - El Auja
BatzP - El Buggar
BatzP - El Burj
BatzP - Haifa
BatzP - Huj
BatzP - JB Yakub
BatzP - Kaukab
BatzP - Khan Kusseir
BatzP - Khuweilfe
BatzP - Kuneitra
BatzP - Megiddo
BatzP - Nablus
BatzP - Rafa
BatzP - Sasa
BatzP - Semakh
BatzP - Sheria
BatzP - Surafend
BatzP - Wadi Fara
BatzS - Sinai
BatzS - Bir el Abd
BatzS - El Arish
BatzS - El Mazar
BatzS - El Qatiya
BatzS - Jifjafa
BatzS - Magdhaba
BatzS - Maghara
BatzS - Romani
BatzS - Suez 1915
BatzSe - Senussi
BatzWF - Westn Front
BW - Boer War
BW - NSW
BW - NSW - 1ACH
BW - NSW - 1NSWMR
BW - NSW - 2NSWMR
BW - NSW - 3ACH
BW - NSW - 3NSWIB
BW - NSW - 3NSWMR
BW - NSW - 5ACH
BW - NSW - A Bty RAA
BW - NSW - AAMC
BW - NSW - Aust H
BW - NSW - Lancers
BW - NSW - NSW Inf
BW - NSW - NSWCBC
BW - NSW - NSWIB
BW - NSW - NSWMR_A
BW - NZ
BW - Qld
BW - Qld - 1ACH
BW - Qld - 1QMI
BW - Qld - 2QMI
BW - Qld - 3ACH
BW - Qld - 3QMI
BW - Qld - 4QIB
BW - Qld - 5QIB
BW - Qld - 6QIB
BW - Qld - 7ACH
BW - QLD - AAMC
BW - SA
BW - SA - 1SAMR
BW - SA - 2ACH
BW - SA - 2SAMR
BW - SA - 3SACB
BW - SA - 4ACH
BW - SA - 4SAIB
BW - SA - 5SAIB
BW - SA - 6SAIB
BW - SA - 8ACH
BW - SA - AAMC
BW - Tas
BW - Tas - 1ACH
BW - Tas - 1TIB
BW - Tas - 1TMI
BW - Tas - 2TB
BW - Tas - 2TIB
BW - Tas - 3ACH
BW - Tas - 8ACH
BW - Vic
BW - Vic - 1VMI
BW - Vic - 2ACH
BW - Vic - 2VMR
BW - Vic - 3VB
BW - Vic - 4ACH
BW - Vic - 4VIB
BW - Vic - 5VMR
BW - Vic - 6ACH
BW - Vic - AAMC
BW - Vic - Scot H
BW - WA
BW - WA - 1WAMI
BW - WA - 2ACH
BW - WA - 2WAMI
BW - WA - 3WAB
BW - WA - 4ACH
BW - WA - 4WAMI
BW - WA - 5WAMI
BW - WA - 6WAMI
BW - WA - 8ACH
BW Gen - Campaign
BW Gen - Soldiers
BW General
Cavalry - General
Diary - Schramm
Egypt - Heliopolis
Egypt - Mena
Gen - Ataturk Pk, CNB
Gen - Australia
Gen - Legends
Gen - Query Club
Gen - St - NSW
Gen - St - Qld
Gen - St - SA
Gen - St - Tas
Gen - St - Vic
Gen - St - WA
Gm - German Items
Gm - Bk - 605 MGC
GW - 11 Nov 1918
GW - Atrocities
GW - August 1914
GW - Biographies
GW - Propaganda
GW - Spies
GW - We forgot
Militia 1899-1920
Militia - Area Officers
Militia - Inf - Infantry
Militia - Inf - 1IB
Militia - Inf - 2IB
Militia - Inf - 3IB
Militia - Inf - NSW
Militia - Inf - Qld
Militia - Inf - SA
Militia - Inf - Tas
Militia - Inf - Vic
Militia - Inf - WA
Militia - K.E.Horse
Militia - LH
Militia - LH - Regts
Militia - LH - 1LHB
Militia - LH - 2LHB
Militia - LH - 3LHB
Militia - LH - 4LHB
Militia - LH - 5LHB
Militia - LH - 6LHB
Militia - LHN - NSW
Militia - LHN - 1/7/1
Militia - LHN - 2/9/6
Militia - LHN - 3/11/7
Militia - LHN - 4/6/16
Militia - LHN - 5/4/15
Militia - LHN - 6/5/12
Militia - LHN - 28
Militia - LHQ - Qld
Militia - LHQ - 13/2
Militia - LHQ - 14/3/11
Militia - LHQ - 15/1/5
Militia - LHQ - 27/14
Militia - LHS - SA
Militia - LHS - 16/22/3
Militia - LHS - 17/23/18
Militia - LHS - 24/9
Militia - LHT - Tas
Militia - LHT - 12/26
Militia - LHV - Vic
Militia - LHV - 7/15/20
Militia - LHV - 8/16/8
Militia - LHV - 9/19
Militia - LHV - 10/13
Militia - LHV - 11/20/4
Militia - LHV - 19/17
Militia - LHV - 29
Militia - LHW - WA
Militia - LHW-18/25/10
Militia - Military Orders
Militia - Misc
MilitiaRC - Rifle Clubs
MilitiaRC - NSW
MilitiaRC - NT
MilitiaRC - Qld
MilitiaRC - SA
MilitiaRC - Tas
MilitiaRC - Vic
MilitiaRC - WA
Militiaz - New Zealand
Tk - Turkish Items
Tk - Army
Tk - Bks - Books
Tk - Bks - 1/33IR
Tk - Bks - 27th IR
Tk - Bks - Air Force
Tk - Bks - Yildirim
Tk - POWs
Wp - Weapons
Wp - Hotchkiss Cav
Wp - Hotchkiss PMG
Blog Tools
Edit your Blog
Build a Blog
RSS Feed
View Profile
Open Community
Post to this Blog
Site Index
Education Centre
LH Militia
Boer War
Transport Ships
LH Battles
ALH - Units
ALH - General
Aboriginal Light H
Weapons
Ottoman Sources

"At a mile distant their thousand hooves were stuttering thunder, coming at a rate that frightened a man - they were an awe inspiring sight, galloping through the red haze - knee to knee and horse to horse - the dying sun glinting on bayonet points..." Trooper Ion Idriess

The Australian Light Horse Studies Centre aims to present an accurate history as chroniclers of early Australian military developments from 1899 to 1920.

The Australian Light Horse Studies Centre site holds over 12,000 entries and is growing daily.

Contact: Australian Light Horse Studies Centre

Let us hear your story: You can tell your story, make a comment or ask for help on our Australian Light Horse Studies Centre Forum called:

Desert Column Forum

WARNING: This site contains: names, information and images of deceased people; and, language which may be considered inappropriate today.

Wednesday, 15 October 2008
The Battle of Beersheba, Palestine, 31 October 1917, Keogh Account
Topic: BatzP - Beersheba

The Battle of Beersheba

Palestine, 31 October 1917

Keogh Account


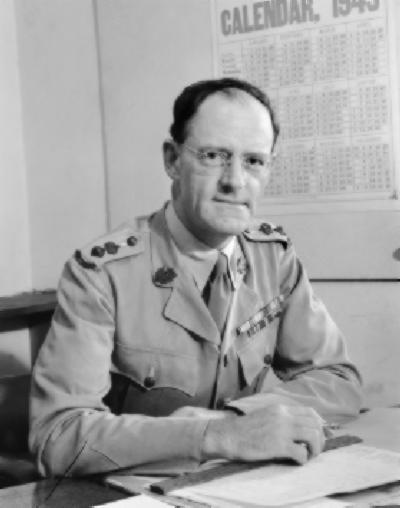
Colonel Eustace Graham Keogh, Military Training, 1945.

[From: AWM 120551]


Colonel Eustace Graham Keogh was commissioned by the Directorate of Military Training to produce a survey of the Sinai and Palestine campaign for training purposes of the Army in 1954. The result was his book called, Suez to Aleppo, published in Melbourne in 1955. This particular book was little used in the study of the Sinai and Palestine Campaign because of the embargo placed upon it by the Army which meant that its pages were only available to those who were members of the Army. Consequently the value of this small work has never been brought to the attention of the public and consequently is often ignored as a source by many scholars of this period. It is a fine book written specifically from a military point of view and thus looks at issues as the men would have done so at the time when these events were being recorded.

Keogh, EG, Suez to Aleppo, (Melbourne 1955), pp. 152 - 6:


Capture of Beersheba

[152] Beersheba lies on the Wadi Saba at the foot of the Judaean range. There are steep, rocky hills to the north, east and south of the town, which lies in a wide hollow. On the west the ground is comparatively flat and open.

On the south-west and south the defences consisted of a series of redoubts along a line of heights three to four miles from the town. These works were strongly built, with good observation, overhead cover and some wire The defect of the system was a lack of depth; in most places it consisted of a single line only. With the exception of a formidable redoubt at Tel el Saba, the defences east and north of the town were less strongly constructed and were without wire since the Turks did not apprehend attack from this direction.

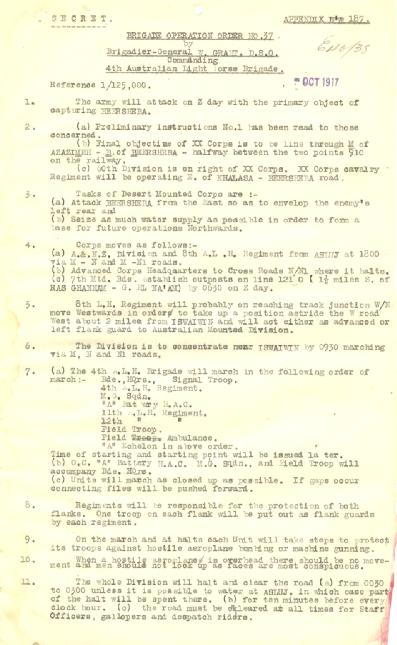
The British plan for the attack on Beersheba was as follows:-

20 Corps was to assault the works south-west of the town between the Khalassa-Beersheba road and the Wadi Saba with two divisions - 60 and 74. The Camel Brigade, with two battalions of 53 Division as to mask the defences north of the Wadi Saba. The remainder of 53 Division was to cover the northern flank of the Corps against interference from the Turkish forces in the Hareira-Sheria area.

Starting from Khalassa and Asluj, the two mounted divisions of Desert Mounted Corps were to make a night march of some thirty miles and appear in the early morning to the east of Beersheba. After blocking the Hebron road they were to break into the town as rapidly as possible, seize the wells, and cut off the retreat of the enemy engaged west of the town with 20 Corps.

7th Mounted Brigade (Army troops) was to operate against the defences south of the town and form a link between 20th Corps and Desert Mounted Corps.

A detachment of Hedjaz Arabs, with a stiffening of British machine-gunners and mounted on camels, was to strike the Hebron road well to the north, and harass any Turkish reinforcements moving towards Beersheba.

[153] The role of 20 Corps was not to capture Beersheba or, indeed, to send any troops into the town except engineers to operate the wells. The role of this Corps was to pin the main garrison firmly down, and thus, it was hoped, give the Desert Mounted Corps the chance to swoop into the town on its least protected side.

On the night of 30/31 October some 40,000 troops of all arms moving to take up their allotted stations for the attack on Beersheba. The date had been fixed to take advantage of a full moon, but the night sultry and still and dense palls of dust enveloped the marching was columns. The assaulting infantry of 20th Corps had to be in their positions, some 2,000 to 2,500 yards from the enemy's works, by 0400 hours. They had eight miles to march over difficult ground. Through careful and meticulous staff work, and the good, solid training Chetwode had given to his Corps, every man and gun was in position well before time.

Desert Mounted Corps had to march thirty miles over rough, confusing country, much of which had not been reconnoitred, using maps [154] compiled chiefly by guesswork. Every unit reached its allotted station by the specified time. And that was no mean feat, even for experienced troops.

The front of attack of 20 Corps was a little over 5,000 yards, equally divided between 60 and 74 Divisions. Opposite 60 Division lay a strong outwork on a commanding knoll known as Hill 1070. Besides directly barring 60 Division's approach to the enemy's main line, it also prevented the batteries of 74 Division from getting within wire cutting range. The capture of this hill, therefore, constituted the first phase of the attack. At 0555 hours a heavy bombardment was opened on the hill. But the air was so still that the hill was soon enveloped in dense clouds of dust, and it became impossible for the gunners to observe the effects of their fire. The bombardment had to be suspended for three-quarters of an hour. It was then resumed, and at 0830 hours the infantry went in and carried their objective.

During this phase the battalions on other parts of the front had been working forward. As soon as Hill 1070 was taken batteries moved up, under heavy artillery fire, to wire culling range. From 1030 hours to 1200 hours the guns battered the Turkish defences while the infantry edged steadily forward to assaulting distance. At 1215 hours the infantry of both divisions went in with the bayonet. Few of the enemy, however, stood to meet the steel, and by 1330 hours the whole position between the Khalassa road and the Wadi Saba had been captured and an outpost line was being established about 2,000 yards further east.

The task of clearing the works north of the Saba was impeded by heavy dust, but they were finally carried by 74 Division by 1000 hours. 20 Corps had thus fulfilled its role in the attack on Beersheba.

While 20 Corps was attacking Hill 1070 Anzac Mounted Division had reached the line Bir Hamam-Sir Salim, at about 0800 hours. Australian Mounted Division was in Corps reserve just south-east of Khasim Zanna. 7th Mounted Brigade was in dismounted action against Ras Ghannam, south of Beersheba.

At 0800 hours Anzac Mounted Division advanced to carry out the first phase of Desert Mounted Corps' programme - the reduction of the enemy's defences east and north-east of Beersheba. These defences were anchored on strong redoubts on Tel el Sakaty and Tel el Saba. The former objective was allotted to 2nd ALH Brigade, the latter to the New Zealand Brigade, with 1 ALH Brigade in reserve.

Starting from Bir Hamam, 2 ALH Brigade rode hard towards Tel el Sakaty and the Hebron road. Their pace saved them from heavy casualtles, but they were forced to dismount just short of the road. Thereafter progress was slow and it was nearly 1300 hours before the Brigade had made good Tel el Sakaty, the wells near by, and the line the road. There it remained for the rest of the day, protecting the right flank of the Corps.

[155] Tel el Saba was a more formidable obstacle. The mound lies on the northern bank of the Wadi Saba, about three miles east of the town. It is 400 yards by 200 yards in extent, with a flat, rocky top. On the wadi side its face is a cliff; on the other sides its face is steep but not sheer. It had been trenched for infantry and machine guns, and in places had two tiers of fire which swept the wadi bed and the bare plain.

Shortly after 0900 hours the New Zealand Brigade advanced with the object of assaulting the mound from the north and east. Progress was slow in the face of heavy and accurate machine gun and rifle fire, the 13-pounder shells of the divisional artillery making little impression on the Turkish defences. At 1100 hours the divisional commander put in two regiments from his reserve brigade Both regiments galloped across the bare plain to within 1,500 yards of their objective before dismounting. They then advanced on foot against the south face of the mound. The Somerset and Inverness batteries, handled with great skill and dash, came into action at a range of only 1,500 yards in an effort to master the Turkish machine gunners. In a intense fire fight the two brigades gradually closed on the mound, which was finally carried at 1500 hours.

3 ALH Brigade of Australian Mounted Division, in Corps Reserve, was now directed on objectives north of Beersheba in order to isolate the town. Meanwhile it had become clear to General Chauvel that if he was to carry out his orders to seize Beersheba before nightfall, orders which had been emphatically repeated by Allenby a little earlier, methodical progress must be abandoned in favour of action designed to produce quicker results. He still had two brigades of Australian Mounted Division in reserve. One of these - 4 ALH - he now ordered to make a mounted attack direct on the town.

In consequence of air attacks 4 ALH Brigade had been somewhat dispersed, and one regiment was on outpost duty. It was 1630 hours before it was concentrated and ready. Between Khasim Zanna and the Turkish trenches on the east of the town lay four miles of bare, open ground, good galloping country. The brigade deployed with two regiments forward - 4 ALH on the right, 12 ALH on the left - and 11 ALH in reserve.

The leading regiments rode in three successive lines each of a squadron extended at four or five paces interval between riders. The men had no swords so carried drawn bayonets in their hands trenches machine gun squadron moved out to the left to engage on that flank.

As soon as the leading squadrons appeared on the plain the Turkish guns opened on them, but the pace and open formation of the horsemen saved them from heavy casualties. Presently they came under heavy machine gun fire from the left flank, but the supporting artillery - "A" Battery, Honourable Artillery Company and the Notts Battery - picked up the flashes in the failing light and quickly found [156] Then the squadrons encountered rapid and sustained musketry fire from the entrenched infantry in front of them. The men rode on at full gallop, and the fire soon became erratic.

The leading horsemen galloped over two lines of trenches straight on into Beersheba, overrunning buns, transport, and infantry. Succeeding waves dismounted and cleared the trenches with the bayonet. The defence fell apart in wild disorder. Night came down with Beersheba firmly in British hands.

The highlight of the capture of Beersheba was the dramatic charge of 4 ALH Brigade. The charge succeeded because from first to last it was pushed home with terrific elan; because it came as a complete and shattering surprise, and because the pace at which it moved defeated the efforts of the Turkish Gunners to correct their ranges. Rifles examined after the action showed that even the infantry had failed to lower their sights below 800 yards. Consequently most of the fire at the shorter and more dangerous ranges passed overhead. The brigade had only 64 casualties, and most of these were sustained in the hand-to-hand fighting in the trenches.

The charge had a notable effect besides the capture of Beersheba. It gave 4 ALH Brigade immense pride in its achievement and confidence n its prowess, and it created in very other brigade in the Corps a spirit of emulation which had important results in subsequent engagements.


Further Reading:

The Battle of Beersheba, Palestine, 31 October 1917

Australian and New Zealand Roll of Honour

Battles where Australians fought, 1899-1920


Citation: The Battle of Beersheba, Palestine, 31 October 1917, Keogh Account

Posted by Project Leader at 7:48 PM EADT
Updated: Sunday, 4 October 2009 11:19 AM EADT
The Battle of Beersheba, Palestine, 31 October 1917, 4th LH Bde, AIF, Operation Order No. 37
Topic: AIF - 4B - 4 LHB

The Battle of Beersheba

Palestine, 31 October 1917

4th LH Bde, AIF, Operation Order No. 37


4th Australian Light Horse Brigade Operation Order No 37, Page 1.


Below is a transcription of the contents from 4th Australian Light Horse Brigade Operation Order No 37


1. The army will attack on Z Day with the primary objective of capturing BEERSHEBA.

2.

(a) Preliminary instructions No. 1 has been read to those concerned.   
(b) final objective of XX Corps is to be line through M of AZAIMEH - B. of BEERSHEBA - halfway between the two points 910 on the railway.   
(c) 60th Division is on right of XX Corps. XX Corps Cavalry Regiment will be operating E. of KHALASA - BEERSHEBA Road.


3. Tasks of the Desert Mounted Corps are:-

(a) Attack BEERSHEBA from the East so as to envelop the enemy's left rear and
(b) Sieze as much water supply as possible in order to form a base for future operations northwards.


4. Corps moves as follows:-

(a) A & NZ Division and 8th A.L.H. Regiment from ASLUJ at 1800 via M - N and M - N1 Roads.
(b) Advanced Corps Headquarters to Cross Roads N/N1 where it halts.
(c) 7th Mtd Bde. establish outposts on line 121 0 (1 1/2 miles S. of RAS GHANNAM - G. EL NA'AM) by 0630 on Z day.


5. 8th L.H. Regiment will probably on reaching track junction W/N move westwards in order to take up position astride the W road about 2 miles from ISAWAIWIN and will act either as advanced or left flank guard to the Australian Mounted Divison.

6. The Division is to concentrate near ISWAIWIN by 0930 marching via M, N and N1 roads.

7.
(a) The 4th A.L.H. Brigade will march in the following order of march:-

BDE., HQrs., Signal Troop.
4th A.L.H. Regiment       
M.G. Sqdn.       
"A" Battery H.A.C.       
11th A.L.H. Regiment     
12th A.L.H. Regiment      
Field Troop.       
Field Ambulance.       
"A" Echelon in above order.

Time of starting and starting point will be issued later.

(b) O.C. "A" Battery H.A.C. M.G. Sqdn., and Feild Troop will accompany Bde HQrs.
(c) Units will march as closed up as possible. If gaps occur connecting files will be pushed forward.


8. Regiments will be responsible for the protection of both flanks. One troop on each flank will be put out as flank guards by each regiment.

9. On the march and at halts each Unit will take steps to protects its troops against hostile aeroplane bombing or machine gunning.

10. When a hostile aeroplane is over head there shall be no movement and men should not look up as faces are most conspicuous.

11. The whole division will halt and clear the road

(a) from 0030 to 0300 unless it is possible to water at ASLUJ in which case part of the halt will be spent there.

(b) for ten minutes before every clock hour.

(c) the road must be cleared at all times for Staff Officers, gallopers and dispatch riders.


4th Australian Light Horse Brigade Operation Order No 37, Page 2.


12. Transport which becomes blocked must clear the way for fighting troops.

13. There is to be no smoking from the commencemtn of the march till dawn on Z day.

14. Care will be taken that no Officer or man goes forward in possession of maps or papers (except such as are essential to the conduct of operations) which if captured would give information of value to the enemy.

15. Watches will be synchronised at 1330 on Z - 1 day.

16. N. Road is know known to branch off M Road at a point due East of Point 1260, thence through W of W EL IMSASH thence through word IMSASH joining up with original N Road at point due South of letter H. This new bit of road is good going and follows the valley all the way to H.

17. Reference Pa. ra. 7:-

STARTING POINT: 500 yards South of B.H.Q.
TIME OF STARTING: 1800.


18. 'B1" and "B2" Echelons with attendant personnel will be ready concentrated by 1800 and will move to No. 2 Area after Brigade has left under orders of Lieut. BARR and Lieut. COLE. These Echelons will remain in No. 2 Area until further orders. Om motor cyclist will be detailed to report to O.C. Ecehlon No. 2 Area at 1700.

19. Machine guns will be changed from "A" Echelon to pack during halt from 0030 to 0200.

20. 12th A.L.H. Regiment will detail 1 N.C.O. and three sections to report to O.C. "A" Echelon at 1800 to set up as escort.


Further Reading:

4th Light Horse Brigade, AIF

The Battle of Beersheba, Palestine, 31 October 1917

Australian and New Zealand Roll of Honour

Battles where Australians fought, 1899-1920


Citation: The Battle of Beersheba, Palestine, 31 October 1917, 4th LH Bde, AIF, Operation Order No. 37

Posted by Project Leader at 5:22 PM EADT
Updated: Sunday, 4 October 2009 11:27 AM EADT
The Battle of Beersheba, Palestine, 31 October 1917, 9th Mobile Veterinary Section, AIF, Unit History Account
Topic: AIF - 4B - 9 MVS

The Battle of Beersheba

Palestine, 31 October 1917

9th Mobile Veterinary Section, AIF, Unit History Account


9th Mobile Veterinary Section at camp near Tripoli, 1919.

[From: AWM B00761]


At the conclusion of the war, Captain GK Thorpe, O.C. 9th Mobile Veterinary Section produced an unpublished  manuscript in 1919 called 9th Mobile Veterinary Section History 1917 - 1919, which included a section specifically related to the battle of Beersheba and is extracted below.


Thorpe, GK, 9th Mobile Veterinary Section History 1917 - 1919, unpublished, pp. 5 - 6:


On 20.9.17 orders were received to march to Kilo 15 on the Railway near Weli Sheikh Nuran at which place it remained till 28.10.17 preparations being there made for the coming operations.

On 28.10.17 the Section moved to Esani and bivouacked with the Brigade marching next day to Maalaga on the Wadi el Immaalaga to be near water.

On 30.10.17 orders were received to move back to Esani as Desert Mounted Corps considered our position unsafe.

On 1.11.17 we were told to push on to Beersheba arriving there that night and the following day took over all the horse casualties of the Brigade.

While at this place about 30 decrepit Turkish ponies were ordered to be destroyed. The OC of the Section was detailed for the job and a party of Turkish prisoners to lead the animals provided. The animals with prisoners holding them were lined up along a deep trench and the prisoners, evidently under the impression that they were to be shot with the horses, commenced to pray with considerable fervour. Their relief was great when they could be made to understand that they were not to be killed.

On 4.4.17 the Section was detailed to conduct 81 horses to Shellal. The party left in charge of Corporal JB Sharpe with one man to six horses. The animals were watered Khasif, one died en route and remainder handed over to the receiving depot at Shellal.


Further Reading:
 
9th Mobile Veterinary Section

The Battle of Beersheba, Palestine, 31 October 1917

Australian and New Zealand Roll of Honour

Battles where Australians fought, 1899-1920


Citation: 9th Mobile Veterinary Section, AIF account about the fall of Beersheba

Posted by Project Leader at 4:47 PM EADT
Updated: Thursday, 8 October 2009 3:37 PM EADT
9th LHR AIF War Diary, 15 October
Topic: AIF - 3B - 9 LHR

9th LHR, AIF

9th Light Horse Regiment

War Diary, 15 October

Pro Gloria et Honore - For Glory and Honour

Regimental March -  Marching Through Georgia


The following entries are extracted and transcribed from the 9th Light Horse Regiment War Diary, the originals of which are held by the Australian War Memorial. There are 366 entries on this site. Each day has entries as they occurred from 1914 to 1919. In addition to the 9th Light Horse Regiment War Diary, when appropriate, entries from the 3rd Light Horse Brigade War Diary and other regiments with the Brigade will also appear. Entries from the unit history, Darley, TH, With the Ninth Light Horse in the Great War, Adelaide, Hassell Press, 1924 will also appear from time to time. The aim is to give the broadest context to the story and allow the reader to follow the day to day activities of the regiment. If a relative happened to have served in the regiment during the Great War, then this provides a general framework in which the individual story may be told.


The Diary


1914

Thursday, October 15, 1914

9th Light Horse Regiment Location -  Morphettville Race Course Camp and Broadmeadows Camp, Victoria. 

9th Light Horse Regiment War Diary - Formation of Regiment occurring at Morphettville Race Course Camp, Adelaide, while "C" Squadron is formed at Broadmeadows Camp, Victoria. 


1915

Friday, October 15, 1915

9th Light Horse Regiment Location - Rhododendron Spur

9th Light Horse Regiment War Diary - Demonstration by our troops all along the line at 0400 only produced feeble response from machine guns on Battleship Ridge. The following members of the Regiment were mentioned in Army Corps Routine Order No. 340 - No 11/595 Sergeant W Wilson for useful reconnaissance in Sazli Beit Dere. No 620 Sergeant FJ Linacre and No 431 Corporal J Fryday for good reconnaissance work. The bivouac at Regimental Headquarters was heavily shelled by 4.8 Howitzers and shrapnel at 1430. One man badly wounded in leg. 20 shells burst. Today's state shows 15 Officers, 301 Other Ranks, total 316. Bayonet strength 194. Sick to hospital 4.


1916

Sunday, October 15, 1916

9th Light Horse Regiment Location - Bir Ganadil

9th Light Horse Regiment War Diary - Routine work. The GOC No 5 Section inspected the Outpost line.


1917

Monday, October 15, 1917

9th Light Horse Regiment Location - Um Urgan

9th Light Horse Regiment War Diary - Demonstration by Commanding Officer to officers and Non Commissioned Officers. Packing saddles 0815 to 0915.


1918

Tuesday, October 15, 1918

9th Light Horse Regiment Location - Kaukab

9th Light Horse Regiment War Diary - C Squadron rejoined Regiment.


1919

Wednesday, October 15, 1918

9th Light Horse Regiment Location - Adelaide

9th Light Horse Regiment War Diary - Regiment disbanded.


Previous: 9th LHR AIF War Diary, 14 October

Next: 9th LHR AIF War Diary, 16 October


Sources:

See: 9th Australian Light Horse Regiment, Contents
Australian Light Horse Studies Centre, AIF War Diaries of the Great War, Site Transcription Policy


Further Reading:

9th Light Horse Regiment AIF

Bert Schramm Diary

9th Australian Light Horse Regiment, Roll of Honour 

Battles where Australians fought, 1899-1920


Citation: 9th LHR AIF War Diary, 15 October

Posted by Project Leader at 4:07 PM EADT
Updated: Thursday, 16 September 2010 3:46 PM EADT
Diaries of AIF Servicemen, Bert Schramm, 15 October 1918
Topic: Diary - Schramm

Diaries of AIF Servicemen

Bert Schramm

15 October 1918


Bert Schramm


2823 Private Herbert Leslie SCHRAMM, a 22 year old Farmer from Whites River, South Australia. He enlisted on 17 February 1916; and at the conclusion of the war Returned to Australia, 10 July 1919.

During part of the course of his military service with the AIF, Bert Schramm kept a diary of his life. Bert was not a man of letters so this diary was produced with great effort on his behalf. Bert made a promise to his sweetheart, Lucy Solley, that he would do so after he received the blank pocket notebook wherein these entries are found. As a Brigade Scout since September 1918, he took a lead part in the September Offensive by the Allied forces in Palestine. Bert's diary entries are placed alongside those of the 9th Light Horse Regiment to which he belonged and to the 3rd Light Horse Brigade to which the 9th LHR was attached. On this basis we can follow Bert in the context of his formation.


The Diaries

The complete diary is now available on the Australian Light Horse Studies Centre Site at:

Bert Schramm Diary


Finding more about a service person. See:

Navigating the National Archives Service File 


Bert Schramm's Handwritten Diary, 12 - 19 October 1918

[Click on page for a larger print version.]


Bert Schramm

Tuesday, October 15, 1918

Bert Schramm's Location - Kaukab

Bert Schramm's Diary -  Nothing worth recording. Rumours of peace floating around.


9th Light Horse Regiment War Diary

9th Light Horse Regiment Location - Kaukab

9th Light Horse Regiment War Diary - C Squadron rejoined Regiment.

9th LHR AIF War Diary, 15 October        


Darley

Darley, TH, With the Ninth Light Horse in the Great War, Adelaide, Hassell Press, 1924.

No Entry


Previous:  Bert Schramm's Diary, 14 October 1918

Next:  Bert Schramm's Diary, 16 October 1918


Sources Used:

Bert Schramm's Diary

National Archives Service File.

Embarkation Roll, AWM8.

Australian War Memorial Roll of Honour

Nominal Roll, AWM133, Nominal Roll of Australian Imperial Force who left Australia for service abroad, 1914-1918 War.


War Diaries and Letters

All War Diaries and letters cited on this site should be read in conjunction with the Australian Light Horse Studies Centre, War Diaries and Letters, Site Transcription Policy which may be accessed at:

Australian Light Horse Studies Centre, War Diaries and Letters, Site Transcription Policy 


Further Reading:

Bert Schramm Diary

Bert Schramm Diary, Album

Bert Schramm's Photo Album

9th Australian Light Horse Regiment, AIF

9th Australian Light Horse Regiment, War Diary, Day by Day Account

Battles where Australians fought, 1899-1920


Citation: Diaries of AIF Servicemen, Bert Schramm, 15 October 1918


Posted by Project Leader at 4:00 PM EADT
Updated: Wednesday, 8 June 2011 6:59 PM EADT

Newer | Latest | Older

Full Site Index


powered by FreeFind
Let us hear your story: You can tell your story, make a comment or ask for help on our forum.

Desert Column Forum

A note on copyright

The Australian Light Horse Studies Centre is a not for profit and non profit group whose sole aim is to write the early history of the Australian Light Horse from 1900 - 1920. It is privately funded and the information is provided by the individuals within the group and while permission for the use of the material has been given for this site for these items by various donors, the residual and actual copyright for these items, should there be any, resides exclusively with the donors. The information on this site is freely available for private research use only and if used as such, should be appropriately acknowledged. To assist in this process, each item has a citation attached at the bottom for referencing purposes.

Please Note: No express or implied permission is given for commercial use of the information contained within this site.

A note to copyright holders

The Australian Light Horse Studies Centre has made every endeavour to contact copyright holders of material digitised for this blog and website and where appropriate, permission is still being sought for these items. Where replies were not received, or where the copyright owner has not been able to be traced, or where the permission is still being sought, the Australian Light Horse Studies Centre has decided, in good faith, to proceed with digitisation and publication. Australian Light Horse Studies Centre would be happy to hear from copyright owners at any time to discuss usage of this item.

Contact

Australian Light Horse Studies Centre

eXTReMe Tracker