« February 2009 »
S M T W T F S
1 2 3 4 5 6 7
8 9 10 11 12 13 14
15 16 17 18 19 20 21
22 23 24 25 26 27 28
You are not logged in. Log in


Search the site:


powered by FreeFind
Volunteer with us.

Entries by Topic All topics  
A Latest Site News
A - Using the Site
AAA Volunteers
AAB-Education Centre
AAC-Film Clips
AAC-Photo Albums
AIF & MEF & EEF
AIF - Lighthorse
AIF - ALH - A to Z
AIF - DMC
AIF - DMC - Or Bat
AIF - DMC - Anzac MD
AIF - DMC - Aus MD
AIF - DMC - British
AIF - DMC - BWI
AIF - DMC - French
AIF - DMC - Indian
AIF - DMC - Italian
AIF - DMC - Medical
AIF - DMC - Remounts
AIF - DMC - Scouts
AIF - DMC - Sigs
AIF - DMC - Sigs AirlnS
AIF - DMC - 1 Sig Sqn
AIF - DMC - 2 Sig Sqn
AIF - DMC - Eng
AIF - DMC - Eng 1FSE
AIF - DMC - Eng 2FSE
AIF - DMC - GSR
AIF - 1B - 1 LHB
AIF - 1B - 6 MVS
AIF - 1B - 1 LHMGS
AIF - 1B - 1 Sig Trp
AIF - 1B - 1 LHFA
AIF - 1B - 1 LHR
AIF - 1B - 2 LHR
AIF - 1B - 3 LHR
AIF - 2B - 2 LHB
AIF - 2B - 7 MVS
AIF - 2B - 2 LHFA
AIF - 2B - 2 LHMGS
AIF - 2B - 2 Sig Trp
AIF - 2B - 5 LHR
AIF - 2B - 6 LHR
AIF - 2B - 7 LHR
AIF - 3B - 3 LHB
AIF - 3B - 8 MVS
AIF - 3B - 3 LHB Sigs
AIF - 3B - 3 LHFA
AIF - 3B - 3 LHMGS
AIF - 3B - 3 Sig Trp
AIF - 3B - 8 LHR
AIF - 3B - 9 LHR
AIF - 3B - 10 LHR
AIF - 4B - 4 LHB
AIF - 4B - 4 Sig Trp
AIF - 4B - 9 MVS
AIF - 4B - 4 LHFA
AIF - 4B - 4 LHMGS
AIF - 4B - 4 LHR
AIF - 4B - 11 LHR
AIF - 4B - 12 LHR
AIF - 5B - 5 LHB
AIF - 5B - 10 MVS
AIF - 5B - 5 LHFA
AIF - 5B - 5 Sig Trp
AIF - 5B - ICC
AIF - 5B - 14 LHR
AIF - 5B - 15 LHR
AIF - 5B - 1er Regt
AIF - 5B - 2 NZMGS
AIF - AASC
AIF - Aboriginal LH
AIF - Badges
AIF - Cars
AIF - Chinese LH
AIF - Double Sqns
AIF - Engineers
AIF - Fr - 22 Corps
AIF - Fr - 13 LHR
AIF - Honour Roll
AIF - HQ - 3rd Echelon
AIF - Marching Songs
AIF - Misc Topics
AIF - NZMRB
AIF - NZMRB - AMR
AIF - NZMRB - CMR
AIF - NZMRB - EFT
AIF - NZMRB - NZMFA
AIF - NZMRB - NZMGS
AIF - NZMRB - OMR
AIF - NZMRB - Sig-Trp
AIF - NZMRB - WMR
AIF - Ships
AIF - Ships - Encountr
AIF - Ships - Una
AIF - WFF
AIF - Wireless Sqn
Battles
BatzA - Australia
BatzA - Broken Hill
BatzA - Liverpool
BatzA - Merivale
BatzB - Boer War
BatzB - Bakenlaagte
BatzB - Belmont
BatzB - Bothaville
BatzB - Buffels Hoek
BatzB - Coetzees Drift
BatzB - Diamond Hill
BatzB - Driefontein
BatzB - Elands
BatzB - Graspan
BatzB - Grobelaar
BatzB - Grootvallier
BatzB - Hartebestfontn
BatzB - Houtnek
BatzB - Karee Siding
BatzB - Kimberley
BatzB - Koster River
BatzB - Leeuw Kop
BatzB - Mafeking
BatzB - Magersfontein
BatzB - Modder River
BatzB - Onverwacht
BatzB - Paardeberg
BatzB - Palmietfontein
BatzB - Pink Hill
BatzB - Poplar Grove
BatzB - Rhenoster
BatzB - Sannahs Post
BatzB - Slingersfontn
BatzB - Stinkhoutbm
BatzB - Sunnyside
BatzB - Wilmansrust
BatzB - Wolvekuil
BatzB - Zand River
BatzG - Gallipoli
BatzG - Anzac
BatzG - Aug 1915
BatzG - Baby 700
BatzG - Evacuation
BatzG - Hill 60
BatzG - Hill 971
BatzG - Krithia
BatzG - Lone Pine
BatzG - Nek
BatzJ - Jordan Valley
BatzJ - 1st Amman
BatzJ - 2nd Amman
BatzJ - Abu Tellul
BatzJ - Es Salt
BatzJ - JV Maps
BatzJ - Ziza
BatzM - Mespot
BatzM - Baghdad
BatzM - Ctesiphon
BatzM - Daur
BatzM - Kurna
BatzM - Kut el Amara
BatzM - Ramadi
BatzN - Naval
BatzN - AE1
BatzN - Cocos Is
BatzN - Heligoland
BatzN - Marmara
BatzN - Zeebrugge
BatzN - Zeppelin L43
BatzNG - Bitapaka
BatzO - Other
BatzO - Baku
BatzO - Egypt 1919
BatzO - Emptsa
BatzO - Karawaran
BatzO - Peitang
BatzO - Wassa
BatzP - Palestine
BatzP - 1st Gaza
BatzP - 2nd Gaza
BatzP - 3rd Gaza
BatzP - Aleppo
BatzP - Amwas
BatzP - Ayun Kara
BatzP - Bald Hill
BatzP - Balin
BatzP - Beersheba
BatzP - Berkusieh
BatzP - Damascus
BatzP - El Auja
BatzP - El Buggar
BatzP - El Burj
BatzP - Haifa
BatzP - Huj
BatzP - JB Yakub
BatzP - Kaukab
BatzP - Khan Kusseir
BatzP - Khuweilfe
BatzP - Kuneitra
BatzP - Megiddo
BatzP - Nablus
BatzP - Rafa
BatzP - Sasa
BatzP - Semakh
BatzP - Sheria
BatzP - Surafend
BatzP - Wadi Fara
BatzS - Sinai
BatzS - Bir el Abd
BatzS - El Arish
BatzS - El Mazar
BatzS - El Qatiya
BatzS - Jifjafa
BatzS - Magdhaba
BatzS - Maghara
BatzS - Romani
BatzS - Suez 1915
BatzSe - Senussi
BatzWF - Westn Front
BW - Boer War
BW - NSW
BW - NSW - 1ACH
BW - NSW - 1NSWMR
BW - NSW - 2NSWMR
BW - NSW - 3ACH
BW - NSW - 3NSWIB
BW - NSW - 3NSWMR
BW - NSW - 5ACH
BW - NSW - A Bty RAA
BW - NSW - AAMC
BW - NSW - Aust H
BW - NSW - Lancers
BW - NSW - NSW Inf
BW - NSW - NSWCBC
BW - NSW - NSWIB
BW - NSW - NSWMR_A
BW - NZ
BW - Qld
BW - Qld - 1ACH
BW - Qld - 1QMI
BW - Qld - 2QMI
BW - Qld - 3ACH
BW - Qld - 3QMI
BW - Qld - 4QIB
BW - Qld - 5QIB
BW - Qld - 6QIB
BW - Qld - 7ACH
BW - QLD - AAMC
BW - SA
BW - SA - 1SAMR
BW - SA - 2ACH
BW - SA - 2SAMR
BW - SA - 3SACB
BW - SA - 4ACH
BW - SA - 4SAIB
BW - SA - 5SAIB
BW - SA - 6SAIB
BW - SA - 8ACH
BW - SA - AAMC
BW - Tas
BW - Tas - 1ACH
BW - Tas - 1TIB
BW - Tas - 1TMI
BW - Tas - 2TB
BW - Tas - 2TIB
BW - Tas - 3ACH
BW - Tas - 8ACH
BW - Vic
BW - Vic - 1VMI
BW - Vic - 2ACH
BW - Vic - 2VMR
BW - Vic - 3VB
BW - Vic - 4ACH
BW - Vic - 4VIB
BW - Vic - 5VMR
BW - Vic - 6ACH
BW - Vic - AAMC
BW - Vic - Scot H
BW - WA
BW - WA - 1WAMI
BW - WA - 2ACH
BW - WA - 2WAMI
BW - WA - 3WAB
BW - WA - 4ACH
BW - WA - 4WAMI
BW - WA - 5WAMI
BW - WA - 6WAMI
BW - WA - 8ACH
BW Gen - Campaign
BW Gen - Soldiers
BW General
Cavalry - General
Diary - Schramm
Egypt - Heliopolis
Egypt - Mena
Gen - Ataturk Pk, CNB
Gen - Australia
Gen - Legends
Gen - Query Club
Gen - St - NSW
Gen - St - Qld
Gen - St - SA
Gen - St - Tas
Gen - St - Vic
Gen - St - WA
Gm - German Items
Gm - Bk - 605 MGC
GW - 11 Nov 1918
GW - Atrocities
GW - August 1914
GW - Biographies
GW - Propaganda
GW - Spies
GW - We forgot
Militia 1899-1920
Militia - Area Officers
Militia - Inf - Infantry
Militia - Inf - 1IB
Militia - Inf - 2IB
Militia - Inf - 3IB
Militia - Inf - NSW
Militia - Inf - Qld
Militia - Inf - SA
Militia - Inf - Tas
Militia - Inf - Vic
Militia - Inf - WA
Militia - K.E.Horse
Militia - LH
Militia - LH - Regts
Militia - LH - 1LHB
Militia - LH - 2LHB
Militia - LH - 3LHB
Militia - LH - 4LHB
Militia - LH - 5LHB
Militia - LH - 6LHB
Militia - LHN - NSW
Militia - LHN - 1/7/1
Militia - LHN - 2/9/6
Militia - LHN - 3/11/7
Militia - LHN - 4/6/16
Militia - LHN - 5/4/15
Militia - LHN - 6/5/12
Militia - LHN - 28
Militia - LHQ - Qld
Militia - LHQ - 13/2
Militia - LHQ - 14/3/11
Militia - LHQ - 15/1/5
Militia - LHQ - 27/14
Militia - LHS - SA
Militia - LHS - 16/22/3
Militia - LHS - 17/23/18
Militia - LHS - 24/9
Militia - LHT - Tas
Militia - LHT - 12/26
Militia - LHV - Vic
Militia - LHV - 7/15/20
Militia - LHV - 8/16/8
Militia - LHV - 9/19
Militia - LHV - 10/13
Militia - LHV - 11/20/4
Militia - LHV - 19/17
Militia - LHV - 29
Militia - LHW - WA
Militia - LHW-18/25/10
Militia - Military Orders
Militia - Misc
MilitiaRC - Rifle Clubs
MilitiaRC - NSW
MilitiaRC - NT
MilitiaRC - Qld
MilitiaRC - SA
MilitiaRC - Tas
MilitiaRC - Vic
MilitiaRC - WA
Militiaz - New Zealand
Tk - Turkish Items
Tk - Army
Tk - Bks - Books
Tk - Bks - 1/33IR
Tk - Bks - 27th IR
Tk - Bks - Air Force
Tk - Bks - Yildirim
Tk - POWs
Wp - Weapons
Wp - Hotchkiss Cav
Wp - Hotchkiss PMG
Blog Tools
Edit your Blog
Build a Blog
RSS Feed
View Profile
Open Community
Post to this Blog
Site Index
Education Centre
LH Militia
Boer War
Transport Ships
LH Battles
ALH - Units
ALH - General
Aboriginal Light H
Weapons
Ottoman Sources

"At a mile distant their thousand hooves were stuttering thunder, coming at a rate that frightened a man - they were an awe inspiring sight, galloping through the red haze - knee to knee and horse to horse - the dying sun glinting on bayonet points..." Trooper Ion Idriess

The Australian Light Horse Studies Centre aims to present an accurate history as chroniclers of early Australian military developments from 1899 to 1920.

The Australian Light Horse Studies Centre site holds over 12,000 entries and is growing daily.

Contact: Australian Light Horse Studies Centre

Let us hear your story: You can tell your story, make a comment or ask for help on our Australian Light Horse Studies Centre Forum called:

Desert Column Forum

WARNING: This site contains: names, information and images of deceased people; and, language which may be considered inappropriate today.

Tuesday, 17 February 2009
Aircrew Serving In Ottoman Army Aircraft Units in Palestine
Topic: Tk - Bks - Air Force

Pasha and Yildirim, the Palestine Front, 1915 to 1918
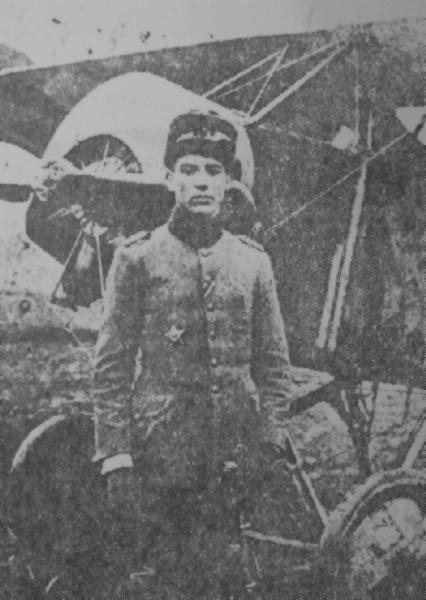
 

Lt Orhan, 3ncü Tayyare Bölük, standing in front of a Pfalz AII.

[From: Ole Nikolajsen, Ottoman Aviation 1911 - 1919, p. 212.]


Part 11 - Aircrew Serving In Ottoman Army Aircraft Units in Palestine


3ncü Tayyare Bölük

Commanding Officers:
Captain Cemil (Observer), service from June 1916 to October 1916
Captain Fazil (Pilot), service from October 1916 to June 1917
Captain Izzettin (Observer), service from June 1917 to August 1918
Lieutenant Salih (Adjutant), service from August 1918 to September 1918

Pilots:
Lieutenant Rifat, service from June 1916 to December 1916.
Lieutenant Orhan, service from June 1916 to August 1918.
Lieutenant Fakir Hasim, service from June 1916.
Captain Saim, service from October 1916 until killed 2 October 1916.
Lieutenant Cevdet, service from March 1917
Sergeant Hasan Fehmi, service from November 1917 until taken prisoner, October 1918.
Lieutenant Emin Nihat, service from November 1917 until transferred to the Caucasus Front.
Sergeant Ismail Zeki, service from November 1917 until taken prisoner, 4 February 1918.
Civ. Hüseyin Hüsnü, service from November 1917.
Sergeant Ihya, service from November 1917.

Observers:
Lieutenant Ahmet Kamil, service from June 1916.
Lieutenant Osman, service from June 1916.
Lieutenant Mehmet Cemal, service from June 1916.
Lieutenant M. Kemal, service from November 1916
Lieutenant Lütfi Fikri, service from March 1917.
Lieutenant Lutfullah, service from March 1917.
Lieutenant Ziya, service from November 1917.
Lieutenant Hasan Hulki, service from November 1917.
Lieutenant Ahmet Zeki, service from November 1917.
Lieutenant Osman Nuri, service from November 1917.
Lieutenant H. Murat, service from November 1917.
Lieutenant Salih, service from November 1917.


4ncü Tayyare Bölük

Commanding Officers:
Captain Hüseyin Mazlum (Observer), service from December 1917 to January 1918
Captain Ihsan (Observer), service from January 1918 to August 1918
Lieutenant Muhsin, service from August 1918 to September 1918

Pilots:
Lieutenant Fuat Halim, service from December 1917.
Civ. Behcet, service from December 1917.
Corp. Max Suchin, service from December 1917 to July 1918.
Sergeant Mustafa Remzi.

Observers:
Lieutenant Ferit, service from December 1917.
Lieutenant Ihsan, service from December 1917.
Lieutenant Ahmet Cemal, service from December 1917.
Lieutenant Cemal Sami, service from December 1917.
Lieutenant Sitki, service from December 1917.


4ncü Tayyare Bölük

Commanding Officers:
Captain Zelich (Observer), service from February 1918 to May 1918.
Captain Levin (Observer), service from May 1918 to October 1918.

Pilots:
Lieutenant Dickmann
Lieutenant Volf
Lieutenant Dox
Sergeant Rolker
Sergeant Vereyn
Sergeant Otto
Sergeant Posbach
Sergeant Pawalka
Sergeant Sabri
Sergeant Hasan Fehmi (Bursa)
Sergeant Bezmi
Sergeant Nickel

Observers:
Captain Prince de Sax.
Captain Beltz
Lieutenant Gandenberg
Lieutenant Vagner
Lieutenant Lüdeke
Lieutenant Wiese
Lieutenant Straup
Lieutenant Salim
Lieutenant von Mois
Lieutenant Benecke
Lieutenant Klamberg
Lieutenant Siya (Shardag)
Lieutenant Hüseyin Haki
Captain Schefer
Captain Mustafa Han (Iranian)
Captain Haseyin Han (Iranian)


Source: The above extract is obtained from a self published work by Ole Nikolajsen called Ottoman Aviation 1911 - 1919Aircrew Serving In Ottoman Army Aircraft Units in Palestine comes from Chapter 8, Pasha and Yildirim, the Palestine Front, 1915 to 1918, pp. 201-2. The text has been edited to remove errors and make it readable for an English speaking audience.


Further Reading:

The German Ottoman Air Force 

Air War on the Palestine Front, December 1915 to January 1917

Turkish Units - The Ottoman Air Force

Lieutenant Colonel Hüseyin Hüsnü Emir, Yildirim


Go To:

Previous Chapter: Aircraft with Ottoman Army Units in Palestine


Citation: Aircrew Serving In Ottoman Army Aircraft Units in Palestine

Posted by Project Leader at 11:01 PM EAST
Updated: Sunday, 1 March 2009 9:29 AM EAST
Hangard Wood, France, April 7, 1918
Topic: BatzWF - Westn Front

Hangard Wood

France, 7 April 1918


Hangard Wood, scene of an ill-conceived attack on 7 April 1918 against German positions south of Villers-Bretonneux (q.v.) Following the successful defence of that Village on 4 April, the Australian 5th Brigade (under Brig.-General Robert Smith) was detached from its parent division-the 2nd, fresh from Flanders-to take over the front-line south of that place to where the British Fourth Army joined with French forces on the River Luce. As a preliminary to a larger operation aimed at returning the front some distance to the east of its present alignment, the Australians were ordered to 'clean up the woods and ravine north and north-east of Hangard'. This entailed making an attack against the eastern half of the woods which the Germans had captured three days earlier.

Although wearied by the process of relieving the British troops already in the vicinity, the Australian 19th and 20th battalions were eager to take on the task when orders reached them about midnight on the 6th for an assault at dawn. The forces involved were small-in several places no more than platoon posts of about 25 men, while the main attack was entrusted to just two companies. The northern assault party, despite showing great dash in the delivery of their attack, could find no tenable position upon which to base a defence once they had gained their objective. The southern force found itself subjected to searching fire from enemy machine-guns across the ravine, and with dead-ground on both flanks which left them vulnerable to counter-attack. From this quarter the Germans launched just such an attack at 6 a.m. and overran the Australians' southern posts. Although continuations of this attack were beaten off, there was no viable alternative for the attack parties but to withdraw to their lines.

The attempt had cost 151 casualties in the two companies required to carry forward the attack. It was nonetheless remarkable that the enemy forces they engaged-two battalions of a regiment of the 24th (Saxon) Reserve Division - suffered vastly more loss, apparently more than 600. The Australians continued to be involved in minor operations here until withdrawn and returned to the Australian Corps on 19 April. In fighting on 15 April another 84 casualties were sustained by one of the 5th Brigade's battalions, though German losses were again worse - nearly 500 in another of the Saxon division's regiments.


Extracted from the book produced by Chris Coulthard-Clark, Where Australians Fought - The Encyclopaedia of Australia's Battles, Allen and Unwin, Sydney, 1998, pp. 141-142.


Additional References cited by Chris Coulthard-Clark:

C.E.W. Bean (1937) The Australian Imperial Force in France during the Main German Offensive, 1918, Sydney: Angus & Robertson.


Further Reading:

Battles where Australians fought, 1899-1920


Citation: Hangard Wood, France, April 7, 1918

Posted by Project Leader at 11:01 PM EAST
Updated: Sunday, 5 April 2009 12:16 PM EADT
Kut el Amara, Mesopotamia, December 3, 1915, to April 29, 1916
Topic: BatzM - Kut el Amara

Kut el Amara

Mesopotamia, 3 December 1915 to 29 April 1916


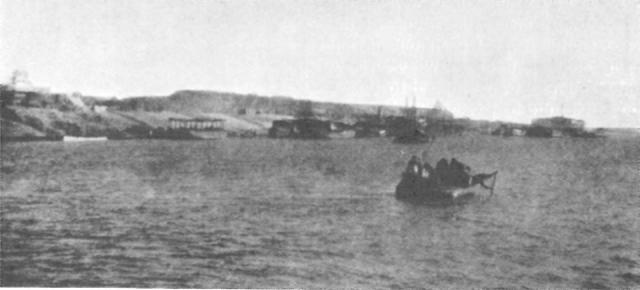
A view of Kut el Amara prior to the battles.


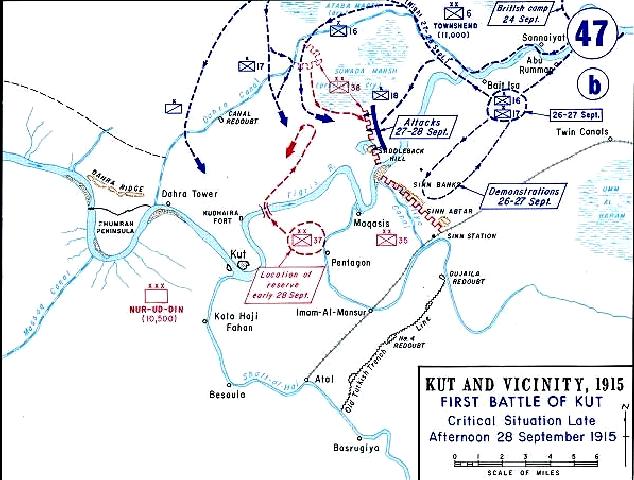
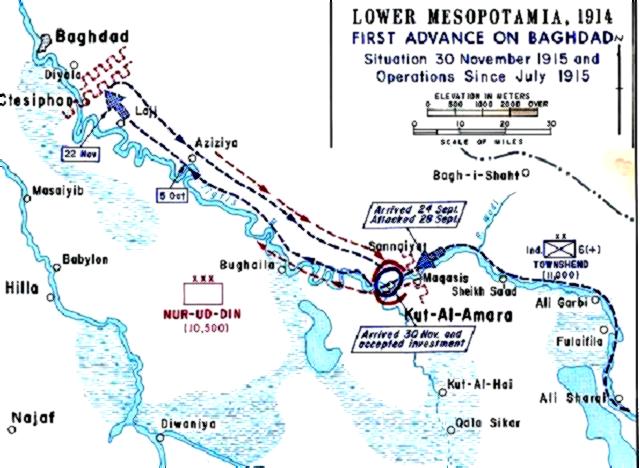
Kut el Amara, scene in Mesopotamia (modern Iraq) of the capitulation of 13,000 British and Indian soldiers under Major-General Charles townshend to Turkish forces on 29 April 1916, after a five-month siege. Townshend's successful campaign up the Tigris turned sour in late November 1915, when his troops were less than 30 kilometres from Baghdad (see Ctesiphon), and by 3 December he was back in Kut which he had captured in September. Withdrawal further down the river was out of the question, both because of the exhausted state of his 6th Indian Division and the pursuit of his men by a greatly superior enemy force. The latter made a few attempts to carry the town by assault, before settling down to starve out the defenders.

The fate of Townshend's command was sealed when attempts to break the siege from the south in January and February 1916 both failed. The number of Turks investing the place only became progressively stronger, as forces released after the ending of the Dardanelles campaign began arriving. The garrison had already experienced deaths from starvation when Townshend was forced to open the negotiations which resulted in unconditional surrender. Among the troops who passed into Turkish captivity were more than 40 members of No.30 Squadron, Royal Flying Corps-mostly ground staff and mechanics left behind after all flyable aircraft were sent out on 7 December 1915. Included in this group were nine Australian Flying Corps personnel who were serving with the unit; only two of these men were among the 2,000 members of the Kut garrison who survived their captivity.


Official History Map of the first Battle of Kut


Part of No. 30 Squadron was not locked up in Kut, including eight other mechanics and one pilot of the AFC. These played a notable part in attempts to meet part of the beleaguered garrison's food requirements by aerial delivery. The pilot, Captain Henry Petre, flew several missions to air-drop grain and other essentials within the perimeter, while a corporal manufactured parachutes for the safe delivery of breakables - including a millstone for grinding corn. The appearance of German Fokker fighters, however, put a stop to this effort, after some five tonnes of supplies had been thus delivered. With the outcome at Kut now inevitable, Petre and the AFC men were returned to Basra (350 kilometres away to the south-east) and all were transferred to Egypt in early 1916. Their departure ended the involvement of Australian airmen in this theatre.


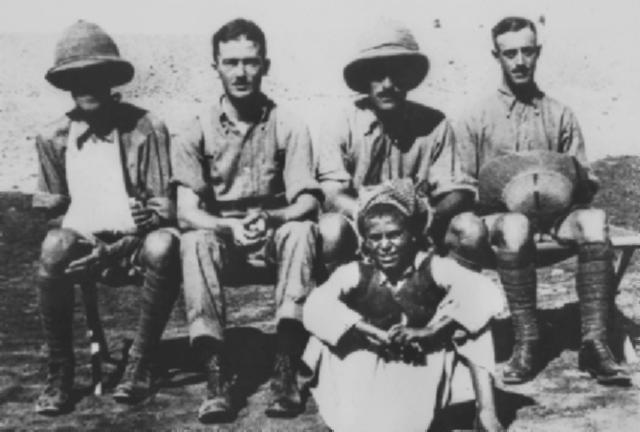
From left: Capt H A Petre, Capt T W White, Lt H Christian (Indian 119th) and Lt GP Merz of No. 30 Squadron.


Extracted from the book produced by Chris Coulthard-Clark, Where Australians Fought - The Encyclopaedia of Australia's Battles, Allen and Unwin, Sydney, 1998, p. 112.


Additional References cited by Chris Coulthard-Clark:

F.M. Cutlack, (1923), The Australian Flying Corps in the Western and Eastern Theatres of War 1914 - 1918, Sydney: Angus & Robertson.

George Odgers, ( 1984), The Royal Australian Air Force: An Illustrated History, Brookvale, NSW Child & Henry.


Further Reading:

Battles where Australians fought, 1899-1920


Citation: Kut el Amara, Mesopotamia, December 3, 1915, to April 29, 1916

Posted by Project Leader at 9:45 PM EAST
Updated: Tuesday, 14 April 2009 1:25 PM EADT
Ctesiphon, Mesopotamia, November 22 to 25, 1915
Topic: BatzM - Ctesiphon

Ctesiphon

Mesopotamia, 22 to 25 November 1915


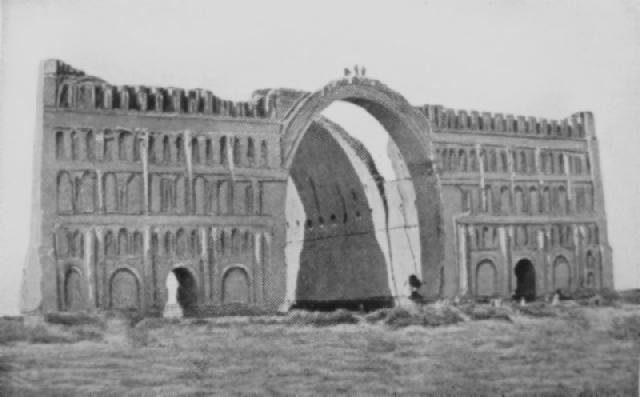
Ctesiphon ruins of King Chosroes's palace


Ctesiphon, fought on 22-25 November 1915 between British and Turkish forces on the Tigris River in Mesopotamia (modern Iraq), only 25 kilometres south-east of Baghdad. After a long but cleverly conducted advance up the Tigris from the Persian Gulf (see Kurna), Major-General Charles Townshend prepared to send his 6th Indian Division against the last major enemy obstacle to Baghdad. This was an extensive and well-defended position lying east of the Tigris, dominated by the huge facade of the ruined palace of the Persian King Chosroes which sat like 'a giant airship hangar' in the centre of the Turkish lines.

Unknown to Townshend, however, the defenders had been strengthened by a fresh Anatolian division before he could begin his attack. While the severe fighting of the first day succeeded in turning the Turks out of both their first and second lines of trenches, with losses of eight guns and 9,000 men (including 1,300 prisoners), this result cost Townshend some 4,500 casualties of his own - about one-third of his force. Not only was Townshend's force too weak to renew the attack the next day, but by that evening he found himself beset by counter-attacks mounted by the Turks. These battles continued on 24 November, and by the following day had gathered impetus from the arrival of still further fresh troops from the Caucasus. Facing markedly superior enemy numbers, the British had no alternative but to begin a retreat which culminated in defeat at Kut el Amara (see Kut el Amara).

The Australian role in this action involved several airmen who were active both in the preparatory phase and during the battle itself. These were members of the Australian Flying Corps serving with No. 30 Squadron, Royal Flying Corps - the new name given to Mesopotamian Flight, RFC, from August. To cut off Baghdad's communication links with outlying bases, a decision was made to attempt to blow up the telegraph line running north and west of the capital. This required an aircraft to fly nearly 100 kilometres from Azizieh to beyond Baghdad, carrying explosives and fuel for the return flight.

Official History Map of the Ctesiphon battle.


The mission was attempted on 13 November (the day the 6th Division began its forward march) by an aircraft piloted by Captain Thomas White, AFC. The task was successfully accomplished but resulted in the aircraft and its two-man crew being captured on the ground by Turks and Arabs who were unexpectedly encountered in the vicinity. This was particularly unfortunate as White and his observer had noted the presence of large bodies of troops indicating 'apparent reinforcement', which might have given Townshend sufficient forewarning of the difficulties he could expect at Ctesiphon.

As a result of White's capture only one AFC pilot remained available to take part in the battle itself. This officer did useful service flying reconnaissance patrols which kept Townshend's headquarters informed of the attack's progress.

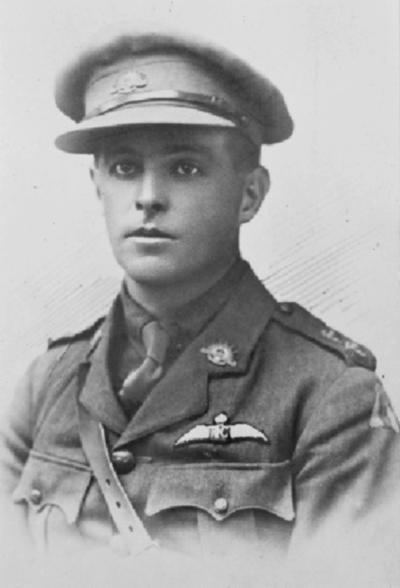
Lieutenant Harold William Treloar, No. 30 Squadron, Royal Flying Corps


Extracted from the book produced by Chris Coulthard-Clark, Where Australians Fought - The Encyclopaedia of Australia's Battles, Allen and Unwin, Sydney, 1998, p. 111.


Additional References cited by Chris Coulthard-Clark:

F.M. Cutlack, (1923), The Australian Flying Corps in the Western and Eastern Theatres of War 1914 - 1918, Sydney: Angus & Robertson.

T.W White, (1928), Guests of the Unspeakable, Sydney: Angus & Robertson.


Further Reading:

Battles where Australians fought, 1899-1920


Citation: Ctesiphon, Mesopotamia, November 22 to 25, 1915

Posted by Project Leader at 8:55 PM EAST
Updated: Tuesday, 14 April 2009 1:26 PM EADT
The Battle of Paardeberg, South Africa, 17-27 February 1900, Roll of Honour
Topic: BatzB - Paardeberg

The Battle of Paardeberg

South Africa, 17-27 February 1900

Allied Forces

Roll of Honour


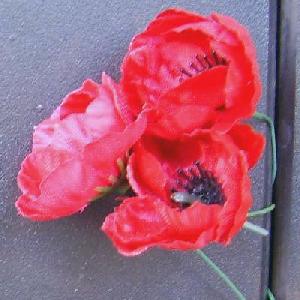
Poppies on the Roll of Honour, Australian War Memorial, Canberra


The Roll of Honour contains the names of all the Allied forces known to have served and lost their lives during the Battle of Paardeberg, South Africa, 17-27 February 1900.


Roll of Honour


The Battle of Paardeberg, South Africa, 17-27 February 1900, Roll of Honour


Lest we forget


Further Reading:

The Battle of Paardeberg, South Africa, 17-27 February 1900

The Battle of Paardeberg, South Africa, 17-27 February 1900, Roll of Honour

Boer War, 1899 - 1902  

Battles where Australians fought, 1899-1920


Citation: The Battle of Paardeberg, South Africa, 17-27 February 1900, Roll of Honour

Posted by Project Leader at 12:01 AM EAST
Updated: Thursday, 7 April 2011 9:52 AM EADT

Newer | Latest | Older

Full Site Index


powered by FreeFind
Let us hear your story: You can tell your story, make a comment or ask for help on our forum.

Desert Column Forum

A note on copyright

The Australian Light Horse Studies Centre is a not for profit and non profit group whose sole aim is to write the early history of the Australian Light Horse from 1900 - 1920. It is privately funded and the information is provided by the individuals within the group and while permission for the use of the material has been given for this site for these items by various donors, the residual and actual copyright for these items, should there be any, resides exclusively with the donors. The information on this site is freely available for private research use only and if used as such, should be appropriately acknowledged. To assist in this process, each item has a citation attached at the bottom for referencing purposes.

Please Note: No express or implied permission is given for commercial use of the information contained within this site.

A note to copyright holders

The Australian Light Horse Studies Centre has made every endeavour to contact copyright holders of material digitised for this blog and website and where appropriate, permission is still being sought for these items. Where replies were not received, or where the copyright owner has not been able to be traced, or where the permission is still being sought, the Australian Light Horse Studies Centre has decided, in good faith, to proceed with digitisation and publication. Australian Light Horse Studies Centre would be happy to hear from copyright owners at any time to discuss usage of this item.

Contact

Australian Light Horse Studies Centre

eXTReMe Tracker