« March 2009 »
S M T W T F S
1 2 3 4 5 6 7
8 9 10 11 12 13 14
15 16 17 18 19 20 21
22 23 24 25 26 27 28
29 30 31
You are not logged in. Log in


Search the site:


powered by FreeFind
Volunteer with us.

Entries by Topic All topics  
A Latest Site News
A - Using the Site
AAA Volunteers
AAB-Education Centre
AAC-Film Clips
AAC-Photo Albums
AIF & MEF & EEF
AIF - Lighthorse
AIF - ALH - A to Z
AIF - DMC
AIF - DMC - Or Bat
AIF - DMC - Anzac MD
AIF - DMC - Aus MD
AIF - DMC - British
AIF - DMC - BWI
AIF - DMC - French
AIF - DMC - Indian
AIF - DMC - Italian
AIF - DMC - Medical
AIF - DMC - Remounts
AIF - DMC - Scouts
AIF - DMC - Sigs
AIF - DMC - Sigs AirlnS
AIF - DMC - 1 Sig Sqn
AIF - DMC - 2 Sig Sqn
AIF - DMC - Eng
AIF - DMC - Eng 1FSE
AIF - DMC - Eng 2FSE
AIF - DMC - GSR
AIF - 1B - 1 LHB
AIF - 1B - 6 MVS
AIF - 1B - 1 LHMGS
AIF - 1B - 1 Sig Trp
AIF - 1B - 1 LHFA
AIF - 1B - 1 LHR
AIF - 1B - 2 LHR
AIF - 1B - 3 LHR
AIF - 2B - 2 LHB
AIF - 2B - 7 MVS
AIF - 2B - 2 LHFA
AIF - 2B - 2 LHMGS
AIF - 2B - 2 Sig Trp
AIF - 2B - 5 LHR
AIF - 2B - 6 LHR
AIF - 2B - 7 LHR
AIF - 3B - 3 LHB
AIF - 3B - 8 MVS
AIF - 3B - 3 LHB Sigs
AIF - 3B - 3 LHFA
AIF - 3B - 3 LHMGS
AIF - 3B - 3 Sig Trp
AIF - 3B - 8 LHR
AIF - 3B - 9 LHR
AIF - 3B - 10 LHR
AIF - 4B - 4 LHB
AIF - 4B - 4 Sig Trp
AIF - 4B - 9 MVS
AIF - 4B - 4 LHFA
AIF - 4B - 4 LHMGS
AIF - 4B - 4 LHR
AIF - 4B - 11 LHR
AIF - 4B - 12 LHR
AIF - 5B - 5 LHB
AIF - 5B - 10 MVS
AIF - 5B - 5 LHFA
AIF - 5B - 5 Sig Trp
AIF - 5B - ICC
AIF - 5B - 14 LHR
AIF - 5B - 15 LHR
AIF - 5B - 1er Regt
AIF - 5B - 2 NZMGS
AIF - AASC
AIF - Aboriginal LH
AIF - Badges
AIF - Cars
AIF - Chinese LH
AIF - Double Sqns
AIF - Engineers
AIF - Fr - 22 Corps
AIF - Fr - 13 LHR
AIF - Honour Roll
AIF - HQ - 3rd Echelon
AIF - Marching Songs
AIF - Misc Topics
AIF - NZMRB
AIF - NZMRB - AMR
AIF - NZMRB - CMR
AIF - NZMRB - EFT
AIF - NZMRB - NZMFA
AIF - NZMRB - NZMGS
AIF - NZMRB - OMR
AIF - NZMRB - Sig-Trp
AIF - NZMRB - WMR
AIF - Ships
AIF - Ships - Encountr
AIF - Ships - Una
AIF - WFF
AIF - Wireless Sqn
Battles
BatzA - Australia
BatzA - Broken Hill
BatzA - Liverpool
BatzA - Merivale
BatzB - Boer War
BatzB - Bakenlaagte
BatzB - Belmont
BatzB - Bothaville
BatzB - Buffels Hoek
BatzB - Coetzees Drift
BatzB - Diamond Hill
BatzB - Driefontein
BatzB - Elands
BatzB - Graspan
BatzB - Grobelaar
BatzB - Grootvallier
BatzB - Hartebestfontn
BatzB - Houtnek
BatzB - Karee Siding
BatzB - Kimberley
BatzB - Koster River
BatzB - Leeuw Kop
BatzB - Mafeking
BatzB - Magersfontein
BatzB - Modder River
BatzB - Onverwacht
BatzB - Paardeberg
BatzB - Palmietfontein
BatzB - Pink Hill
BatzB - Poplar Grove
BatzB - Rhenoster
BatzB - Sannahs Post
BatzB - Slingersfontn
BatzB - Stinkhoutbm
BatzB - Sunnyside
BatzB - Wilmansrust
BatzB - Wolvekuil
BatzB - Zand River
BatzG - Gallipoli
BatzG - Anzac
BatzG - Aug 1915
BatzG - Baby 700
BatzG - Evacuation
BatzG - Hill 60
BatzG - Hill 971
BatzG - Krithia
BatzG - Lone Pine
BatzG - Nek
BatzJ - Jordan Valley
BatzJ - 1st Amman
BatzJ - 2nd Amman
BatzJ - Abu Tellul
BatzJ - Es Salt
BatzJ - JV Maps
BatzJ - Ziza
BatzM - Mespot
BatzM - Baghdad
BatzM - Ctesiphon
BatzM - Daur
BatzM - Kurna
BatzM - Kut el Amara
BatzM - Ramadi
BatzN - Naval
BatzN - AE1
BatzN - Cocos Is
BatzN - Heligoland
BatzN - Marmara
BatzN - Zeebrugge
BatzN - Zeppelin L43
BatzNG - Bitapaka
BatzO - Other
BatzO - Baku
BatzO - Egypt 1919
BatzO - Emptsa
BatzO - Karawaran
BatzO - Peitang
BatzO - Wassa
BatzP - Palestine
BatzP - 1st Gaza
BatzP - 2nd Gaza
BatzP - 3rd Gaza
BatzP - Aleppo
BatzP - Amwas
BatzP - Ayun Kara
BatzP - Bald Hill
BatzP - Balin
BatzP - Beersheba
BatzP - Berkusieh
BatzP - Damascus
BatzP - El Auja
BatzP - El Buggar
BatzP - El Burj
BatzP - Haifa
BatzP - Huj
BatzP - JB Yakub
BatzP - Kaukab
BatzP - Khan Kusseir
BatzP - Khuweilfe
BatzP - Kuneitra
BatzP - Megiddo
BatzP - Nablus
BatzP - Rafa
BatzP - Sasa
BatzP - Semakh
BatzP - Sheria
BatzP - Surafend
BatzP - Wadi Fara
BatzS - Sinai
BatzS - Bir el Abd
BatzS - El Arish
BatzS - El Mazar
BatzS - El Qatiya
BatzS - Jifjafa
BatzS - Magdhaba
BatzS - Maghara
BatzS - Romani
BatzS - Suez 1915
BatzSe - Senussi
BatzWF - Westn Front
BW - Boer War
BW - NSW
BW - NSW - 1ACH
BW - NSW - 1NSWMR
BW - NSW - 2NSWMR
BW - NSW - 3ACH
BW - NSW - 3NSWIB
BW - NSW - 3NSWMR
BW - NSW - 5ACH
BW - NSW - A Bty RAA
BW - NSW - AAMC
BW - NSW - Aust H
BW - NSW - Lancers
BW - NSW - NSW Inf
BW - NSW - NSWCBC
BW - NSW - NSWIB
BW - NSW - NSWMR_A
BW - NZ
BW - Qld
BW - Qld - 1ACH
BW - Qld - 1QMI
BW - Qld - 2QMI
BW - Qld - 3ACH
BW - Qld - 3QMI
BW - Qld - 4QIB
BW - Qld - 5QIB
BW - Qld - 6QIB
BW - Qld - 7ACH
BW - QLD - AAMC
BW - SA
BW - SA - 1SAMR
BW - SA - 2ACH
BW - SA - 2SAMR
BW - SA - 3SACB
BW - SA - 4ACH
BW - SA - 4SAIB
BW - SA - 5SAIB
BW - SA - 6SAIB
BW - SA - 8ACH
BW - SA - AAMC
BW - Tas
BW - Tas - 1ACH
BW - Tas - 1TIB
BW - Tas - 1TMI
BW - Tas - 2TB
BW - Tas - 2TIB
BW - Tas - 3ACH
BW - Tas - 8ACH
BW - Vic
BW - Vic - 1VMI
BW - Vic - 2ACH
BW - Vic - 2VMR
BW - Vic - 3VB
BW - Vic - 4ACH
BW - Vic - 4VIB
BW - Vic - 5VMR
BW - Vic - 6ACH
BW - Vic - AAMC
BW - Vic - Scot H
BW - WA
BW - WA - 1WAMI
BW - WA - 2ACH
BW - WA - 2WAMI
BW - WA - 3WAB
BW - WA - 4ACH
BW - WA - 4WAMI
BW - WA - 5WAMI
BW - WA - 6WAMI
BW - WA - 8ACH
BW Gen - Campaign
BW Gen - Soldiers
BW General
Cavalry - General
Diary - Schramm
Egypt - Heliopolis
Egypt - Mena
Gen - Ataturk Pk, CNB
Gen - Australia
Gen - Legends
Gen - Query Club
Gen - St - NSW
Gen - St - Qld
Gen - St - SA
Gen - St - Tas
Gen - St - Vic
Gen - St - WA
Gm - German Items
Gm - Bk - 605 MGC
GW - 11 Nov 1918
GW - Atrocities
GW - August 1914
GW - Biographies
GW - Propaganda
GW - Spies
GW - We forgot
Militia 1899-1920
Militia - Area Officers
Militia - Inf - Infantry
Militia - Inf - 1IB
Militia - Inf - 2IB
Militia - Inf - 3IB
Militia - Inf - NSW
Militia - Inf - Qld
Militia - Inf - SA
Militia - Inf - Tas
Militia - Inf - Vic
Militia - Inf - WA
Militia - K.E.Horse
Militia - LH
Militia - LH - Regts
Militia - LH - 1LHB
Militia - LH - 2LHB
Militia - LH - 3LHB
Militia - LH - 4LHB
Militia - LH - 5LHB
Militia - LH - 6LHB
Militia - LHN - NSW
Militia - LHN - 1/7/1
Militia - LHN - 2/9/6
Militia - LHN - 3/11/7
Militia - LHN - 4/6/16
Militia - LHN - 5/4/15
Militia - LHN - 6/5/12
Militia - LHN - 28
Militia - LHQ - Qld
Militia - LHQ - 13/2
Militia - LHQ - 14/3/11
Militia - LHQ - 15/1/5
Militia - LHQ - 27/14
Militia - LHS - SA
Militia - LHS - 16/22/3
Militia - LHS - 17/23/18
Militia - LHS - 24/9
Militia - LHT - Tas
Militia - LHT - 12/26
Militia - LHV - Vic
Militia - LHV - 7/15/20
Militia - LHV - 8/16/8
Militia - LHV - 9/19
Militia - LHV - 10/13
Militia - LHV - 11/20/4
Militia - LHV - 19/17
Militia - LHV - 29
Militia - LHW - WA
Militia - LHW-18/25/10
Militia - Military Orders
Militia - Misc
MilitiaRC - Rifle Clubs
MilitiaRC - NSW
MilitiaRC - NT
MilitiaRC - Qld
MilitiaRC - SA
MilitiaRC - Tas
MilitiaRC - Vic
MilitiaRC - WA
Militiaz - New Zealand
Tk - Turkish Items
Tk - Army
Tk - Bks - Books
Tk - Bks - 1/33IR
Tk - Bks - 27th IR
Tk - Bks - Air Force
Tk - Bks - Yildirim
Tk - POWs
Wp - Weapons
Wp - Hotchkiss Cav
Wp - Hotchkiss PMG
Blog Tools
Edit your Blog
Build a Blog
RSS Feed
View Profile
Open Community
Post to this Blog
Site Index
Education Centre
LH Militia
Boer War
Transport Ships
LH Battles
ALH - Units
ALH - General
Aboriginal Light H
Weapons
Ottoman Sources

"At a mile distant their thousand hooves were stuttering thunder, coming at a rate that frightened a man - they were an awe inspiring sight, galloping through the red haze - knee to knee and horse to horse - the dying sun glinting on bayonet points..." Trooper Ion Idriess

The Australian Light Horse Studies Centre aims to present an accurate history as chroniclers of early Australian military developments from 1899 to 1920.

The Australian Light Horse Studies Centre site holds over 12,000 entries and is growing daily.

Contact: Australian Light Horse Studies Centre

Let us hear your story: You can tell your story, make a comment or ask for help on our Australian Light Horse Studies Centre Forum called:

Desert Column Forum

WARNING: This site contains: names, information and images of deceased people; and, language which may be considered inappropriate today.

Friday, 20 March 2009
605th Machine Gun Company War Diary
Topic: Gm - Bk - 605 MGC

German 605th Machine Gun Company (MGC)

War Diary, 29 March to 31 March 1916


During the Battle of Romani, at Bir um Ziad, the men from the 2nd Light Horse Brigade captured members of the 605th Machine Gun Company. Along with the machine guns, a number of gun chests were also recovered. An ambulance man, 429 Sgt John Jackson Dunbar from the 2nd Light Horse Field Ambulance opened up one of the chests and discovered the unit's War Diary. Much later on, the War Diary was translated by Major General John Gellibrand. Eventually it found its way by donation to the Australian War Memorial by the good services of Captain RA Perkins from the 2/41st Battalion.


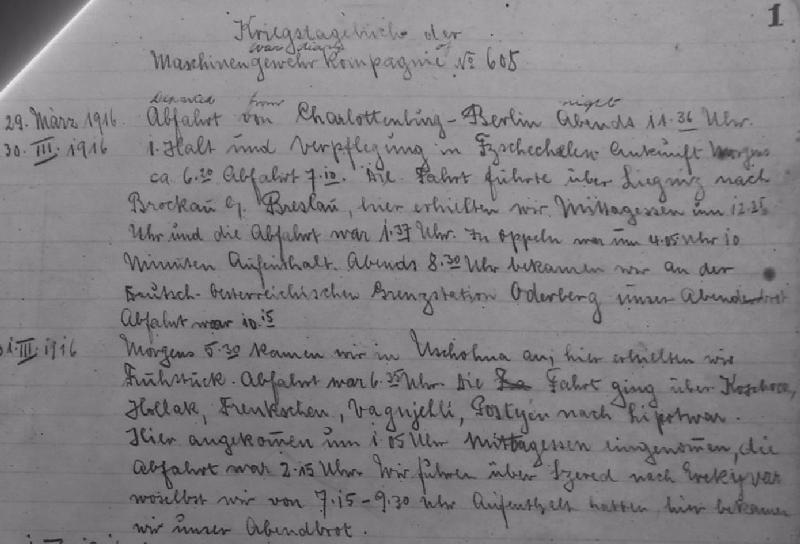
605th Machine Gun Company War Diary - 29 to 31 March 1916


The entries


Translation:

29 March 1916:

Departure from Charlottenburg-Berlin 11.36 p.m.


30.III.16:

1st stop and meal at Fzschechelin, arrival about 6.20 a.m., departure 7.10 a.m. The journey went through Liegnitz to Brockau and Breslau chase we got dinner about 12.35 p.m. and departure took lace at 1.37 p.m. At Oppeln there was 10-minute stop about 4.05 p.m.. At 8.30 in the evening we received our evening meal at the Austro-German frontier station Oderberg. Departure at 10.15.

31:III.16:

At 5.30 a.m. we arrived at Lischohna where we got breakfast. Departure at 6.35 a.m. The journey went through Koschoor, Hollak. Frenkschen, Vagnjehli, Postyen to Lipotwar. Arrived this place about 1.05 p.m., got the midday departure was at 2.15 p.m. To travelled via Seared to Erekyvar where we had a stop from 7.15 to 9.30 where we got our evening meal.


Previous Page: No previous page.

Next Page: 605th Machine Gun Company War Diary - 1 to 3 April 1916


Further Reading:

German 605th Machine Gun Company (MGC) , Contents 

The Battle of Romani

Light Horse Battles

Battles where Australians fought, 1899-1920


Citation: 605th Machine Gun Company War Diary - 29 to 31 March 1916 


Posted by Project Leader at 12:01 AM EADT
Updated: Wednesday, 15 April 2009 10:52 PM EADT
1st Australian Armoured Car Section - Palestine - Part 2
Topic: AIF - Cars

1st AUSTRALIAN ARMOURED CAR SECTION, AIF

PALESTINE

Part 2


This is a transcription from a manuscript submitted by Captain E.H. James called "The Motor Patrol". It is lodged in the AWM as AWM 224 MSS 209. This is Part 2.


PALESTINE

We worked our way along for another very rough two miles when we came to a very steep decline of about 1100 feet. This looked almost impossible, but we decided to try it out, so stripped every ounce possible off one of the vehicles and lowered it crown the track with the men holding it beak with ropes. We managed this successfully but decided to go on with the one hour to reconnoitre the rest of the track before bringing more vehicles down the same way. is discovered however, that a little further on the track petered out altogether and any further progress was right out of the question, so we had over an hour's hard work hauling the car back again with ropes up the steep slope. By this time it was dark, so we decided to spend the night where we were and after posting sentries, we took turns to sleep under the tarpaulins of the cars.

Everybody was moving at the first streaks of dawn and we soon packed up and moving back over the track we had taken back again to the old Roman Jericho road, and we found that the engineers had been busy during the night to such an extent that the Darts of the road which had been blown up were now almost negotiable for light traffic, so by dint of a little more of our customary pushing and manhandling, we got our Lizzies over the worst places. The previous evening one of the "Rolls" Armoured Cars of the L.A.C.B. in endeavouring to get across the Pilgrims Road got out of control owing to the severe and rough nature of the ground and got rather badly smashed over one of the cliffs. However, we heard that it was hauled up again and repaired next day. We soon reached the rocky hill by Talat-et-Dum where an old stone building (supposed to be the Good Samaritan’s Inn mentioned in the scriptures) gave us cover while we boiled the Billy for breakfast. This building belied its name as throughout the night the machine guns inside had kept up a continuous din, while the enemy gunners had made it their chief target for their artillery. We now had a large column of motor transport vehicles under our control and ante and as we were very anxious to get these to the head of the column, we only spent a few minutes over breakfast. We pushed on with about a dozen motor vehicles following us and reached Headquarters at Neby Muss by midday. The Division now pushed on and took up positions at Jericho at 2 p.m. where headquarters was established.

Apparently the enemy was aware of this fact as at 3.30 p. m. they began to drop shells there from a long range across the Jordan River.

The first shell that dropped caused considerable amusement. It could be heard whining for quite a time before it dropped. One of the natives of the village heard it coming and dropped flat on the ground. Strange to say the shell dropped in the mud almost beside him and smothered him with earth but did no further damage. The native then jumped up and ran until out of sight to the screams of laughter of the troops. One of the next shells went clean through the Radiator of the divisional Commander's car and as this was one of the vehicles under our charge, we had to got busy.

Things were getting too warm at this spot, so we moved camp to a now position about 400 yards away. We towed the general's car away and dismantled the broken parts. After dark we sent a car back along the road towards Jerusalem for about 10 miles where some advanced M.T. Stores were kept and he managed to obtain a new Radiator which he brought to us before midnight. Before daybreak the car was repaired and ready to move off with the real of the fleet at Reveille.

In the morning one half of the unit was ordered to patrol the road from Jericho to the Jordan and the other half to reconnoitre a road marked on the map from Umm-ed-Dumm to Neby Muss and the Jericho Road. We found this road to be merely a pack-horse track, unfit for wheeled vehicles. We reconnoitred on foot for a few miles and made our report and received orders to proceed to Jerusalem where we arrived at 6 p.m. setting up camp in the cold and wet, very different to the warm valley at Jericho only twenty five miles away.

This was the middle of February which was probably the coldest time of the year. For the next few weeks the patrol had vary little excitement beyond a few reconnaissances around Jerusalem Nailin and other parts of the front now extending from the River Jordan to the Coast north of Jaffa. However, on the 13th March, we received orders to make the Jordan Valley our Headquarters and this was apparently the flank where any future movements were to take place.

Ten days afterwards we crossed the Jordan River by a pontoon bridge and received orders to reconnoitre the roads from the river to the base of the hills on the Fast now occupied by the Turkish army. We found that most of the roads petered out into mule trucks once the hills were reached and only one road (that leading from Ghoragyeh where we had established a bridge-head) was suitable for wheeled transport. Next night, the A & NZ Mtd. division pushed on up the mule tracks and left their transport behind them. The man led their horses all night long up the steep hills in the rain and in the morning the division was an top of the hills pushing on towards Amman with the surprised enemy running before them.

The light car patrol received orders to proceed up the Ghoranyeh road with the infantry via Es Salt which we did. We however, found considerable difficulty in getting through the heavy columns of transport accompanying the infantry who had about six hours start of us and they had also added to the difficulties by churning the mud up along the road to the consistency of butter. By dusk we were within three miles of the town of Es Salt which had not yet been captured and as it was too dark to see where we were going there was nothing to do but camp for the night which we did alongside the mad. Beyond an occasional shot from a few snipers in the hills, we had a fairly peaceful night.

At day break next morning we were packed up and on the move again, shortly afterwards we were packed up and on the move again, shortly afterwards we drove into the town of Es Salt. Tile villagers welcomed us by firing fusillades from their rifles into the air. The villagers were very friendly to us and during the night they had prevented the Turks taking a battery of artillery away with them with the result that it fell into our hands next morning. We could not afford to waste much time in the town as. Our instructions were to push on along the road towards Amman and join our own division. We drove on along the road taken by the retreating enemy in a North Easterly direction and soon left the infantry behind. We were now acting on our own in the open land between the two divisions without the slightest knowledge of where our own division was.

The so-called road was a veritable quagmire as during the night the whole of the Turkish and German transport had ploughed it until the mud was knee deep and the continuous rain during the night had not improved it. About 2 p.m. we captured a Turkish prisoner who had been wounded and as he could speak Arabic we learnt from him that his army was about two hours ahead in full retreat. We directed him to the rear and proceeded on our way. Two miles further on we overtook two German motor lorries hopelessly bogged. The first thing we did was to syphon the petrol tanks into our own as the heavy going was using our supplies of "juice” up too rapidly for our liking. We also put the engines out of action and pushed on.

After another hour's hard pushing and driving we came in sight of a large body of transport surrounded by men. On examining them through field glasses we saw that the transport consisted of 23 German army motor lorries and a number of cars. These had been abandoned and the men around them were hoards of Bedouins busy looting. A couple of rounds from the Lewis Guns soon cleared this mob away end we shortly came up to inspect our new find. We discovered however, that the lorries and cars were all axle deep in mud and that it was almost as impossible for us to proceed ourselves. We got a little more petrol and oil and after rendering the enemy vehicles hors-de-combat, we decided as it was rapidly getting dark we had better make ourselves secure for the night.

We moved back along the road to a small hill about half a mile back which was comparatively dry which commanded a fair view of the surrounding country and here we parked our cars in a square with a Lewis gun at each corner and after posting sentries we endeavoured to take turns at sleeping. This however, was not an easy matter as every now and then loud bursts of rifle fire kept occurring from various quarters. This turned out afterwards to be fights between various Circassian and Bedouin villages who were having a little war on their own and apparently were quite disinterested in our doings.

We unfortunately did not know which of these were friendly or otherwise so had to keep all villagers at a distance. We sent a small patrol on foot under Sergeant Langley towards the east in order to get in touch with H.Q. of the Mounted Division as we estimated that owing to the distance we had come we could not be more than a few miles away from them. Our estimate was not very far out as our patrol ran across their outposts about three miles away.

The patrol informed H.Q. of our position and brought back the information that the mounted men were having a very rough time. Numbers of the wounded were dying from exposure as no ambulances were able to traverse the country. When our patrol returned in the morning they brought back instructions for us to stay in the present position for the day and before dark to return to Es Salt. Fortunately, the day was dry and we spent the time drying our blankets and salving the magnetos and other useful parts from the German vehicles. (These we handed in later on to the officer in charge of the motor workshops) During the day we got into touch with some men from the Anzac Division Signals who required petrol for the motor on their wireless outfit and we were able to spare them some of our loot for this purpose.


Previous section: 1st Australian Armoured Car Section - Palestine - Part 1

Next section: 1st Australian Armoured Car Section - Palestine - Part 3


Further Reading:

1st AUSTRALIAN ARMOURED CAR SECTION, AIF, Contents 

Australian Light Horse Order of Battle - Outline 

The Australian Light Horse - Structure

Australian Light Horse Order of Battle

Battles where Australians fought, 1899-1920


Citation: 1st Australian Armoured Car Section - Palestine - Part 2


Posted by Project Leader at 12:01 AM EADT
Updated: Monday, 13 April 2009 11:15 PM EADT
The Battle of Hébuterne, France, 30 March 1918, Roll of Honour
Topic: BatzWF - Westn Front

The Battle of Hébuterne

France, 27 March to 5 April 1918

AIF

Roll of Honour, 30 March 1918


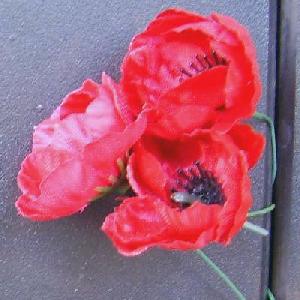
Poppies on the Roll of Honour, Australian War Memorial, Canberra


The Roll of Honour contains the names of all the men from the Allied Forces known to have given their lives on 30 March 1918 during the Battle of Hébuterne, France, 27 March to 5 April 1918.


Roll of Honour


Carl Hugo ANDERSON, 33rd Infantry Battalion, 30 March 1918

Thomas ANSON, 34th Infantry Battalion, 30 March 1918

Bertie Stanley ASPERY, 4th Light Trench Mortar Battery, 30 March 1918


Thomas George Alfred BARROW, 44th Infantry Battalion, 30 March 1918

Albert Harris Tasman BENDER, 40th Infantry Battalion, 30 March 1918

Walter Priestley BINNING, 4th Light Trench Mortar Battery, 30 March 1918

Andrew BLACK, 34th Infantry Battalion, 30 March 1918

Adam Robert BLACK, 42nd Infantry Battalion, 30 March 1918

William Charles Lowry BROOKS, 51st Infantry Battalion, 30 March 1918

Wallace BROOM, 4th Light Trench Mortar Battery, 30 March 1918

Leslie Carlisle BROWN, 33rd Infantry Battalion, 30 March 1918

Frank BURROWS, 33rd Infantry Battalion, 30 March 1918


William CAMPBELL, 8th Field Artillery Brigade, 30 March 1918

Royston Stanley CAPEL, 33rd Infantry Battalion, 30 March 1918

Horace CHAMBERLAIN, 40th Infantry Battalion, 30 March 1918

Charles CHAMBERS, 40th Infantry Battalion, 30 March 1918

Thomas William CHILTON, 53rd Infantry Battalion, 30 March 1918

Edward Ligoria COHEN, 8th Field Artillery Brigade, 30 March 1918

Robert Colin CONN, 41st Infantry Battalion, 30 March 1918

Alfred George COOK, 33rd Infantry Battalion, 30 March 1918

Leon Seymour CORBETT, 42nd Infantry Battalion, 30 March 1918

Allan CORMACK, 13th Infantry Battalion, 30 March 1918

George Leslie CUCEL, 51st Infantry Battalion, 30 March 1918

Patrick CURRIE, 4th Light Trench Mortar Battery, 30 March 1918


Harry DALE, 34th Infantry Battalion, 30 March 1918

Edward Charles DAWSON, 33rd Infantry Battalion, 30 March 1918

Leonard Hastings DORNAN, 33rd Infantry Battalion, 30 March 1918

Arthur DUCKWORTH, 6th Field Artillery Brigade, 30 March 1918

Leonard DUNN, 14th Infantry Battalion, 30 March 1918


Vyvian Eric ELLEM, 15th Infantry Battalion, 30 March 1918

Ernest Reuben ERICKSON, 43rd Infantry Battalion, 30 March 1918

Leslie Francis Robert EYRE, 10th Infantry Battalion, 30 March 1918


John Vincent FANNING, 2nd Field Artillery Brigade, 30 March 1918

Frederick Jillett FEALY, 44th Infantry Battalion, 30 March 1918

Howard Stanley FILMER, 33rd Infantry Battalion, 30 March 1918

John FITZGERALD, 8th Field Artillery Brigade, 30 March 1918

Albert Henry FORSTER, 15th Infantry Battalion, 30 March 1918

Albert George FORTESCUE, 33rd Infantry Battalion, 30 March 1918

Thomas Leonard FRY, 44th Infantry Battalion, 30 March 1918


Michael James GRIMES, 33rd Infantry Battalion, 30 March 1918


Joe HALL, 42nd Infantry Battalion, 30 March 1918

Albert Edward HARRISON, 51st Infantry Battalion, 30 March 1918

Harold Unwin HILLYAR, 34th Infantry Battalion, 30 March 1918

Alfred Johannes HOLM, 43rd Infantry Battalion, 30 March 1918

Ralph HOPE, 33rd Infantry Battalion, 30 March 1918

Henry Ernest HOWARD, 44th Infantry Battalion, 30 March 1918

Thomas Walter HYLAND, 33rd Infantry Battalion, 30 March 1918


Robert ISACKSON, 33rd Infantry Battalion, 30 March 1918


William JACK, 42nd Infantry Battalion, 30 March 1918

Percy William JAMES, 33rd Infantry Battalion, 30 March 1918

William Ernest JENETZKY, 48th Infantry Battalion, 30 March 1918

Charles Henry JOHANSEN, 42nd Infantry Battalion, 30 March 1918

Thomas JOHNSTON, 43rd Infantry Battalion, 30 March 1918


Leonard Augustus LAMBSON, 14th Infantry Battalion, 30 March 1918


Reginald William MALLIGAN, 33rd Infantry Battalion, 30 March 1918

John Burley MARSDEN, 33rd Infantry Battalion, 30 March 1918

Frederick Singleton MARTIN, 33rd Infantry Battalion, 30 March 1918

William Philip Oscar MAXWELL, 33rd Infantry Battalion, 30 March 1918

Maurice Ernest MCGRATH, 34th Infantry Battalion, 30 March 1918

James MCINTOSH, 43rd Infantry Battalion, 30 March 1918

Thomas Joseph MCKENNA, 39th Infantry Battalion, 30 March 1918

Theodor MCKENNAREY, 3rd Field Artillery Brigade, 30 March 1918

Cecil Herbert MCKEOWN, 44th Infantry Battalion, 30 March 1918

Charles Dumbar MONTEATH, 51st Infantry Battalion, 30 March 1918

William Daniel MOYES, 42nd Infantry Battalion, 30 March 1918

Kevin Vincent MULLARKEY, 20th Infantry Battalion, 30 March 1918

George MULLER, 42nd Infantry Battalion, 30 March 1918

George Alexander Hugh MURRAY, 14th Infantry Battalion, 30 March 1918

Richard MURRAY, 43rd Infantry Battalion, 30 March 1918


Leslie NICHOLLS, 33rd Infantry Battalion, 30 March 1918

Joshua Thomas NICHOLLS, 44th Infantry Battalion, 30 March 1918

Victor Lawrence William NIELSEN, 39th Infantry Battalion, 30 March 1918


Joseph William OLIVER, 43rd Infantry Battalion, 30 March 1918


Leslie Francis O'SHEA, 33rd Infantry Battalion, 30 March 1918


Ernest Frederick Murray PAMMENT, 43rd Infantry Battalion, 30 March 1918

Reuben PARKES, 34th Infantry Battalion, 30 March 1918

Fred PETTY, 34th Infantry Battalion, 30 March 1918

Charles Starmer PINNEY, 44th Infantry Battalion, 30 March 1918

Ernest William PITTY, 8th Field Artillery Brigade, 30 March 1918

John Graham Antill POCKLEY, 33rd Infantry Battalion, 30 March 1918

Thomas POLLOCK, 14th Infantry Battalion, 30 March 1918

John Thomas Reinsford PRICE, 33rd Infantry Battalion, 30 March 1918

Marshall James PRICE, 44th Infantry Battalion, 30 March 1918

Thomas Easton PROCTER, 45th Infantry Battalion, 30 March 1918


Frederick William RICHARDS, 43rd Infantry Battalion, 30 March 1918


Robert Melville SALTER, 44th Infantry Battalion, 30 March 1918

Edward Andrew SCOTT, 48th Infantry Battalion, 30 March 1918

Hubert Sydney Centennial SIMPSON, 13th Infantry Battalion, 30 March 1918

Wilfred James SIMSHAUSER, 33rd Infantry Battalion, 30 March 1918

Elliott Darcy SLADE, 33rd Infantry Battalion, 30 March 1918

John Willis SMILIE, 14th Infantry Battalion, 30 March 1918

Josiah Needham SMITH, 33rd Infantry Battalion, 30 March 1918

Leslie John SMITH, 3rd Machine Gun Battalion, 30 March 1918


Donald Alexander TEASDALE, 14th Infantry Battalion, 30 March 1918

Horace William THOMPSON, 1st Pioneer Battalion, 30 March 1918

William TISDALL, 19th Infantry Battalion, 30 March 1918

John Thomas TRIM, 8th Field Artillery Brigade, 30 March 1918

Frederick Martin TURNER, 3rd Machine Gun Battalion, 30 March 1918


Hector William WADE, 44th Infantry Battalion, 30 March 1918

Frederick William WALDRON, 41st Infantry Battalion, 30 March 1918

Thomas WALKER, 7th Field Artillery Brigade, 30 March 1918

James WELLS, 40th Infantry Battalion, 30 March 1918

Alpheus Eric WENBAN, 33rd Infantry Battalion, 30 March 1918

Alston Lyle WHEELDON, 42nd Infantry Battalion, 30 March 1918

Neville Dacre WILKINSON, 33rd Infantry Battalion, 30 March 1918

Arthur William WOOD, 4th Light Trench Mortar Battery, 30 March 1918


Hector Francis YOUNGSON, 33rd Infantry Battalion, 30 March 1918


Lest We Forget


Further Reading:

The Battle of Hébuterne, France, 27 March to 5 April 1918, Contents

The Battle of Hébuterne, France, 27 March to 5 April 1918, Roll of Honour

Battles where Australians fought, 1899-1920


Citation: The Battle of Hébuterne, France, 30 March 1918, Roll of Honour


Posted by Project Leader at 12:01 AM EADT
Updated: Monday, 28 March 2011 7:02 AM EADT
Bert Schramm's Diary, 20 March 1919
Topic: Diary - Schramm

Diaries of AIF Servicemen

Bert Schramm


During part of the course of his military service with the AIF, 2823 Private Herbert Leslie Schramm, a farmer from White's River, near Tumby Bay on the Eyre Peninsular, kept a diary of his life. Bert was not a man of letters so this diary was produced with great effort on his behalf. Bert made a promise to his sweetheart, Lucy Solley, that he would do so after he received the blank pocket notebook wherein these entries are found. As a Brigade Scout since September 1918, he took a lead part in the September 1918 breakout by the Allied forces in Palestine. Bert's diary entries are placed alongside those of the 9th Light Horse Regiment to which he belonged and to the 3rd Light Horse Brigade to which the 9th LHR was attached. On this basis we can follow Bert in the context of his formation.

 Bert Schramm's Diary, 20 March 1919


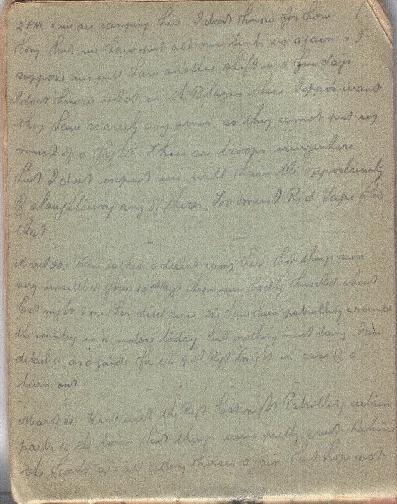
Bert Schramm's Handwritten Diary, 20 - 21 March 1919

[Click on page for a larger print version.]

Diaries

Bert Schramm

Thursday, March 20, 1919

Bert Schramm's Location - Zagazig, Egypt.

Bert Schramm's Diary - Have rather a decent camp here but things seem very unsettled four 10th Regiment chaps were badly knocked about last night and one has died since. We have been patrolling around the country in a motor today but nothing much doing. I am detailed as a guide for the 9th Regiment tonight in case of a turn out.


9th Light Horse Regiment War Diary

9th Light Horse Regiment Location - Zagazig, Egypt.

9th Light Horse Regiment War Diary - As all tentage and camp equipment had been brought from Moascar by rear parties a very comfortable camp was soon made. A large sporting pavilion in vicinity was taken into use as an officers Mess. A second pavilion in the Greek Sporting Club Grounds adjoining was used as a cook house and mess for the men. A fine tennis court was available for use.

At kilo 40 Ismailia line a post of four of the 10th Light Horse Regiment had been rushed by a large crowd during the evening of the 19th March 1919. All members of the post were beaten into unconsciousness and their arms stolen. One of these from the 10th Light Horse Regiment subsequently died.

0345 Mounted Squadron under Bleechmore, Major C, moved out to E2, Wusef Pasha and other villages in the vicinity north of kilo 40. This Squadron had orders to demand the return of stolen arms. If arms are not returned then orders are to arrest the leaders if discoverable. No trace could be found of the arms. The headmen of three villages and Gaffirs were therefore arrested and escorted back to Zagazig. Several inhabitants of the Ez I Beir Has el Tarzi were particularly hostile. Squadron returned to Regimental headquarters about 0900.

1700 Lieutenant Driscoll's troop [mounted squadron] proceeded to Belbeis. Regiment took over protection of the railway Abu el Akdar exclusive to Zagazig inclusive. Posts each ten all ranks were placed along line approximately 11/2 kilometre apart.

Proclamation issued warning all inhabitants of Zagazig

they must not be in the streets of Zagazig between the hours of 2100 and 0430 unless in possession of a pass issued by the Military Authorities.

Movements of inhabitants between villages and towns between the hours of 1900 and 0500 were prohibited.

Order received that an unlawful assembly of inhabitants was an assembly of more than 10.

Firearms were not to be used to disperse same unless absolutely necessary.

Four Officers 50 Other Ranks B Squadron and Lieutenant Edgerly's party rejoined Regiment.


Darley

Darley, TH, With the Ninth Light Horse in the Great War, Adelaide, Hassell Press, 1924.

No Entry


Previous: Bert Schramm's Diary, 19 March 1919

Next: Bert Schramm's Diary, 21 March 1919


Further Reading:

9th Light Horse Regiment AIF War Diary - Complete day by day list

Bert Schramm Diary 

Bert Schramm Diary - Complete day by day list


Additional Reading:

Darley, TH, With the Ninth Light Horse in the Great War, Adelaide, Hassell Press, 1924.


Citation: Bert Schramm's Diary, 20 March 1919


Posted by Project Leader at 12:01 AM EADT
Updated: Wednesday, 6 May 2009 10:57 AM EADT
The Australian Light Horse - Structure
Topic: AIF - Lighthorse

The Australian Light Horse, AIF

Structure


Parts of the Light Horse Units

We are all concentrated in sections. A section is four men. A section lives together, eats together, sleeps together, fights together, and when a shell lands on it, dies together. A full troop of men has eight sections. There are four troops to a squadron, three squadrons to a regiment. I'm not going further than the regiment. Our big world is the regiment and even then most of us don't know intimately the men out of our own squadron. Our life is just concentrated in the "section". We growl together, we swear together, we take one another's blasted horses to water, we conspire against the damned troop-sergeant together, we growl against the war and we damn the officers up hill and down dale together; we do every-thing together — in fact, this whole blasted war is being fought in sections. The fate of all the East at least, depends entirely upon the section.

[From: Idriess, IL, The Desert Column, (Sydney 1933), p. 63.]


When reading about the various parts of a Light Horse unit, the following terms relating to specific formations are employed:

  • Trooper
  • Regimental Service Number
  • Section
  • Troop
  • Squadron
  • Regiment
  • Brigade
  • Division
  • Corps
  • Army.

Each of these specific units will be examined in terms of ideal composition and role.


Trooper

The term "trooper" comes from the Middle French word "troupe" which basically means "company or herd." The basic idea is that a trouper hung around a herd of horses or was with a company of men, take your pick. The term has stuck in common usage. Indeed, both "trooper" and "trouper" are correct and are pronounced exactly the same.

The employment of the term “trooper” in Australia was rather capricious until the formalisation of the designation occurred in 1923 when the volume called: 'Annual Training Establishments Citizens Forces 1923-24', was published under command of Australian Military Order (AMO) 503 of 1923. It reads:

"In Light Horse Regiments the designation trooper is to be substituted for private whenever that latter occurs (vide AMR [Australian Military Regulation] 195 sub-table v)."

Prior to the formation of the AIF, the term “private” was generally employed. The West Australian raised 10th Light Horse Regiment was the exception as the term “trooper” was utilised at the inception of that unit.

By December 1914, those AIF Light Horse units in Egypt began the practice of employing the term “trooper” to differentiate their men from the Infantry who remained with the title “private”. As troops arrived from Australia, the new regiments changed the designation. By mid 1915, the use of “trooper” throughout the AIF was common practice and remained until 1919 when the last of the Light Horse Regiments was disbanded.

At the conclusion of the war, the Militia formations were beginning to fill with returned servicemen from the Light Horse who preferred title “trooper” to distinguish them from other service arms. Eventually pressure from common usage forced the hand of the military authorities in 1923 to make the designation universal for certain arms within the Australian Defence Forces.


Regimental Service Number

At the beginning of the Great War, Australian recruiting was done on the same basis as that in the United Kingdom. Units were locally raised and service numbers were peculiar to that regiment or battalion rather than to the military service. So upon joining a Light Horse Regiment or an Infantry Battalion, the recruit was allocated a number specific to that unit. While theoretically it was possible for about 200 men to have the same Service Number, the highest number recorded of a specific Service Number was 109 men. Below are the first ten Service Numbers allotted and the numbers of AIF members who were allotted this number:

AIF Service Number: 1 = 102 men.

AIF Service Number: 2 = 109 men.

AIF Service Number: 3 = 106 men.

AIF Service Number: 4 = 105 men.

AIF Service Number: 5 = 102 men.

AIF Service Number: 6 = 106 men.

AIF Service Number: 7 = 102 men.

AIF Service Number: 8 = 105 men.

AIF Service Number: 9 = 99 men.

AIF Service Number: 10 = 96 men.

Needless to say this became confusing if a person transferred to another unit. The person carried the original service number and if another in that unit already had that number the conflict was usually resolved by placing an "A" as part of the Service Number. If that number was taken, then "B" was used and if taken, "C" as part of the number.

Officers were not issued with a service number and thus throughout the diaries, whilst the enlisted men have their service numbers provided where ever possible, when a person became an officer, they no longer carried their original Service Number. If the person was enrolled as an officer that person would not have received a number in the first instance.


Claiming

A soldier who had a younger brother or son in another unit was able to claim that younger immediate relative and if there were no technical problems, allow for the transfer of the relative to the older person's unit.


Section.

The foundation formation of the entire Light Horse was based upon the Section. The Section was the most cohesive formation that the trooper could rely upon for support and sustenance within any Light Horse unit. It consisted of four men, one of whom was designated the leader who usually held a Non Commissioned Officer (NCO) rank of either Lance Corporal or Corporal.

Within the Section, each man has a designated combat role. Three are riflemen who are actually to be engaged into combat. The one man in the Section who is not allotted to the front line has possibly the most dangerous task while in combat, that of horse holder. Once the requisite positions were reached by the riflemen, usually just in range of the enemy where their fire is accurate, the three men dismount and seek cover. The horse holder then is required to gather the reigns of the other three horses and ride off from the battlefield to safety. During the course of the actual combat, the horse holder remained out of range until summoned to bring the horses forward which then occurred. It may appear counter intuitive that this was a dangerous job. However, a man lying prone on the ground presents a very low profile and so a small target. In contrast, a man on top of a horse presented a large target. Riding off with three other horses in tow was a difficult and slow task leaving the horse holder exposed to enemy fire for quite some time.

At camp, in undertaking the various important duties, such as guard duty, the whole section was given the responsibility for allocating the men at the appropriate time. Sections were often detailed to undertake patrol or scouting duties. During deployment of the unit in the front line, each section was expected to hold 8 metres, or over two metres per man.


Troop

Eight Sections, or 32 men formed the effective combat strength of a Troop. In addition, there were some 7-8 men who performed specialist functions within the troops. These duties were as diverse as being the troop commander, the troop sergeant, signallers, saddlers, shoeing smiths, drivers, grooms and batmen and buglers. In addition, the Major in charge of the Squadron was also a member of a troop as was the Captain who was second in command.

Within the troop was a man usually designated as the cook. In undertaking the task of preparing food for the large volume of men, the cook was relieved of many of the ordinary tasks undertaken by the men during the day. A man was specifically allotted to undertake all the horse maintenance tasks that would normally attach to the Light Horseman.

The troop was the single coherent body of men that each trooper could identify with in the Light Horse. Anything outside the troops was usually another place altogether. Because the troop worked and rested together, everyone was on intimate terms with each other. Men allocated their loyalty to their Section first and to the Troop in general. After that, for the average trooper, the world did not exist. It was more the preserve of the officers.

The Officer Commander of a Troop was usually either a Lieutenant or a Second Lieutenant.

Troops were allotted a letter to designate their place within the Squadron. They would be called: "A", "B", "C", and "D" Troop.

Exception: 12th Light Horse Regiment reverted to the pre-1912 strucure by naming the Troops 1st, 2nd, 3rd and 4th respectively in place of "A", "B", "C", and "D" Troop.

As a combat force, it was the most complete force with all the requisite skills and specialists to maintain the force in the field. In combat, a Troop was expected to maintain a 65m of front line. Such a frontage indicated that out of the 39-40 members, there were only 25 rifles available in a Troop for actual combat work.

Squadron

Four troops made a Squadron. Inclusive of all the combat troops and ancillary soldiers, the numbers making a Squadron was usually about 158 men. Below is a dissection of the Squadron composition made up of "A", "B", "C", and "D" Troops.


A

B

C

D


Troop Members

Troop

Troop

Troop

Troop

Total

Major


1


1

Captain


1


1

Subaltern

1

1

1

1

4

Squadron Sergeant Major

1


1

Squadron Quartermaster Sergeant


1

1

Sergeants

2

2

2

2

8

Farrier Sergeant


1


1

Signal Corporal


1

1

Shoeing Smith Corporal

1


1

Corporals

2

2

2

2

8

Saddler

1


1

Signaller


1

1


2

Trumpeter

1


1

2

Troopers

26

26

26

26

104

Drivers

2

2

1

2

7

Shoeing Smiths


1

1

1

3

Batman and Groom

2

4

4

2

12

Total

39

40

40

39

158

The composition of the Light Horse Squadron and placement of members within the individual Troop.

[Extracted from Military Order 176, 1916, Australian Military Force Tables of Peace Organisation and Establishments, 1916-17, Part II, Annual Establishments of Personnel, Horses, Guns, and Vehicles (Provisional), Light Horse, p. 53 and issued to all Light Horse Regiments on 4 April 1917.]


The Squadron names were designated by a letter. Most Squadrons were called: "A", "B", and "C" Squadron. On occasion when a Regiment was broken up for reinforcement purposes such as happened to the 11th and 12th Light Horse Regiments in 1915, the incoming Squadron would be called "D" Squadron.  Later on, from 1916, the Training Squadron for the Regiment was usually denoted as "D" Squadron. 

Due to the establishment numbers of Majors within a Light Horse Regiment, two Squadrons were usually commanded by a Major while the third was commanded by a Captain, commonly called OC [Officer Commanding] Squadron. This depended upon the circumstances but the majority of Regiments allotted “C” Squadron as that commanded by the Captain.

The Squadron was the next coherent formation which allowed deployment in some considerable strength. It was expected to be mobile enough to deploy as an independent unit with minimal support. A Squadron was an unwieldy force to deploy as a single formation and was rarely deployed as such. When a Squadron deployed, three Troops were moved into actual combat while the fourth was maintained as Squadron reserve. To deploy the entire Squadron without a reserve was to ask for disaster as any weakness in the line needed to be filled with speed. A fully committed Squadron usually came to grief.

Each Squadron was allotted 200m of front line. This translated to about 2.6m per man, the increased area required because of fewer rifles in the firing line. An average Squadron could fully deploy about 100 rifles but with one Troop out of the firing line, only 75 rifles are available for active combat.


Regiment

The next unit up the line is the Regiment. This was the first identifiable formation in the Light Horse. Each Regiment had its own distinct command structure and independent identity. During the Great War, each Regiment recruited their own members as distinct from the body of the AIF. Consequently, as a man was attached to the Regiment, he gained a Regimental number specific to that Regiment. Thus over the range of 15 Regiments, 60 Infantry Battalions, and 15 Field Artillery Brigades let alone other ancillary service formations, about 110 distinct formations in all, each having their own numbers. Potentially a Regimental Number was replicated over the whole AIF another 110 times. A common error when first examining a service record is to see such a low number in comparison to 420,000 men in the AIF and conclude that the man enlisted early in the war when no such situation existed.

Each Regiment comprised three Squadrons and a Headquarters Section of 42 men. Earlier in the war, each Regiment also contained a Machine Gun Section but at the end of July 1916, the Machine Gun Sections were hived off and formed into a single Squadron attached to the Brigade rather than the Regiment. Prior to July 1916, the established strength of a Regiment was 558 men but after the creation of the Light Horse Machine Gun Squadrons, the established strength fell to 516 men. Also a dedicated transport train of about 16 wagons existed which was for the exclusive use of the Regiment.

In combat, only two Squadrons as once were ever committed usually leaving one Squadron and Regimental Headquarters as reserve. The same reason for not committing an entire Squadron followed here too. So too does this same principle extend right to the top of the Army chain. Each Regiment was responsible for covering about 400m of front line.

By 1917, one additional weapon increased the firepower of a Regiment to well above its manpower levels. This was the introduction of the Hotchkiss Automatic Rifle, a rapid firing gun that used standard issue ammunition. Every Troop had a dedicated Hotchkiss Gun team making about 12 available for a Regiment. The mobility of the Hotchkiss Gun and the weight of fire it could bring to bear on a target without the loss of time combined with a robustness that could withstand the desert sands and the heat of battle made it an ideal cavalry weapon.

See: Weapons – The Hotchkiss Gun

The Commander of a Light Horse Regiment was usually a Lieutenant Colonel and called the CO [Commanding Officer] of the Regiment.

The Australian Light Horse Regiment was the fundamental formation raised to sustain combat. As time passed and new techniques and weapons became available, the Light Horse Regiments were able to tackle forces where the ratio of manpower was at least 2:1 against them and still prevail. In terms of combat effectiveness, there were few units that could match the Light Horse Regiments on a man for man basis. It was this edge that gave the Light Horsemen a ferocious reputation.


Brigade

The Brigade was important to the Regiment as it supplied additional services required by the men in the Regiments. Each Brigade usually contained three Regiments as its core combat formation.

To assist protection of the formation, each Brigade had the services of an artillery battery. The calibre of the guns varied from either 25 pounders to 13 pounder mountain batteries. Each battery contained about 160 men. Alluded to at the Regimental level was the Brigaded Machine Gun Sections called the Light Horse Machine Gun Squadron. The mobility of this Squadron added much to the mobility of the Brigade while giving it a high fire power ratio per man.

The services provided by the Brigade to the Regiments was of particular importance. The Brigade had a logistics train which had to ensure sufficient water, food and ammunition was available to the Regiments when it was required. The transport columns were nothing short of incredible with the ability to navigate some of the most hostile, formless and changing environments in the Sinai with the result that no man or horse was ever short of the necessities of life or ability to perform active combat. One other job the Brigade Train conducted to the joy of all the men was undertaking mail movements. They made sure the mail arrived at the correct unit for the men to read when it arrived. This service maintained morale at a high level within the various units.

Two other services attached to the Brigade were the medical units, one for the horses and the other for the men. Each Brigade had a Mobile Veterinary Unit and a Light Horse Field Ambulance unit. Both units provided a valuable service and saved many lives during the years in operation.

The composition of the average Brigade included the following:


Brigade Units

Men

3 Light Horse Regiments + Brigade Headquarters

1,718

1 Artillery Battery

414

1 Machine Gun Squadron

78

Brigade Train

160

1 Field Ambulance

118

1 Mobile Veterinary Unit

28

Engineers

156


Total

2,672


The Commander of a Brigade is usually a Full Colonel or a Brigadier General. Usually the person was referred to as GOC [General Officer Commanding] Brigade.

In combat, the Brigade was expected to maintain a front line of about 800m employing the same principles as the smaller units by keeping only two Regiments on the front line at any one time while keeping one Regiment always as Brigade Reserve.

One other function conducted by the Brigade was scouting. While each Regiment had an ad hoc body of 10 scouts, the Brigade often brought these men together as a specific unit and assigned the scouts difficult tasks which required individual initiative and bravery. The most notable Brigade Scouts were with the 3rd Light Horse Brigade.


Division

A Division contains sufficient material and men to allow the formation to undertake combat actions without reference to any other unit. It is usually called an independent command. All the military services were available within the Division. The core of the Division’s combat ability was provided by three Brigades. The key function of the division was logistical support of the Brigades as well as planning support when combat is offered.

One noticable support function absent from the two Australian Light Horse Divisions was the Casualty Clearing Station. Rather than carry their own, the Australian Light Horse Divisions were reliant upon the Casualty Clearing Stations which accompanied the British Infantry Divisions. The one concession to high level medical treatment near the battlefield was the formation of the Operations Unit which was a mobile formation containing skilled surgeons. The Operations Unit followed the Division as it moved along the various battle fronts rendering care which saved many lives that ordinarily would have been lost through lack of immediate attention had they passed through the Casualty Clearing Station system. 

The following table details the breakdown of the authorised Mounted Division Establishment.


Detail Officers Other Ranks Total Horses    Guns
Headquarters  
Divisional Headquarters 15 82 97 63  
     
Light Horse      
3 Brigades      
3 Headquarters, 9 Regiments 255 4,899 5,154 5,619    18 Machine Guns
Machine Gun Squadron 8 222 230 304    12 Machine Guns
     
Horse Artillery      
Headquarters, Divisional Artillery 3 17 20 18  
2 Horse Artillery Brigades 32 1,190 1,222 1,248    24 Field Guns, 13 pounder Quick Firing
[4 Batteries, 2 Brigade Ammunition Columns]      
     
Engineers      
1 Field Squadron 7 184 191 196  
1 Signal Squadron 8 198 206 164  
3 Signal Troops 3 69 72 48  
     
Army Service Corps      
Headquarters Light Horse Divisional ASC 4 21 25 11  
3 Light Horse Brigade Trains 21 459 480 474  
     
Army Medical Corps      
3 Light Horse Field Ambulances 18 336 354 318  
     
Army Veterinary Corps      
3 Mobile Verinary Sections 3 81 84 72  
     
Total Mounted Division 377 7,758 8,135 8,535  
     
Attached      
2 Depot Units of Supply 372 26 398    
New Zealand Mounted Rifles Brigade 90 1,802 1,892 1,904    12 Machine Guns
     
Total Anzac Mounted Division till February 1917 839 9,586 10,425 10,439    42 Machine Guns and
   24 Field Guns, 13 pounder Quick Firing


The Attachments listed at the bottom of the table was current to February 1917 when the Anzac Mounted Division was split with the 3rd Light Horse Brigade being transferred to the newly created Imperial Mounted Division. From there the authorised establishment followed those elements on the table minus the Attached. 

The Division contained about 8,135 men including some 8,535 horses and was commanded by a Major General, known as GOC [General Officer Commanding] Division. Australian Divisional Commanders usually had the ability to contact the Prime Minister directly should the GOC wish to do so. Not many undertook this option but it was always there for the men to exercise should they deem it necessary.

As a combat formation, it presented awesome power. The anticipated front line occupied by a division was 1,600m held by two Brigades with one in reserve.


Corps

A Corps was a major military organisation which consisted of a minimum of two divisions. There was only one Australian styled Light Horse Corps, the Desert Mounted Corps, or Descorps, which contained a majority of Australian troops supplemented by a Brigade of New Zealand Mounted Rifles, a Brigade of British Cavalry, the 5th Mounted Brigade and a Regiment of French Cavalry, the 1er Regiment Mixte de Cavalerie du Lavant.

The commander of a Corps, usually a Lieutenant General, known as GOC [General Officer Commanding] Corps. Only one Australian was appointed, Lieutenant General Sir Henry “Harry” George Chauvel who became GOC in September 1917 and remained in command for the remainder of the war. The GOC was in charge of the overall deployment of the forces but in terms of conducting operations, these decisions were left to the Divisional Commanders. As such, the GOC seemed a rather remote character.

The only other Corps Commander in the AIF was on the Western Front, Lieutenant General Sir John Monash.

The structure of the Desert Mounted Corps which consisted of two primarily Australian Divisions, the Anzac Mounted Division and the Australian Mounted Division is detailed in the Australian Light Horse Order of Battle. 


Army

An Army, in the formation sense, is composed of two Corps. The Commander, GOC [General Officer Commanding] Army was usually a full General. The Army under the command of General Sir Edmund Allenby was composed of three Corps, they being: Descorps, 20th and 21st Infantry Corps, a total of six divisions pus a composite force containing a Battalion of Italian troops and a Regiment of French Cavalry. Adding to the weight of firepower was the command of the Royal Flying Corps which included originally the No 67 Squadron, and Australian unit which changed its name to No 1 Squadron, Australian Flying Corps as part of the No 5 Wing. In addition, there were many tens of thousands of Egyptians recruited into the Egyptian Labour Corps. It was a sizable army and there is little doubt that Allenby handled it well.


Further Reading:

Anzac Mounted Division

Australian Mounted Division

The Light Horse

Australian Light Horse Order of Battle


Citation: The Australian Light Horse - Structure


Posted by Project Leader at 12:01 AM EADT
Updated: Sunday, 20 September 2009 7:10 PM EADT

Newer | Latest | Older

Full Site Index


powered by FreeFind
Let us hear your story: You can tell your story, make a comment or ask for help on our forum.

Desert Column Forum

A note on copyright

The Australian Light Horse Studies Centre is a not for profit and non profit group whose sole aim is to write the early history of the Australian Light Horse from 1900 - 1920. It is privately funded and the information is provided by the individuals within the group and while permission for the use of the material has been given for this site for these items by various donors, the residual and actual copyright for these items, should there be any, resides exclusively with the donors. The information on this site is freely available for private research use only and if used as such, should be appropriately acknowledged. To assist in this process, each item has a citation attached at the bottom for referencing purposes.

Please Note: No express or implied permission is given for commercial use of the information contained within this site.

A note to copyright holders

The Australian Light Horse Studies Centre has made every endeavour to contact copyright holders of material digitised for this blog and website and where appropriate, permission is still being sought for these items. Where replies were not received, or where the copyright owner has not been able to be traced, or where the permission is still being sought, the Australian Light Horse Studies Centre has decided, in good faith, to proceed with digitisation and publication. Australian Light Horse Studies Centre would be happy to hear from copyright owners at any time to discuss usage of this item.

Contact

Australian Light Horse Studies Centre

eXTReMe Tracker