« April 2009 »
S M T W T F S
1 2 3 4
5 6 7 8 9 10 11
12 13 14 15 16 17 18
19 20 21 22 23 24 25
26 27 28 29 30
You are not logged in. Log in


Search the site:


powered by FreeFind
Volunteer with us.

Entries by Topic All topics  
A Latest Site News
A - Using the Site
AAA Volunteers
AAB-Education Centre
AAC-Film Clips
AAC-Photo Albums
AIF & MEF & EEF
AIF - Lighthorse
AIF - ALH - A to Z
AIF - DMC
AIF - DMC - Or Bat
AIF - DMC - Anzac MD
AIF - DMC - Aus MD
AIF - DMC - British
AIF - DMC - BWI
AIF - DMC - French
AIF - DMC - Indian
AIF - DMC - Italian
AIF - DMC - Medical
AIF - DMC - Remounts
AIF - DMC - Scouts
AIF - DMC - Sigs
AIF - DMC - Sigs AirlnS
AIF - DMC - 1 Sig Sqn
AIF - DMC - 2 Sig Sqn
AIF - DMC - Eng
AIF - DMC - Eng 1FSE
AIF - DMC - Eng 2FSE
AIF - DMC - GSR
AIF - 1B - 1 LHB
AIF - 1B - 6 MVS
AIF - 1B - 1 LHMGS
AIF - 1B - 1 Sig Trp
AIF - 1B - 1 LHFA
AIF - 1B - 1 LHR
AIF - 1B - 2 LHR
AIF - 1B - 3 LHR
AIF - 2B - 2 LHB
AIF - 2B - 7 MVS
AIF - 2B - 2 LHFA
AIF - 2B - 2 LHMGS
AIF - 2B - 2 Sig Trp
AIF - 2B - 5 LHR
AIF - 2B - 6 LHR
AIF - 2B - 7 LHR
AIF - 3B - 3 LHB
AIF - 3B - 8 MVS
AIF - 3B - 3 LHB Sigs
AIF - 3B - 3 LHFA
AIF - 3B - 3 LHMGS
AIF - 3B - 3 Sig Trp
AIF - 3B - 8 LHR
AIF - 3B - 9 LHR
AIF - 3B - 10 LHR
AIF - 4B - 4 LHB
AIF - 4B - 4 Sig Trp
AIF - 4B - 9 MVS
AIF - 4B - 4 LHFA
AIF - 4B - 4 LHMGS
AIF - 4B - 4 LHR
AIF - 4B - 11 LHR
AIF - 4B - 12 LHR
AIF - 5B - 5 LHB
AIF - 5B - 10 MVS
AIF - 5B - 5 LHFA
AIF - 5B - 5 Sig Trp
AIF - 5B - ICC
AIF - 5B - 14 LHR
AIF - 5B - 15 LHR
AIF - 5B - 1er Regt
AIF - 5B - 2 NZMGS
AIF - AASC
AIF - Aboriginal LH
AIF - Badges
AIF - Cars
AIF - Chinese LH
AIF - Double Sqns
AIF - Engineers
AIF - Fr - 22 Corps
AIF - Fr - 13 LHR
AIF - Honour Roll
AIF - HQ - 3rd Echelon
AIF - Marching Songs
AIF - Misc Topics
AIF - NZMRB
AIF - NZMRB - AMR
AIF - NZMRB - CMR
AIF - NZMRB - EFT
AIF - NZMRB - NZMFA
AIF - NZMRB - NZMGS
AIF - NZMRB - OMR
AIF - NZMRB - Sig-Trp
AIF - NZMRB - WMR
AIF - Ships
AIF - Ships - Encountr
AIF - Ships - Una
AIF - WFF
AIF - Wireless Sqn
Battles
BatzA - Australia
BatzA - Broken Hill
BatzA - Liverpool
BatzA - Merivale
BatzB - Boer War
BatzB - Bakenlaagte
BatzB - Belmont
BatzB - Bothaville
BatzB - Buffels Hoek
BatzB - Coetzees Drift
BatzB - Diamond Hill
BatzB - Driefontein
BatzB - Elands
BatzB - Graspan
BatzB - Grobelaar
BatzB - Grootvallier
BatzB - Hartebestfontn
BatzB - Houtnek
BatzB - Karee Siding
BatzB - Kimberley
BatzB - Koster River
BatzB - Leeuw Kop
BatzB - Mafeking
BatzB - Magersfontein
BatzB - Modder River
BatzB - Onverwacht
BatzB - Paardeberg
BatzB - Palmietfontein
BatzB - Pink Hill
BatzB - Poplar Grove
BatzB - Rhenoster
BatzB - Sannahs Post
BatzB - Slingersfontn
BatzB - Stinkhoutbm
BatzB - Sunnyside
BatzB - Wilmansrust
BatzB - Wolvekuil
BatzB - Zand River
BatzG - Gallipoli
BatzG - Anzac
BatzG - Aug 1915
BatzG - Baby 700
BatzG - Evacuation
BatzG - Hill 60
BatzG - Hill 971
BatzG - Krithia
BatzG - Lone Pine
BatzG - Nek
BatzJ - Jordan Valley
BatzJ - 1st Amman
BatzJ - 2nd Amman
BatzJ - Abu Tellul
BatzJ - Es Salt
BatzJ - JV Maps
BatzJ - Ziza
BatzM - Mespot
BatzM - Baghdad
BatzM - Ctesiphon
BatzM - Daur
BatzM - Kurna
BatzM - Kut el Amara
BatzM - Ramadi
BatzN - Naval
BatzN - AE1
BatzN - Cocos Is
BatzN - Heligoland
BatzN - Marmara
BatzN - Zeebrugge
BatzN - Zeppelin L43
BatzNG - Bitapaka
BatzO - Other
BatzO - Baku
BatzO - Egypt 1919
BatzO - Emptsa
BatzO - Karawaran
BatzO - Peitang
BatzO - Wassa
BatzP - Palestine
BatzP - 1st Gaza
BatzP - 2nd Gaza
BatzP - 3rd Gaza
BatzP - Aleppo
BatzP - Amwas
BatzP - Ayun Kara
BatzP - Bald Hill
BatzP - Balin
BatzP - Beersheba
BatzP - Berkusieh
BatzP - Damascus
BatzP - El Auja
BatzP - El Buggar
BatzP - El Burj
BatzP - Haifa
BatzP - Huj
BatzP - JB Yakub
BatzP - Kaukab
BatzP - Khan Kusseir
BatzP - Khuweilfe
BatzP - Kuneitra
BatzP - Megiddo
BatzP - Nablus
BatzP - Rafa
BatzP - Sasa
BatzP - Semakh
BatzP - Sheria
BatzP - Surafend
BatzP - Wadi Fara
BatzS - Sinai
BatzS - Bir el Abd
BatzS - El Arish
BatzS - El Mazar
BatzS - El Qatiya
BatzS - Jifjafa
BatzS - Magdhaba
BatzS - Maghara
BatzS - Romani
BatzS - Suez 1915
BatzSe - Senussi
BatzWF - Westn Front
BW - Boer War
BW - NSW
BW - NSW - 1ACH
BW - NSW - 1NSWMR
BW - NSW - 2NSWMR
BW - NSW - 3ACH
BW - NSW - 3NSWIB
BW - NSW - 3NSWMR
BW - NSW - 5ACH
BW - NSW - A Bty RAA
BW - NSW - AAMC
BW - NSW - Aust H
BW - NSW - Lancers
BW - NSW - NSW Inf
BW - NSW - NSWCBC
BW - NSW - NSWIB
BW - NSW - NSWMR_A
BW - NZ
BW - Qld
BW - Qld - 1ACH
BW - Qld - 1QMI
BW - Qld - 2QMI
BW - Qld - 3ACH
BW - Qld - 3QMI
BW - Qld - 4QIB
BW - Qld - 5QIB
BW - Qld - 6QIB
BW - Qld - 7ACH
BW - QLD - AAMC
BW - SA
BW - SA - 1SAMR
BW - SA - 2ACH
BW - SA - 2SAMR
BW - SA - 3SACB
BW - SA - 4ACH
BW - SA - 4SAIB
BW - SA - 5SAIB
BW - SA - 6SAIB
BW - SA - 8ACH
BW - SA - AAMC
BW - Tas
BW - Tas - 1ACH
BW - Tas - 1TIB
BW - Tas - 1TMI
BW - Tas - 2TB
BW - Tas - 2TIB
BW - Tas - 3ACH
BW - Tas - 8ACH
BW - Vic
BW - Vic - 1VMI
BW - Vic - 2ACH
BW - Vic - 2VMR
BW - Vic - 3VB
BW - Vic - 4ACH
BW - Vic - 4VIB
BW - Vic - 5VMR
BW - Vic - 6ACH
BW - Vic - AAMC
BW - Vic - Scot H
BW - WA
BW - WA - 1WAMI
BW - WA - 2ACH
BW - WA - 2WAMI
BW - WA - 3WAB
BW - WA - 4ACH
BW - WA - 4WAMI
BW - WA - 5WAMI
BW - WA - 6WAMI
BW - WA - 8ACH
BW Gen - Campaign
BW Gen - Soldiers
BW General
Cavalry - General
Diary - Schramm
Egypt - Heliopolis
Egypt - Mena
Gen - Ataturk Pk, CNB
Gen - Australia
Gen - Legends
Gen - Query Club
Gen - St - NSW
Gen - St - Qld
Gen - St - SA
Gen - St - Tas
Gen - St - Vic
Gen - St - WA
Gm - German Items
Gm - Bk - 605 MGC
GW - 11 Nov 1918
GW - Atrocities
GW - August 1914
GW - Biographies
GW - Propaganda
GW - Spies
GW - We forgot
Militia 1899-1920
Militia - Area Officers
Militia - Inf - Infantry
Militia - Inf - 1IB
Militia - Inf - 2IB
Militia - Inf - 3IB
Militia - Inf - NSW
Militia - Inf - Qld
Militia - Inf - SA
Militia - Inf - Tas
Militia - Inf - Vic
Militia - Inf - WA
Militia - K.E.Horse
Militia - LH
Militia - LH - Regts
Militia - LH - 1LHB
Militia - LH - 2LHB
Militia - LH - 3LHB
Militia - LH - 4LHB
Militia - LH - 5LHB
Militia - LH - 6LHB
Militia - LHN - NSW
Militia - LHN - 1/7/1
Militia - LHN - 2/9/6
Militia - LHN - 3/11/7
Militia - LHN - 4/6/16
Militia - LHN - 5/4/15
Militia - LHN - 6/5/12
Militia - LHN - 28
Militia - LHQ - Qld
Militia - LHQ - 13/2
Militia - LHQ - 14/3/11
Militia - LHQ - 15/1/5
Militia - LHQ - 27/14
Militia - LHS - SA
Militia - LHS - 16/22/3
Militia - LHS - 17/23/18
Militia - LHS - 24/9
Militia - LHT - Tas
Militia - LHT - 12/26
Militia - LHV - Vic
Militia - LHV - 7/15/20
Militia - LHV - 8/16/8
Militia - LHV - 9/19
Militia - LHV - 10/13
Militia - LHV - 11/20/4
Militia - LHV - 19/17
Militia - LHV - 29
Militia - LHW - WA
Militia - LHW-18/25/10
Militia - Military Orders
Militia - Misc
MilitiaRC - Rifle Clubs
MilitiaRC - NSW
MilitiaRC - NT
MilitiaRC - Qld
MilitiaRC - SA
MilitiaRC - Tas
MilitiaRC - Vic
MilitiaRC - WA
Militiaz - New Zealand
Tk - Turkish Items
Tk - Army
Tk - Bks - Books
Tk - Bks - 1/33IR
Tk - Bks - 27th IR
Tk - Bks - Air Force
Tk - Bks - Yildirim
Tk - POWs
Wp - Weapons
Wp - Hotchkiss Cav
Wp - Hotchkiss PMG
Blog Tools
Edit your Blog
Build a Blog
RSS Feed
View Profile
Open Community
Post to this Blog
Site Index
Education Centre
LH Militia
Boer War
Transport Ships
LH Battles
ALH - Units
ALH - General
Aboriginal Light H
Weapons
Ottoman Sources

"At a mile distant their thousand hooves were stuttering thunder, coming at a rate that frightened a man - they were an awe inspiring sight, galloping through the red haze - knee to knee and horse to horse - the dying sun glinting on bayonet points..." Trooper Ion Idriess

The Australian Light Horse Studies Centre aims to present an accurate history as chroniclers of early Australian military developments from 1899 to 1920.

The Australian Light Horse Studies Centre site holds over 12,000 entries and is growing daily.

Contact: Australian Light Horse Studies Centre

Let us hear your story: You can tell your story, make a comment or ask for help on our Australian Light Horse Studies Centre Forum called:

Desert Column Forum

WARNING: This site contains: names, information and images of deceased people; and, language which may be considered inappropriate today.

Wednesday, 22 April 2009
Driefontein, South Africa, 10 March 1900, Contents
Topic: BatzB - Driefontein

Driefontein

South Africa, 10 March 1900

Contents


Driefontein, an action of the Second South African War, fought on 10 March 1900 during the advance on Bloemfontein by a large British force under field Marshal Lord Roberts.


Items


Driefontein - Description of Battle, South Africa, March 10, 1900 

Driefontein, South Africa, - From the Australian perspective - The Town and Country Journal, 17 March 1900

Driefontein, South Africa, - BOER TREACHERY pt 1 - The Times, 20 March 1900

Driefontein, South Africa, The Times, 20 March 1900, Item 1

Driefontein, South Africa, The Times, 20 March 1900, Item 2

Driefontein, South Africa, The Times, 20 March 1900, Item 3

Driefontein, South Africa, - BOER TREACHERY - The Times, 20 March 1900, Item 4

Driefontein, South Africa, The Times, 20 March 1900, Item 5


Further Reading:

Battles where Australians fought, 1899-1920


Citation: Driefontein, South Africa, 10 March 1900, Contents

Posted by Project Leader at 8:49 PM EADT
Updated: Wednesday, 22 April 2009 11:12 PM EADT
Bert Schramm's Diary, 22 April 1919
Topic: Diary - Schramm

Diaries of AIF Servicemen

Bert Schramm


During part of the course of his military service with the AIF, 2823 Private Herbert Leslie Schramm, a farmer from White's River, near Tumby Bay on the Eyre Peninsular, kept a diary of his life. Bert was not a man of letters so this diary was produced with great effort on his behalf. Bert made a promise to his sweetheart, Lucy Solley, that he would do so after he received the blank pocket notebook wherein these entries are found. As a Brigade Scout since September 1918, he took a lead part in the September 1918 breakout by the Allied forces in Palestine. Bert's diary entries are placed alongside those of the 9th Light Horse Regiment to which he belonged and to the 3rd Light Horse Brigade to which the 9th LHR was attached. On this basis we can follow Bert in the context of his formation.

 Bert Schramm's Diary, 22 April 1919


Bert Schramm's Handwritten Diary, 19 - 22 April 1919

[Click on page for a larger print version.]

Diaries

Bert Schramm

Tuesday, April 22, 1919

Bert Schramm's Location - Zagazig, Egypt.

Bert Schramm's Diary - Nothing worth recording. Toby and Tom have been out on Patrol all day and I have to go out tomorrow. Helps to break the monotony.


9th Light Horse Regiment War Diary

9th Light Horse Regiment Location - Zagazig, Egypt.

9th Light Horse Regiment War Diary - Orders issued reference change over of Squadrons.

One mounted troop patrolled to El Ghar and Ku Abaza reporting all quiet.

Simpson, 639 Shoeing Smith J, was tried by the FGCM [Field General Court Martial].

Change over of A and B Squadrons commenced.


Darley

Darley, TH, With the Ninth Light Horse in the Great War, Adelaide, Hassell Press, 1924.

No Entry


Previous: Bert Schramm's Diary, 21 April 1919

Next: Bert Schramm's Diary, 23 April 1919


Further Reading:

9th Light Horse Regiment AIF War Diary - Complete day by day list

Bert Schramm Diary 

Bert Schramm Diary - Complete day by day list


Additional Reading:

Darley, TH, With the Ninth Light Horse in the Great War, Adelaide, Hassell Press, 1924.


Citation: Bert Schramm's Diary, 22 April 1919


Posted by Project Leader at 12:01 AM EADT
Updated: Saturday, 9 May 2009 7:17 PM EADT
Tuesday, 21 April 2009
Hotchkiss Portable Machine Gun Handbook, Contents
Topic: Wp - Hotchkiss PMG

Hotchkiss Portable Machine Gun Handbook

Contents


Items


Hotchkiss Portable Machine Gun Handbook

Hotchkiss Portable Machine Gun Handbook - Summary Page

Hotchkiss Portable Machine Gun Handbook - Cover Page

Hotchkiss Portable Machine Gun Handbook - Plate 1

Hotchkiss Portable Machine Gun Handbook - Plate 2

Hotchkiss Portable Machine Gun Handbook - Plate 3

Hotchkiss Portable Machine Gun Handbook - Plate 4

Hotchkiss Portable Machine Gun Handbook - Page 11

Hotchkiss Portable Machine Gun Handbook - Page 13

Hotchkiss Portable Machine Gun Handbook - Page 14

Hotchkiss Portable Machine Gun Handbook - Page 15

Hotchkiss Portable Machine Gun Handbook - Page 16

Hotchkiss Portable Machine Gun Handbook - Page 17

Hotchkiss Portable Machine Gun Handbook - Page 18

Hotchkiss Portable Machine Gun Handbook - Page 19

Hotchkiss Portable Machine Gun Handbook - Page 20

Hotchkiss Portable Machine Gun Handbook - Page 21

Hotchkiss Portable Machine Gun Handbook - Page 22

Hotchkiss Portable Machine Gun Handbook - Page 23

Hotchkiss Portable Machine Gun Handbook - Page 24

Hotchkiss Portable Machine Gun Handbook - Page 25

Hotchkiss Portable Machine Gun Handbook - Page 26

Hotchkiss Portable Machine Gun Handbook - Page 27

Hotchkiss Portable Machine Gun Handbook - Page 28

Hotchkiss Portable Machine Gun Handbook - Page 29

Hotchkiss Portable Machine Gun Handbook - Page 31

Hotchkiss Portable Machine Gun Handbook - Page 33

Hotchkiss Portable Machine Gun Handbook - Page 34

Hotchkiss Portable Machine Gun Handbook - Page 35

Hotchkiss Portable Machine Gun Handbook - Page 36

Hotchkiss Portable Machine Gun Handbook - Page 37

Hotchkiss Portable Machine Gun Handbook - Page 38

Hotchkiss Portable Machine Gun Handbook - Page 39

Hotchkiss Portable Machine Gun Handbook - Page 40

Hotchkiss Portable Machine Gun Handbook - Page 41

Hotchkiss Portable Machine Gun Handbook - Page 42

Hotchkiss Portable Machine Gun Handbook - Page 43 Plate 5

Hotchkiss Portable Machine Gun Handbook - Page 47 Plate 7


Further Reading:

Weapons, Contents 


Citation: Hotchkiss Portable Machine Gun Handbook, Contents

Posted by Project Leader at 12:03 AM EADT
Updated: Tuesday, 21 April 2009 12:07 AM EADT
Driefontein, South Africa, March 10, 1900, Outline
Topic: BatzB - Driefontein

The Battle of Driefontein

South Africa, 10 March 1900

Outline


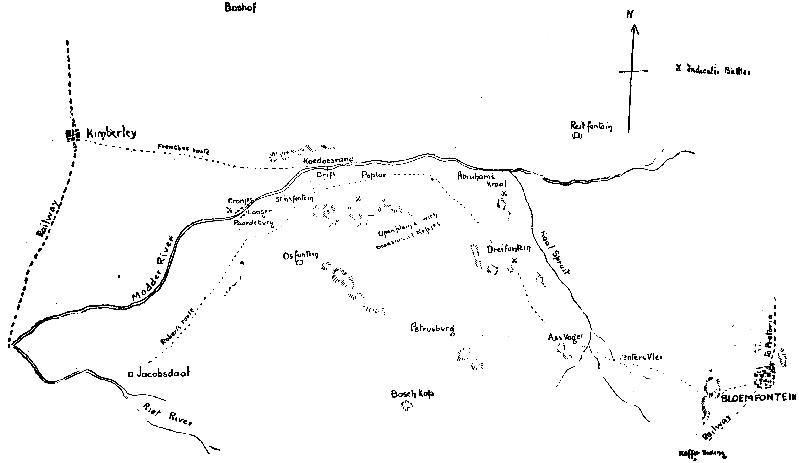
Map detailing the movement of Lord Roberts to Bloemfontein.

[Click on map for larger version.]


Driefontein, an action of the Second South African War, fought on 10 March 1900 during the advance on Bloemfontein by a large British force under field Marshal Lord Roberts. Following the fiasco at Poplar Grove on 7 March, Boer General Christiaan De Wet succeeded in persuading 5,000 - 6,000 burghers to mount a further delaying effort about 30 kilometres east, along a line of ridges south of the Modder River. Although aware that the enemy was holding the hills near Abraham's Kraal beside the river, and those a little further to the south-east at Damvallei, the British did not initially realise that other parties were occupying the Driefontein - Boschrand ridges as well. This fact only became apparent during the morning of the 10th, as elements of the British force progressively scouted and probed the enemy lines.


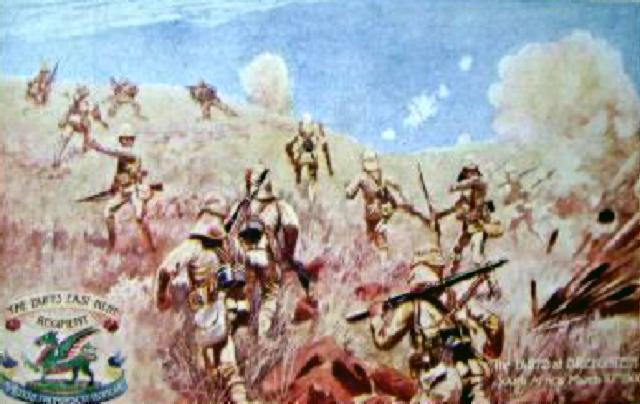
A contemporary post card illustrating the charge of the Buffs at Driefontein.


From 3.30 p.m. the British began steadily pressing in against the 1,500 burghers holding the Driefontein kopjes (hills), judged to be the key to the position, until from about 5 p.m. it was observed that there was a growing trickle of Boers leaving the battlefield in twos and threes. This led to the mounting of a final charge at 6 p.m. which carried the position and sent the Boers streaming away to the north-east. Although British mounted troops (including some Australians) attempted a pursuit from the southern flank, these were unable to intercept a withdrawal in such a direction - because of the poor condition of their mounts - and returned empty-handed as dusk fell. Although the Boers were still in possession of the northern hills, the retention of these was now pointless and they were evacuated, too, during the night. The day's fighting cost the British 424 casualties, 82 of whom were killed or died of wounds; the Boers lost about 300 men, including about 100 killed.

In the morning's fighting, Captain John Antill's squadron of New South Wales Mounted Rifles was engaged in reconnoitring the limits of the enemy's right (north) flank near the river. While performing this work, the Australians had one man killed by a shot fired from a farmhouse flying a white flag of neutrality. Also during the morning, the squadrons of the New South Wales Lancers and 1st Australian Horse (another New South Wales unit) were active on the same flank-both units being attached to the cavalry brigade commanded by Colonel T.C. Porter. Shortly before midday, however, these were switched to Colonel R.G. Broadwood's brigade opposite the enemy's left flank. Here, they took part in the later cavalry movement to follow up the Boer retirement, until forced to retire by enemy artillery and pom-pom fire.

Also among the British casualties for the day was a Victorian, Lieut.-Colonel C.E. Umphelby, serving as a special service officer with the artillery, who was mortally wounded by a sniper late in the afternoon and died three days later.


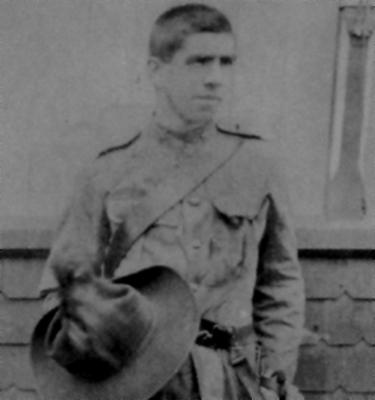
334 Trooper John William Haydon, in the uniform of the 1st Australian Horse, was wounded in action at Dreifontein.
 
[From: AWM P01578.002] 


Extracted from the book produced by Chris Coulthard-Clark, Where Australians Fought - The Encyclopaedia of Australia's Battles, Allen and Unwin, Sydney, 1998, pp. 70-71.


Additional References cited by Chris Coulthard-Clark:

R.L. Wallace (1976) The Australians at the Boer War, Canberra: Australian War Memorial & Australian Government Publishing Service.


Further Reading:

The Battle of Driefontein

The Boer War

Battles where Australians fought, 1899-1920


Citation: Driefontein, South Africa, March 10, 1900

Posted by Project Leader at 12:01 AM EADT
Updated: Sunday, 28 February 2010 11:29 AM EAST
Bert Schramm's Diary, 21 April 1919
Topic: Diary - Schramm

Diaries of AIF Servicemen

Bert Schramm


During part of the course of his military service with the AIF, 2823 Private Herbert Leslie Schramm, a farmer from White's River, near Tumby Bay on the Eyre Peninsular, kept a diary of his life. Bert was not a man of letters so this diary was produced with great effort on his behalf. Bert made a promise to his sweetheart, Lucy Solley, that he would do so after he received the blank pocket notebook wherein these entries are found. As a Brigade Scout since September 1918, he took a lead part in the September 1918 breakout by the Allied forces in Palestine. Bert's diary entries are placed alongside those of the 9th Light Horse Regiment to which he belonged and to the 3rd Light Horse Brigade to which the 9th LHR was attached. On this basis we can follow Bert in the context of his formation.

 Bert Schramm's Diary, 21 April 1919


Bert Schramm's Handwritten Diary, 19 - 22 April 1919

[Click on page for a larger print version.]

Diaries

Bert Schramm

Monday, April 21, 1919

Bert Schramm's Location - Zagazig, Egypt.

Bert Schramm's Diary - Easter Mon. We have had a quiet day today but we start patrols again tomorrow. We have heard today and it is supposed to be on good authority that we are not likely to get away for another three months so most likely as if it is correct. I think it will just about drive me mad, another three months here. Masonic Ball in Lincoln tonight. Don't I wish I could be there.


9th Light Horse Regiment War Diary

9th Light Horse Regiment Location - Zagazig, Egypt.

9th Light Horse Regiment War Diary - Easter Monday and also is an Egyptian holiday - Shem el Nessim [Smelling the Zephyr].

One mounted troop patrolled to El Aslugi - Shubra el Nakhla reporting all quiet.

No 2 Post Zagazig - Abu el Akdar line abolished.

Lieutenant Gibney marched in from attached pay officer AIF Headquarters Cairo.


Darley

Darley, TH, With the Ninth Light Horse in the Great War, Adelaide, Hassell Press, 1924.

No Entry


Previous: Bert Schramm's Diary, 20 April 1919

Next: Bert Schramm's Diary, 22 April 1919


Further Reading:

9th Light Horse Regiment AIF War Diary - Complete day by day list

Bert Schramm Diary 

Bert Schramm Diary - Complete day by day list


Additional Reading:

Darley, TH, With the Ninth Light Horse in the Great War, Adelaide, Hassell Press, 1924.


Citation: Bert Schramm's Diary, 21 April 1919


Posted by Project Leader at 12:01 AM EADT
Updated: Saturday, 9 May 2009 7:20 PM EADT

Newer | Latest | Older

Full Site Index


powered by FreeFind
Let us hear your story: You can tell your story, make a comment or ask for help on our forum.

Desert Column Forum

A note on copyright

The Australian Light Horse Studies Centre is a not for profit and non profit group whose sole aim is to write the early history of the Australian Light Horse from 1900 - 1920. It is privately funded and the information is provided by the individuals within the group and while permission for the use of the material has been given for this site for these items by various donors, the residual and actual copyright for these items, should there be any, resides exclusively with the donors. The information on this site is freely available for private research use only and if used as such, should be appropriately acknowledged. To assist in this process, each item has a citation attached at the bottom for referencing purposes.

Please Note: No express or implied permission is given for commercial use of the information contained within this site.

A note to copyright holders

The Australian Light Horse Studies Centre has made every endeavour to contact copyright holders of material digitised for this blog and website and where appropriate, permission is still being sought for these items. Where replies were not received, or where the copyright owner has not been able to be traced, or where the permission is still being sought, the Australian Light Horse Studies Centre has decided, in good faith, to proceed with digitisation and publication. Australian Light Horse Studies Centre would be happy to hear from copyright owners at any time to discuss usage of this item.

Contact

Australian Light Horse Studies Centre

eXTReMe Tracker