« July 2009 »
S M T W T F S
1 2 3 4
5 6 7 8 9 10 11
12 13 14 15 16 17 18
19 20 21 22 23 24 25
26 27 28 29 30 31
You are not logged in. Log in


Search the site:


powered by FreeFind
Volunteer with us.

Entries by Topic All topics  
A Latest Site News
A - Using the Site
AAA Volunteers
AAB-Education Centre
AAC-Film Clips
AAC-Photo Albums
AIF & MEF & EEF
AIF - Lighthorse
AIF - ALH - A to Z
AIF - DMC
AIF - DMC - Or Bat
AIF - DMC - Anzac MD
AIF - DMC - Aus MD
AIF - DMC - British
AIF - DMC - BWI
AIF - DMC - French
AIF - DMC - Indian
AIF - DMC - Italian
AIF - DMC - Medical
AIF - DMC - Remounts
AIF - DMC - Scouts
AIF - DMC - Sigs
AIF - DMC - Sigs AirlnS
AIF - DMC - 1 Sig Sqn
AIF - DMC - 2 Sig Sqn
AIF - DMC - Eng
AIF - DMC - Eng 1FSE
AIF - DMC - Eng 2FSE
AIF - DMC - GSR
AIF - 1B - 1 LHB
AIF - 1B - 6 MVS
AIF - 1B - 1 LHMGS
AIF - 1B - 1 Sig Trp
AIF - 1B - 1 LHFA
AIF - 1B - 1 LHR
AIF - 1B - 2 LHR
AIF - 1B - 3 LHR
AIF - 2B - 2 LHB
AIF - 2B - 7 MVS
AIF - 2B - 2 LHFA
AIF - 2B - 2 LHMGS
AIF - 2B - 2 Sig Trp
AIF - 2B - 5 LHR
AIF - 2B - 6 LHR
AIF - 2B - 7 LHR
AIF - 3B - 3 LHB
AIF - 3B - 8 MVS
AIF - 3B - 3 LHB Sigs
AIF - 3B - 3 LHFA
AIF - 3B - 3 LHMGS
AIF - 3B - 3 Sig Trp
AIF - 3B - 8 LHR
AIF - 3B - 9 LHR
AIF - 3B - 10 LHR
AIF - 4B - 4 LHB
AIF - 4B - 4 Sig Trp
AIF - 4B - 9 MVS
AIF - 4B - 4 LHFA
AIF - 4B - 4 LHMGS
AIF - 4B - 4 LHR
AIF - 4B - 11 LHR
AIF - 4B - 12 LHR
AIF - 5B - 5 LHB
AIF - 5B - 10 MVS
AIF - 5B - 5 LHFA
AIF - 5B - 5 Sig Trp
AIF - 5B - ICC
AIF - 5B - 14 LHR
AIF - 5B - 15 LHR
AIF - 5B - 1er Regt
AIF - 5B - 2 NZMGS
AIF - AASC
AIF - Aboriginal LH
AIF - Badges
AIF - Cars
AIF - Chinese LH
AIF - Double Sqns
AIF - Engineers
AIF - Fr - 22 Corps
AIF - Fr - 13 LHR
AIF - Honour Roll
AIF - HQ - 3rd Echelon
AIF - Marching Songs
AIF - Misc Topics
AIF - NZMRB
AIF - NZMRB - AMR
AIF - NZMRB - CMR
AIF - NZMRB - EFT
AIF - NZMRB - NZMFA
AIF - NZMRB - NZMGS
AIF - NZMRB - OMR
AIF - NZMRB - Sig-Trp
AIF - NZMRB - WMR
AIF - Ships
AIF - Ships - Encountr
AIF - Ships - Una
AIF - WFF
AIF - Wireless Sqn
Battles
BatzA - Australia
BatzA - Broken Hill
BatzA - Liverpool
BatzA - Merivale
BatzB - Boer War
BatzB - Bakenlaagte
BatzB - Belmont
BatzB - Bothaville
BatzB - Buffels Hoek
BatzB - Coetzees Drift
BatzB - Diamond Hill
BatzB - Driefontein
BatzB - Elands
BatzB - Graspan
BatzB - Grobelaar
BatzB - Grootvallier
BatzB - Hartebestfontn
BatzB - Houtnek
BatzB - Karee Siding
BatzB - Kimberley
BatzB - Koster River
BatzB - Leeuw Kop
BatzB - Mafeking
BatzB - Magersfontein
BatzB - Modder River
BatzB - Onverwacht
BatzB - Paardeberg
BatzB - Palmietfontein
BatzB - Pink Hill
BatzB - Poplar Grove
BatzB - Rhenoster
BatzB - Sannahs Post
BatzB - Slingersfontn
BatzB - Stinkhoutbm
BatzB - Sunnyside
BatzB - Wilmansrust
BatzB - Wolvekuil
BatzB - Zand River
BatzG - Gallipoli
BatzG - Anzac
BatzG - Aug 1915
BatzG - Baby 700
BatzG - Evacuation
BatzG - Hill 60
BatzG - Hill 971
BatzG - Krithia
BatzG - Lone Pine
BatzG - Nek
BatzJ - Jordan Valley
BatzJ - 1st Amman
BatzJ - 2nd Amman
BatzJ - Abu Tellul
BatzJ - Es Salt
BatzJ - JV Maps
BatzJ - Ziza
BatzM - Mespot
BatzM - Baghdad
BatzM - Ctesiphon
BatzM - Daur
BatzM - Kurna
BatzM - Kut el Amara
BatzM - Ramadi
BatzN - Naval
BatzN - AE1
BatzN - Cocos Is
BatzN - Heligoland
BatzN - Marmara
BatzN - Zeebrugge
BatzN - Zeppelin L43
BatzNG - Bitapaka
BatzO - Other
BatzO - Baku
BatzO - Egypt 1919
BatzO - Emptsa
BatzO - Karawaran
BatzO - Peitang
BatzO - Wassa
BatzP - Palestine
BatzP - 1st Gaza
BatzP - 2nd Gaza
BatzP - 3rd Gaza
BatzP - Aleppo
BatzP - Amwas
BatzP - Ayun Kara
BatzP - Bald Hill
BatzP - Balin
BatzP - Beersheba
BatzP - Berkusieh
BatzP - Damascus
BatzP - El Auja
BatzP - El Buggar
BatzP - El Burj
BatzP - Haifa
BatzP - Huj
BatzP - JB Yakub
BatzP - Kaukab
BatzP - Khan Kusseir
BatzP - Khuweilfe
BatzP - Kuneitra
BatzP - Megiddo
BatzP - Nablus
BatzP - Rafa
BatzP - Sasa
BatzP - Semakh
BatzP - Sheria
BatzP - Surafend
BatzP - Wadi Fara
BatzS - Sinai
BatzS - Bir el Abd
BatzS - El Arish
BatzS - El Mazar
BatzS - El Qatiya
BatzS - Jifjafa
BatzS - Magdhaba
BatzS - Maghara
BatzS - Romani
BatzS - Suez 1915
BatzSe - Senussi
BatzWF - Westn Front
BW - Boer War
BW - NSW
BW - NSW - 1ACH
BW - NSW - 1NSWMR
BW - NSW - 2NSWMR
BW - NSW - 3ACH
BW - NSW - 3NSWIB
BW - NSW - 3NSWMR
BW - NSW - 5ACH
BW - NSW - A Bty RAA
BW - NSW - AAMC
BW - NSW - Aust H
BW - NSW - Lancers
BW - NSW - NSW Inf
BW - NSW - NSWCBC
BW - NSW - NSWIB
BW - NSW - NSWMR_A
BW - NZ
BW - Qld
BW - Qld - 1ACH
BW - Qld - 1QMI
BW - Qld - 2QMI
BW - Qld - 3ACH
BW - Qld - 3QMI
BW - Qld - 4QIB
BW - Qld - 5QIB
BW - Qld - 6QIB
BW - Qld - 7ACH
BW - QLD - AAMC
BW - SA
BW - SA - 1SAMR
BW - SA - 2ACH
BW - SA - 2SAMR
BW - SA - 3SACB
BW - SA - 4ACH
BW - SA - 4SAIB
BW - SA - 5SAIB
BW - SA - 6SAIB
BW - SA - 8ACH
BW - SA - AAMC
BW - Tas
BW - Tas - 1ACH
BW - Tas - 1TIB
BW - Tas - 1TMI
BW - Tas - 2TB
BW - Tas - 2TIB
BW - Tas - 3ACH
BW - Tas - 8ACH
BW - Vic
BW - Vic - 1VMI
BW - Vic - 2ACH
BW - Vic - 2VMR
BW - Vic - 3VB
BW - Vic - 4ACH
BW - Vic - 4VIB
BW - Vic - 5VMR
BW - Vic - 6ACH
BW - Vic - AAMC
BW - Vic - Scot H
BW - WA
BW - WA - 1WAMI
BW - WA - 2ACH
BW - WA - 2WAMI
BW - WA - 3WAB
BW - WA - 4ACH
BW - WA - 4WAMI
BW - WA - 5WAMI
BW - WA - 6WAMI
BW - WA - 8ACH
BW Gen - Campaign
BW Gen - Soldiers
BW General
Cavalry - General
Diary - Schramm
Egypt - Heliopolis
Egypt - Mena
Gen - Ataturk Pk, CNB
Gen - Australia
Gen - Legends
Gen - Query Club
Gen - St - NSW
Gen - St - Qld
Gen - St - SA
Gen - St - Tas
Gen - St - Vic
Gen - St - WA
Gm - German Items
Gm - Bk - 605 MGC
GW - 11 Nov 1918
GW - Atrocities
GW - August 1914
GW - Biographies
GW - Propaganda
GW - Spies
GW - We forgot
Militia 1899-1920
Militia - Area Officers
Militia - Inf - Infantry
Militia - Inf - 1IB
Militia - Inf - 2IB
Militia - Inf - 3IB
Militia - Inf - NSW
Militia - Inf - Qld
Militia - Inf - SA
Militia - Inf - Tas
Militia - Inf - Vic
Militia - Inf - WA
Militia - K.E.Horse
Militia - LH
Militia - LH - Regts
Militia - LH - 1LHB
Militia - LH - 2LHB
Militia - LH - 3LHB
Militia - LH - 4LHB
Militia - LH - 5LHB
Militia - LH - 6LHB
Militia - LHN - NSW
Militia - LHN - 1/7/1
Militia - LHN - 2/9/6
Militia - LHN - 3/11/7
Militia - LHN - 4/6/16
Militia - LHN - 5/4/15
Militia - LHN - 6/5/12
Militia - LHN - 28
Militia - LHQ - Qld
Militia - LHQ - 13/2
Militia - LHQ - 14/3/11
Militia - LHQ - 15/1/5
Militia - LHQ - 27/14
Militia - LHS - SA
Militia - LHS - 16/22/3
Militia - LHS - 17/23/18
Militia - LHS - 24/9
Militia - LHT - Tas
Militia - LHT - 12/26
Militia - LHV - Vic
Militia - LHV - 7/15/20
Militia - LHV - 8/16/8
Militia - LHV - 9/19
Militia - LHV - 10/13
Militia - LHV - 11/20/4
Militia - LHV - 19/17
Militia - LHV - 29
Militia - LHW - WA
Militia - LHW-18/25/10
Militia - Military Orders
Militia - Misc
MilitiaRC - Rifle Clubs
MilitiaRC - NSW
MilitiaRC - NT
MilitiaRC - Qld
MilitiaRC - SA
MilitiaRC - Tas
MilitiaRC - Vic
MilitiaRC - WA
Militiaz - New Zealand
Tk - Turkish Items
Tk - Army
Tk - Bks - Books
Tk - Bks - 1/33IR
Tk - Bks - 27th IR
Tk - Bks - Air Force
Tk - Bks - Yildirim
Tk - POWs
Wp - Weapons
Wp - Hotchkiss Cav
Wp - Hotchkiss PMG
Blog Tools
Edit your Blog
Build a Blog
RSS Feed
View Profile
Open Community
Post to this Blog
Site Index
Education Centre
LH Militia
Boer War
Transport Ships
LH Battles
ALH - Units
ALH - General
Aboriginal Light H
Weapons
Ottoman Sources

"At a mile distant their thousand hooves were stuttering thunder, coming at a rate that frightened a man - they were an awe inspiring sight, galloping through the red haze - knee to knee and horse to horse - the dying sun glinting on bayonet points..." Trooper Ion Idriess

The Australian Light Horse Studies Centre aims to present an accurate history as chroniclers of early Australian military developments from 1899 to 1920.

The Australian Light Horse Studies Centre site holds over 12,000 entries and is growing daily.

Contact: Australian Light Horse Studies Centre

Let us hear your story: You can tell your story, make a comment or ask for help on our Australian Light Horse Studies Centre Forum called:

Desert Column Forum

WARNING: This site contains: names, information and images of deceased people; and, language which may be considered inappropriate today.

Thursday, 9 July 2009
The Volunteer Movement in Western Australia, 1st Battalion, W.A. Infantry Brigade
Topic: Militia - LHW - WA

Western Australian Militia

1st Battalion, W.A. Infantry Brigade


The following is an extract from the book written in 1962 by George F. Wieck called The Volunteer Movement in Western Australia 1861-1903, pp. 63 - 64:

 
1st Battalion, W.A. Infantry Brigade
The 1st Battalion was formed with the Perth personnel of the former 1st Infantry Regiment, that is, Headquarters, Band "A" "B", and "G" Companies. A fourth Company was added later. "G" Company became "C" Company and the new one "D". It was a purely metropolitan corps.

On the dissolution of the W.A. Infantry Brigade on 1 July 1903 its 1st and Second Battalions, together with the Guildford portion of the 3rd Battalion, became the 11th Infantry Regiment, with Headquarters at Perth. The new Regiment was allotted to the Field Force as one of the Battalions of the 3rd Infantry Brigade, Queensland.


Previous:  W.A. Infantry Brigade

Next: Second Battalion, W.A. Infantry Brigade 


Further Reading:

Western Australian Militia, Light Horse

Western Australian Militia, Infantry


Citation: The Volunteer Movement in Western Australia, 1st Battalion, W.A. Infantry Brigade

Posted by Project Leader at 12:01 AM EADT
Updated: Friday, 4 September 2009 7:57 PM EADT
Wednesday, 8 July 2009
The Volunteer Movement in Western Australia, Second Battalion, W.A. Infantry Brigade
Topic: Militia - LHW - WA

Western Australian Militia

Second Battalion, W.A. Infantry Brigade


The following is an extract from the book written in 1962 by George F. Wieck called The Volunteer Movement in Western Australia 1861-1903, p. 64:

 
Second Battalion, W.A. Infantry Brigade
The Second Battalion was formed with the Fremantle personnel of the former 1st Infantry Regiment, that is, "C", "D", and "F" Companies, a Headquarters Band, and another Company being added later. It was a purely Fremantle corps.

On the dissolution of the W.A. Infantry Brigade on 1 July 1903 its 1st and Second Battalions, together with the Guildford portion of the 3rd Battalion, became the 11th Infantry Regiment, with Headquarters at Perth. The new Regiment was allotted to the Field Force as one of the Battalions of the 3rd Infantry Brigade, Queensland.


Previous:  1st Battalion, W.A. Infantry Brigade 

Next: 3rd Battalion, W.A. Infantry Brigade 


Further Reading:

Western Australian Militia, Light Horse

Western Australian Militia, Infantry


Citation: The Volunteer Movement in Western Australia, Second Battalion, W.A. Infantry Brigade

Posted by Project Leader at 12:01 AM EADT
Updated: Friday, 4 September 2009 7:56 PM EADT
Hill 971, Turkey, August 8, 1915, Outline
Topic: BatzG - Hill 971

Hill 971

Turkey, 8 August 1915

Outline


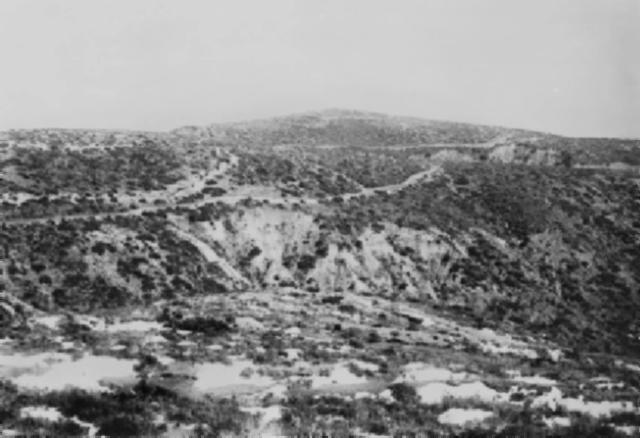
The summit of Hill 971 from Chunuk Bair looking north.

[From the CEW Bean Collection.]


Hill 971, known to the Turks as Koja Chemen Tepe, was the chief objective of a British offensive launched at Gallipoli in August 1915 in conjunction with a second landing of troops at Suvla Bay, six kilometres north of  Anzac (q.v.). The aim of the offensive was to seize the three main heights of the ridgeline (wrongly called 'Sari Bair' by the British) running north-east from the hill known as Baby 700 (q.v.), which formed the apex of Anzac itself-these being Chunuk Bair, Hill Q and Hill 971. Once these dominating peaks of the main range of the Gallipoli Peninsula had been captured, the British expected to be able to march directly to the Narrows of the Dardanelles waterway and achieve a decisive breakthrough in the campaign.

The plan devised required that two columns of troops sally from the northern end of the Anzac beach-head on the night of 6 August and seize foothills which commanded routes to the summit of the range. Another two forces would then move through these and take the summits, before co-operating with attacks to be made from the old Anzac perimeter against Baby 700. A feint was ordered for 6 August at the southern end of the Anzac perimeter (see Lone Pine), to tie up Turkish reserves and keep them away from both the northern movements and the landing at Suvla. The British troops involved in the latter operation, undertaken primarily to secure a base at which stores could he laid down to provide for the Anzac positions needs during the coming winter, were also ordered to aid the main attack in any way possible.

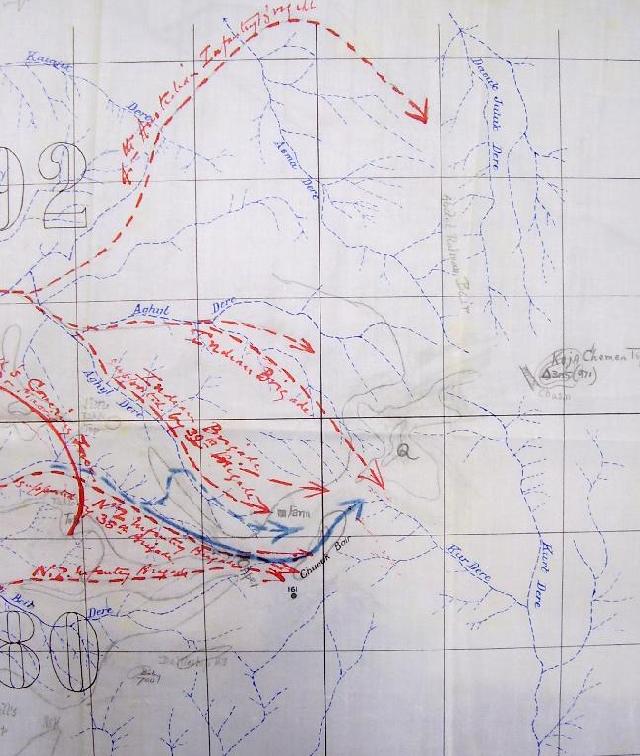
Despite the high hopes held for this plan, its execution came apart in the incredibly rugged country to be traversed, due to inadequate maps and the confusion involved in moving at night through such terrain. While the covering force succeeded in clearing the foothills, delays put the march of the attacking columns behind schedule. The leading elements of the Australian 4th Brigade under Brigadier-General John Monash, which had furthest to go before getting into position to form the left attacking force to take Hill 971, were harried by constant contacts with small groups of the enemy. The arrival of dawn found Monash unsure of his position in a valley called Arghyl Dere, his men exhausted and the brigade still nowhere near its objective.


Hand drawn plan for the attack on Hill 971


The right column, comprising the 29th Indian Brigade and the New Zealand Infantry Brigade, had more luck and got almost to the top of Chunuk Bair. After both columns rested up on 7 August, a renewed push was made the next day. This saw the New Zealanders actually attain their objective, but Monash's troops-ordered to seize a northern spur line known as Adbel Rahman Bair then move south along it to Hill 971 - were caught in the open by well-sited Turkish machine-guns and driven back with great slaughter. On 9 August Ghurkhas from the 29th Brigade had seized Hill Q as well.

This was, however, as close as the plan came to success. The Ghurkhas were shelled off their position by British warships which accidentally dropped a salvo short, and soon after the New Zealanders were relieved by British troops on 10 August a massive Turkish counter-attack wrested back control of Chunuk Bair. This was, effectively, the climax of the Gallipoli campaign, since once this vital ground was retaken by the Turks the Allies' last and best chance of winning at Gallipoli was gone.


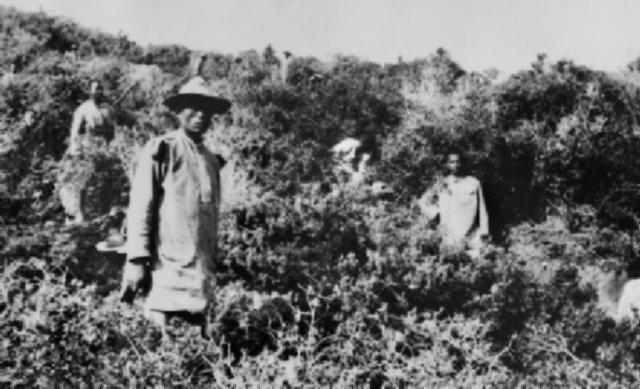
Ghurkha stretcher bearers during the action near Hill 971.


Extracted from the book produced by Chris Coulthard-Clark, Where Australians Fought - The Encyclopaedia of Australia's Battles, Allen and Unwin, Sydney, 1998, pp. 109-110.


Additional References cited by Chris Coulthard-Clark:

C.E.W. Bean, (1924), The Story of Anzac, Vol. 2 , Sydney: Angus & Robertson.


Further Reading:

Hill 971, Turkey, August 8, 1915

Gallipoli Campaign 

Battles where Australians fought, 1899-1920


Citation: Hill 971, Turkey, August 8, 1915, Outline

Posted by Project Leader at 12:01 AM EADT
Updated: Sunday, 11 October 2009 10:39 AM EADT
Tuesday, 7 July 2009
Where Australians Fought, Palestine, 1917-1918
Topic: BatzP - Palestine

Where Australians Fought

Palestine, 1917-1918


Chronology of Australian participation in Palestinian Battles, 1917-18


1917

Rafa, Sinai, January 9, 1917.

First Gaza, Palestine, March 26 to 27, 1917.

Second Gaza, Palestine, April 19, 1917.

El Auja, Palestine, May 23, 1917.
El Buggar Ridge, Palestine, October 27, 1917.

Beersheba, Palestine, October 31, 1917.

Khuweilfe, Palestine, November 1 to 8, 1917.
Tel es Sheria, Palestine, November 7, 1917.
Huj, Palestine, November 8, 1917. 
El Burj, 1 December 1917 

1918

First Amman, Palestine, March 27 to 30, 1918.

Es Salt, Palestine, April 30 to May 3, 1918.

Abu Tellul, Palestine, July 14, 1918.
Megiddo, Palestine, September 19 to 21, 1918.
Nablus, Palestine, September 20, 1918.

Wady Fara, Palestine, September 21, 1918.

Second Amman, Palestine, September 25, 1918.

Semakh, Palestine, September 25, 1918.

Kaukab, Palestine, September 30, 1918.
Surafend, Palestine, 10 December 1918 .


Further Reading:

Light Horse Battles

Battles where Australians fought, 1899-1920

Palestine Battles


Citation: Where Australians Fought, Palestine, 1917-1918


Posted by Project Leader at 12:01 AM EADT
Updated: Monday, 3 August 2009 6:25 PM EADT
The Volunteer Movement in Western Australia, 3rd Battalion, W.A. Infantry Brigade
Topic: Militia - LHW - WA

Western Australian Militia

3rd Battalion, W.A. Infantry Brigade


The following is an extract from the book written in 1962 by George F. Wieck called The Volunteer Movement in Western Australia 1861-1903, p. 64:

 
3rd Battalion, W.A. Infantry Brigade
"E" (Guildford) Company of the former 1st Infantry Regiment formed the nucleus of this Battalion. To it were added the formerly independent corps at Geraldton, Bunbury and York, each forming a Company of the new body. The York Company was disbanded in 1902.

Each centre dealt direct with the Ordnance Services and generally there was little administrative guidance except at camps of training when all were assembled.

At the dissolution of the W.A. Infantry Brigade on 1 July 1903, the Guildford Company of the Battalion was allotted to the 11th Infantry Regiment (See: 1st Battalion, W.A. Infantry Brigade) whilst the Geraldton and Bunbury Companies were amalgamated with the 4th Battalion to form the new 1st Battalion, W.A. Infantry Regiment (See also 4th Battalion, W.A. Infantry Brigade).


Previous:  Second Battalion, W.A. Infantry Brigade

Next: 4th Battalion, W.A. Infantry Brigade


Further Reading:

Western Australian Militia, Light Horse

Western Australian Militia, Infantry


Citation: The Volunteer Movement in Western Australia, 3rd Battalion, W.A. Infantry Brigade

Posted by Project Leader at 12:01 AM EADT
Updated: Friday, 4 September 2009 7:54 PM EADT

Newer | Latest | Older

Full Site Index


powered by FreeFind
Let us hear your story: You can tell your story, make a comment or ask for help on our forum.

Desert Column Forum

A note on copyright

The Australian Light Horse Studies Centre is a not for profit and non profit group whose sole aim is to write the early history of the Australian Light Horse from 1900 - 1920. It is privately funded and the information is provided by the individuals within the group and while permission for the use of the material has been given for this site for these items by various donors, the residual and actual copyright for these items, should there be any, resides exclusively with the donors. The information on this site is freely available for private research use only and if used as such, should be appropriately acknowledged. To assist in this process, each item has a citation attached at the bottom for referencing purposes.

Please Note: No express or implied permission is given for commercial use of the information contained within this site.

A note to copyright holders

The Australian Light Horse Studies Centre has made every endeavour to contact copyright holders of material digitised for this blog and website and where appropriate, permission is still being sought for these items. Where replies were not received, or where the copyright owner has not been able to be traced, or where the permission is still being sought, the Australian Light Horse Studies Centre has decided, in good faith, to proceed with digitisation and publication. Australian Light Horse Studies Centre would be happy to hear from copyright owners at any time to discuss usage of this item.

Contact

Australian Light Horse Studies Centre

eXTReMe Tracker