« July 2009 »
S M T W T F S
1 2 3 4
5 6 7 8 9 10 11
12 13 14 15 16 17 18
19 20 21 22 23 24 25
26 27 28 29 30 31
You are not logged in. Log in


Search the site:


powered by FreeFind
Volunteer with us.

Entries by Topic All topics  
A Latest Site News
A - Using the Site
AAA Volunteers
AAB-Education Centre
AAC-Film Clips
AAC-Photo Albums
AIF & MEF & EEF
AIF - Lighthorse
AIF - ALH - A to Z
AIF - DMC
AIF - DMC - Or Bat
AIF - DMC - Anzac MD
AIF - DMC - Aus MD
AIF - DMC - British
AIF - DMC - BWI
AIF - DMC - French
AIF - DMC - Indian
AIF - DMC - Italian
AIF - DMC - Medical
AIF - DMC - Remounts
AIF - DMC - Scouts
AIF - DMC - Sigs
AIF - DMC - Sigs AirlnS
AIF - DMC - 1 Sig Sqn
AIF - DMC - 2 Sig Sqn
AIF - DMC - Eng
AIF - DMC - Eng 1FSE
AIF - DMC - Eng 2FSE
AIF - DMC - GSR
AIF - 1B - 1 LHB
AIF - 1B - 6 MVS
AIF - 1B - 1 LHMGS
AIF - 1B - 1 Sig Trp
AIF - 1B - 1 LHFA
AIF - 1B - 1 LHR
AIF - 1B - 2 LHR
AIF - 1B - 3 LHR
AIF - 2B - 2 LHB
AIF - 2B - 7 MVS
AIF - 2B - 2 LHFA
AIF - 2B - 2 LHMGS
AIF - 2B - 2 Sig Trp
AIF - 2B - 5 LHR
AIF - 2B - 6 LHR
AIF - 2B - 7 LHR
AIF - 3B - 3 LHB
AIF - 3B - 8 MVS
AIF - 3B - 3 LHB Sigs
AIF - 3B - 3 LHFA
AIF - 3B - 3 LHMGS
AIF - 3B - 3 Sig Trp
AIF - 3B - 8 LHR
AIF - 3B - 9 LHR
AIF - 3B - 10 LHR
AIF - 4B - 4 LHB
AIF - 4B - 4 Sig Trp
AIF - 4B - 9 MVS
AIF - 4B - 4 LHFA
AIF - 4B - 4 LHMGS
AIF - 4B - 4 LHR
AIF - 4B - 11 LHR
AIF - 4B - 12 LHR
AIF - 5B - 5 LHB
AIF - 5B - 10 MVS
AIF - 5B - 5 LHFA
AIF - 5B - 5 Sig Trp
AIF - 5B - ICC
AIF - 5B - 14 LHR
AIF - 5B - 15 LHR
AIF - 5B - 1er Regt
AIF - 5B - 2 NZMGS
AIF - AASC
AIF - Aboriginal LH
AIF - Badges
AIF - Cars
AIF - Chinese LH
AIF - Double Sqns
AIF - Engineers
AIF - Fr - 22 Corps
AIF - Fr - 13 LHR
AIF - Honour Roll
AIF - HQ - 3rd Echelon
AIF - Marching Songs
AIF - Misc Topics
AIF - NZMRB
AIF - NZMRB - AMR
AIF - NZMRB - CMR
AIF - NZMRB - EFT
AIF - NZMRB - NZMFA
AIF - NZMRB - NZMGS
AIF - NZMRB - OMR
AIF - NZMRB - Sig-Trp
AIF - NZMRB - WMR
AIF - Ships
AIF - Ships - Encountr
AIF - Ships - Una
AIF - WFF
AIF - Wireless Sqn
Battles
BatzA - Australia
BatzA - Broken Hill
BatzA - Liverpool
BatzA - Merivale
BatzB - Boer War
BatzB - Bakenlaagte
BatzB - Belmont
BatzB - Bothaville
BatzB - Buffels Hoek
BatzB - Coetzees Drift
BatzB - Diamond Hill
BatzB - Driefontein
BatzB - Elands
BatzB - Graspan
BatzB - Grobelaar
BatzB - Grootvallier
BatzB - Hartebestfontn
BatzB - Houtnek
BatzB - Karee Siding
BatzB - Kimberley
BatzB - Koster River
BatzB - Leeuw Kop
BatzB - Mafeking
BatzB - Magersfontein
BatzB - Modder River
BatzB - Onverwacht
BatzB - Paardeberg
BatzB - Palmietfontein
BatzB - Pink Hill
BatzB - Poplar Grove
BatzB - Rhenoster
BatzB - Sannahs Post
BatzB - Slingersfontn
BatzB - Stinkhoutbm
BatzB - Sunnyside
BatzB - Wilmansrust
BatzB - Wolvekuil
BatzB - Zand River
BatzG - Gallipoli
BatzG - Anzac
BatzG - Aug 1915
BatzG - Baby 700
BatzG - Evacuation
BatzG - Hill 60
BatzG - Hill 971
BatzG - Krithia
BatzG - Lone Pine
BatzG - Nek
BatzJ - Jordan Valley
BatzJ - 1st Amman
BatzJ - 2nd Amman
BatzJ - Abu Tellul
BatzJ - Es Salt
BatzJ - JV Maps
BatzJ - Ziza
BatzM - Mespot
BatzM - Baghdad
BatzM - Ctesiphon
BatzM - Daur
BatzM - Kurna
BatzM - Kut el Amara
BatzM - Ramadi
BatzN - Naval
BatzN - AE1
BatzN - Cocos Is
BatzN - Heligoland
BatzN - Marmara
BatzN - Zeebrugge
BatzN - Zeppelin L43
BatzNG - Bitapaka
BatzO - Other
BatzO - Baku
BatzO - Egypt 1919
BatzO - Emptsa
BatzO - Karawaran
BatzO - Peitang
BatzO - Wassa
BatzP - Palestine
BatzP - 1st Gaza
BatzP - 2nd Gaza
BatzP - 3rd Gaza
BatzP - Aleppo
BatzP - Amwas
BatzP - Ayun Kara
BatzP - Bald Hill
BatzP - Balin
BatzP - Beersheba
BatzP - Berkusieh
BatzP - Damascus
BatzP - El Auja
BatzP - El Buggar
BatzP - El Burj
BatzP - Haifa
BatzP - Huj
BatzP - JB Yakub
BatzP - Kaukab
BatzP - Khan Kusseir
BatzP - Khuweilfe
BatzP - Kuneitra
BatzP - Megiddo
BatzP - Nablus
BatzP - Rafa
BatzP - Sasa
BatzP - Semakh
BatzP - Sheria
BatzP - Surafend
BatzP - Wadi Fara
BatzS - Sinai
BatzS - Bir el Abd
BatzS - El Arish
BatzS - El Mazar
BatzS - El Qatiya
BatzS - Jifjafa
BatzS - Magdhaba
BatzS - Maghara
BatzS - Romani
BatzS - Suez 1915
BatzSe - Senussi
BatzWF - Westn Front
BW - Boer War
BW - NSW
BW - NSW - 1ACH
BW - NSW - 1NSWMR
BW - NSW - 2NSWMR
BW - NSW - 3ACH
BW - NSW - 3NSWIB
BW - NSW - 3NSWMR
BW - NSW - 5ACH
BW - NSW - A Bty RAA
BW - NSW - AAMC
BW - NSW - Aust H
BW - NSW - Lancers
BW - NSW - NSW Inf
BW - NSW - NSWCBC
BW - NSW - NSWIB
BW - NSW - NSWMR_A
BW - NZ
BW - Qld
BW - Qld - 1ACH
BW - Qld - 1QMI
BW - Qld - 2QMI
BW - Qld - 3ACH
BW - Qld - 3QMI
BW - Qld - 4QIB
BW - Qld - 5QIB
BW - Qld - 6QIB
BW - Qld - 7ACH
BW - QLD - AAMC
BW - SA
BW - SA - 1SAMR
BW - SA - 2ACH
BW - SA - 2SAMR
BW - SA - 3SACB
BW - SA - 4ACH
BW - SA - 4SAIB
BW - SA - 5SAIB
BW - SA - 6SAIB
BW - SA - 8ACH
BW - SA - AAMC
BW - Tas
BW - Tas - 1ACH
BW - Tas - 1TIB
BW - Tas - 1TMI
BW - Tas - 2TB
BW - Tas - 2TIB
BW - Tas - 3ACH
BW - Tas - 8ACH
BW - Vic
BW - Vic - 1VMI
BW - Vic - 2ACH
BW - Vic - 2VMR
BW - Vic - 3VB
BW - Vic - 4ACH
BW - Vic - 4VIB
BW - Vic - 5VMR
BW - Vic - 6ACH
BW - Vic - AAMC
BW - Vic - Scot H
BW - WA
BW - WA - 1WAMI
BW - WA - 2ACH
BW - WA - 2WAMI
BW - WA - 3WAB
BW - WA - 4ACH
BW - WA - 4WAMI
BW - WA - 5WAMI
BW - WA - 6WAMI
BW - WA - 8ACH
BW Gen - Campaign
BW Gen - Soldiers
BW General
Cavalry - General
Diary - Schramm
Egypt - Heliopolis
Egypt - Mena
Gen - Ataturk Pk, CNB
Gen - Australia
Gen - Legends
Gen - Query Club
Gen - St - NSW
Gen - St - Qld
Gen - St - SA
Gen - St - Tas
Gen - St - Vic
Gen - St - WA
Gm - German Items
Gm - Bk - 605 MGC
GW - 11 Nov 1918
GW - Atrocities
GW - August 1914
GW - Biographies
GW - Propaganda
GW - Spies
GW - We forgot
Militia 1899-1920
Militia - Area Officers
Militia - Inf - Infantry
Militia - Inf - 1IB
Militia - Inf - 2IB
Militia - Inf - 3IB
Militia - Inf - NSW
Militia - Inf - Qld
Militia - Inf - SA
Militia - Inf - Tas
Militia - Inf - Vic
Militia - Inf - WA
Militia - K.E.Horse
Militia - LH
Militia - LH - Regts
Militia - LH - 1LHB
Militia - LH - 2LHB
Militia - LH - 3LHB
Militia - LH - 4LHB
Militia - LH - 5LHB
Militia - LH - 6LHB
Militia - LHN - NSW
Militia - LHN - 1/7/1
Militia - LHN - 2/9/6
Militia - LHN - 3/11/7
Militia - LHN - 4/6/16
Militia - LHN - 5/4/15
Militia - LHN - 6/5/12
Militia - LHN - 28
Militia - LHQ - Qld
Militia - LHQ - 13/2
Militia - LHQ - 14/3/11
Militia - LHQ - 15/1/5
Militia - LHQ - 27/14
Militia - LHS - SA
Militia - LHS - 16/22/3
Militia - LHS - 17/23/18
Militia - LHS - 24/9
Militia - LHT - Tas
Militia - LHT - 12/26
Militia - LHV - Vic
Militia - LHV - 7/15/20
Militia - LHV - 8/16/8
Militia - LHV - 9/19
Militia - LHV - 10/13
Militia - LHV - 11/20/4
Militia - LHV - 19/17
Militia - LHV - 29
Militia - LHW - WA
Militia - LHW-18/25/10
Militia - Military Orders
Militia - Misc
MilitiaRC - Rifle Clubs
MilitiaRC - NSW
MilitiaRC - NT
MilitiaRC - Qld
MilitiaRC - SA
MilitiaRC - Tas
MilitiaRC - Vic
MilitiaRC - WA
Militiaz - New Zealand
Tk - Turkish Items
Tk - Army
Tk - Bks - Books
Tk - Bks - 1/33IR
Tk - Bks - 27th IR
Tk - Bks - Air Force
Tk - Bks - Yildirim
Tk - POWs
Wp - Weapons
Wp - Hotchkiss Cav
Wp - Hotchkiss PMG
Blog Tools
Edit your Blog
Build a Blog
RSS Feed
View Profile
Open Community
Post to this Blog
Site Index
Education Centre
LH Militia
Boer War
Transport Ships
LH Battles
ALH - Units
ALH - General
Aboriginal Light H
Weapons
Ottoman Sources

"At a mile distant their thousand hooves were stuttering thunder, coming at a rate that frightened a man - they were an awe inspiring sight, galloping through the red haze - knee to knee and horse to horse - the dying sun glinting on bayonet points..." Trooper Ion Idriess

The Australian Light Horse Studies Centre aims to present an accurate history as chroniclers of early Australian military developments from 1899 to 1920.

The Australian Light Horse Studies Centre site holds over 12,000 entries and is growing daily.

Contact: Australian Light Horse Studies Centre

Let us hear your story: You can tell your story, make a comment or ask for help on our Australian Light Horse Studies Centre Forum called:

Desert Column Forum

WARNING: This site contains: names, information and images of deceased people; and, language which may be considered inappropriate today.

Friday, 10 July 2009
El Burj, Palestine, 1 December 1917, Falls Account
Topic: BatzP - El Burj

El Burj, Palestine, 1 December 1917

Falls Account


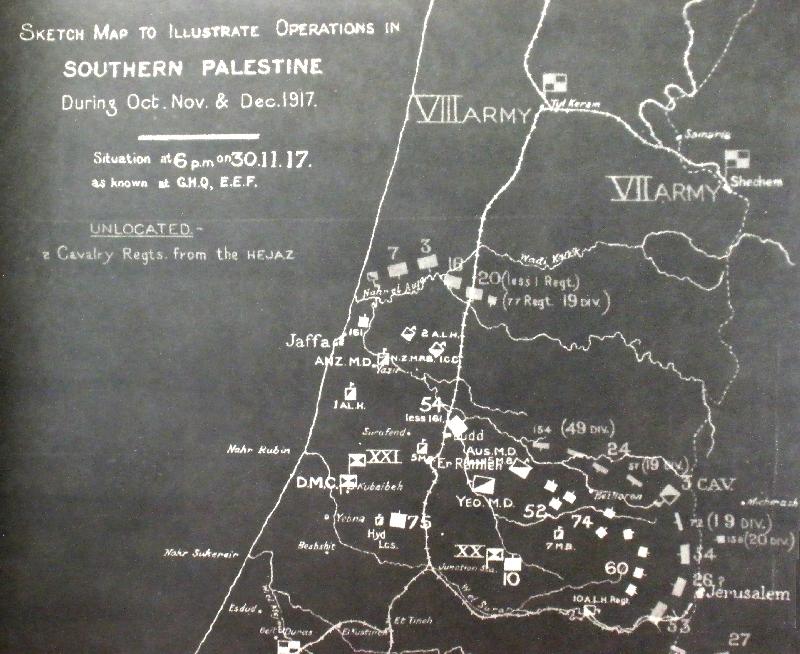
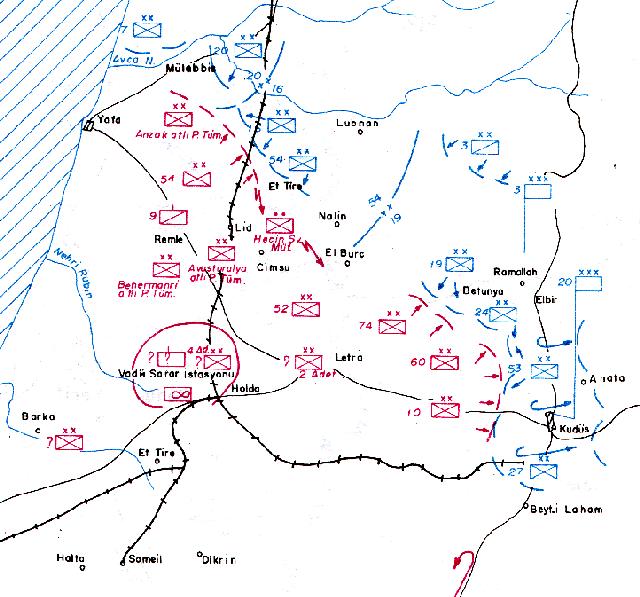
The situation in Southern Palestine at 6p.m., 30 November 1917


As part of the Official British War History of the Great War, Captain Cyril Falls was commissioned to produce a commentary on the Sinai, Palestine and Syrian operations that took place. In 1930, his finished work, Military Operations Egypt and Palestine from June 1917 to the end of the war, produced in two parts, was published in London. This is Falls account of El Burj.

Falls, C, Military Operations Egypt and Palestine from June 1917 to the end of the war, Part I, London, 1930, pp. 234 - 236:


On the night of the 30th November the 4th L.H. Brigade, having been relieved by the 74th Division at Tahta and in the Wadi Zeit, had relieved the left of the 156th Brigade east of El Burj. The 3rd and 4th L.H. Brigades were now in line side by side, with the 7th Mounted Brigade in support, awaiting relief by the 5th Mounted Brigade, which had now reached Qaryet el 'Inab. Major-General Hodgson took over command of the front from north of Beit Sira to south-west of Shilta.

About 1 a.m. on the 1st December the Turks renewed their attacks, both at Tahta against the 157th Brigade and north-east of El Burj against the 3rd L.H. Brigade. At Tahta they succeeded after two fruitless attempts in driving the right company of the 5/H.L.I., which had lost half its strength, off two hundred yards of the ridge in front of the village. Br.-General Hamilton Moore forbade an immediate counter-attack and ordered the rocky ground to be first thoroughly searched by Stokes mortars. At 4.30 a.m. a company of the 5/Argyll & Sutherland Highlanders and the company of the H.L.I. reoccupied the position with little difficulty.

The other Turkish attack penetrated the line of the 8th A.L.H. north-east of El Burj, but four separate onslaughts with stick bombs were driven back by a squadron under Major A. Crawford on a rocky hill. A squadron of the Gloucester Hussars, still attached to the 3rd L.H. Brigade, was rushed up to fill gaps in the line, and the Hong Kong Battery came into action. Next a company of the 4/Royal Scots Fusiliers from Beit Sira, led by Lieut.-Colonel N. G. Stewart-Richardson with a small party of bombers, arrived on the scene just as the Turks were launching a new assault. A bombing party under 2nd Lieutenant S. H. P. Boughey attacked the enemy bombers engaging Major Crawford' squadron and after a fierce struggle forced them back. The Turks continued to attack with desperate bravery, but another company of the 4/Scots Fusiliers came up and the enemy, galled by the steady fire of the 3rd L.H. Brigade and assailed by a shower of bombs from the Fusiliers fell back to cover. The Scotsmen, infuriated at losing their hard earned rest, vented their rage upon the enemy, pursuing him without respite. Boughey outran his men and forced twenty-five Turks to surrender. A moment later he was shot dead. He received the posthumous reward of the Victoria Cross.

Australians, Scotsmen, and Yeomen held their position till dawn, when it was found that the attacking force was at their mercy, since its retreat was barred by a barrage laid down by the machine guns of the 3rd L.H. Brigade. Six officers and 106 other ranks surrendered, while over one hundred dead were found upon the ground. The prisoners belonged to the Storm Battalion of the 19th Division. They had proved themselves troops of high quality, and were far better equipped than most Turkish troops at this period, wearing shrapnel helmets and carrying 1917 Mausers. It appears from Turkish of the 54th Division also took part in the attack. The battalion, 600 strong, was almost annihilated.

On the morning of the 3rd December a last attempt 3 Dec. was made by the 74th Division to recover Beit 'Ur el Foqa. This attack was carried out by the 16/Devonshire, 229th Brigade, and launched from the head of the Wadi Zeit at 1 a.m. At 3.30 the village was captured with 17 prisoners and three machine guns. But heavy counter-attacks were launched before consolidation could be carried out, and the battalion was galled by machine-gun fire from the neighbouring ridges. Bombing and hand-to-hand fighting continued all the morning. The 74th Division was, in fact, learning over again the lesson which had been impressed upon Major General Barrow when he had had time to study the ground, that Foqa was untenable while the Zeitun Ridge, Jonquil Hill, and the hills to the north were in the enemy's hands. Soon afternoon Lieut.-Colonel A. C. Mardon obtained permission to withdraw through Tahta. The losses were heavy, numbering 286, and included three company commanders.

It was obvious that local attacks of this nature were not worth their cost, and General Chetwode, who had now had time to reconnoitre the front, ordered them to stop. The Turks had been defeated and fought to a standstill; he had now all the fresh troops of his own corps up - the 10th Division having relieved the 52nd - and could afford to mature his preparations for the capture of Jerusalem.


THE BATTLE FROM THE TURKISH SIDE.

Falkenhayn's aim was now to take pressure off the Seventh Army and delay an attack on Jerusalem until the reinforcements which he was expecting had arrived. These consisted of the 20th Division, which was to join the Eighth Army; the 1st Division, the Caucasus Cavalry Brigade, the Asia Corps, and from east of Jordan the 7th Cavalry Regiment and 150th Regiment, destined to support the Seventh Army. The 20th Division, as we have seen, was in action on the 27th November. The leading battalion of the Asia Corps was expected at Nablus on the 12th December, and the 70th Regiment of the 1st Division at Jenin about the same date. The troops from over Jordan began to arrive in Jerusalem on the 1st December.

The 19th Division was placed under the orders of the Eighth Army for good reason, though its attack was intended to assist the Seventh. The Marshal feared that if he handed it over to Fevzi Pasha the latter would draw it closer to his own front, whereas he wished to make a divergent attack against the British left and the gap at Suffa. The plan was brilliantly conceived, but it failed to take into account the fatigue of this very fine division after its long marches. "On the 1st December," writes Colonel Hussein Husni, "our attack gave out and was stopped before positions which Falkenhayn could not penetrate."'

Yet the Marshal did not despair. He was quite convinced that the British would never reach the Nablus road at Bire. He " fixed his attention on the daily change of the enemy's dispositions," confident that Jerusalem could not be taken until the British shifted their attack further south and drove the XX Corps from its position south of Nabi Samweil. Sir Philip Chetwode, we shall see, was of the same opinion. It was the Marshal's misfortune that, while his III Corps, not thought worthy of defending Jerusalem, had defended the Nablus road with courage and devotion, his XX Corps, selected for the greater task, was to fail abjectly when put to the test.


Further Reading:

Battles where Australians fought, 1899-1920

The Battle of El Burj, 1 December 1917


Citation: El Burj, Palestine, 1 December 1917, Falls Account

Posted by Project Leader at 12:01 AM EADT
Updated: Tuesday, 14 July 2009 12:59 PM EADT
The Volunteer Movement in Western Australia, W.A. Infantry Brigade
Topic: Militia - LHW - WA

Western Australian Militia

W.A. Infantry Brigade


The following is an extract from the book written in 1962 by George F. Wieck called The Volunteer Movement in Western Australia 1861-1903, pp. 62 - 63:

 
W.A. Infantry Brigade
The impact of the war in South Africa and the raising of Contingents for service therein gave a tremendous fillip to the Volunteer Movement in Western Australia. Two new Battalions of Infantry were raised and by regrouping and expanding some of the older corps other Battalions could be formed. General Orders issued on 8 October 1900 gave formal approval for the formation of the West Australian Infantry Brigade existing of five Battalions (to include all the existing Infantry corps), organised on the following lines:

Headquarters,
Perth.
Commandant and Staff.

1st Battalion,
Perth.
Officer Commanding Major J. C. Strickland.

2nd Battalion,
Fremantle.
Officer Commanding Captain J. A. E. Humble.

3rd Battalion,
Guildford,

York,

Bunbury,

Geraldton.
Officer Commanding Captain W. D. Cowan.

4th Battalion, (Metropolitan Civil Service Battalion)
Perth.
Officer Commanding Major H. J. Hunt.

5th Battalion, (Goldfields Battalion of Infantry)
Kalgoorlie.
Officer Commanding Major H. A. Judd.

After the inauguration of the Commonwealth in 1901 the Brigade continued to flourish until 1 July 1903 when it was liquidated by the issue of the new Federal Defence Scheme. Federal troops were divided into two bodies known as Field Force and Garrison Troops, each having a distinctive role. All the corps of the former Brigade (except York) became components, under changed designations, of either of these two bodies, as shown in 1st to 5th Battalions, W.A. Infantry Brigade.


Previous:  Goldfields Battalion of Infantry 

Next: 1st Battalion, W.A. Infantry Brigade 


Further Reading:

Western Australian Militia, Light Horse

Western Australian Militia, Infantry


Citation: The Volunteer Movement in Western Australia, W.A. Infantry Brigade

Posted by Project Leader at 12:01 AM EADT
Updated: Friday, 4 September 2009 7:58 PM EADT
El Burj, Palestine, 1 December 1917, Huseyin Husnu Emir Account
Topic: BatzP - El Burj

El Burj, Palestine, 1 December 1917

Hüseyin Hüsnü Emir Account


Map 28 from Hüseyin Hüsnü Emir, Yildirim, p. 432.

[Click on map for larger version.]


One of the most important and authoritative books that was written by Lieutenant Colonel Hüseyin Hüsnü Emir, Turkish General Staff, a Turkish officer at the centre of major historical events in Palestine from 1917 to 1917. The book he wrote was called Yilderim which translates into English as either "lightning" or "thunderbolt". This was the name given to the Army formed under the command of General Falkenheyn in 1917. It fought in Palestine until the cessation of hostilities.

The book was 1st published in 1922 in Ottoman Script by the Turkish General Staff War History Department in Ankara. At that time, Turkey was in a state of internal chaos. Mustafa Kemal Pasha was still fighting against the Greeks and British. Hüsnü completed his book on 1 May 1921 in occupied Istanbul and joined the National forces of Mustafa Kemal Pasha in Anatolia with the manuscript. The 2nd edition was published in 2002. The translation presented here comes from the 1st edition.

Lieutenant Colonel Hüseyin Hüsnü Emir, Yildirim, p. 245.

1st December

On both enemy fronts the artillery fire was less than usual and nothing important occurred. The front was stabilised (Map 28). In the zone of the 19th Division the front was advanced from south of Nalin to the Beit aur el Fuqa road. The enemy remained in El Tahta. Later the storm battalion of the 19th Division with the detachment of the 54th Division attacked El Burj. They captured some machine guns but the enemy attacked their rear and threw them back to the hills north of the road with heavy loss.


Bodies of Turkish storm troopers litter the landscape after the failed attack.


Further Reading:

Turkish Army, Hücüm Müfrezesi - Storm Troopers  

Battles where Australians fought, 1899-1920

The Battle of El Burj, 1 December 1917


Citation: El Burj, Palestine, 1 December 1917, Hüseyin Hüsnü Emir Account

Posted by Project Leader at 12:01 AM EADT
Updated: Wednesday, 15 July 2009 1:19 PM EADT
Thursday, 9 July 2009
The Volunteer Movement in Western Australia, 1st Battalion, W.A. Infantry Brigade
Topic: Militia - LHW - WA

Western Australian Militia

1st Battalion, W.A. Infantry Brigade


The following is an extract from the book written in 1962 by George F. Wieck called The Volunteer Movement in Western Australia 1861-1903, pp. 63 - 64:

 
1st Battalion, W.A. Infantry Brigade
The 1st Battalion was formed with the Perth personnel of the former 1st Infantry Regiment, that is, Headquarters, Band "A" "B", and "G" Companies. A fourth Company was added later. "G" Company became "C" Company and the new one "D". It was a purely metropolitan corps.

On the dissolution of the W.A. Infantry Brigade on 1 July 1903 its 1st and Second Battalions, together with the Guildford portion of the 3rd Battalion, became the 11th Infantry Regiment, with Headquarters at Perth. The new Regiment was allotted to the Field Force as one of the Battalions of the 3rd Infantry Brigade, Queensland.


Previous:  W.A. Infantry Brigade

Next: Second Battalion, W.A. Infantry Brigade 


Further Reading:

Western Australian Militia, Light Horse

Western Australian Militia, Infantry


Citation: The Volunteer Movement in Western Australia, 1st Battalion, W.A. Infantry Brigade

Posted by Project Leader at 12:01 AM EADT
Updated: Friday, 4 September 2009 7:57 PM EADT
Wednesday, 8 July 2009
The Volunteer Movement in Western Australia, Second Battalion, W.A. Infantry Brigade
Topic: Militia - LHW - WA

Western Australian Militia

Second Battalion, W.A. Infantry Brigade


The following is an extract from the book written in 1962 by George F. Wieck called The Volunteer Movement in Western Australia 1861-1903, p. 64:

 
Second Battalion, W.A. Infantry Brigade
The Second Battalion was formed with the Fremantle personnel of the former 1st Infantry Regiment, that is, "C", "D", and "F" Companies, a Headquarters Band, and another Company being added later. It was a purely Fremantle corps.

On the dissolution of the W.A. Infantry Brigade on 1 July 1903 its 1st and Second Battalions, together with the Guildford portion of the 3rd Battalion, became the 11th Infantry Regiment, with Headquarters at Perth. The new Regiment was allotted to the Field Force as one of the Battalions of the 3rd Infantry Brigade, Queensland.


Previous:  1st Battalion, W.A. Infantry Brigade 

Next: 3rd Battalion, W.A. Infantry Brigade 


Further Reading:

Western Australian Militia, Light Horse

Western Australian Militia, Infantry


Citation: The Volunteer Movement in Western Australia, Second Battalion, W.A. Infantry Brigade

Posted by Project Leader at 12:01 AM EADT
Updated: Friday, 4 September 2009 7:56 PM EADT

Newer | Latest | Older

Full Site Index


powered by FreeFind
Let us hear your story: You can tell your story, make a comment or ask for help on our forum.

Desert Column Forum

A note on copyright

The Australian Light Horse Studies Centre is a not for profit and non profit group whose sole aim is to write the early history of the Australian Light Horse from 1900 - 1920. It is privately funded and the information is provided by the individuals within the group and while permission for the use of the material has been given for this site for these items by various donors, the residual and actual copyright for these items, should there be any, resides exclusively with the donors. The information on this site is freely available for private research use only and if used as such, should be appropriately acknowledged. To assist in this process, each item has a citation attached at the bottom for referencing purposes.

Please Note: No express or implied permission is given for commercial use of the information contained within this site.

A note to copyright holders

The Australian Light Horse Studies Centre has made every endeavour to contact copyright holders of material digitised for this blog and website and where appropriate, permission is still being sought for these items. Where replies were not received, or where the copyright owner has not been able to be traced, or where the permission is still being sought, the Australian Light Horse Studies Centre has decided, in good faith, to proceed with digitisation and publication. Australian Light Horse Studies Centre would be happy to hear from copyright owners at any time to discuss usage of this item.

Contact

Australian Light Horse Studies Centre

eXTReMe Tracker