"At a mile distant their thousand hooves were stuttering thunder, coming at a rate that frightened a man - they were an awe inspiring sight, galloping through the red haze - knee to knee and horse to horse - the dying sun glinting on bayonet points..." Trooper Ion Idriess
The Australian Light Horse Studies Centre aims to present an accurate history as chroniclers of early Australian military developments from 1899 to 1920.
The Australian Light Horse Studies Centre site holds over 12,000 entries and is growing daily.
Contact:Australian Light Horse Studies CentreLet us hear your story:
You can tell your story, make a comment or ask for help on our Australian Light Horse Studies Centre Forum called:
WARNING: This site contains: names, information and images of deceased people; and, language which may be considered inappropriate today.
Tuesday, 8 September 2009
Latest News, Battle of Romani, 4-5 August 1916 Topic: A Latest Site News
Latest News
Battle of Romani, 4-5 August 1916
For those interested in the Battle of Romani and its companions, Katia and Bir el Abd fought over the period 4 -9 August 1916, then these pages might be of interest. At the moment, the Romani aspect of the battle has been completed. For those people keen to examine the primary source documents and compare them to the Official accounts, this is now available as this information is collected in one topic.
Included in the pages are some documents that came to light during unrelated searches of private papers. One particular find was a hand drawn map detailing the location of all burials from the 5th LHR. This gem was hidden amongst a sheave of unrelated material. Rather keep it hidden, it is now part of public property and available to all researchers.
There are other unique and previously unpublished documents and pix amongst these collections. We are in the process of analysing a few more pix from a collection recently made available which specifically details the actions at Romani and Bir el Abd. These will be made available soon.
The pages on Romani are collected in a Contents page and all may be found at this location:
Battle of Romani, Sinai, August 4 to 5, 1916, Contents
The Battle of Romani was the first major engagement after Gallipoli which involved the Light Horse working as a mounted formation.
Outline
Romani, Sinai, August 4 to 5, 1916
Pictures
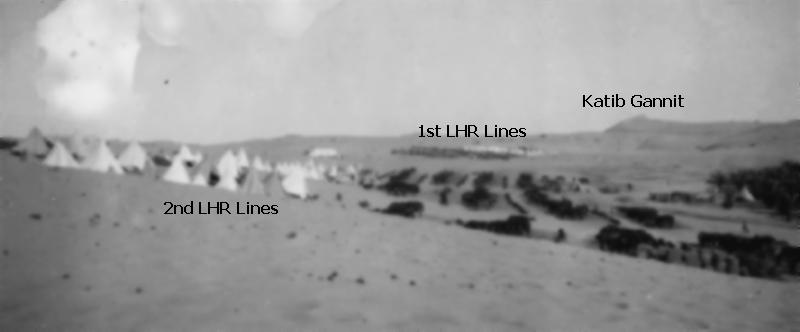
Encampment near Romani, August 1916
Maps
1:125,000 map of Romani area
1:40,000 map of Mt Meredith area
1:40,000 map of Mt Royston area
1:40,000 map of Dueidar, Hassaia and Nuss area
1:40,000 map of Bir el Abd area
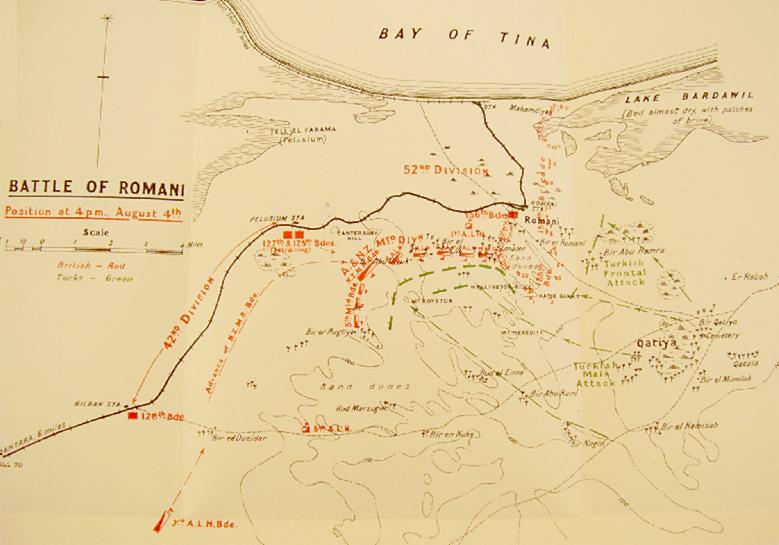
Official British War History map of Romani, 4 August 1916
1st ALHR AIF account map
1:250,000 German map of Romani area
Accounts
Official War History Accounts
Gullett Australian Official History account about Katia
Gullett Australian Official History account about Romani
Powles New Zealand Official History account about Romani
Official British War History
The British Occupation of Romani
The Turkish Advance
The Turkish Attack on The 4th August
The Pursuit on The 5th August
The end of the pursuit
The Results of the Battle
Turkish and German Forces Engaged
Distribution of E.E.F., 27 July 1916
The State of The Royal Flying Corps in Egypt at the time of the Battle of Romani
The Evacuation of the Wounded
Australian Unit Histories
1st ALHR AIF account about Romani
2nd ALHR AIF account about the Battle of Romani
3rd ALHR AIF account about the Battle of Romani
5th LHR, AIF account about the Battle of Romani
6th LHR, AIF account about the Battle of Romani
7th LHR, AIF account about the Battle of Romani
8th LHR, AIF account about the Battle of Romani
9th LHR, AIF account about the Battle of Romani
10th LHR, AIF account about the Battle of Romani
Australian Unit War Diary Accounts
1st ALHR, AIF, War Diary, account about the Battle of Romani
2nd ALHR, AIF, War Diary, account about the Battle of Romani
Account of the 2nd Light Horse Regiment's participation in the Battle of Romani, War Diary, Appendix 4.
3rd ALHR, AIF, War Diary, account about the Battle of Romani
5th ALHR, AIF, War Diary, account about the Battle of Romani
5th LHR, AIF account about the Battle of Romani, Killed in Action
6th ALHR, AIF, War Diary, account about the Battle of Romani
7th ALHR, AIF, War Diary, account about the Battle of Romani
8th ALHR, AIF, War Diary, account about the Battle of Romani
9th ALHR, AIF, War Diary, account about the Battle of Romani
10th ALHR, AIF, War Diary, account about the Battle of Romani
New Zealand Unit Histories
AMR, NZMRB account about Romani
CMR, NZMRB account about Romani
WMR, NZMRB account about Romani
Newspaper Accounts
New York Times account of Romani, 6 August 1916
London Times account of Romani, 10 August 1916
Individual Accounts
859 Corporal Francis Patrick Curran, 7th LHR
Possibly the most poignant account is that of 859 Corporal Francis Patrick Curran, 7th LHR. His story captured the attention of the international audience when it was published in the London Times.
Romani was the first action which involved the mounted forces from Australia working as mounted infantry. Their role would expand later to that of cavalry but this was a learning process for everyone.
el Qatiya, Sinai, 23 April 1916, Falls Account, Egypt in the Spring of 1916 Topic: BatzS - El Qatiya
el Qatiya
Sinai, 23 April 1916
Falls Account, Egypt in the Spring of 1916
As part of the Official British War History of the Great War, Captain Cyril Falls and Lieutenant General George MacMunn were commissioned to produce a commentary on the Sinai, Palestine and Syrian operations that took place. In 1928, their finished work, Military Operations, Egypt and Palestine - From the outbreak of war with Germany to June 1917, was published in London. Their book included a section specifically related to the battle of Romani and is extracted below.
MacMunn, G. & Falls, C., Military operations: Egypt and Palestine, (London 1930), pp. 154 - 159:
Egypt in the Spring of 1916.
In Chapter VI the general narrative was carried up to the arrival of the troops from Gallipoli in Egypt : there to be re-equipped, restored in health, and finally either despatched to the Western Front or employed to protect Egypt and the Suez Canal against the Turkish offensive then expected. In the same chapter the amalgamation of the two Egyptian commands in March was anticipated, the return of Sir J. Maxwell to England and Sir A. Murray's assumption of command of the combined Mediterranean Expeditionary Force and Force in Egypt, under the name of the Egyptian Expeditionary Force, being recorded. Though that point has been disposed of, it must be remembered in reading the pages which follow that until the 19th March Sir A. Murray's command included only Sharqia, the easternmost province of Egypt, and Sinai, and that his attention was concentrated on the defence of the Canal. For these reasons he established his headquarters at Ismailia.
The administrative work of the first six weeks was very heavy. Every day during that period ships arrived at Alexandria and Port Said with troops, guns, transport and stores of the Dardanelles Army ; every formation in need of reorganization and re-equipment. Before the last units reached the country or the components of this great mass has been disentangled, the move of troops from Egypt for service elsewhere began, further to complicate the administration. In both material and personnel the formations from Gallipoli were incomplete, and training was one of the most urgent problems to be faced.
A training centre for Australian and New Zealand reinforcements was at once formed at Tell el Kebir, and a machine-gun school at Ismailia. Sir J. Maxwell had already organized at Zeitun the Imperial School of Instruction on a considerable scale. When this passed under the 1916. control of Sir A. Murray in March, he expanded it and merged in it the machine-gun school, concentrating all training, except that of the Australian reinforcements, at Zeitun, under the command of Lieut.-Colonel the Hon. E. M. Colston, Grenadier Guards. Classes were formed for:
(i) officers,
(ii) non-commissioned officers,
(iii) machine gunners,
(iv) Lewis gunners,
(v) signallers,
(vi) artillery,
(vii) Stokes gunners,
(viii) grenadiers.
Between the 7th January and 31st May, 1,165 officers and 5,512 other ranks passed through the various courses of instruction.
The organization of the signal services was also of importance. The signallers from Gallipoli had to be almost entirely re-equipped in material and reorganized to suit Egyptian conditions, while fresh personnel had to be trained to replace their heavy casualties. [Up to the 31st May 94 officers and 1,305 other ranks were trained in signal duties at Zeitun and Alexandria.] Until this period the civil administration had worked the telegraph system for the army, employing mainly native operators. New units had to be formed, equipped and trained to take over this work on the Sinai front, on the coast of the Western Desert as far as Sollum, and for the force defending the Nile Valley from the west.
Yet another piece of work, on the importance of which Sir A. Murray lays stress in his Despatches, was the survey on a large scale of the Canal Zone and certain areas east of the advanced line. This was initiated by Mr. E. M. Dowson, Director-General of the Survey of Egypt, who put his resources at Sir A. Murray's disposal, and carried out by the Topographical Section of the Intelligence Branch, working in co-operation with the Royal Flying Corps. By the end of May the survey had approached Qatiya.
Sir A. Murray found the work on the Canal Defences, the plan and organization of which have been outlined, fast progressing. No part of the advanced line was as yet occupied by troops, mainly because there had been delays in establishing the water supply caused by lack of piping. But on the 13th January Sir A. Murray ordered his Corps Commanders to the Canal, to take over the work and prepare schemes of defence.
The Canal was divided into three sections, [The military term employed in this connection is generally "sector.'' As, however, "section" is used in Sir A. Murray's Despatches and the official titles of the headquarters were subsequently "Headquarters No. … Section," the latter has been retained.] each held by a corps, as follows:-
No. 1 Section (Southern) - Suez to Kabrit:–
IX Corps (Lieut.-General the Hon. Sir J. G. H. Byng);
29th, 46th, and 10th Indian, Divisions.
Headquarters, Suez.
No. 2 Section (Central) - Kabrit to Ferdan:-
Anzac Corps (Lieut.-General Sir W. R. Birdwood);
1st and 2nd Australian, and New Zealand and Australian, Divisions.
Headquarters, Ismailia.
No. 3 Section (Northern) - Ferdan to Port Said:–
XV Corps (Lieut.-General H. S. Horne);
11th, 13th and 31st Divisions.
Headquarters, Port Said;
Advanced Headquarters, Qantara.
The VIII Corps (Lieut.-General F. J. Davies), consisting of the 42nd and 52nd Divisions, was at first concentrated at Tell el Kebir and later, as other divisions moved to France, broken up. General Davies then succeeded General Byng, who had returned to the Western Front, in command of the IX Corps.
In addition to these eleven divisions, there were the 53rd and 54th, in Sir J. Maxwell's command, the former guarding the Nile Valley, the latter at Cairo. By the end of February, after the departure of the 13th, 31st and 46th Divisions and the break-up of the 10th Indian, the distribution was as follows:
No. 1 Section:-
IX Corps;
29th and 42nd Divisions.
No. 2 Section:-
Anzac Corps;
1st and 2nd Australian, and New Zealand and Australian, Divisions. No. 3 Section:–
XV Corps;
11th and 52nd Divisions.
Then the Anzac Corps and its troops went to France, and on the 27th March the II Anzac Corps, commanded by Lieut.-General Sir A. J. Godley, and consisting of the 4th and 5th Australian Divisions and the Australian and New Zealand. Mounted Division, came into being and took over No. 2 Section. [The 3rd Australian Division went to England direct from Australia.] By this time, though the defences were not yet complete, the advanced line was occupied.
Sir A. Murray, however, was not content to adopt a system of passive defence. He was already buying camels in order to organize large mobile columns in each section. He was engaged in preparations for pushing out a railway to the Qatiya district, to permit of its occupation, in accordance with the appreciation made by him when C.I.G.S. But he now contemplated an advance much greater than to Qatiya. In a letter addressed to Sir W. Robertson on the 15th February, 1916, he stated that in his opinion the best method of defending Egypt from the east was to advance across Sinai to El Arish, and that fewer troops would be required for this undertaking than for the passive defence of the Suez Canal. With regard to the danger of a Turkish invasion he stated that during the early spring it would be possible for the Turks to bring down to Beersheba and push across the desert a force of 250,000 men, but added that there was no sign of their attempting such an enterprise and that the time available was short. Replying on the 27th, Sir W. Robertson agreed that Qatiya should be occupied if possible; an advance to El Arish was a far bigger question, on which no decision could for the moment be made. For his part, he thought it extremely unlikely that more than 100,000 Turks could be brought against Egypt.
We see then that as late as mid-February the command in Egypt still contemplated the possibility - though not the probability - of a force of 250,000 Turks advancing to the attack on Egypt, and that the C.I.G.S. considered two-fifths of this force to be the maximum which the enemy could concentrate for the purpose. In view of the scanty information available from the Turkish side regarding this period, it is difficult to ascertain exactly what the enemy's intentions were. That an offensive was contemplated in February we know from both Kress and Liman. ["Sinai": Kress, i, p. 21; Liman, p. 181. Both speak of it as "eine grössere Expedition," meaning a major expedition. The Historical Section of the Turkish General Staff speaks somewhat vaguely of an expedition consisting of seven divisions and 100,000 strong (57 battalions, 23 batteries) having been contemplated. But this was first projected in April 1915 and then found impossible owing to the drain of Gallipoli. Later it was hoped to carry out the expedition in October 1916, but "patience was not “exercised" and "for some urgent reasons" the small-scale advance which led to the Battle of Romani took place in the hottest season of the year.] The question to which we must attempt to find an answer is: How far were the British estimates justified, and why was the Turkish expedition postponed until July and then limited to a single reinforced division?
There is no evidence that the Turks ever contemplated, still less made preparation for, an expedition approaching the strength of 250,000 men. In February 1916 their troops between the Cilician Gates and the Suez Canal numbered from forty to sixty thousand men, but of these the bulk were in Northern Syria, where the enemy was concerned for the safety of his communications at Alexandretta. Three Turkish Armies, the First, Second and Fifth, were in Thrace, where, as Liman von Sanders caustically remarks, there was no enemy. As an example of the slow rate at which Turkish troops in large numbers were transported to a distant theatre of war, it may be mentioned that when the Second Army was transferred to the area south-west of Lake Van in Armenia, the move began in April and lasted until August. Communications with Palestine were better, and the ten divisions of this army might have been concentrated in Southern Palestine in a shorter period, but not before the end of the wet season. With the forces already in Syria there might then have been 150,000 men between Jerusalem and the Sinai frontier. But if they had come they could hardly have been fed, as we now know, even in Southern Palestine, far less in Sinai ; for in the summer of 1917 the 40,000 combatants holding the Gaza-Beersheba line were seriously under-nourished and their transport animals half-starved. Turkish troops can subsist on less than any European troops, the Russians not excepted, but the resources of Palestine in food were comparatively small, all munitions of war had to come from Constantinople (when not from Berlin), and the railway system, which has been described in detail, was quite inadequate to maintain a quarter of a million men even at Beersheba. As to the equipment of the Turkish reserves at this period, the following telegram sent by Liman to the Turkish Ministry of War from Balikisri in Asia Minor on the 14th March is instructive: "Saw to-day depot regiment over 8,000 strong, with only 1,050 rifles of various models. Not a single bandolier, and a great proportion of those who had rifles without side-arms." (Liman, p. 157.)
Turkish plans were, perhaps, as Sir A. Murray subsequently stated in his Despatches, upset by the campaign of the Grand Duke Nicholas, which resulted in the capture of the fortress of Erzerum on the 15th February and in April of Trebizond, the best Turkish Black Sea harbour in the zone of operations. This campaign did not result in the withdrawal of troops from Syria to any great extent, but it may have kept reinforcements from being sent there, and certainly kept the Baghdad Railway fully employed in transporting the Second Army to Ras el Ain, whence it was to march towards Erzerum. As a result, the German and Austrian reinforcements sent to Palestine, small in numbers though valuable in quality, were delayed till the summer, when Sinai was at its driest and hottest, and no move against the Canal was made until July. This, however, does not affect the contention that the M.E.F.'s estimate of Turkish resources was altogether excessive. Sir W. Robertson's figure of 100,000 represented their means and intentions much more nearly, and this appears, in the light of present knowledge, to be the extreme limit of any concentration ever contemplated by Turkey, or in her power to effect. That the exaggeration of the former estimate was quickly recognized by the Imperial General Staff is shown by the speed with which British divisions were transferred from Egypt to the Western Front, even before the end of the wet season in Sinai. It will be noted that Sir A. Murray lays down in his appreciation that after the beginning of the hot weather, that is from about the 15th April, one corps of three divisions on the Canal, one division holding Qatiya, and three mounted brigades for all purposes, would suffice for the defence of Egypt from the east.
Australian Light Horse, Tactical Training of the AIF at Zeitoun, Rearguards Topic: AIF - Lighthorse
Australian Light Horse
Tactical Training of the AIF at Zeitoun
Rearguards
The following entries dealing with the emerging tactics taught to officers and NCO's at the Imperial School of Instruction, Zeitoun and are extracted from a very informative handbook called Lectures by Commandant, School of Instruction, Zeitoun, 1916. At one time or another, all officers and NCO's within the Light Horse were inculcated with the tenets expounded by the lectures.
REARGUARDS.
Rearguards are used to prevent the march of the mainbody, from being hindered by attack.
A rearguard is above everything a Fighting Force. It is divided into a Main Guard and Rear Party, corresponding to the divisions of an advanced Guard. They are linked up in the same way by connecting files.
If not engaged the duties of a Rearguard are easy, but when attacked by an enterprising enemy the commander has a very difficult and dangerous task to perform.
The chief duties of a Rearguard are:
1. To offer enough resistance to allow the main body to retire unmolested.
2. Not to allow the enemy to approach and to engage too closely. The commander must watch his flanks most carefully in order not to let the enemy envelope him and cut him off.
To achieve the above, the Commander must observe the following points:
(1) Choose positions with an extended field of fire, to force the enemy to deploy early and so occasion him delay, occupying positions with fiery wile extension.
(2) Open fire very early with the same object as No. 1.
(3) Quit positions before the enemy approaches too closely.
(4) The whole of the Rearguard never retires at the same time.
(5) One portion retires and occupies another position the other portion holding on to the original position, the first portion then retires through the second line and takes up a third position, and so on.
(6) It is better to sacrifice a portion of the rearguard than to allow the evenly to fall on the rear of the mainbody, and so possibly turn the retirement into a rout.
It is essential for a Rearguard to be strong in Artillery as by shelling the evenly at long ranges, the enemy will be forced to extend, which enables the retiring force to gain time, a most important factor.
el Qatiya, Sinai, 23 April 1916, Falls Account, The Advance into Sinai Topic: BatzS - El Qatiya
el Qatiya
Sinai, 23 April 1916
Falls Account, The Advance into Sinai
As part of the Official British War History of the Great War, Captain Cyril Falls and Lieutenant General George MacMunn were commissioned to produce a commentary on the Sinai, Palestine and Syrian operations that took place. In 1928, their finished work, Military Operations, Egypt and Palestine - From the outbreak of war with Germany to June 1917, was published in London. Their book included a section specifically related to the battle of Romani and is extracted below.
MacMunn, G. & Falls, C., Military operations: Egypt and Palestine, (London 1930), pp. 159 - 162:
The Advance into Sinai.
Until the middle of February the troops were fully engaged in reorganization, training, and work upon the Canal Defences, in the making of roads and laying of light railways and pipe-lines, without which these defences could not be occupied. Reconnaissances by the Royal Flying Corps and the seaplanes of the Royal Naval Air Service (a squadron of which now succeeded the French seaplane detachment at Port Said - The "East Indies and Egypt Seaplane Squadron" was formed in late January 1916, and consisted of British seaplanes which had been employed in the Gallipoli campaign and of the French seaplane detachment. There is no record of the precise date at which the French detachment was withdrawn from Egypt, but its last reported flight took place on the 16th April. Squadron Commander C. L'Estrange Malone was the first commander of the East Indies Squadron, Commander C. R. Sampson, R.N., taking over command in May 1916. The seaplane carriers at the disposal of the squadron were the Ben-my-Chree, Anne, Raven, and Empress, but the last named was sent to Mudros in May. The depot included a training base for observers, who were supplied by the Army, and an intelligence report centre. The squadron carried out remarkable work in reconnaissance, photography, and bombing along the Syrian coast throughout 1916 and 1917, and was also employed in the Red Sea and at Aden. An interesting account of its activities is to be found in "In the Side Shows" by Captain Wedgwood Benn (Holder and Stoughton).)" established the fact that there were no considerable Turkish forces in Sinai and no signs of a concentration in Southern Palestine for an attack on Egypt. During the latter half of the month the XV Corps pushed its mounted patrols out 20 miles, to Bir en Nuss and Hod Umm Ugba, finding this area clear of the enemy and practically deserted by the Bedouin. From Tor, at the southern end of Sinai, which was garrisoned by the 2nd Battalion Egyptian Army and had come under General Murray's control by arrangement with General Maxwell, a reconnaissance was carried out, and a small force of the enemy - chiefly Bedouin with a few Turkish officers - ejected from a camp established several miles inland. In No. 2 (the Central) Section a force about a squadron strong of the 8th and 9th Australian Light Horse and a detachment of Bikanir Camel Corps carried out between the 11th and 15th April a raid to Jifjafa, [See:Jifjafa] a distance of 52 miles, captured an Austrian engineer officer and 33 men, and destroyed a well-boring plant which had been at work for five months. At the same time the IX Corps in the Southern Section reconnoitred 30 miles to Bir el Giddi and the tracks leading east there from.
Meanwhile the standard-gauge line from Qantara towards Qatiya had been begun. On the 10th March the first shipload of rails and sleepers arrived at Qantara, and in four weeks 16 miles, including sidings, were laid. The line followed the caravan track for 5 miles and was then to make a sweep north to avoid the large and shifting sand dunes of Romani, curving back to the caravan route near the 0ghratina oasis, 5 miles east of Qatiya. A subsidiary 2 ft. 6 in. line was also begun from Port Said along the shore, April.
The railway having passed through the advanced line of the Canal Defences, it became necessary to establish permanent posts ahead of it in the Qatiya Oasis to protect it from attack by the enemy and to ensure the Egyptian labourers against interference from armed Bedouin. On the 6th April, Br.-General E. A. Wiggin, 5th Mounted Brigade (the mounted troops in the XV Corps Section), was appointed to the command of the Qatiya district, and made responsible to Lieut.-General Horne. Three days afterwards the latter was recalled to a command in France and succeeded by Major-General the Hon. H. Lawrence, hitherto commanding the 52nd Division. The XV Corps Headquarters was broken up and General Lawrence was given a reduced corps staff, known as Headquarters No. 3 Section.
On the 9th April a squadron of the Worcester Yeomanry found the Turks in some strength at Bir el Abd, 15 miles east of Qatiya. By the third week of the month the whole of the 5th Mounted Brigade was disposed to cover the railway:
Headquarters and Gloucester Hussars at Romani,
Worcester Yeomanry at Qatiya,
Warwick Yeomanry (less one squadron on the Canal) at Bir el Hamisah, 3 miles south of Qatiya.
The 2/2nd Lowland Field Company, R.E., 52nd Division, was attached to the brigade for the development of wells.
The brigade had no artillery, the ground being soft sand over which wheels could scarcely move and the water supply for horses still far from plentiful. On the 21st and 22nd two squadrons (less one troop) Worcester Yeomanry with a detachment (4 officers and 60 other ranks) of the Field Company were pushed out to the Oasis of Oghratina, and replaced in Qatiya by a squadron of Gloucester Hussars until the arrival of the 5th Australian Light Horse. This regiment had been ordered to reinforce General Wiggin, in view of signs of renewed activity on the part of the enemy, an outpost of the Warwick Yeomanry from Bir el Hamisah having been attacked by Turkish or Bedouin cavalry before dawn on the 19th and having had its horses stampeded. The Light Horse was due to arrive at Qatiya on the 24th.
Thirteen miles S.S.W. of Qatiya, on the track from Qantara, the small oasis of Dueidar was held by 120 rifles 5th Royal Scots Fusiliers, a few Yeomanry and men of the Bikanir Camel Corps, 156 rifles in all. Five miles behind this post, at Hill 70 in the advanced line of the Canal Defences, was the 4th Royal Scots Fusiliers, of the 52nd (Lowland) Division, which was holding this portion of the front. Railhead was on the 21st near El Arais and 4 miles west of Romani, so that the time had come when Qatiya could be held in greater strength and more easily supplied. At the very moment when this reinforcement was about to take place, the enemy struck a blow which for combined speed, skill, daring, and success is hardly to be matched in the records of the campaign.
Battle of Romani, Sinai, August 4 to 5, 1916, Outline Topic: BatzS - Romani
Battle of Romani
Sinai, August 4 to 5, 1916
Outline
1st Light Horse Brigade camp at Romani
Romani, an action fought on 4-5 August 1916 in the Sinai Desert 35 kilometres east of the Suez Canal, took place amid towering sand-dunes astride the old caravan route to Palestine skirting the Mediterranean Sea. After Turkish raids had inflicted some damage to British outposts in this area during April, Romani was occupied by the 52nd (Lowland) Infantry Division and the Anzac Mounted Division, the latter at that time comprising two brigades of Australian light horse under Major-General Harry Chauvel. From here the mounted troops undertook a vigorous program of desert patrols, aimed at keeping the enemy away from this route to the canal and detecting any approach that was made.
On 18 July, aerial reconnaissance had discovered the presence of four large bodies of Turkish troops a few days' march beyond the line of British outposts. The next fortnight involved continual skirmishing in the midsummer heat, during which it was established from enemy prisoners that the puckish force comprised a reinforced division of 12,000-14,000 men under command of a German general, Kress von Kressenstein. During the night of 2-3 August the Turks advanced to Katia, eight kilometres south-east of Romani, and it was concluded that an attack on the main British position was imminent.
In the expectation that the enemy planned to envelop the southern end of the Romani defences, before sweeping onto the camps and railway behind than, Chauvel positioned his 1st Brigade - all that was available to him since his 2nd Brigade was out on reconnaissance-in small posts covering a frontage of five kilometres south of the 2nd Division's Lines. The Turks were in the process of forming up on their start-lines for an assault when they unexpectedly bumped into the Australians at about midnight on 3 August. After adjusting their plans, the Turks come on an hour later. In the fighting that quickly developed, the 700 rifles in Chauvel's screen of outposts were opposed by up to 8,000 Turks.
Under the weight of the unrelenting enemy pressure, the light horsemen fell back steadily. At 4.30 a.m., when it appeared that the Turks' outflanking movement must succeed, Chauvel brought in his 2nd Brigade into line on the right flank of the 1st. As the Turks continued to feel their way around the southern flank of the defence, Chauvel began moving troops from the left of his line to keep extending his right, with the 52nd Division taking over the parts of his front that had to be thus vacated. Despite these tactics, by 7 a.m. the enemy had gained a long sandhill dubbed Wellington Ridge flanking the camps. The Australians had been pushed back to a towering sand-dune called Mount Royston, their front now facing due south.
Romani and the disposition of the various armies, 4 August 1916
[Click on map for larger image]
At about 7 a.m. the New Zealand Mounted Rifles Brigade and a brigade of British yeomanry, having been sent forward from reserve positions closer to the canal, were ordered into action against the enemy's now exposed flank. These forces were not in position to commence a counter-attack on Mount Royston until nearly 2 p.m. The fight continued throughout the afternoon, but by the time a brigade from a British infantry division in reserve, the 42nd (Lancashire), also neared the scene at about 6 p.m. the Turks had begun surrendering in large numbers. Meanwhile Chauvel's brigades had managed to maintain their positions in the centre, but were too tired for any further counter-stroke to be attempted.
At 4 a.m. on 5 August the 1st and 2nd Light Horse Brigades, together with adjoining infantry, advanced with the bayonet. Except at one point, Turkish resistance on Wellington Ridge was quickly subdued. With the enemy flank now crushed, Chauvel was instructed at 6.30 a.m. to undertake a pursuit using all available mounted troops. This now involved the 3rd Brigade of his own division, which had arrived from the canal zone. The 3rd Light Horse Brigade had a major success south of Katia, when a Turkish strongpoint was rushed at about 1 p.m. and resulted in the capture of 425 enemy and seven machine-guns.
Elsewhere on this front the Turkish positions proved too strong and well protected by fire, so that Katia itself remained untaken. The British forces were compelled to retire, essentially through lack of water for the horses, but during the night the Turks took the opportunity to abandon the place anyway. Thus the threat to Romani had been decisively eliminated, although the failure of the British command to turn the Turkish defeat into a rout has largely obscured the significance of the victory. The brunt of the fighting had fallen upon the Anzac Mounted Division, which suffered over 900 of the 1,130 casualties (including 202 killed) on the British side. Turkish losses are unknown but were estimated at 9,000; 1,250 dead were buried by the victors and nearly 4,000 were taken prisoner.
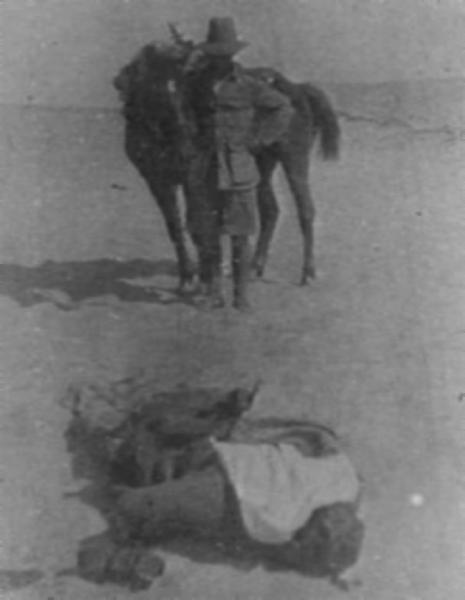
A poignant moment as a 3rd LHR man pays his respects to a fallen Turk.
Extracted from the book produced by Chris Coulthard-Clark, Where Australians Fought - The Encyclopaedia of Australia's Battles, Allen and Unwin, Sydney, 1998, pp. 118-118.
Additional References cited by Chris Coulthard-Clark:
H.S. Gullett, (1944), The Australian Imperial Force in Sinai and Palestine, Sydney: Angus & Robertson.
A.J. Hill, (1978), Chauvel of the Light Horse, Carlton, Vic.: Melbourne University Press.
The Australian Light Horse Studies Centre is a not for profit and non profit group whose sole aim is to write the early history of the Australian Light Horse from 1900
- 1920. It is privately funded and the information is provided by the individuals within the group and while permission for the use of the material has been given for this
site for these items by various donors, the residual and actual copyright for these items, should there be any, resides exclusively with the donors. The information on
this site is freely available for private research use only and if used as such, should be appropriately acknowledged. To assist in this process, each item has a citation
attached at the bottom for referencing purposes.
Please Note: No express or implied permission is given for commercial use of the information contained within this site.
A note to copyright holders
The Australian Light Horse Studies Centre has made every endeavour to contact copyright holders of material digitised for this blog and website and where
appropriate, permission is still being sought for these items. Where replies were not received, or where the copyright owner has not been able to be traced, or where
the permission is still being sought, the Australian Light Horse Studies Centre has decided, in good faith, to proceed with digitisation and publication. Australian Light
Horse Studies Centre would be happy to hear from copyright owners at any time to discuss usage of this item.