"At a mile distant their thousand hooves were stuttering thunder, coming at a rate that frightened a man - they were an awe inspiring sight, galloping through the red haze - knee to knee and horse to horse - the dying sun glinting on bayonet points..." Trooper Ion Idriess
The Australian Light Horse Studies Centre aims to present an accurate history as chroniclers of early Australian military developments from 1899 to 1920.
The Australian Light Horse Studies Centre site holds over 12,000 entries and is growing daily.
Contact:Australian Light Horse Studies CentreLet us hear your story:
You can tell your story, make a comment or ask for help on our Australian Light Horse Studies Centre Forum called:
WARNING: This site contains: names, information and images of deceased people; and, language which may be considered inappropriate today.
Wednesday, 27 January 2010
The Battle of Anzac Cove, Gallipoli, 25 April 1915, 2nd Infantry Brigade Signals - No. 5 Topic: BatzG - Anzac
The Battle of Anzac Cove
Gallipoli, 25 April 1915
2nd Infantry Brigade Signals - No. 5
2nd Infantry Brigade, AIF, Signals - No. 5
The following is a transcription of the Signal No. 5 of the 2nd Infantry Brigade, AIF, which forms part of a series which illustrates the chaos and problems experienced in executing their role in the landings at Anzac on 25 April 1915.
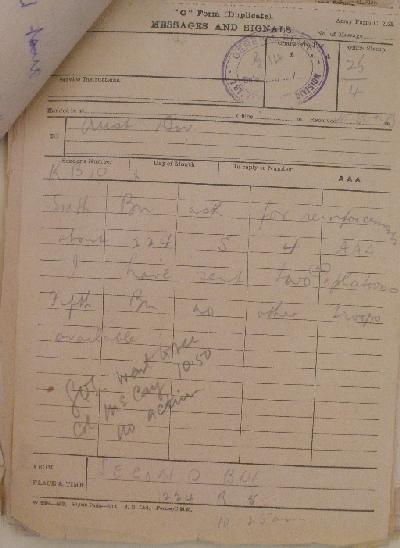
Aust Div
KB 10 25/4/15 AAA
Begins:
Sixth Bn ask for reinforcements about 224 S 4 AAA I have sent two (2) platoons Fifth Bn no other troops available
The Battle of Anzac Cove, Gallipoli, 25 April 1915, 2nd Infantry Brigade Signals - No. 6 Topic: BatzG - Anzac
The Battle of Anzac Cove
Gallipoli, 25 April 1915
2nd Infantry Brigade Signals - No. 6
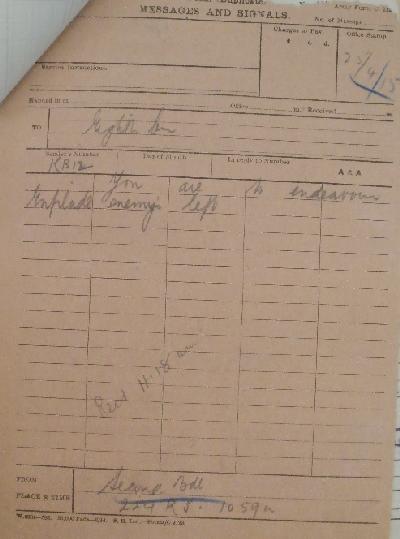
2nd Infantry Brigade, AIF, Signals - No. 6
The following is a transcription of the Signal No. 6 of the 2nd Infantry Brigade, AIF, which forms part of a series which illustrates the chaos and problems experienced in executing their role in the landings at Anzac on 25 April 1915.
The Battle of Anzac Cove, Gallipoli, 25 April 1915, 2nd Infantry Brigade Signals - No. 7 Topic: BatzG - Anzac
The Battle of Anzac Cove
Gallipoli, 25 April 1915
2nd Infantry Brigade Signals - No. 7
2nd Infantry Brigade, AIF, Signals - No. 7
The following is a transcription of the Signal No. 7 of the 2nd Infantry Brigade, AIF, which forms part of a series which illustrates the chaos and problems experienced in executing their role in the landings at Anzac on 25 April 1915.
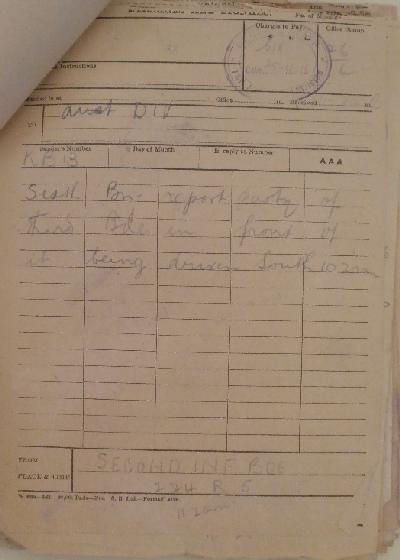
Aust Div
KB 13 25/4/15 AAA
Begins:
Sixth Bn report party of Third Bde in front of it being driven South 10.20 am
The Battle of Anzac Cove, Gallipoli, 25 April 1915, 2nd Infantry Brigade Signals - No. 8 Topic: BatzG - Anzac
The Battle of Anzac Cove
Gallipoli, 25 April 1915
2nd Infantry Brigade Signals - No. 8
2nd Infantry Brigade, AIF, Signals - No. 8
The following is a transcription of the Signal No. 8 of the 2nd Infantry Brigade, AIF, which forms part of a series which illustrates the chaos and problems experienced in executing their role in the landings at Anzac on 25 April 1915.
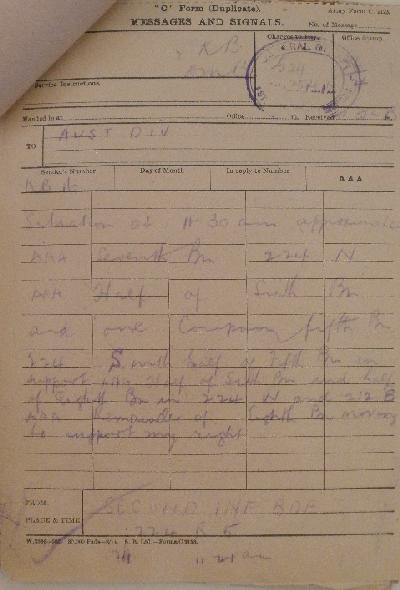
Aust Div
KB 16 25/4/15 AAA
Begins:
Situation at 11.30 am approximate AAA Seventh Bn 224 N AAA Half of Sixth Bn and one Company fifth Bn 224 S with half of Fifth Bn in support AAA Half of Sixth Bn and half of Eighth Bn in 224 N and 212 B AAA Remainder of Eighth Bn moving to support my right
The Battle of Anzac Cove, Gallipoli, 25 April 1915, 9th Infantry Battalion, AIF, Unit History Account Topic: BatzG - Anzac
The Battle of Anzac Cove
Gallipoli, 25 April 1915
9th Infantry Battalion, AIF, Unit History Account
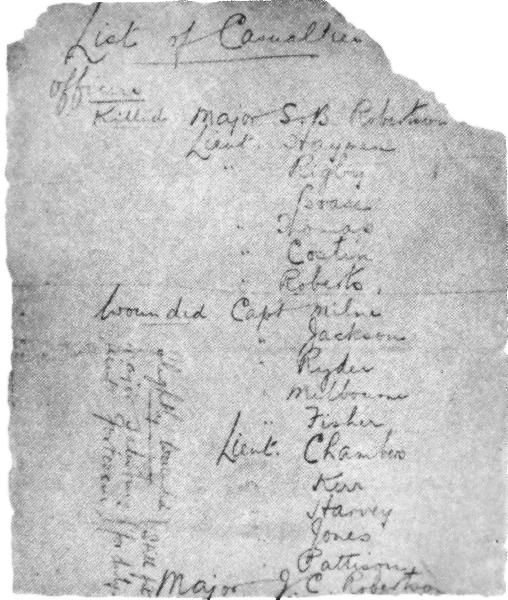
9th Battalion casualty list for April
After the commencement of World War 2, Norman K. Harvey and the 9th Battalion Association, felt that it was time to record the events of the battalion before the memory of the events was overshadowed by the history unfolding around him. He wrote the first history of this Battalion called From Anzac to the Hindenburg Line: the history of the 9th Battalion, A.I.F.. The book was published in 1941. The following is an extract from this book detailing the landing at Anzac in a manner that is seen from the members of the Battalion and so contains all the humour, fears, joy and sadness that is the full gamit of human emotions. As such this story fills in the gaps between the dry reports and the official histories.
Harvey, N.K., From Anzac to the Hindenburg Line: the history of the 9th Battalion, A.I.F., 1941, pp. 34 - 53.
CHAPTER III
THE LANDING AT ANZAC
In order to understand the Landing at Anzac and the Gallipoli operations, it is necessary to know the main points of the country where the fighting took place, and also to be acquainted with the proposed plan of operations.
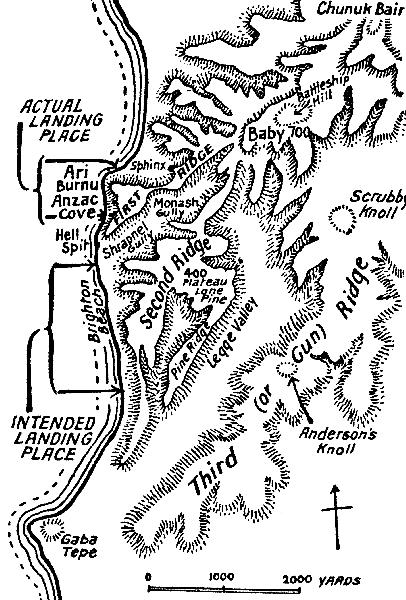
The Gallipoli peninsula is roughly the shape of a foot with the toes pointing downwards and the front facing the Straits of the Dardanelles. Suvla Bay is at the heel, Cape Helles at the toe, and Gaba Tepe l is a cape on the sole, a little more than half-way from the toe towards the heel, and about 60 miles from Mudros Harbour.
Nearly the whole of the peninsula is taken up with a series of hills, with separating valleys, running lengthways, with numerous rugged spurs running towards the coast. From the point of Gaba Tepe a beach runs north in a gentle curve about a mile and a half to Little Ari Burnu, then a gently curved bay running another thousand yards north to Ari Burnu point is the celebrated Anzac Beach or Anzac Cove. North of Ari Burnu is another curving beach which carries the coastline up to Suvla Bay, five miles north of Gaba Tepe. [The name Kaba Tepe was also used at first.]
If we take a point on the coast a mile north of Ari Burnu, and go inland in an easterly direction for two miles, we come to a hilltop known as Koja Chemen Tepe or "Hill 971." From this hill towards Little Ari Burnu runs a succession of hilltops and ridges, about the middle of which is "Baby 700" hill. About six hundred yards further back along this line towards Hill 971 is "Battleship Hill," or "Big 700," and near the beach end is "Plugge's Plateau," overlooking Anzac Cove. From Plugge's a final ridge ("MacLagan's Ridge") runs towards Little Ari Burnu.
Map 8, p. 36.
From Baby 700 another succession of ridges runs to the sea at a point a little more than a thousand yards south of Little Ari Burnu. Midway along these ridges is the "400 Plateau," which is continued to the south-west by "Bolton's Ridge."
Running in a nearly southerly direction from Battleship Hill is "Gun Ridge," which ends in Gaba Tepe. On this ridge are two hilltops which will need to be referred to by name, "Scrubby Knoll," east of Anzac Cove, and "Anderson Knoll," east of the end of Bolton's Ridge. Inland from Anderson Knoll, and about 3½ miles back from the coast is another hill-top, Mal Tepe, which is only a mile and a quarter from the Dardanelles, on the other side of the peninsula. The whole range from Hill 971 to Gaba Tepe was known on the War Office maps as Sari Bair; this name, however, meaning "Yellow Slope," was really the Turkish name for a high steep cliff which from the day of the Landing was called by our men the "Sphinx" or the "Cathedral."
The following was the plan for the enterprise: The 29th Division, landing at Cape Helles, was to work its way up the peninsula from the extremity, while Birdwood's Australian and New Zealand Corps would land about ten miles up the side of the peninsula on the beach between Gaba Tepe and a place known as "Fisherman's Hut," three miles further north. After a covering party had occupied a line stretching from Gaba Tepe to Koja Chemen Tepe (Hill 971), the main Australian and New Zealand force was to land and advance beyond it to an objective line running through Mal Tepe. From this position the Turkish communications with Helles could be threatened, and perhaps cut off altogether. The attack was to depend for its success upon surprise, and was to be supported by bombardment from the navy, but this bombardment was not to commence until the operation had come to the knowledge of the enemy. Even the mere threat on this position would, it was thought, prevent the Turks from sending reinforcements to assist in repelling the attack at Cape Helles.
One brigade from the 1st Australian Division was to form the northern covering force, which was to land soon after dawn, an hour before the 29th Division would begin its assault at Helles. General Bridges chose for this purpose the 3rd Brigade. The northern parties of the brigade, immediately on landing near Little Ari Burnu, were to advance and seize Battleship Hill and extend their line to Hill 971, while the rest of the brigade captured outstanding summits on Gun Ridge, from Scrubby Knoll to Gaba Tepe. The battalion on the extreme right of the advance was to be the 9th: its first two companies were to swing to the right immediately after the landing, about 1,000 yards above Gaba Tepe, and capture and disable the battery believed to be on that promontory. The other two companies, landing at the same point, were to seize Anderson Knoll, about a mile inland.
Besides the landings at Gaba Tepe and Helles, there was to be a landing by the French on the coast of Asia Minor, at Kum Kale at the southern entrance of the Dardanelles; a demonstration by warships and transports at Besika Bay, south of the French landing, and a pretended landing on the Gulf of Saros, well to the north of Suvla Bay.
The landing at Kum Kale, too, was only intended as a feint, and after having occupied their position for a day or two the French troops were to re-embark and then land at Helles to assist the 29th Division.
The actual landing of the troops was under the control of the naval authorities; the arrangements were worked out in detail, the naval orders for the Anzac landing occupying 27 typed foolscap sheets.
A concert was given, the items being contributed by members of the crew. At the close of the day a good hot meal, given by the ship, was supplied to all the troops, who were invited to eat as much as they liked, after which, for two or three hours, they were able to snatch some sleep.
About midnight the destroyers Beagle and Colne drew up alongside the Malda, and the men of "C" and "D" Companies dropped quietly over the side on to their decks. Two platoons of the 12th Battalion were also on each destroyer, beside which were seen the row-boats in which the troops were to land. For the next five hours the men could do nothing but sit or lie in their crowded quarters and talk or sleep. At 2 a.m. members of the crew came round with buckets of steaming hot cocoa, very welcome by this time, as the night was somewhat sharp.
The men in the Queen were awakened about midnight, and, after a drink of hot cocoa had been served out by some of the bluejackets, they began to climb down into the boats. It was then 1.30 a.m. on Sunday, April 25th, St. Mark's Day. "A" Company went into two tows on the starboard side of the ship, "B" Company into two on the port side. Each tow consisted of a cutter and two lifeboats. By 2.35 every man of the covering party from the three battleships was in his tow. Rear-Admiral Thursby, who was in command of the Anzac landing, with his flag in the Queen, says:
"The embarkation was carried out so quietly and expeditiously that I did not realize it had begun, and sent to know what was the cause of the delay. I would not have believed that the operation could have been carried out so quietly that I could not hear them, although on the bridge only a few yards away.
[As quoted by Admiral Wester Wemyss in "The Navy in the Dardanelles Campaign."]
The troops had not been able to see the coast from the ship, but they were able to see its outline faintly when they were in the tows. It had been a moonlight night, but the moon was now very low, and they had about an hour of absolute darkness ahead of them, as the first streak of dawn was due at five minutes past four, and sunrise at 5.15.
As soon as the men were in the tows, the battleships, which had been stopped since I a.m., began to move in slowly through a sea as smooth as glass. The tows advanced with them, each drawn by its picket-boat. About 3 o'clock the moon vanished. Half an hour later, the battleships having arrived as close to the shore as they could without running the risk of being seen, an officer on the bridge of the Queen called out in a clear, loud voice, "Go ahead and land." Thereupon the tows quickened their speed, and as they left, the sailors lining the sides of the Queen gave a "silent cheer" by waving their caps and uttering a subdued whisper, which was barely audible to those in the boats.
The naval officer in charge of the most southerly tow, one of those containing 9th Battalion men, was to give the direction, the other tows keeping in line with him at intervals of about 1.50 yards. It was now very dark, on account of a thick mist, and the men in the boats could hardly distinguish the tows on either side of them. Not a word was spoken above a whisper, and barely heard was the splash of the boats as the little waves lapped their sides. The suspense in the crowded boats was very trying: "I was shaking all over with nervousness and excitement," wrote one man.
Suddenly two searchlights, one after the other, shot their beams out ahead of the tows for a few moments. Fortunately they were on the far side of the peninsula, and so their rays could not reach the boats on account of the intervening hills. On reaching shallow water the steamboats cast off their tows, leaving the troops to row the remainder of the way to the shore. It was about this time that flames and sparks flared out of the funnel of one of the northern pinnaces to the height of at least three feet; this lasted for nearly half-a-minute. Shortly afterwards, at 4.29 a.m., there appeared on the top of a dimly-seen hill to the south a bright yellow light, which lasted for about half-a-minute. A single rifle-shot rang out from the shore, followed a second or two later by several shots. Then a heavier fire began.
At the sound of the firing the feeling of suspense ended. Some began singing in the boats. A voice was heard through a megaphone: "Make your landing, lads, where you can, and hold on." The boats almost immediately began to run aground, and the men, climbed over their sides and waded ashore as best they could. This was no easy matter, as the weighty equipment and arms impeded their movements, and underneath the water the bottom was slippery rounded shingle, not very easy to walk on with military boots. Some of the men found themselves in water half-way up their chests, but scrambling to the shore, they ran across a narrow stretch of beach until brought up by a sandy bank about ten feet high. Here they lay on the ground, took off their packs and laid them down, and fixed bayonets. Some had vainly attempted to fix their bayonets while in the water. Orders had been given that no shots were to be fired until daylight. [4 These orders were for the most part very carefully observed, despite the fact that a few men on first landing lost their heads in the excitement and began to fire into the darkness. It is said that of the men killed or wounded before daylight. none was found with a cartridge in his magazine and every one had the cut-off of his rifle closed, as instructed. This indicates the high state of discipline existing among the troops.]
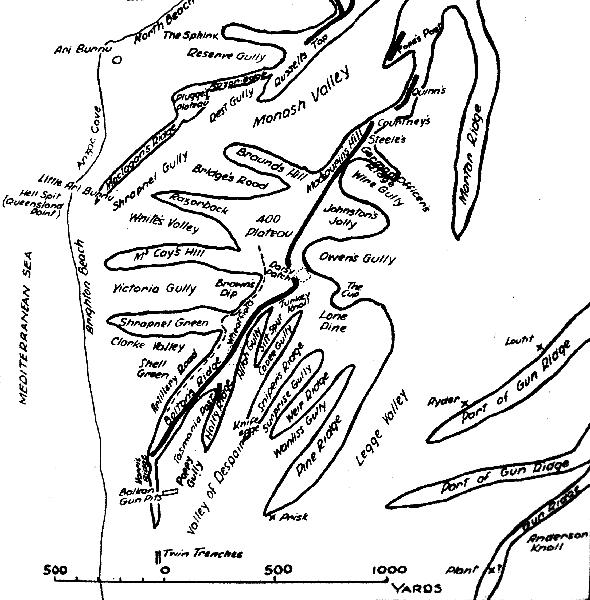
Map 9, p. 42.
Tradition has it that it was a 9th Battalion boat that was the first to ground at 4.30 a.m., and a number of its men had already reached the bank at the far side of the beach when the first shot was heard. To Lieutenant Duncan Chapman belongs the honour of having been the first Australian soldier to set foot on Anzac. He later reached the rank of major, and was killed in action at Pozieres in August, 1916. Among others in his boat were J. D. Bostock, F. C. Coe, E. Coles, W. A. Fisher, L. Hansen, T. A. Hellmuth, J. C. Henderson, C. Holdway, W. Jarrett, B. H. Kendrick, D. Kendrick, W. E. Latimer, R. McN. C. McKenzie, S. A. McKenzie, W. Pollock, B. Rider, and L. Thomas.
In the darkness it was difficult to see what was happening even close by. Many men were hit before they left the boats, some while in the water, and others as they were running across the beach. Some who had dropped into deep water were helpless on account of their heavy kits, and it is probable that not a few were drowned in this way.
At this stage it became apparent that some mistake must have been made in the point of landing. After forming up in the shelter of the bank, the orders were to attack the first ridge across the open ground. However, there was no open ground to be seen. The bank was the lower part of a high steep rugged hill. Some officers thought that this must be Gaba Tepe; others did not think so, but had no idea where they were. To add to the confusion the battalions were found to be mixed up. Men from the 10th were intermingled with those of the 9th.
It is now known that owing to a strong current the tows were carried out of their course, and made the shore at Ari Burnu, about a mile to the north of the intended landing-place. Some of the naval officers, realising they were off their course, had attempted to remedy the mistake at the last moment, and this it was that led to some mixing of the battalions. Major Salisbury, who was in 'the extreme right-hand tow, says:
"The naval officer guiding the tows [Lieutenant J. B. Waterlow] was in the picket boat of my tow. Apparently he was steering the right course for Gaba Tepe, for somewhat more than half way in to shore the rest of the tows had sagged away to the north and were out of sight. Some of the picket boats were smaller than the others and perhaps could not keep their loads up against the current setting north. Our tow was behind a large picket boat, and when the rest of the tows got out of sight to the north we turned north until we steamed across the sterns of the other tows with the naval officer apparently counting them; we then turned south to get back to our place on the right, but very soon the shore could be seen, so the picket boat drew up into position as third tow instead of first, thus sandwiching half of 'B' Company into 'A'."
Instead, therefore, of landing where there was a comparatively easy climb to the first ridge, the troops found themselves facing something which was in places very like a wall. In the meantime they were being met with rifle and machine-gun fire. One man states that, as soon as he reached the bank, he was "shot by a machine-gun through both knees, was spun round, and then fell down." Another, who could not find room at the foot of the bank, lay down a little further back, on the open beach, where he heard a succession of bullets passing just overhead, one of them hitting the man next to him.
However, it had been forcibly impressed on all that on landing they must advance at all costs, so as to clear the way for the main body. Consequently they began to climb the steep hill in front of them. On the southern side of Ari Burnu, where Major J. C. Robertson landed, was a steep bank as high as the wall of a room, and those attempting to climb it slipped back. Then someone found a rough track leading round it, and by this means they reached the top of the knoll.
Besides being very steep, the hillside was covered with scrub. This was mainly composed of small bushes of prickly dwarf oak, about three feet high, with leaves like a small holly: there was also a smaller arbutus, with leaves like those of a laurel. In places this scrub was so close and thorny that even a strong man had difficulty in forcing his way through it. A machine gun was firing from the top of Ari Burnu, but some of the men climbed up to it, quickly drove the Turks away from their gun, and captured a small stretch of trench from which it had been firing.
As they climbed the men cheered, swore, and joked; one of them afterwards said, "the swearing that went on, as well as the jokes, was marvellous." When they encountered any of the Turks they chased the enemy with shouts of "imshee yalla," "eggs-a-cook," "oranngees" (oranges), and other expressions which they had picked up in Egypt.
Some men of various battalions who had lost touch with their officers, cleaned their rifles and began shooting up at the flashes of the Turkish rifles far above on the hills. Captain Graham Butler, the M.O. of the 9th, who was attending to several wounded men on the beach, saw the uselessness of this, and realising that it might endanger the troops who had begun to climb the hills, urged these men to go on with the bayonet alone. He himself led them up a steep hill to Plugge's Plateau. How steep was the slope may be imagined by Dr. Bean's description in the Official History:-
"Those who were wounded (he says) rolled or slid down it until caught and supported by some tuft or scrub. Here and there a man hung over a slope so precipitous that Butler, going to his help, had to cut steps in the gravel face with his entrenching tool in order to reach him."
Men from the 9th, 10th, and 11th were now on Plugge's, [Later in the day. when some New Zealanders were occupying it, Colonel Plugge, of the Auckland Battalion, had his headquarters there, and it was thus named after him.] a small triangular plateau with steep approaches on every side. The Turks who had occupied it ran off down a zig-zag path on the far side, while several Australians stood on the edge of the plateau firing at them. A few even went down the zig-zag path in pursuit. Lieutenant Fortescue, who had lost sight of most of his men on the way up to the plateau, "skidded" down a landslide on the far side and lost the rest of his platoon except two, who went down in the same way as he did.
A few senior officers had now arrived on the plateau. Major EA Drake Brockman, of the 11th, sorted out the men of the three battalions, sending those of the 9th to the right, those of the 10th to the centre, and those of the 11th to the left. He also stopped the men from firing at the retreating Turks, leaving them to be dealt with by other parties who were landing further south.
By this time nearly the whole of "A" and "B" Companies of the 9th were on the plateau, but they were without senior officers. "The colonel had not reached the plateau. Major JC Robertson had received a bullet-wound in the chest: Major S. B. Robertson had gone far to the left with a few of his men, and was killed later in the day on Baby 700. The junior major, AC Salisbury, accordingly assumed command of the battalion and led it for the rest of the day. He himself took charge of the right of it, and handed over the left to Captain J. F. Ryder.
Noticing Turks running to the rear down the valley to his right, he ordered the 9th to move into the gully after them. These Turks were fleeing from the second instalment of the covering force, the men in the destroyer tows, whose landing will now be described.
The earlier portion of the trip, in the bright light of the moon, was quite pleasant, "resembling a moonlight river trip," said one man in a letter home. But, after the moon had set, as the hostile shore was approached memories of holiday experiences gave way to the same feeling of suspense as those in the battleship tows had endured, “The suspense was awful," wrote a signaller.
About 4 a.m. or a little later, "C" Company on the Beagle, and "D" on the Come, were ordered into the rowing-boats. A wooden staging had been fixed round the side of each ship, and the men stepped on to this and then down into the boats.
The boats from the seven destroyers were better distributed than those from the battleships, having a spread of over a mile from the northernmost to the southernmost, and they landed the battalions in correct order, although all were further to the north than had been planned.
When the destroyers reached a point about 500 yards from the shore, the commander of the Come shouted to the Beagle to move south, as they had steered too far north. However, it was too late to rectify the error. As the boats pushed off, the men in them could see the outline of mountains ahead, and the faintest streaks of dawn appeared. After leaving the destroyers the boats spread somewhat, with the result that the several parties of each company reached the shore at different spots.
But they landed under similar conditions to their comrades of "A” and "B" Companies, except that for most of them the slope up from the beach was not so steep. Part of "D" Company (Captain Jackson's) landed at Little Ari Burnu (afterwards known as "Queensland Point," or "Hell Spit") and part of "C" Company (Captain Milne's) about 300 yards further south, opposite the mouth of Victoria Gully. Others of "C" Company reached the shore a little farther south still, near the entrance to Clarke's Gully.
Colonel MacLagan, the brigade commander, was in one of "D" Company's boats, and as it approached the land, he looked through his night-glasses to see if the ridge immediately in front was occupied by the enemy. When the boats were about thirty yards from the shore they heard the first shot from in front of them, and then knew that the ridge was occupied; the Turks who were firing were under cover within sixty yards of the beach, some in trenches and some firing from the scrub.
The men landed, dumped their packs on the beach, and rushed the nearest of the enemy. Half-way to the top of the first hill (“M'Cay's Hill") part of Milne's company met a portion of Jackson's coming from the other side. This latter detachment, numbering perhaps half of the company, on landing at the side of Hell Spit, charged, cheering as they ran, over Little Ari Burnu and then began to move south. Going down the far side of the hill through scattered rifle-fire into a valley they found a small stone hut, in which were half-a-dozen Turks sitting by a fire with a pot of coffee on it. These Turks were bayoneted, and the company went on to the top of M'Cay's Hill, a few hundred yards further on, and there joined Milne's company. While some of "D" Company were crossing M'Cay's Hill. Sergeant T. A. Graham was shot in the thigh. "I'm done, boys, I'll never see Constantinople," he said, and soon afterwards he died, Lieutenant C. F. Ross wrote:
"I shall never forget the scene as we reached the top of the hills and could look back on the sea. Huge stabs of flame from the guns of a long line of warships reaching from Anzac to the Straits could be seen as they pelted shells at various points of the enemy positions.
As the light increased, the flame gave way to smoke, and the noise was terrific. Not only was there the noise of the firing of the guns and bursting of the shells, but the hills of the mainland seemed to take up the echoes and hurl them back to Imbros and Samothrace, whence they were re-echoed back again."
It was still too dark to see a man at 50 yards' distance. The staffs and troops of the main body on the transports could not gain much information of the progress of the landing. They saw the flare and heard the rifle-fire following it, and Some heard what appeared to be faint cheering-this would be either the shouting of the men in the boats during the actual landing, or else the cheering, swearing, and joking which went on during the charge up the hills.
When daylight came, what was going on ashore could be discerned more clearly, especially by those who had telescopes or field-glasses. The men who were then landing, and those climbing the first ridge of hills, were visible and also the fighting going on along the sides and tops of those hills, but occurrences beyond the first ridge were for the most part out of sight of the ships. Enough of the fighting could be seen, however, to show the sailors and other onlookers what sort of men the Australians were. Admiral Wemyss was very much impressed, and to an Australian officer he afterwards said:
"Your men are not soldiers, they are fiends. I have seen many famous regiments charging, but I have never seen fighting like this. Your men will do me. It would give me great pleasure to lead them into action at any time."
Vice-Admiral de Robeck wrote:
"At Gaba Tepe the landing and dash of the Australian Brigade for the cliffs was magnificent-nothing could stop such men. The Australian and New Zealand Army Corps in this, their feat battle, set a standard as high as that of any army in history, and one of which their countrymen have every reason to be proud."
According to the original plan the troops after landing were to cross the ridge extending from Baby 700 to Bolton's Ridge, and to occupy the next one, Gun Ridge and its extensions. But owing to the mistake in landing too far north, another ridge was found between the beach and the one from Bolton's to Baby 700, with the result that the "first" ridge of the orders actually became the "second" ridge, and the so-called second" ridge the "third."' When daylight came the officers on Plugge's could recognise, from their previous study of the plans, the ridge which had now become the second ridge from a prominent feature on it, half-a-mile to their right front. This was a level-topped hill, a little higher than the rest of the ridge, which has been compared to a heart with its point to the sea. Known as the "400 Plateau," it should have been on the left centre of their landing-place.
At this moment, while the 10th Battalion should have been over the second ridge and on its way to the third, the 9th ought to have been far to the south hurrying to Gaba Tepe, which was two miles away from them when they expected it to be only 1000 yards distant. However, Major Salisbury led "A" and "B" Companies towards the 400 Plateau, moving thither across Shrapnel Gully a little to the south of the 10th, which had also left Plugge's, and was following retreating Turks. The seaward "point" of the 400 Plateau was not exactly a point but was separated into two spurs, the Razorback to the north and M'Cay's Hill to the south, with White's Gully between. Salisbury and his men climbed the steep Razorback, meeting only scattered fire, and reached the far side of the Plateau a little north of the head of Owen's Gully.
In the meantime, Lieutenant Thomas, with a platoon of Jackson's company, had reached the 400 Plateau and was reorganising in the scrub at its edge. One of his sections, under Corporal Harrison, was missing. The rest of the platoon then advanced across the plateau, its 50 men in a line about 300 yards from flank to flank. Reaching Owen's Gully-the valley which divides the northern lobe of the plateau ("Johnston's Jolly''.) from the southern one ("Lone Pine") - Thomas saw, about 200 yards ahead, some newly-turned mounds of earth which he thought were machine-gun emplacements. He saw, too, some Australians in the scrub to his right going straight in the direction of them.
Thomas tried to warn this party, but each time that his signaller stood up to semaphore the message, an enemy machinegun fired at him. Thomas then recognised the party. It was Harrison's section, which had reached the plateau some 300 yards south of him. Harrison had for a little while acted under the orders of Captain Milne, and then led his section across the plateau to join Thomas, whom he had seen (or had heard was) making towards Owen's Gully. Harrison, going to the northeast through the scrub, had just caught sight of a cup-shaped depression in front of him, when he came under machine-gun fire from the scrub beyond it. His men fell flat and crawled through the bushes to the edge of the depression, in which, immediately below them, they saw some tents. Other tents were visible further down the valley, while the smoke of camp fires was seen between them.
Harrison at once began to move towards these tents, and it was then that Thomas tried to signal to him. The only word that Harrison could make out was the last - "gun." But at that moment two field-guns fired close above his head. He called together his nine men and all crawled up the steep bank and found the guns just above them. There were seven Turks round the guns and fifty yards behind were others, loading machine guns on mules. They had not seen Harrison's party, and he told his men each to pick a member of the guns' crews, fire together, and rush the guns. All seven men round the guns fell.
A Turkish officer appeared at the entrance of the gun-pit and raised his revolver, but Harrison fired first, with the rifle from the hip, and the officer fell dead. The Australians next fired on the men who were loading the mules, and only one of them seems to have escaped. Then Thomas came up with his platoon and joined Harrison.
There were either two or three guns, and mules had already been harnessed to one of them. In a small roofed shelter was a quartermaster's store, containing books, papers, spare parts for machine-guns, leather equipment, tobacco and cigarettes. Some of our men wheeled one gun round to fire it on the Turks, but found that the breech-blocks had been thrown away. Bugler Maxwell, who was never seen again after that day, knocked off the sights; others, including some of the 10th who had by then come up, tried to burr the screws inside the breeches so as to put the guns out of action. These were the first guns captured at Anzac. [These guns did not remain in our possession, as they could not be removed at the time, and during the night they were secured by the enemy and withdrawn.]
Thomas now placed his men in a line in the scrub about 50 yards beyond the depression which Harrison had stumbled upon and which, for want of a better name, Dr. Bean has called "The Cup." As they were exhausted, they rested for ten minutes, and were allowed to smoke. The fighting hereabouts had temporarily ceased by this time, and there was no noise except a little occasional distant firing. A party of Turks with mules could be seen hurrying over the third ridge, that which was to have been the objective of the covering force.
Major Brand, the brigade-major, now arrived, accompanied by Lieutenant Boase and a platoon of Jackson's company. They crossed the plateau just south of Owen's Gully, passing on their way, near the head of the gully, a level patch of green grass and poppies, about 100 yards square, with the scrub forming a high border all round it. This was afterwards known as the "Daisy Patch." They passed by the south of The Cup without noticing it, and found Thomas's platoon lined out in the scrub.
The first definite orders for a change of plan were now given. The main parties of the 9th and 10th were arriving on the plateau, and the brigadier, Colonel MacLagan, followed them. He ordered that, instead of advancing to the third ridge, they should dig in and reorganise where they were, on the second ridge.
When Major Salisbury reached the plateau he collected the scattered men of the 9th who came up, and carried out the brigadier's instructions to dig in there. Leaving a platoon under Lieutenant Fortescue as an outpost lining the northern side of Owen's Gully, he set the others to dig in to the right of the 10th, making his line face to the south-east.
The line thus formed by the two battalions was not continuous, but had several wide gaps in it. These were to be filled by the 12th Battalion, which was to be in close support according to the plans; and some were soon filled by one company of the 12th which came up. The top of the "plateau" was not flat, but was a succession of ridges and gullies covered for the most part by thick scrub.
Various advanced parties, such as those of Thomas and Boase, remained a few hundred yards in front of the line, and Major Brand decided that the best plan would be for them to act as a screen for the main bodies of the 9th and 10th digging in. He therefore gave temporary orders to this effect to the advanced parties, telling Boase and Thomas to go forward to the far edge of the plateau, where they could get a better view of the third ridge, but to go cautiously and not too far. He then signalled back the suggestion to Colonel MacLagan, who adopted it for the time being and sent the following message to Brand: "Keep advanced companies forward, Second Brigade caning in on our right."
MacLagan's order to dig in on the second ridge did not, however, reach all the advanced parties. A detachment of the 10th, under Lieutenant Loutit, with whom were a few men of the 9th, had been among the first to arrive on the 400 Plateau, and they entered the head of Owen's Gully and passed down it. Then they made their way to the third ridge and, after climbing the greater part of the rise, came upon a large body of Turks, and lay down and opened fire on them. Loutit with two men made a reconnaissance and saw in the distance the waters of the Dardanelles, on the far side of the peninsula.
Then, noticing a party on the inland slope of Lone Pine, he sent over and asked the officer in charge of them to bring his men over to the third ridge and protect his southern flank. This party was a portion of the 9th under Captain Ryder, who had come along with Salisbury from Plugge's. As Brand's order not to advance beyond the edge of the plateau had not yet been made, Ryder at once crossed the valley with his men and took up a position to the right of Loutit.
Lieutenant E. C. Plant led a party of about 20 men from the southern end of the plateau over the spurs which jut out southwards from that end of it. Going very fast, they reached the third ridge, south of the position attained by Ryder's party, at a point which gave a good view over the country behind the ridge. In the distance they could see water, which they took to be the Sea of Marmora. There was danger of being cut off, however, and the party returned.
It was now between 8 and 9 o'clock. The parties of Loutit and Ryder were under very hot fire from a much superior force, and soon they found themselves also under fire from the left. Ryder's party was receiving this fire in their backs, and Ryder sent urgent messages asking for support. One of his sergeants reached the main line on a Turkish horse found in the valley. Some of Ryder's messengers, or wounded men making their way to the rear, met Captain Peck, the adjutant of the 11th, on the northern slope of the 400 Plateau. They said that Ryder was in danger of being cut off, so Peck collected some men and went down Wire Gully, just to the north of Johnston's Jolly, and across the valley to reinforce the advanced party.
It was now nearly 9.30 a.m. and Ryder had already begun to withdraw. His party, together with Plant's and Loutit's, had carried out the whole of the original plan of operations, reaching the nearest point to the Dardanelles which any of our troops ever attained, but, meeting with greatly superior numbers who were about to outflank them, they were forced to retire. After Ryder's and Loutit's parties reached the edge of 400 Plateau, they noticed that a line of entrenchments was being dug about 50 yards further back, but instead of retiring upon it they dug in where they were and remained as an outpost overlooking Wire Gully and German Officer's Ridge beyond it.
In the meantime news began to reach the main line from the advanced parties on the third ridge, first that they were in difficulties, and next that they were retiring. Then word came that it was doubtful if Ryder and his men could get back, but soon afterwards they arrived safely.
Captain Jackson, commanding "D" Company, having been hit on the way up from the beach to the 400 Plateau, Captain Dougall took command of the part of "D," which met men of "C" (as previously mentioned) on the way up to the plateau. Both parties reached the southern or Lone Pine end of the plateau. Victoria Gully on the seaward side, separated it from Bolton's Ridge, and where this ridge joined the plateau there was an enemy trench. Captain Milne was fired on from this position as soon as he arrived at the top of the hill, and was wounded. He sent a section under Corporal Harrison-the same who afterwards attacked the Turkish guns-to work round behind the trench, which was soon taken by this party and by the scouts, the few Turks in it being killed or captured. Milne moved into this trench; he was hit several times, and his second-in-command, Captain Fisher, had been wounded too, whereupon Milne left the trench, and went to the east till he reached the Turkish guns near The Cup.
Dougall, holding a rifle with bayonet fixed, called out, with a broad grin, "Come on, boys," and led his party, now only a handful, at a run along Bolton's Ridge towards Gaba Tepe. Near Bolton's Hill, in which Bolton's Ridge ended, not far from the sea, they found an empty trench. Lieutenant Chambers had now been hit. Occupying the trench, the party soon noticed a large enemy column come on to the third ridge from behind and march along the top of it. As no reinforcements reached Dougall, he withdrew his men to the place where Salisbury was digging in on the 400 Plateau. Here he found the brigadier, to whom he reported the news of the approaching Turks, and soon afterwards they were seen like ants coming over the sky-line. By this time Salisbury, assisted by the orderly-room sergeant, Maurice Wilder, who was doing the work of adjutant, had collected about half of the battalion, and he was under the impression that the line he occupied was being definitely taken up. It was now about 9 a.m.
MacLagan could see the 2nd Brigade, which had landed between 5 a.m. and 7 a.m., advancing towards the plateau. Very heavy firing broke out on the left front. He thereupon went to Salisbury and told him that a serious counter-attack was developing, and that he would have to send men forward by sections to meet it. This action was carried out between 10 a.m. and noon, the trenches which the 9th had been digging being left empty, and no settled line was formed there during the remainder of the day.
As section after section moved off through the scrub, they met with a tremendous fire, both from rifles and machine-guns, and became scattered and hopelessly mixed. Advancing south of Owen's Gully towards The Cup, they overtook about fifty men of various companies of the 9th, among whom were Milne and Lieutenant Young, advancing through the scrub. About this time Major Salisbury was hit in the hand, and losses were heavy.
The enemy had driven in Loutit's and Ryder's parties. Those under Boase and Thomas, still in advance of most of the troops on the plateau, had advanced down two of the spurs leading into Legge Valley, from which they had observed Turkish reinforcements passing along the third ridge. They sniped at them, and also sent back messengers with word of the enemy movements. A fierce fire from rifles and machine-guns began to play on the plateau, but it passed for the most part over the heads of these two advanced parties. Thomas's, however, moving nearly to the foot of the spur, came under fire and lost heavily.
Soon afterwards the Turks, who so far had been advancing northwards along the third ridge, deployed and began to come down towards 400 Plateau in extended order. Both flanks of the 9th's advanced parties were unsupported, and the Turks appeared about to pass them on the left in order to cut them off, so Boase and Thomas decided to withdraw alternately by stages of about fifty yards, each party covering the retirement of the other by its fire.
Corporal Harrison and his section were on the extreme right of Thomas's platoon, and isolated, and they did not see the Turkish attack. Not hearing of the withdrawal, they stayed on. In the meantime the others had retired to a position about fifty yards in front of the Turkish guns at The Cup. Thomas sent Lance-Corporal Harman to Major Brand to report the situation and to ask for support. Harman was hit, but the message seems to have got through, for Lieutenant Haymen with some fifty men was ordered by Brand to reinforce the advanced party. They reached Thomas about half-an-hour after the retirement to The Cup, and then Milne and afterwards Salisbury reached the position with remnants of the 9th and 10th.
By this time heavy loss was being caused by the enemy fire. It was impossible to organise the line, or even to keep communication along it. At some little distance to the right of this position were the two machine-guns of the 9th, under Lieutenant Costin, but he knew nothing of the whereabouts of the rest of the 9th nor of the existence of any firing-line.
Haymen and about fifteen men occupied the trenches near the captured guns. Fortescue, who had been stationed on Johnston's Jolly as a covering party while Salisbury was digging in there, came under severs fire from an invisible machine-gun, and crossed Owen's Gully to avoid it. As his party lay on the southern edge of the gully, it was joined by some men of the 2nd Brigade under a captain whose orders were to reinforce the firing-line. According to the original plan, the 2nd Brigade, when it landed, was to have gone in to the right of the 3rd Brigade, to occupy new ground and extend the front, but owing to the tactical situation it had to be used for reinforcing. The captain sharply asked Fortescue what he was doing there, and not being satisfied with the tatter's explanation, ordered Fortescue to go on with his men to the firing-line, towards which he himself thought he was going.
Fortescue therefore went forward, to the south, and soon saw ahead some Australians who proved to be Costin and his machine-gunners. Costin knew nothing of the rest of the 9th, except that he believed that Haymen with a few men was in some gun position down the hill. Fortescue, who had now only seven men left, continued in that direction, and duly found Haymen with fifteen of his men in a somewhat sheltered position. Fortescue asked whether the firing-line was ahead, but Haymen replied that he was sure that there were no Australians in front of them, for he was being fired on from the front at short range.
Between 11 a.m. and noon, a battery of enemy mountain guns established near Scrubby Knoll opened a deadly fire on the 400 Plateau. The Turks were advancing on to Johnston's Jolly and to the bottom of Owen's Gully. Some of them even tried to steal across the gully into their old trenches on Lone fine, but they were stopped by fire from a party of the 12th on the northern side.
Salisbury had sent back for reinforcements, but as his messengers did not return and no reinforcements came, he consulted with Milne and they decided to retire to the summit of Lone Pine, about 300 yards in rear. Milne had already been wounded three times, and he now received two more wounds under circumstances which he himself described in a letter as follows:
"A man lying next to me got killed, and I put out my left hand to take his rifle and have a shot, and just as I did so a shell burst right overhead and hit me across the fingers, smashing the stock of the rifle to splinters, so I didn't have a shot that time. I got out my field dressing and tied them up and carried on, but very soon after a six-inch shell got to business and a piece of it ripped through the beck of my upper left arm."
Nevertheless he continued to lead his men, but finally was only able to crawl about encouraging them. When they went farther forward they noticed him lying down, and thought he was dead. Some men dragged him out and carried him down to the beach, and it was not till they reached there that he was found to be still alive.
Salisbury again advanced a little, close to Costin's position, and remained there for the greater part of the day. The fire was now almost unbearable. Captain Melbourne was badly wounded in the head; Lieutenant Chambers also was hit, and Costin was killed by a shell which destroyed one of his machineguns. He and his sergeant, Steele, when the rest of the section became casualties, had continued to work one of his guns, and when Costin fell, Steele carried the remaining gun to Haymen's party in the gun-pits. [8 For his work this day Steele was awarded the D.C.M.]
Salisbury returned two or three times for reinforcements to "Brown's Dip," behind the crest, at the head of Victoria Gully, and each time he took forward men of the 2nd Brigade. Most of his own men had now fallen and his line thus became gradually held by the 2nd Brigade, as did Thomas's position fifty yards in front of the gun-pits.
Other parties from the 2nd Brigade now began to arrive on the plateau, but so thick was the scrub and so difficult the communications that they did not get into touch with the Australians already there; in fact, the newcomers had no real idea of their whereabouts or of where they were going. At this time those on the plateau looking back could see men-perhaps a platoon or what was left of it-moving through the bushes. On reaching the edge of a small clearing, their officers apparently ordered a charge, for they rushed, cheering, across, the open space, shot at from every side except the direct rear, with their bayonets flashing in the sunlight, before disappearing in the undergrowth again.
At 10.30 the first of our artillery, an Indian mountain battery, began to land. It took up a position just behind the crest, on the north side of the 400 Plateau, and at 11.55 directed its fire on to the third ridge. The sound of these guns brought fresh heart to our men, but the Turks fired heavily on the battery, and at 2.25 its guns had to be withdrawn to shelter.
By about 1 p.m. the tide of battle definitely turned in favour of the enemy, and by 2 o'clock the Australians were gradually falling back to what was to become their permanent line until the August offensive. It seemed to many that "the game was up," and that none of them would be able to withdraw from the Peninsula. But very few of the Turks reached the plateau, those who did being swept off by a fire nearly as deadly as their own had been. Lieutenant Haymen was killed during the afternoon; at 3.30 p.m. Thomas's shoulder was smashed by shrapnel, and he handed over his part of the line to a 2nd Brigade officer. Salisbury, dazed, exhausted and wounded, retired to a dressing station, and later joined a part of the 9th in reserve.
Some more guns were landed during the afternoon, and came into action at 4.45 p.m. Up to this time the only artillery support which the Australians had received was that from the Indian mountain battery and the naval guns, but the latter could only fire at those parts of the battlefield which could be seen from the sea. When the 18-pounders landed, they found it difficult to secure positions in which they could not be enfiladed by the enemy. During the whole campaign. in fact, it was no easy matter to find such positions.
The Australian Light Horse Studies Centre is a not for profit and non profit group whose sole aim is to write the early history of the Australian Light Horse from 1900
- 1920. It is privately funded and the information is provided by the individuals within the group and while permission for the use of the material has been given for this
site for these items by various donors, the residual and actual copyright for these items, should there be any, resides exclusively with the donors. The information on
this site is freely available for private research use only and if used as such, should be appropriately acknowledged. To assist in this process, each item has a citation
attached at the bottom for referencing purposes.
Please Note: No express or implied permission is given for commercial use of the information contained within this site.
A note to copyright holders
The Australian Light Horse Studies Centre has made every endeavour to contact copyright holders of material digitised for this blog and website and where
appropriate, permission is still being sought for these items. Where replies were not received, or where the copyright owner has not been able to be traced, or where
the permission is still being sought, the Australian Light Horse Studies Centre has decided, in good faith, to proceed with digitisation and publication. Australian Light
Horse Studies Centre would be happy to hear from copyright owners at any time to discuss usage of this item.