« August 2010 »
S M T W T F S
1 2 3 4 5 6 7
8 9 10 11 12 13 14
15 16 17 18 19 20 21
22 23 24 25 26 27 28
29 30 31
You are not logged in. Log in


Search the site:


powered by FreeFind
Volunteer with us.

Entries by Topic All topics  
A Latest Site News
A - Using the Site
AAA Volunteers
AAB-Education Centre
AAC-Film Clips
AAC-Photo Albums
AIF & MEF & EEF
AIF - Lighthorse
AIF - ALH - A to Z
AIF - DMC
AIF - DMC - Or Bat
AIF - DMC - Anzac MD
AIF - DMC - Aus MD
AIF - DMC - British
AIF - DMC - BWI
AIF - DMC - French
AIF - DMC - Indian
AIF - DMC - Italian
AIF - DMC - Medical
AIF - DMC - Remounts
AIF - DMC - Scouts
AIF - DMC - Sigs
AIF - DMC - Sigs AirlnS
AIF - DMC - 1 Sig Sqn
AIF - DMC - 2 Sig Sqn
AIF - DMC - Eng
AIF - DMC - Eng 1FSE
AIF - DMC - Eng 2FSE
AIF - DMC - GSR
AIF - 1B - 1 LHB
AIF - 1B - 6 MVS
AIF - 1B - 1 LHMGS
AIF - 1B - 1 Sig Trp
AIF - 1B - 1 LHFA
AIF - 1B - 1 LHR
AIF - 1B - 2 LHR
AIF - 1B - 3 LHR
AIF - 2B - 2 LHB
AIF - 2B - 7 MVS
AIF - 2B - 2 LHFA
AIF - 2B - 2 LHMGS
AIF - 2B - 2 Sig Trp
AIF - 2B - 5 LHR
AIF - 2B - 6 LHR
AIF - 2B - 7 LHR
AIF - 3B - 3 LHB
AIF - 3B - 8 MVS
AIF - 3B - 3 LHB Sigs
AIF - 3B - 3 LHFA
AIF - 3B - 3 LHMGS
AIF - 3B - 3 Sig Trp
AIF - 3B - 8 LHR
AIF - 3B - 9 LHR
AIF - 3B - 10 LHR
AIF - 4B - 4 LHB
AIF - 4B - 4 Sig Trp
AIF - 4B - 9 MVS
AIF - 4B - 4 LHFA
AIF - 4B - 4 LHMGS
AIF - 4B - 4 LHR
AIF - 4B - 11 LHR
AIF - 4B - 12 LHR
AIF - 5B - 5 LHB
AIF - 5B - 10 MVS
AIF - 5B - 5 LHFA
AIF - 5B - 5 Sig Trp
AIF - 5B - ICC
AIF - 5B - 14 LHR
AIF - 5B - 15 LHR
AIF - 5B - 1er Regt
AIF - 5B - 2 NZMGS
AIF - AASC
AIF - Aboriginal LH
AIF - Badges
AIF - Cars
AIF - Chinese LH
AIF - Double Sqns
AIF - Engineers
AIF - Fr - 22 Corps
AIF - Fr - 13 LHR
AIF - Honour Roll
AIF - HQ - 3rd Echelon
AIF - Marching Songs
AIF - Misc Topics
AIF - NZMRB
AIF - NZMRB - AMR
AIF - NZMRB - CMR
AIF - NZMRB - EFT
AIF - NZMRB - NZMFA
AIF - NZMRB - NZMGS
AIF - NZMRB - OMR
AIF - NZMRB - Sig-Trp
AIF - NZMRB - WMR
AIF - Ships
AIF - Ships - Encountr
AIF - Ships - Una
AIF - WFF
AIF - Wireless Sqn
Battles
BatzA - Australia
BatzA - Broken Hill
BatzA - Liverpool
BatzA - Merivale
BatzB - Boer War
BatzB - Bakenlaagte
BatzB - Belmont
BatzB - Bothaville
BatzB - Buffels Hoek
BatzB - Coetzees Drift
BatzB - Diamond Hill
BatzB - Driefontein
BatzB - Elands
BatzB - Graspan
BatzB - Grobelaar
BatzB - Grootvallier
BatzB - Hartebestfontn
BatzB - Houtnek
BatzB - Karee Siding
BatzB - Kimberley
BatzB - Koster River
BatzB - Leeuw Kop
BatzB - Mafeking
BatzB - Magersfontein
BatzB - Modder River
BatzB - Onverwacht
BatzB - Paardeberg
BatzB - Palmietfontein
BatzB - Pink Hill
BatzB - Poplar Grove
BatzB - Rhenoster
BatzB - Sannahs Post
BatzB - Slingersfontn
BatzB - Stinkhoutbm
BatzB - Sunnyside
BatzB - Wilmansrust
BatzB - Wolvekuil
BatzB - Zand River
BatzG - Gallipoli
BatzG - Anzac
BatzG - Aug 1915
BatzG - Baby 700
BatzG - Evacuation
BatzG - Hill 60
BatzG - Hill 971
BatzG - Krithia
BatzG - Lone Pine
BatzG - Nek
BatzJ - Jordan Valley
BatzJ - 1st Amman
BatzJ - 2nd Amman
BatzJ - Abu Tellul
BatzJ - Es Salt
BatzJ - JV Maps
BatzJ - Ziza
BatzM - Mespot
BatzM - Baghdad
BatzM - Ctesiphon
BatzM - Daur
BatzM - Kurna
BatzM - Kut el Amara
BatzM - Ramadi
BatzN - Naval
BatzN - AE1
BatzN - Cocos Is
BatzN - Heligoland
BatzN - Marmara
BatzN - Zeebrugge
BatzN - Zeppelin L43
BatzNG - Bitapaka
BatzO - Other
BatzO - Baku
BatzO - Egypt 1919
BatzO - Emptsa
BatzO - Karawaran
BatzO - Peitang
BatzO - Wassa
BatzP - Palestine
BatzP - 1st Gaza
BatzP - 2nd Gaza
BatzP - 3rd Gaza
BatzP - Aleppo
BatzP - Amwas
BatzP - Ayun Kara
BatzP - Bald Hill
BatzP - Balin
BatzP - Beersheba
BatzP - Berkusieh
BatzP - Damascus
BatzP - El Auja
BatzP - El Buggar
BatzP - El Burj
BatzP - Haifa
BatzP - Huj
BatzP - JB Yakub
BatzP - Kaukab
BatzP - Khan Kusseir
BatzP - Khuweilfe
BatzP - Kuneitra
BatzP - Megiddo
BatzP - Nablus
BatzP - Rafa
BatzP - Sasa
BatzP - Semakh
BatzP - Sheria
BatzP - Surafend
BatzP - Wadi Fara
BatzS - Sinai
BatzS - Bir el Abd
BatzS - El Arish
BatzS - El Mazar
BatzS - El Qatiya
BatzS - Jifjafa
BatzS - Magdhaba
BatzS - Maghara
BatzS - Romani
BatzS - Suez 1915
BatzSe - Senussi
BatzWF - Westn Front
BW - Boer War
BW - NSW
BW - NSW - 1ACH
BW - NSW - 1NSWMR
BW - NSW - 2NSWMR
BW - NSW - 3ACH
BW - NSW - 3NSWIB
BW - NSW - 3NSWMR
BW - NSW - 5ACH
BW - NSW - A Bty RAA
BW - NSW - AAMC
BW - NSW - Aust H
BW - NSW - Lancers
BW - NSW - NSW Inf
BW - NSW - NSWCBC
BW - NSW - NSWIB
BW - NSW - NSWMR_A
BW - NZ
BW - Qld
BW - Qld - 1ACH
BW - Qld - 1QMI
BW - Qld - 2QMI
BW - Qld - 3ACH
BW - Qld - 3QMI
BW - Qld - 4QIB
BW - Qld - 5QIB
BW - Qld - 6QIB
BW - Qld - 7ACH
BW - QLD - AAMC
BW - SA
BW - SA - 1SAMR
BW - SA - 2ACH
BW - SA - 2SAMR
BW - SA - 3SACB
BW - SA - 4ACH
BW - SA - 4SAIB
BW - SA - 5SAIB
BW - SA - 6SAIB
BW - SA - 8ACH
BW - SA - AAMC
BW - Tas
BW - Tas - 1ACH
BW - Tas - 1TIB
BW - Tas - 1TMI
BW - Tas - 2TB
BW - Tas - 2TIB
BW - Tas - 3ACH
BW - Tas - 8ACH
BW - Vic
BW - Vic - 1VMI
BW - Vic - 2ACH
BW - Vic - 2VMR
BW - Vic - 3VB
BW - Vic - 4ACH
BW - Vic - 4VIB
BW - Vic - 5VMR
BW - Vic - 6ACH
BW - Vic - AAMC
BW - Vic - Scot H
BW - WA
BW - WA - 1WAMI
BW - WA - 2ACH
BW - WA - 2WAMI
BW - WA - 3WAB
BW - WA - 4ACH
BW - WA - 4WAMI
BW - WA - 5WAMI
BW - WA - 6WAMI
BW - WA - 8ACH
BW Gen - Campaign
BW Gen - Soldiers
BW General
Cavalry - General
Diary - Schramm
Egypt - Heliopolis
Egypt - Mena
Gen - Ataturk Pk, CNB
Gen - Australia
Gen - Legends
Gen - Query Club
Gen - St - NSW
Gen - St - Qld
Gen - St - SA
Gen - St - Tas
Gen - St - Vic
Gen - St - WA
Gm - German Items
Gm - Bk - 605 MGC
GW - 11 Nov 1918
GW - Atrocities
GW - August 1914
GW - Biographies
GW - Propaganda
GW - Spies
GW - We forgot
Militia 1899-1920
Militia - Area Officers
Militia - Inf - Infantry
Militia - Inf - 1IB
Militia - Inf - 2IB
Militia - Inf - 3IB
Militia - Inf - NSW
Militia - Inf - Qld
Militia - Inf - SA
Militia - Inf - Tas
Militia - Inf - Vic
Militia - Inf - WA
Militia - K.E.Horse
Militia - LH
Militia - LH - Regts
Militia - LH - 1LHB
Militia - LH - 2LHB
Militia - LH - 3LHB
Militia - LH - 4LHB
Militia - LH - 5LHB
Militia - LH - 6LHB
Militia - LHN - NSW
Militia - LHN - 1/7/1
Militia - LHN - 2/9/6
Militia - LHN - 3/11/7
Militia - LHN - 4/6/16
Militia - LHN - 5/4/15
Militia - LHN - 6/5/12
Militia - LHN - 28
Militia - LHQ - Qld
Militia - LHQ - 13/2
Militia - LHQ - 14/3/11
Militia - LHQ - 15/1/5
Militia - LHQ - 27/14
Militia - LHS - SA
Militia - LHS - 16/22/3
Militia - LHS - 17/23/18
Militia - LHS - 24/9
Militia - LHT - Tas
Militia - LHT - 12/26
Militia - LHV - Vic
Militia - LHV - 7/15/20
Militia - LHV - 8/16/8
Militia - LHV - 9/19
Militia - LHV - 10/13
Militia - LHV - 11/20/4
Militia - LHV - 19/17
Militia - LHV - 29
Militia - LHW - WA
Militia - LHW-18/25/10
Militia - Military Orders
Militia - Misc
MilitiaRC - Rifle Clubs
MilitiaRC - NSW
MilitiaRC - NT
MilitiaRC - Qld
MilitiaRC - SA
MilitiaRC - Tas
MilitiaRC - Vic
MilitiaRC - WA
Militiaz - New Zealand
Tk - Turkish Items
Tk - Army
Tk - Bks - Books
Tk - Bks - 1/33IR
Tk - Bks - 27th IR
Tk - Bks - Air Force
Tk - Bks - Yildirim
Tk - POWs
Wp - Weapons
Wp - Hotchkiss Cav
Wp - Hotchkiss PMG
Blog Tools
Edit your Blog
Build a Blog
RSS Feed
View Profile
Open Community
Post to this Blog
Site Index
Education Centre
LH Militia
Boer War
Transport Ships
LH Battles
ALH - Units
ALH - General
Aboriginal Light H
Weapons
Ottoman Sources

"At a mile distant their thousand hooves were stuttering thunder, coming at a rate that frightened a man - they were an awe inspiring sight, galloping through the red haze - knee to knee and horse to horse - the dying sun glinting on bayonet points..." Trooper Ion Idriess

The Australian Light Horse Studies Centre aims to present an accurate history as chroniclers of early Australian military developments from 1899 to 1920.

The Australian Light Horse Studies Centre site holds over 12,000 entries and is growing daily.

Contact: Australian Light Horse Studies Centre

Let us hear your story: You can tell your story, make a comment or ask for help on our Australian Light Horse Studies Centre Forum called:

Desert Column Forum

WARNING: This site contains: names, information and images of deceased people; and, language which may be considered inappropriate today.

Thursday, 19 August 2010
The Battle for Hill 60, Gallipoli, 22 - 23, and 27 August 1915, Photographic representation of Hill 60
Topic: BatzG - Hill 60

The Battle for Hill 60

Gallipoli, 22 - 23, and 27 August 1915

Photographic representation of Hill 60


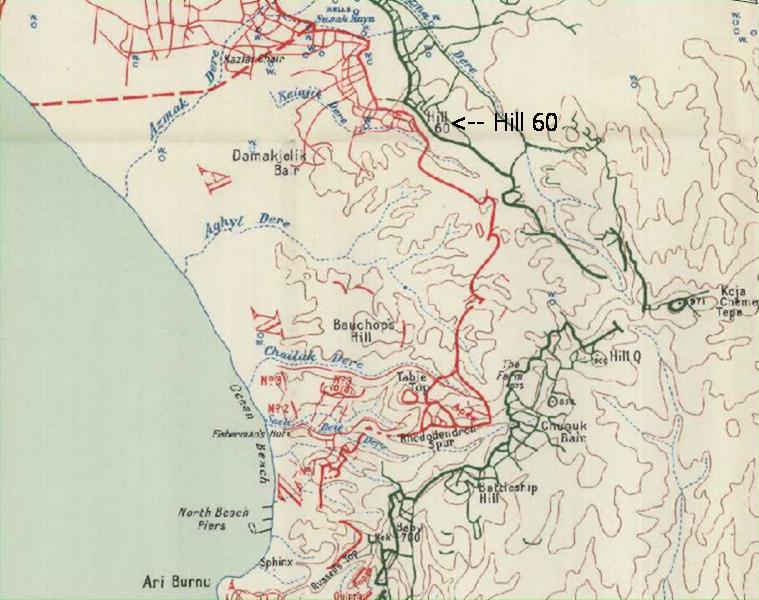
Trench Map highlighting the position of Hill 60


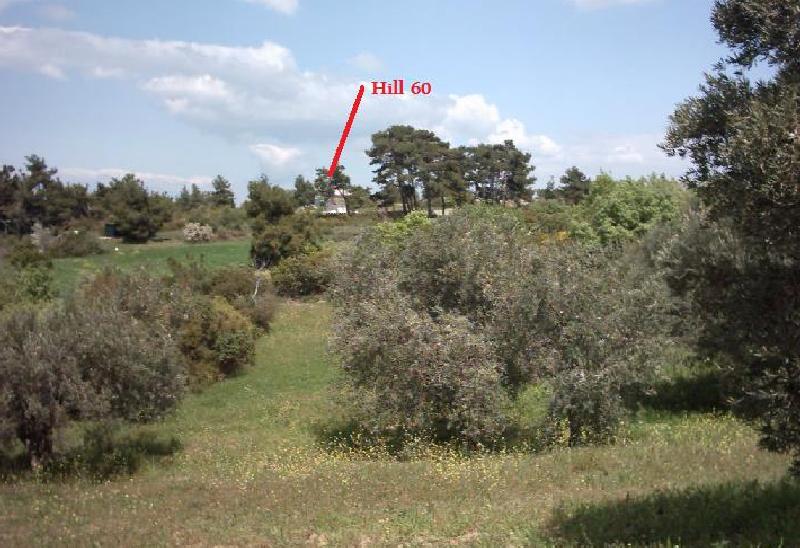
Looking up to the summit of Hill 60


This picture illustrates the task facing the men as they prepared themselves for the battle on 27 August 1917.  The task from this view appears deceptively simple and as the soldiers learned at Gallipoli, nothing was ever simple.


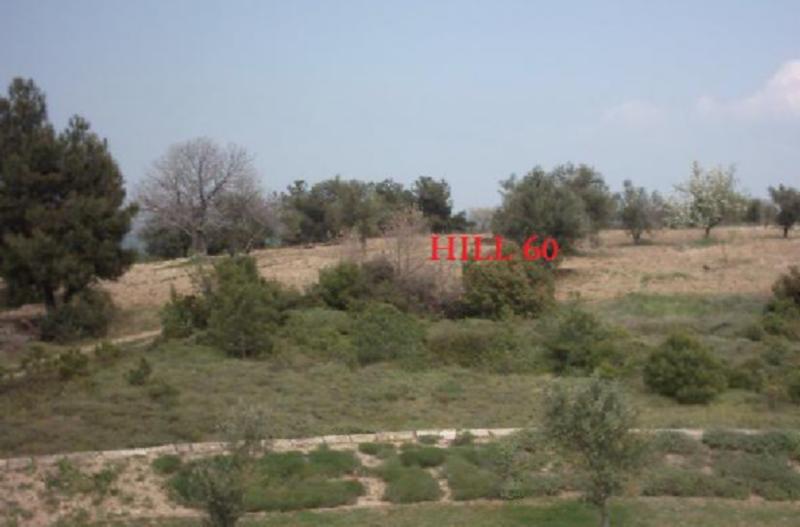
The area in which the fighting took place at Hill 60


This is a much closer picture of Hill 60 illustrating the features the men were to fight and die over that evening. 


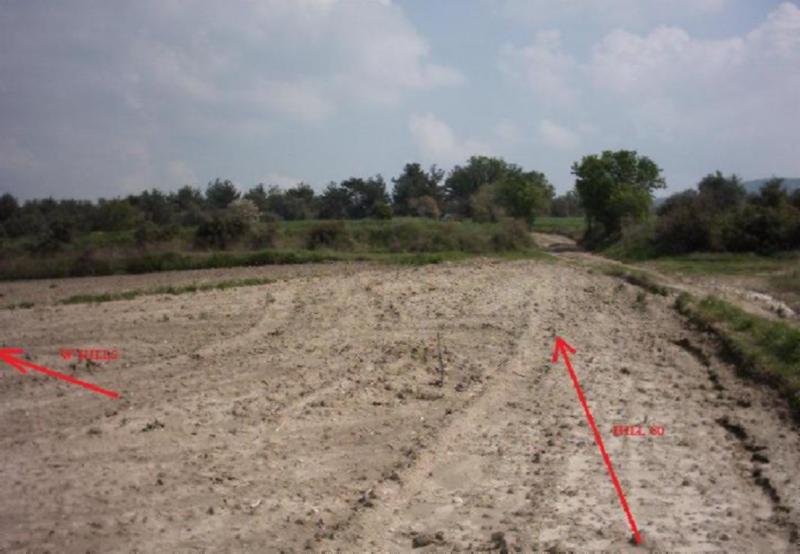
Location of Allied trenches at Hill 60


The sumit of Hill 60 looking down to where the Allied lines were located. The holding of the hill gave the Turks an advantage in being able to look over the Allied trenches and direct artillery or machine gun fire at targets of opportunity. This harassment proved to be so severe that all movements of supplies became very difficult during the day adding a further burden to the desperate lives of the men in the trenches.


Special thanks are directed to William "Tuna" Crookshanks for his pictures and the time he has spent annotating them.


Further Reading:

Hill 60, Gallipoli, 22 - 23, and 27 August 1915

The Battle for Hill 60, Gallipoli, 22 - 23, and 27 August 1915, Roll of Honour

Gallipoli Campaign

Battles where Australians fought, 1899-1920


Citation: The Battle for Hill 60, Gallipoli, 22 - 23, and 27 August 1915, Photographic representation of Hill 60

Posted by Project Leader at 12:01 AM EADT
Updated: Saturday, 21 August 2010 5:10 PM EADT
Saturday, 14 August 2010
Indian Army, Contents
Topic: AIF - DMC - Indian

EEF

Indian Army

Contents


Items

Outline

Indian Army EEF, Outline


History


Roll of Honour

Indian Army EEF, Roll of Honour

Lest we forget


Further Reading:

Indian Army

Indian Army EEF, Roll of Honour

Battles where Australians fought, 1899-1920


Citation: Indian Army EEF, Contents

Posted by Project Leader at 12:01 AM EADT
Updated: Sunday, 30 January 2011 2:33 PM EAST
Desert Mounted Column Medical Services, AIF, Contents
Topic: AIF - DMC - Medical

DMC Medical Services, AIF

Desert Mounted Column Medical Services, AIF

Contents


Items

Outline

Desert Mounted Column Medical Services, AIF, Outline


History


Roll of Honour

Desert Mounted Column Medical Services, AIF, Roll of Honour

Lest we forget


Further Reading:

Desert Mounted Column Medical Services, AIF

Desert Mounted Column Medical Services, AIF, Roll of Honour

Battles where Australians fought, 1899-1920


Citation: Desert Mounted Column Medical Services, AIF, Contents

Posted by Project Leader at 12:01 AM EADT
Updated: Sunday, 30 January 2011 2:19 PM EAST
Saturday, 7 August 2010
The Nek, Turkey, August 7, 1915, Outline
Topic: BatzG - Nek

The Nek

Turkey, 7 August 1915

Outline


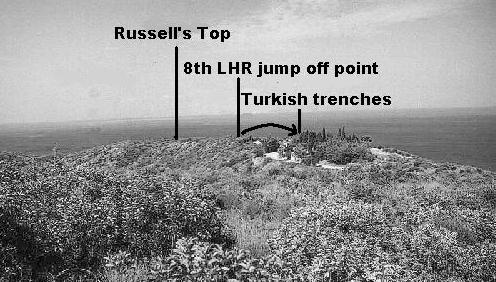
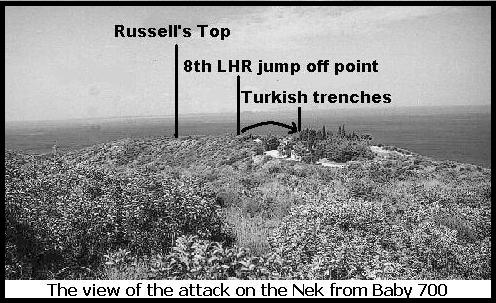
Scene from Baby 700 to Russell's Top illustrating the Nek from the Ottoman point of view.


The Nek, a narrow saddle running east-west between the ridgeline known as Russell's Top and Baby 700 - the strongest position at Anzac (q.v.) - which was the scene of a tragic assault on 7 August 1915 by Australian light horsemen fighting as infantry. Passage over this strip of ground was barred by opposing Turkish and Australian trenches, which faced each other at distances varying from 20 to 60 metres; the edges of both firing lines fell away at each side to the valley floor 150 metres below. Rebind the Turkish front-line, moreover, were right more trenches rising in tiers to the Summit of Baby 700, so that annihilating lire could be brought to bear upon any movement not just from rifles but no fewer than five groups of machine-guns.


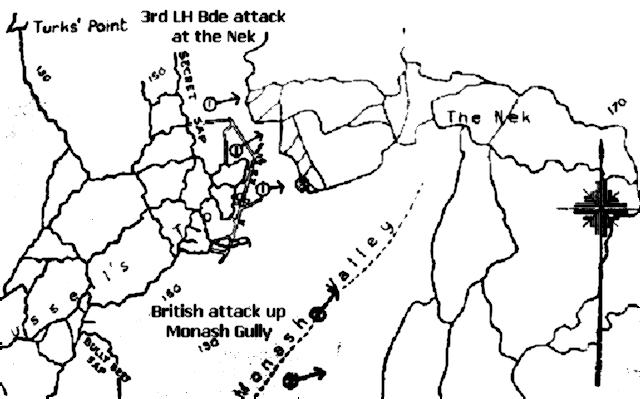
The direction of the charge at the Nek, 7 August 1915.


In ordering a feint to be launched here at dawn the day after Lone Pine (q.v.), aimed at ensuring that Turkish attention continued to he focused on the main Anzac position rather than on activities underway further north (see Hill 971), British commanders were not unmindful of the futility of attacking 'unaided'. The assault was therefore planned to proceed only after supporting movements had taken place, designed to silence some of the enemy machine-guns or draw off fire while the attack went in. In the event, these other operations either failed or were delayed, so that at the time designated for the attempt the 3rd Light Horse Brigade received no relief from any of them.

To make matters worse, an intense artillery barrage that was to begin half an hour before the troops attacked at 4.30 a.m. was mistimed due to the synchronisation of watches having been overlooked. The barrage ended seven minutes earlier than expected, and the Turks were given ample opportunity to recover and re-occupy their parapets. Accordingly, when the first assault line of 150 men rose to the attack-the ground being so narrow that there was no room for more-most fell dead or wounded before they had covered ten metres under the withering fire directed at them. Three more waves were sent forward at intervals and each met the same fate. Since no-one in the later assault lines can have doubted the outcome, there were poignant scenes as men farewelled each other while they waited for the order to attack.

By 5.15 a.m. some 300 men of the 8th and 10th Light Horse regiments lay in a huddled mass within an area no larger than a tennis court. In the words of the Official History:

At first here and there a man raised his arm to the sky, or tried to drink from his water bottle. But as the sun of that burning day climbed higher, such movement ceased. Over the whole summit the figures lay still in the quivering heat.


At most, the bold display by the light horsemen at the Nek may have impeded for a few hours - but did not prevent - the transfer of Turkish reinforcements towards Chunuk Bair, where the New Zealanders were also engaged in a desperate struggle.


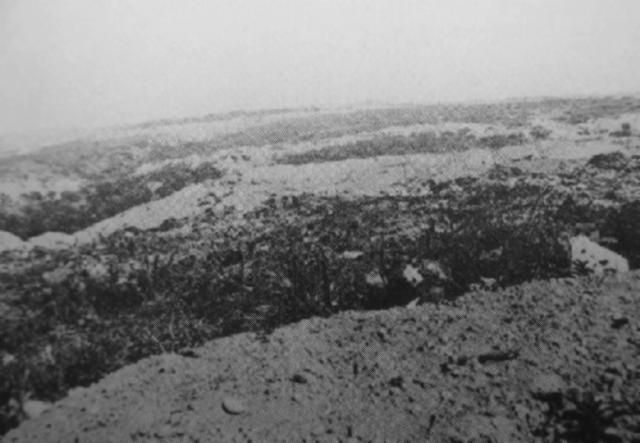
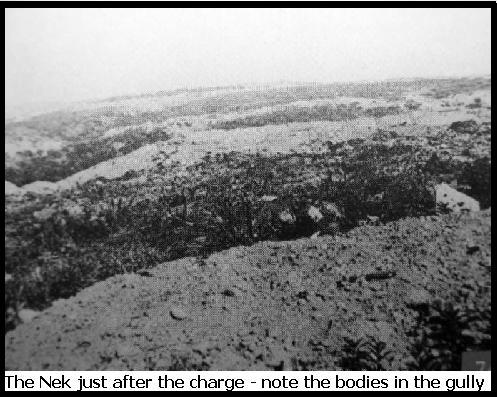
Picture taken from Russell Top trenches overlooking the Nek soon after the charge.


Extracted from the book produced by Chris Coulthard-Clark, Where Australians Fought - The Encyclopaedia of Australia's Battles, Allen and Unwin, Sydney, 1998, pp. 108-109.


Additional References cited by Chris Coulthard-Clark:

C.E.W. Bean, (1924), The Story of Anzac, Vol. 2 , Sydney: Angus & Robertson.

Peter Burness, (1996), The Nek, Kenthurst, NSW: Kangaroo Press


Further Reading:

The Nek, Gallipoli, 7 August 1915

Roll of Honour, Australian, British and Turkish 

Gallipoli Campaign

Battles where Australians fought, 1899-1919


Citation: The Nek, Turkey, August 7, 1915, Outline

Posted by Project Leader at 12:01 AM EADT
Updated: Sunday, 7 August 2011 9:24 AM EADT
The Nek, Gallipoli, 7 August 1915, The Chronology
Topic: BatzG - Nek
The Nek

Gallipoli, 7 August 1915

The Chronology


The Chronology

4.23 - the "joke" of a bombardment ends.

4.28 - Turks clearly seen manning the parapets of the trenches and machine gun ranged.

4.29 – The men in the first line already know they are in for a tough time.

4.30 – The whistle blows and 150 men of the 8th Light Horse Regiment, led by Colonel White, climb out of the trenches and charge across the Nek.

4.35 – 150 men lay dead or wounded within 30 metres of the trench. Three men made it to the Turkish trench only to die there. An observer spots a location flag in Turkish trenches and reports this to Antill.
The whistle blows and a further 150 men climb out of their trench.

4.40 – 150 more men lay dead or wounded.
Colonel Brazier, commander of the 10th Light Horse Regiment argues with Antill about sending the next line out. Antill orders Brazier to send out the third line.

4.45 - Trooper Harold Rush, 10th Light Horse Regiment, says to his friend as both men shake hands: “Goodbye Cobber. God bless you." He died a minute later.

The whistle blows and a 150 men from the 10th Light Horse Regiment climb out of their trench.

4.50 – 150 more men lay dead, wounded or pretending to be dead.

5.15 - The 4th line of the attack is called off but some troops misunderstand this direction and charge.

5.20 – 234 dead and wounded from the 8th LHR and 138 from the 10th LHR lay on the blood soaked ground of the Nek. Any movement of the wounded men brought Turkish machine gun fire to bear on the person. Some of the wounded were able to crawl back into the trenches. Others who had been lucky and not injured made their way as best as possible. For the rest, their lot was a miserable day in the sun without any hope of relief until the evening.


The Consequences

Nek Killed in Action


Lest we forget


Further Reading:

The Nek, Gallipoli, 7 August 1915

Roll of Honour, Australian, British and Turkish 

Gallipoli Campaign

Battles where Australians fought, 1899-1919


Citation: The Nek, Gallipoli, 7 August 1915, The Chronology


Posted by Project Leader at 12:01 AM EADT
Updated: Sunday, 7 August 2011 9:21 AM EADT

Newer | Latest | Older

Full Site Index


powered by FreeFind
Let us hear your story: You can tell your story, make a comment or ask for help on our forum.

Desert Column Forum

A note on copyright

The Australian Light Horse Studies Centre is a not for profit and non profit group whose sole aim is to write the early history of the Australian Light Horse from 1900 - 1920. It is privately funded and the information is provided by the individuals within the group and while permission for the use of the material has been given for this site for these items by various donors, the residual and actual copyright for these items, should there be any, resides exclusively with the donors. The information on this site is freely available for private research use only and if used as such, should be appropriately acknowledged. To assist in this process, each item has a citation attached at the bottom for referencing purposes.

Please Note: No express or implied permission is given for commercial use of the information contained within this site.

A note to copyright holders

The Australian Light Horse Studies Centre has made every endeavour to contact copyright holders of material digitised for this blog and website and where appropriate, permission is still being sought for these items. Where replies were not received, or where the copyright owner has not been able to be traced, or where the permission is still being sought, the Australian Light Horse Studies Centre has decided, in good faith, to proceed with digitisation and publication. Australian Light Horse Studies Centre would be happy to hear from copyright owners at any time to discuss usage of this item.

Contact

Australian Light Horse Studies Centre

eXTReMe Tracker