« September 2010 »
S M T W T F S
1 2 3 4
5 6 7 8 9 10 11
12 13 14 15 16 17 18
19 20 21 22 23 24 25
26 27 28 29 30
You are not logged in. Log in


Search the site:


powered by FreeFind
Volunteer with us.

Entries by Topic All topics  
A Latest Site News
A - Using the Site
AAA Volunteers
AAB-Education Centre
AAC-Film Clips
AAC-Photo Albums
AIF & MEF & EEF
AIF - Lighthorse
AIF - ALH - A to Z
AIF - DMC
AIF - DMC - Or Bat
AIF - DMC - Anzac MD
AIF - DMC - Aus MD
AIF - DMC - British
AIF - DMC - BWI
AIF - DMC - French
AIF - DMC - Indian
AIF - DMC - Italian
AIF - DMC - Medical
AIF - DMC - Remounts
AIF - DMC - Scouts
AIF - DMC - Sigs
AIF - DMC - Sigs AirlnS
AIF - DMC - 1 Sig Sqn
AIF - DMC - 2 Sig Sqn
AIF - DMC - Eng
AIF - DMC - Eng 1FSE
AIF - DMC - Eng 2FSE
AIF - DMC - GSR
AIF - 1B - 1 LHB
AIF - 1B - 6 MVS
AIF - 1B - 1 LHMGS
AIF - 1B - 1 Sig Trp
AIF - 1B - 1 LHFA
AIF - 1B - 1 LHR
AIF - 1B - 2 LHR
AIF - 1B - 3 LHR
AIF - 2B - 2 LHB
AIF - 2B - 7 MVS
AIF - 2B - 2 LHFA
AIF - 2B - 2 LHMGS
AIF - 2B - 2 Sig Trp
AIF - 2B - 5 LHR
AIF - 2B - 6 LHR
AIF - 2B - 7 LHR
AIF - 3B - 3 LHB
AIF - 3B - 8 MVS
AIF - 3B - 3 LHB Sigs
AIF - 3B - 3 LHFA
AIF - 3B - 3 LHMGS
AIF - 3B - 3 Sig Trp
AIF - 3B - 8 LHR
AIF - 3B - 9 LHR
AIF - 3B - 10 LHR
AIF - 4B - 4 LHB
AIF - 4B - 4 Sig Trp
AIF - 4B - 9 MVS
AIF - 4B - 4 LHFA
AIF - 4B - 4 LHMGS
AIF - 4B - 4 LHR
AIF - 4B - 11 LHR
AIF - 4B - 12 LHR
AIF - 5B - 5 LHB
AIF - 5B - 10 MVS
AIF - 5B - 5 LHFA
AIF - 5B - 5 Sig Trp
AIF - 5B - ICC
AIF - 5B - 14 LHR
AIF - 5B - 15 LHR
AIF - 5B - 1er Regt
AIF - 5B - 2 NZMGS
AIF - AASC
AIF - Aboriginal LH
AIF - Badges
AIF - Cars
AIF - Chinese LH
AIF - Double Sqns
AIF - Engineers
AIF - Fr - 22 Corps
AIF - Fr - 13 LHR
AIF - Honour Roll
AIF - HQ - 3rd Echelon
AIF - Marching Songs
AIF - Misc Topics
AIF - NZMRB
AIF - NZMRB - AMR
AIF - NZMRB - CMR
AIF - NZMRB - EFT
AIF - NZMRB - NZMFA
AIF - NZMRB - NZMGS
AIF - NZMRB - OMR
AIF - NZMRB - Sig-Trp
AIF - NZMRB - WMR
AIF - Ships
AIF - Ships - Encountr
AIF - Ships - Una
AIF - WFF
AIF - Wireless Sqn
Battles
BatzA - Australia
BatzA - Broken Hill
BatzA - Liverpool
BatzA - Merivale
BatzB - Boer War
BatzB - Bakenlaagte
BatzB - Belmont
BatzB - Bothaville
BatzB - Buffels Hoek
BatzB - Coetzees Drift
BatzB - Diamond Hill
BatzB - Driefontein
BatzB - Elands
BatzB - Graspan
BatzB - Grobelaar
BatzB - Grootvallier
BatzB - Hartebestfontn
BatzB - Houtnek
BatzB - Karee Siding
BatzB - Kimberley
BatzB - Koster River
BatzB - Leeuw Kop
BatzB - Mafeking
BatzB - Magersfontein
BatzB - Modder River
BatzB - Onverwacht
BatzB - Paardeberg
BatzB - Palmietfontein
BatzB - Pink Hill
BatzB - Poplar Grove
BatzB - Rhenoster
BatzB - Sannahs Post
BatzB - Slingersfontn
BatzB - Stinkhoutbm
BatzB - Sunnyside
BatzB - Wilmansrust
BatzB - Wolvekuil
BatzB - Zand River
BatzG - Gallipoli
BatzG - Anzac
BatzG - Aug 1915
BatzG - Baby 700
BatzG - Evacuation
BatzG - Hill 60
BatzG - Hill 971
BatzG - Krithia
BatzG - Lone Pine
BatzG - Nek
BatzJ - Jordan Valley
BatzJ - 1st Amman
BatzJ - 2nd Amman
BatzJ - Abu Tellul
BatzJ - Es Salt
BatzJ - JV Maps
BatzJ - Ziza
BatzM - Mespot
BatzM - Baghdad
BatzM - Ctesiphon
BatzM - Daur
BatzM - Kurna
BatzM - Kut el Amara
BatzM - Ramadi
BatzN - Naval
BatzN - AE1
BatzN - Cocos Is
BatzN - Heligoland
BatzN - Marmara
BatzN - Zeebrugge
BatzN - Zeppelin L43
BatzNG - Bitapaka
BatzO - Other
BatzO - Baku
BatzO - Egypt 1919
BatzO - Emptsa
BatzO - Karawaran
BatzO - Peitang
BatzO - Wassa
BatzP - Palestine
BatzP - 1st Gaza
BatzP - 2nd Gaza
BatzP - 3rd Gaza
BatzP - Aleppo
BatzP - Amwas
BatzP - Ayun Kara
BatzP - Bald Hill
BatzP - Balin
BatzP - Beersheba
BatzP - Berkusieh
BatzP - Damascus
BatzP - El Auja
BatzP - El Buggar
BatzP - El Burj
BatzP - Haifa
BatzP - Huj
BatzP - JB Yakub
BatzP - Kaukab
BatzP - Khan Kusseir
BatzP - Khuweilfe
BatzP - Kuneitra
BatzP - Megiddo
BatzP - Nablus
BatzP - Rafa
BatzP - Sasa
BatzP - Semakh
BatzP - Sheria
BatzP - Surafend
BatzP - Wadi Fara
BatzS - Sinai
BatzS - Bir el Abd
BatzS - El Arish
BatzS - El Mazar
BatzS - El Qatiya
BatzS - Jifjafa
BatzS - Magdhaba
BatzS - Maghara
BatzS - Romani
BatzS - Suez 1915
BatzSe - Senussi
BatzWF - Westn Front
BW - Boer War
BW - NSW
BW - NSW - 1ACH
BW - NSW - 1NSWMR
BW - NSW - 2NSWMR
BW - NSW - 3ACH
BW - NSW - 3NSWIB
BW - NSW - 3NSWMR
BW - NSW - 5ACH
BW - NSW - A Bty RAA
BW - NSW - AAMC
BW - NSW - Aust H
BW - NSW - Lancers
BW - NSW - NSW Inf
BW - NSW - NSWCBC
BW - NSW - NSWIB
BW - NSW - NSWMR_A
BW - NZ
BW - Qld
BW - Qld - 1ACH
BW - Qld - 1QMI
BW - Qld - 2QMI
BW - Qld - 3ACH
BW - Qld - 3QMI
BW - Qld - 4QIB
BW - Qld - 5QIB
BW - Qld - 6QIB
BW - Qld - 7ACH
BW - QLD - AAMC
BW - SA
BW - SA - 1SAMR
BW - SA - 2ACH
BW - SA - 2SAMR
BW - SA - 3SACB
BW - SA - 4ACH
BW - SA - 4SAIB
BW - SA - 5SAIB
BW - SA - 6SAIB
BW - SA - 8ACH
BW - SA - AAMC
BW - Tas
BW - Tas - 1ACH
BW - Tas - 1TIB
BW - Tas - 1TMI
BW - Tas - 2TB
BW - Tas - 2TIB
BW - Tas - 3ACH
BW - Tas - 8ACH
BW - Vic
BW - Vic - 1VMI
BW - Vic - 2ACH
BW - Vic - 2VMR
BW - Vic - 3VB
BW - Vic - 4ACH
BW - Vic - 4VIB
BW - Vic - 5VMR
BW - Vic - 6ACH
BW - Vic - AAMC
BW - Vic - Scot H
BW - WA
BW - WA - 1WAMI
BW - WA - 2ACH
BW - WA - 2WAMI
BW - WA - 3WAB
BW - WA - 4ACH
BW - WA - 4WAMI
BW - WA - 5WAMI
BW - WA - 6WAMI
BW - WA - 8ACH
BW Gen - Campaign
BW Gen - Soldiers
BW General
Cavalry - General
Diary - Schramm
Egypt - Heliopolis
Egypt - Mena
Gen - Ataturk Pk, CNB
Gen - Australia
Gen - Legends
Gen - Query Club
Gen - St - NSW
Gen - St - Qld
Gen - St - SA
Gen - St - Tas
Gen - St - Vic
Gen - St - WA
Gm - German Items
Gm - Bk - 605 MGC
GW - 11 Nov 1918
GW - Atrocities
GW - August 1914
GW - Biographies
GW - Propaganda
GW - Spies
GW - We forgot
Militia 1899-1920
Militia - Area Officers
Militia - Inf - Infantry
Militia - Inf - 1IB
Militia - Inf - 2IB
Militia - Inf - 3IB
Militia - Inf - NSW
Militia - Inf - Qld
Militia - Inf - SA
Militia - Inf - Tas
Militia - Inf - Vic
Militia - Inf - WA
Militia - K.E.Horse
Militia - LH
Militia - LH - Regts
Militia - LH - 1LHB
Militia - LH - 2LHB
Militia - LH - 3LHB
Militia - LH - 4LHB
Militia - LH - 5LHB
Militia - LH - 6LHB
Militia - LHN - NSW
Militia - LHN - 1/7/1
Militia - LHN - 2/9/6
Militia - LHN - 3/11/7
Militia - LHN - 4/6/16
Militia - LHN - 5/4/15
Militia - LHN - 6/5/12
Militia - LHN - 28
Militia - LHQ - Qld
Militia - LHQ - 13/2
Militia - LHQ - 14/3/11
Militia - LHQ - 15/1/5
Militia - LHQ - 27/14
Militia - LHS - SA
Militia - LHS - 16/22/3
Militia - LHS - 17/23/18
Militia - LHS - 24/9
Militia - LHT - Tas
Militia - LHT - 12/26
Militia - LHV - Vic
Militia - LHV - 7/15/20
Militia - LHV - 8/16/8
Militia - LHV - 9/19
Militia - LHV - 10/13
Militia - LHV - 11/20/4
Militia - LHV - 19/17
Militia - LHV - 29
Militia - LHW - WA
Militia - LHW-18/25/10
Militia - Military Orders
Militia - Misc
MilitiaRC - Rifle Clubs
MilitiaRC - NSW
MilitiaRC - NT
MilitiaRC - Qld
MilitiaRC - SA
MilitiaRC - Tas
MilitiaRC - Vic
MilitiaRC - WA
Militiaz - New Zealand
Tk - Turkish Items
Tk - Army
Tk - Bks - Books
Tk - Bks - 1/33IR
Tk - Bks - 27th IR
Tk - Bks - Air Force
Tk - Bks - Yildirim
Tk - POWs
Wp - Weapons
Wp - Hotchkiss Cav
Wp - Hotchkiss PMG
Blog Tools
Edit your Blog
Build a Blog
RSS Feed
View Profile
Open Community
Post to this Blog
Site Index
Education Centre
LH Militia
Boer War
Transport Ships
LH Battles
ALH - Units
ALH - General
Aboriginal Light H
Weapons
Ottoman Sources

"At a mile distant their thousand hooves were stuttering thunder, coming at a rate that frightened a man - they were an awe inspiring sight, galloping through the red haze - knee to knee and horse to horse - the dying sun glinting on bayonet points..." Trooper Ion Idriess

The Australian Light Horse Studies Centre aims to present an accurate history as chroniclers of early Australian military developments from 1899 to 1920.

The Australian Light Horse Studies Centre site holds over 12,000 entries and is growing daily.

Contact: Australian Light Horse Studies Centre

Let us hear your story: You can tell your story, make a comment or ask for help on our Australian Light Horse Studies Centre Forum called:

Desert Column Forum

WARNING: This site contains: names, information and images of deceased people; and, language which may be considered inappropriate today.

Sunday, 12 September 2010
The Battle of Bitapaka, New Guinea, 11 September 1914, Contents
Topic: BatzNG - Bitapaka

The Battle of Bitapaka

New Guinea, 11 September 1914

Contents


Items

Outline

The Battle of Bitapaka, New Guinea, 11 September 1914, Outline


History

Official Australian War History, Volume 10

Mackenzie Account


Military Journal, January 1915

Military Journal January 1915 Account


Burnell's Photographic Essay, 1914

Burnell's Photographic Essay, 1914, Part 1

Burnell's Photographic Essay, 1914, Part 2

Burnell's Photographic Essay, 1914, Part 3

Burnell's Photographic Essay, 1914, Part 4


War Crimes

Flogging Germans, New Guinea, 30 November 1914 


Roll of Honour

The Battle of Bitapaka, New Guinea, 11 September 1914, Allied Forces, Roll of Honour 

Lest we forget


Further Reading:

The Battle of Bitapaka, New Guinea, 11 September 1914

The Battle of Bitapaka, New Guinea, 11 September 1914, Allied Forces, Roll of Honour 

Battles where Australians fought, 1899-1920


Citation: The Battle of Bitapaka, New Guinea, 11 September 1914, Contents


Posted by Project Leader at 12:01 AM EADT
Updated: Friday, 4 February 2011 6:11 AM EAST
Saturday, 11 September 2010
The Battle of Bitapaka, New Guinea, 11 September 1914, Outline
Topic: BatzNG - Bitapaka

The Battle of Bitapaka

New Guinea, 11 September 1914

Outline


Details of the Battle at Bitapaka


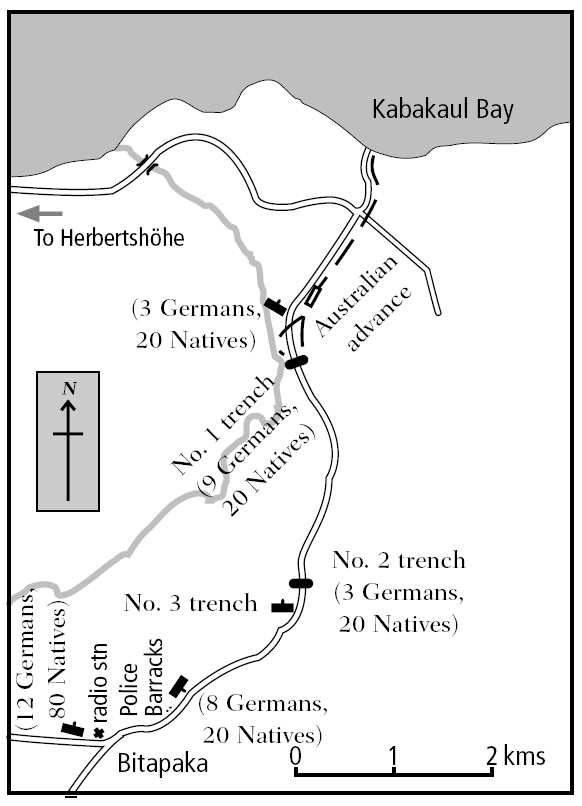
Bitapaka, the only significant action arising from the Australian seizure of German New Guinea at the start of the First World War, was fought on 11 September 1914 south of Kabakaul on the north-east coastline of the Gazelle Peninsula, New Britain. At dawn that day a joint army-navy contingent (the Australian Naval & Military Expeditionary Force, or AN&MEF) arrived off Rabaul in ships of the Australian fleet commanded by Rear-Admiral George Patey, to demand the German colony's surrender. Meanwhile, a 25-man party of naval reservists (with about fifteen others who were to provide medical support and maintain communications) was landed at Kabakaul with orders to capture a radio station believed to be in operation at Bitapaka, seven kilometres to the south.

At about 9 a.m., as the Australians pushed inland following a jungle-edged road, two scouts surprised an enemy party of about twenty Melanesian soldiers led by three Germans apparently setting an ambush. They opened fire, wounding one of the Germans and scattering the rest. In addition to the wounded man who surrendered, the other two Germans were soon afterwards captured (one of whom turned out to be the captain commanding the Bitapaka section of the German forces). Reinforcements were called up from the beach at the same time as the advance was resumed. The Australians had only gone some 500 metres when they came under fire from a strongly held trench dug across the road. Joined here by about 50 more men from the ships, a flanking attack was launched under Lieut.-Commander Charles Elwell shortly after 1 p.m. which caused a white flag to be raised by the trench's defenders and terms of surrender requested. To this point the Australians had suffered Elwell and three men killed, and five others wounded (two fatally).

Accompanied by two Germans from the captured trench to serve as interpreters, the Australians proceeded along the road carrying a flag of truce. The Germans persuaded the garrisons of three more trench obstacles to surrender also-though not before a brisk skirmish took place at the last of these in which three Australians were wounded (one fatally) and one of the interpreters and several Melanesian soldiers killed. Another group of German-led Melanesians was encountered and disarmed before the radio station was reached about 7 p.m. This was found to have been abandoned, the mast dropped but its instruments and machinery intact. The No. 2 trench (3 Germans. 20 Natives) AN&MEF personnel killed during the day's fighting were the first Australians to fall in the First World War.

Although successful, the operation could scarcely be rated as well managed. The Australian advance had been effectively delayed by a half-trained force of native police, and plantation labourers, and this opposition had been overcome only at a cost of seven officers and men killed or died of wounds and five wounded; some Germans present later claimed that two of the Australian fatalities had been shot by their own side in the confused engagement. Against this, Bitapaka's defenders had suffered one German NCO and about 30 Melanesians killed, and one German and ten Melanesians wounded. It has been claimed that the heavy losses among the Melanesian troops were the result of the Australian practice of bayoneting all those that fell into their hands during the fighting.


Extracted from the book produced by Chris Coulthard-Clark, Where Australians Fought - The Encyclopaedia of Australia's Battles, Allen and Unwin, Sydney, 1998, pp. 96-97.


Additional References cited by Chris Coulthard-Clark:

S.S. Mackenzie, (1927), The Australians at Rabaul, Sydney: Angus & Robertson;

Hermann Joseph Him, (1995), The Neglected War, Honolulu: University of Hawai'i Press.


Further Reading:

The Battle of Bitapaka, New Guinea, 11 September 1914

The Battle of Bitapaka, New Guinea, 11 September 1914, Allied Forces, Roll of Honour

Flogging Germans, New Guinea, 30 November 1914

Battles where Australians fought, 1899-1920


Citation: The Battle of Bitapaka, New Guinea, 11 September 1914, Outline

Posted by Project Leader at 12:01 AM EADT
Updated: Thursday, 3 February 2011 7:27 AM EAST
Monday, 30 August 2010
The Battle of Baku, Azerbaijan, 26 August to 14 September 1918, Contents
Topic: BatzO - Baku

The Battle of Baku

Azerbaijan, 26 August - 14 September 1918

Contents


Items

Outline

The Battle of Baku, Azerbaijan, August 26 to September 14, 1918, Outline 


Baku Maps

British

Area Map 

Turkish

Turkish Maps 


Accounts

Bülent Gökay Account 

The Diary of General Lionel Dunsterville 

Captain S.G. Savige, Stalky’s Forlorn Hope 


Further Reading:

The Battle of Baku, Azerbaijan, August 26 to September 14, 1918

Battles where Australians fought, 1899-1920


Citation: The Battle of Baku, Azerbaijan, August 26 to September 14, 1918, Contents

Posted by Project Leader at 12:01 AM EADT
Updated: Sunday, 5 September 2010 7:50 AM EADT
Sunday, 29 August 2010
The Battle of Baku, Azerbaijan, 26 August to 14 September 1918, Outline
Topic: BatzO - Baku

The Battle of Baku

Azerbaijan, 26 August - 14 September 1918

Outline


The Battle of Baku, Azerbaijan, 26 August to 14 September 1918

[From: Purnell's History of the First World War, 1970, p. 2768.]


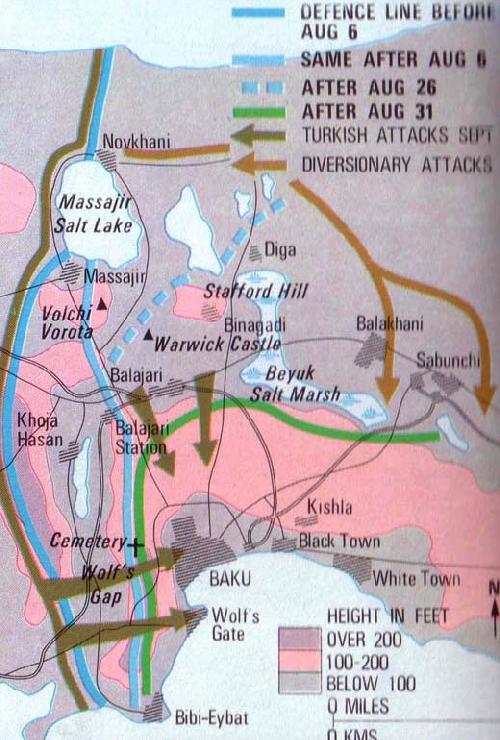
Baku, an oil port and town on the west coast of the Caspian Sea, was the scene of desperate fighting between Turkish forces and a special British unit known as 'Dunsterforce' and their Armenian and Russian allies between 26 August and 14 September 1918. In line with its goal of organising resistance to Turkish and German advances in the region, Dunsterforce - under its commander, Major-General Lionel Dunsterville - had attempted to bolster the local forces totalling 6,000 men which were holding a 20-kilometre-long defensive line across the Baku peninsula against some 14,000 Turkish troops. Apart from the small number of Dunsterforce members advising local commanders, elements of the British 39th Brigade were obtained from Mesopotamia totalling about 1,000 infantry, and one artillery battery.

Following the communist revolution in Russia, the task of Dunsterville's mission was an immensely complicated undertaking Russia's formal withdrawal from the war meant that many Russian Army units were disinclined to fight, while Bolshevik sympathies among large sections of the local populace caused the British presence to be widely viewed with suspicion and hostility. Instead of accepting the assistance of Dunsterville's 'advisers' (several of whom were Australians), local authorities largely expected the British to carry the weight of the fighting for them. Consequently, when the Turks attacked on 26 and 31 August, the Armenian levies promptly melted away or failed to give support.

After the first two Turkish assaults succeeded in making significant gains against the right flank of the town's defences, Dunsterville told the local leaders that he would withdraw his troops whenever it was necessary to save them from destruction. When he next advised them that he intended to leave Baku entirely, he was warned that any attempt to sail away from the port would be resisted. Although not intimidated by this, he decided to remain, and was encouraged by an apparent improvement in affairs during the next fortnight. When a deserter from the Turkish lines disclosed that a further assault was to he expected on 14 September, this news was awaited with greater confidence.

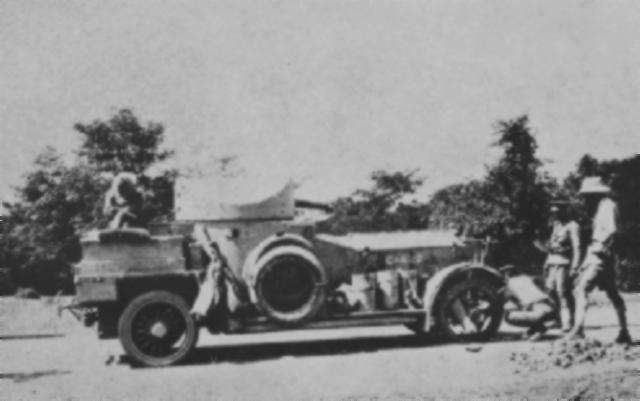
In the event, the Turkish attack met with the same absence of fight by the local troops: first reports that morning were of the enemy advancing at the run upon the town. The British, acting with a handful of Cossacks, stemmed the Turkish advance through the rest of the day, but Dunsterville immediately prepared to make good his threat to withdraw once night arrived. The local authorities initially acquiesced in his plans, then attempted to prevent the evacuation. Despite this, the whole of the British force successfully got off under cover of dark and was taken to Enzeli. Two Australians, Major H.B. Suttor and Sergeant A.L. Bullen, although left behind through not being notified of the departure, subsequently escaped in a refugee boat to Krasnovodsk.


Russian armoured car captured by Dunsterforce near Baku, 1918.

[Photo: S. Fallance]


Extracted from the book produced by Chris Coulthard-Clark, Where Australians Fought - The Encyclopaedia of Australia's Battles, Allen and Unwin, Sydney, 1998, pp. 155-157.


Additional References cited by Chris Coulthard-Clark:

C.E.W. Bean (1937) The Australian Imperial Force in France during the Main German Offensive, 1918, Sydney: Angus & Robertson.


Further Reading:

The Battle of Baku, Azerbaijan, August 26 to September 14, 1918

Battles where Australians fought, 1899-1920


Citation: The Battle of Baku, Azerbaijan, August 26 to September 14, 1918, Outline

Posted by Project Leader at 12:01 AM EADT
Updated: Sunday, 5 September 2010 7:52 AM EADT
Friday, 27 August 2010
The Battle for Hill 60, Gallipoli, 22 - 23, and 27 August 1915, Contents
Topic: BatzG - Hill 60

The Battle for Hill 60

Gallipoli, 22 - 23, and 27 August 1915

Contents


Items:

Outline

Hill 60, Turkey, August 21 to 22 and 27, 1915, Outline
The Nek and Hill 60 - The massacre of the Australians  
The Battle of Hill 60, Gallipoli, August 1915, Maps
Hill 60, Gallipoli, August 1915
The Battle of Hill 60, Gallipoli, August 1915, Album Contents  
Photographs of Hill 60
Photographic representation of Hill 60
Turkish Information
Turkish Order of Battle, 27 August 1915 
The Turkish View of Hill 60 - Kayacikagili (Bombatepe) Battle, 27 August 1915 
New Zealand & Australian Division
NZ & A Division Report for 27 August 1915.
15th Infantry Battalion
Report by Captain McSharry to General Monash, 27 August 1915
17th Infantry Battalion 
17th Infantry Battalion, War Diary, August 1915 
3rd Light Horse Brigade 

3rd LHB War Diary, 29 August 1915  

3rd LHB War Diary, 30 August 1915, part 1  

3rd LHB War Diary, 30 August 1915, part 2

3rd LHB War Diary, 30 August 1915, part 3

3rd LHB War Diary, 2 - 6 September 1915


9th Light Horse Regiment

9th Australian Light Horse Regiment, AIF, The Regiment after the Battle of Hill 60


10th Light Horse Regiment

10th LHR War Diary 29 - 29 August 1915 

Signals to 3rd LHB regarding 10th LHR attack


Roll of Honour

The Battle for Hill 60, Gallipoli, 22 - 23, and 27 August 1915, Roll of Honour

Lest We Forget


Further Reading:

Hill 60, Gallipoli, 22 - 23, and 27 August 1915

The Battle for Hill 60, Gallipoli, 22 - 23, and 27 August 1915, Roll of Honour

Gallipoli Campaign

Battles where Australians fought, 1899-1920


Citation: The Battle for Hill 60, Gallipoli, 22 - 23, and 27 August 1915, Contents


Posted by Project Leader at 12:01 AM EADT
Updated: Sunday, 5 August 2012 6:04 PM EADT

Newer | Latest | Older

Full Site Index


powered by FreeFind
Let us hear your story: You can tell your story, make a comment or ask for help on our forum.

Desert Column Forum

A note on copyright

The Australian Light Horse Studies Centre is a not for profit and non profit group whose sole aim is to write the early history of the Australian Light Horse from 1900 - 1920. It is privately funded and the information is provided by the individuals within the group and while permission for the use of the material has been given for this site for these items by various donors, the residual and actual copyright for these items, should there be any, resides exclusively with the donors. The information on this site is freely available for private research use only and if used as such, should be appropriately acknowledged. To assist in this process, each item has a citation attached at the bottom for referencing purposes.

Please Note: No express or implied permission is given for commercial use of the information contained within this site.

A note to copyright holders

The Australian Light Horse Studies Centre has made every endeavour to contact copyright holders of material digitised for this blog and website and where appropriate, permission is still being sought for these items. Where replies were not received, or where the copyright owner has not been able to be traced, or where the permission is still being sought, the Australian Light Horse Studies Centre has decided, in good faith, to proceed with digitisation and publication. Australian Light Horse Studies Centre would be happy to hear from copyright owners at any time to discuss usage of this item.

Contact

Australian Light Horse Studies Centre

eXTReMe Tracker