« July 2008 »
S M T W T F S
1 2 3 4 5
6 7 8 9 10 11 12
13 14 15 16 17 18 19
20 21 22 23 24 25 26
27 28 29 30 31
You are not logged in. Log in


Search the site:


powered by FreeFind
Volunteer with us.

Entries by Topic All topics  
A Latest Site News
A - Using the Site
AAA Volunteers
AAB-Education Centre
AAC-Film Clips
AAC-Photo Albums
AIF & MEF & EEF
AIF - Lighthorse
AIF - ALH - A to Z
AIF - DMC
AIF - DMC - Or Bat
AIF - DMC - Anzac MD
AIF - DMC - Aus MD
AIF - DMC - British
AIF - DMC - BWI
AIF - DMC - French
AIF - DMC - Indian
AIF - DMC - Italian
AIF - DMC - Medical
AIF - DMC - Remounts
AIF - DMC - Scouts
AIF - DMC - Sigs
AIF - DMC - Sigs AirlnS
AIF - DMC - 1 Sig Sqn
AIF - DMC - 2 Sig Sqn
AIF - DMC - Eng
AIF - DMC - Eng 1FSE
AIF - DMC - Eng 2FSE
AIF - DMC - GSR
AIF - 1B - 1 LHB
AIF - 1B - 6 MVS
AIF - 1B - 1 LHMGS
AIF - 1B - 1 Sig Trp
AIF - 1B - 1 LHFA
AIF - 1B - 1 LHR
AIF - 1B - 2 LHR
AIF - 1B - 3 LHR
AIF - 2B - 2 LHB
AIF - 2B - 7 MVS
AIF - 2B - 2 LHFA
AIF - 2B - 2 LHMGS
AIF - 2B - 2 Sig Trp
AIF - 2B - 5 LHR
AIF - 2B - 6 LHR
AIF - 2B - 7 LHR
AIF - 3B - 3 LHB
AIF - 3B - 8 MVS
AIF - 3B - 3 LHB Sigs
AIF - 3B - 3 LHFA
AIF - 3B - 3 LHMGS
AIF - 3B - 3 Sig Trp
AIF - 3B - 8 LHR
AIF - 3B - 9 LHR
AIF - 3B - 10 LHR
AIF - 4B - 4 LHB
AIF - 4B - 4 Sig Trp
AIF - 4B - 9 MVS
AIF - 4B - 4 LHFA
AIF - 4B - 4 LHMGS
AIF - 4B - 4 LHR
AIF - 4B - 11 LHR
AIF - 4B - 12 LHR
AIF - 5B - 5 LHB
AIF - 5B - 10 MVS
AIF - 5B - 5 LHFA
AIF - 5B - 5 Sig Trp
AIF - 5B - ICC
AIF - 5B - 14 LHR
AIF - 5B - 15 LHR
AIF - 5B - 1er Regt
AIF - 5B - 2 NZMGS
AIF - AASC
AIF - Aboriginal LH
AIF - Badges
AIF - Cars
AIF - Chinese LH
AIF - Double Sqns
AIF - Engineers
AIF - Fr - 22 Corps
AIF - Fr - 13 LHR
AIF - Honour Roll
AIF - HQ - 3rd Echelon
AIF - Marching Songs
AIF - Misc Topics
AIF - NZMRB
AIF - NZMRB - AMR
AIF - NZMRB - CMR
AIF - NZMRB - EFT
AIF - NZMRB - NZMFA
AIF - NZMRB - NZMGS
AIF - NZMRB - OMR
AIF - NZMRB - Sig-Trp
AIF - NZMRB - WMR
AIF - Ships
AIF - Ships - Encountr
AIF - Ships - Una
AIF - WFF
AIF - Wireless Sqn
Battles
BatzA - Australia
BatzA - Broken Hill
BatzA - Liverpool
BatzA - Merivale
BatzB - Boer War
BatzB - Bakenlaagte
BatzB - Belmont
BatzB - Bothaville
BatzB - Buffels Hoek
BatzB - Coetzees Drift
BatzB - Diamond Hill
BatzB - Driefontein
BatzB - Elands
BatzB - Graspan
BatzB - Grobelaar
BatzB - Grootvallier
BatzB - Hartebestfontn
BatzB - Houtnek
BatzB - Karee Siding
BatzB - Kimberley
BatzB - Koster River
BatzB - Leeuw Kop
BatzB - Mafeking
BatzB - Magersfontein
BatzB - Modder River
BatzB - Onverwacht
BatzB - Paardeberg
BatzB - Palmietfontein
BatzB - Pink Hill
BatzB - Poplar Grove
BatzB - Rhenoster
BatzB - Sannahs Post
BatzB - Slingersfontn
BatzB - Stinkhoutbm
BatzB - Sunnyside
BatzB - Wilmansrust
BatzB - Wolvekuil
BatzB - Zand River
BatzG - Gallipoli
BatzG - Anzac
BatzG - Aug 1915
BatzG - Baby 700
BatzG - Evacuation
BatzG - Hill 60
BatzG - Hill 971
BatzG - Krithia
BatzG - Lone Pine
BatzG - Nek
BatzJ - Jordan Valley
BatzJ - 1st Amman
BatzJ - 2nd Amman
BatzJ - Abu Tellul
BatzJ - Es Salt
BatzJ - JV Maps
BatzJ - Ziza
BatzM - Mespot
BatzM - Baghdad
BatzM - Ctesiphon
BatzM - Daur
BatzM - Kurna
BatzM - Kut el Amara
BatzM - Ramadi
BatzN - Naval
BatzN - AE1
BatzN - Cocos Is
BatzN - Heligoland
BatzN - Marmara
BatzN - Zeebrugge
BatzN - Zeppelin L43
BatzNG - Bitapaka
BatzO - Other
BatzO - Baku
BatzO - Egypt 1919
BatzO - Emptsa
BatzO - Karawaran
BatzO - Peitang
BatzO - Wassa
BatzP - Palestine
BatzP - 1st Gaza
BatzP - 2nd Gaza
BatzP - 3rd Gaza
BatzP - Aleppo
BatzP - Amwas
BatzP - Ayun Kara
BatzP - Bald Hill
BatzP - Balin
BatzP - Beersheba
BatzP - Berkusieh
BatzP - Damascus
BatzP - El Auja
BatzP - El Buggar
BatzP - El Burj
BatzP - Haifa
BatzP - Huj
BatzP - JB Yakub
BatzP - Kaukab
BatzP - Khan Kusseir
BatzP - Khuweilfe
BatzP - Kuneitra
BatzP - Megiddo
BatzP - Nablus
BatzP - Rafa
BatzP - Sasa
BatzP - Semakh
BatzP - Sheria
BatzP - Surafend
BatzP - Wadi Fara
BatzS - Sinai
BatzS - Bir el Abd
BatzS - El Arish
BatzS - El Mazar
BatzS - El Qatiya
BatzS - Jifjafa
BatzS - Magdhaba
BatzS - Maghara
BatzS - Romani
BatzS - Suez 1915
BatzSe - Senussi
BatzWF - Westn Front
BW - Boer War
BW - NSW
BW - NSW - 1ACH
BW - NSW - 1NSWMR
BW - NSW - 2NSWMR
BW - NSW - 3ACH
BW - NSW - 3NSWIB
BW - NSW - 3NSWMR
BW - NSW - 5ACH
BW - NSW - A Bty RAA
BW - NSW - AAMC
BW - NSW - Aust H
BW - NSW - Lancers
BW - NSW - NSW Inf
BW - NSW - NSWCBC
BW - NSW - NSWIB
BW - NSW - NSWMR_A
BW - NZ
BW - Qld
BW - Qld - 1ACH
BW - Qld - 1QMI
BW - Qld - 2QMI
BW - Qld - 3ACH
BW - Qld - 3QMI
BW - Qld - 4QIB
BW - Qld - 5QIB
BW - Qld - 6QIB
BW - Qld - 7ACH
BW - QLD - AAMC
BW - SA
BW - SA - 1SAMR
BW - SA - 2ACH
BW - SA - 2SAMR
BW - SA - 3SACB
BW - SA - 4ACH
BW - SA - 4SAIB
BW - SA - 5SAIB
BW - SA - 6SAIB
BW - SA - 8ACH
BW - SA - AAMC
BW - Tas
BW - Tas - 1ACH
BW - Tas - 1TIB
BW - Tas - 1TMI
BW - Tas - 2TB
BW - Tas - 2TIB
BW - Tas - 3ACH
BW - Tas - 8ACH
BW - Vic
BW - Vic - 1VMI
BW - Vic - 2ACH
BW - Vic - 2VMR
BW - Vic - 3VB
BW - Vic - 4ACH
BW - Vic - 4VIB
BW - Vic - 5VMR
BW - Vic - 6ACH
BW - Vic - AAMC
BW - Vic - Scot H
BW - WA
BW - WA - 1WAMI
BW - WA - 2ACH
BW - WA - 2WAMI
BW - WA - 3WAB
BW - WA - 4ACH
BW - WA - 4WAMI
BW - WA - 5WAMI
BW - WA - 6WAMI
BW - WA - 8ACH
BW Gen - Campaign
BW Gen - Soldiers
BW General
Cavalry - General
Diary - Schramm
Egypt - Heliopolis
Egypt - Mena
Gen - Ataturk Pk, CNB
Gen - Australia
Gen - Legends
Gen - Query Club
Gen - St - NSW
Gen - St - Qld
Gen - St - SA
Gen - St - Tas
Gen - St - Vic
Gen - St - WA
Gm - German Items
Gm - Bk - 605 MGC
GW - 11 Nov 1918
GW - Atrocities
GW - August 1914
GW - Biographies
GW - Propaganda
GW - Spies
GW - We forgot
Militia 1899-1920
Militia - Area Officers
Militia - Inf - Infantry
Militia - Inf - 1IB
Militia - Inf - 2IB
Militia - Inf - 3IB
Militia - Inf - NSW
Militia - Inf - Qld
Militia - Inf - SA
Militia - Inf - Tas
Militia - Inf - Vic
Militia - Inf - WA
Militia - K.E.Horse
Militia - LH
Militia - LH - Regts
Militia - LH - 1LHB
Militia - LH - 2LHB
Militia - LH - 3LHB
Militia - LH - 4LHB
Militia - LH - 5LHB
Militia - LH - 6LHB
Militia - LHN - NSW
Militia - LHN - 1/7/1
Militia - LHN - 2/9/6
Militia - LHN - 3/11/7
Militia - LHN - 4/6/16
Militia - LHN - 5/4/15
Militia - LHN - 6/5/12
Militia - LHN - 28
Militia - LHQ - Qld
Militia - LHQ - 13/2
Militia - LHQ - 14/3/11
Militia - LHQ - 15/1/5
Militia - LHQ - 27/14
Militia - LHS - SA
Militia - LHS - 16/22/3
Militia - LHS - 17/23/18
Militia - LHS - 24/9
Militia - LHT - Tas
Militia - LHT - 12/26
Militia - LHV - Vic
Militia - LHV - 7/15/20
Militia - LHV - 8/16/8
Militia - LHV - 9/19
Militia - LHV - 10/13
Militia - LHV - 11/20/4
Militia - LHV - 19/17
Militia - LHV - 29
Militia - LHW - WA
Militia - LHW-18/25/10
Militia - Military Orders
Militia - Misc
MilitiaRC - Rifle Clubs
MilitiaRC - NSW
MilitiaRC - NT
MilitiaRC - Qld
MilitiaRC - SA
MilitiaRC - Tas
MilitiaRC - Vic
MilitiaRC - WA
Militiaz - New Zealand
Tk - Turkish Items
Tk - Army
Tk - Bks - Books
Tk - Bks - 1/33IR
Tk - Bks - 27th IR
Tk - Bks - Air Force
Tk - Bks - Yildirim
Tk - POWs
Wp - Weapons
Wp - Hotchkiss Cav
Wp - Hotchkiss PMG
Blog Tools
Edit your Blog
Build a Blog
RSS Feed
View Profile
Open Community
Post to this Blog
Site Index
Education Centre
LH Militia
Boer War
Transport Ships
LH Battles
ALH - Units
ALH - General
Aboriginal Light H
Weapons
Ottoman Sources

"At a mile distant their thousand hooves were stuttering thunder, coming at a rate that frightened a man - they were an awe inspiring sight, galloping through the red haze - knee to knee and horse to horse - the dying sun glinting on bayonet points..." Trooper Ion Idriess

The Australian Light Horse Studies Centre aims to present an accurate history as chroniclers of early Australian military developments from 1899 to 1920.

The Australian Light Horse Studies Centre site holds over 12,000 entries and is growing daily.

Contact: Australian Light Horse Studies Centre

Let us hear your story: You can tell your story, make a comment or ask for help on our Australian Light Horse Studies Centre Forum called:

Desert Column Forum

WARNING: This site contains: names, information and images of deceased people; and, language which may be considered inappropriate today.

Saturday, 19 July 2008
9th LHR On Manoeuvres, The Alleged Elliott Photograph Examined, Part 1
Topic: BatzP - Beersheba

9th LHR On Manoeuvres

The Alleged Elliott Photograph Examined, Part 1


 9th Australian Light Horse Regiment "On Manoeuvres".

Schramm Photograph Album

[Click on photograph for a larger version.]


The above photograph is possibly the most controversial photograph of the Palestine campaign. There are many different beliefs from the reasonable to the outright bizarre. This particular photograph was in our family collection with the heading "On Manoeuvres". The person who wrote that description was a veteran of the Sinai and Palestine campaign and was on Tel el Saba when the charge began.

Later on, after the Great War, when the "Charge at Beersheba" had cache,Trooper E.G. Elliot of the 4th Light Horse Machine Gun Squadron claimed authorship of this particular photograph. This claim was examined by Ian Jones in and article called: Is This The Charge At Beersheba? It was published in the Journal of the Australian War Memorial, October 1983. A copy of this article is located on the web site of the Australian Light Horse Association at this address:

BEERSHEEBA... THE CONTROVERSIAL PHOTOGRAPH OF THE CHARGE 

Elliott claimed that the photograph portrays the historic charge of the 4th and 12th LHRs of the Australian 4th Light Horse Brigade at Beersheba, Palestine, 31 October 1917. His Statutory Declaration claims that he was in an advanced position performing range finding duties and was unaware that the charge was planned but fortunately had a small camera with him and so took a quick snap as the horses charged towards him. In his latest work, The legend of the Light Horse written by Ian Jones in 2007, the arguments are reiterated with a few modifications but essentially alleging the same conclusion as made in 1983.

Matthew Woodhead and and Jacqui Lobach, in The Australian Charge at Beersheba, 1917: Is the Photograph Genuine or Staged, Wartime, Issue 1 (November 1997) refutes the Jones' thesis and formulates the hypothesis that the photograph was produced by Frank Hurley, the Australian Official Photographer, on 7 February 1918. They claim it portrays a re-enactment of the charge. The location of this photograph was around the Deir el Belah township south of Gaza where the Australian Mounted Division was resting for three months.

The relationship between Hurley and Brigadier General LC Wilson of the 3rd Light Horse Brigade was very much in evidence when Wilson escorted Hurley around the front lines in late December 1917. The various diary entries are found on this site at this address:

Fleas on fleas -The results from careless work - a case study 

My personal research agrees with this conclusion by Woodhead and Lobach and indicates that it is more than probable that the regiment in the photograph is the 9th Australian Light Horse Regiment. There are two reasons for this.

The first relates to other photograph albums claiming that the photograph is of the 9th LHR. In addition, there is a letter from Major Jack Davies, the Officer Commanding "C" Squadron, 12th LHR to his wife detailing his purchase of this very photograph from Lieutenant Colonel Scott, the Commanding Officer of the 9th LHR on 26 March 1918. No mention in his letter that this was a photograph of the charge at Beersheba yet the officer in question was quite happy to let his wife know in great detail other events in which he participated during the campaign. His photographs were always well described. Elsie Ritchie compiled all his letters in 1998 in a self published volume called Crusaders of the Southern Cross at p. 218. 

In addition, it requires an examination of the Massie Map:

Hand drawn map of the 4th LHB prior to charging into Beersheba, 31 October 1917

Special attention should be paid to the third line in the picture compared to that shown in the Massie Map. The representation of the third line in the Massie map indicates that the troops are in line of column. The alleged Elliott photograph shows the third line as a single line, a totally different concept. It comes down to whose evidence is accepted in this case. Massie's map was fully authenticated by the men who took part in the action at Beersheba. He was a thorough man who knew his task and produced a map accordingly. In the alternative there is Elliott who claims he took the picture but never saw it until years later. There does not appear to be any contest on credibility with the evidence put in sharp relief. The Massie map is accurate. It is the third line of the photograph that undermines the claim of Elliott. 

Finally the topography of the picture needs to be qualified by that portrayed quite accurately in the Official Map: 

Official map of the Beersheba Charge 

One major item missing from this picture is Tel el Saba which should have been clearly seen in the photograph as it is in any other photograph of the point where the charge was formed. An examination of the alleged Elliott picture requires a comparison of the topography. This is clearly undertaken in an earlier post and presented at:

Pictures (taken 2006) of the route taken by the 4th LHB charge at Beersheba


The thing to keep in mind, if this was a photograph of the charge as alleged by Elliott, is the background.

In addition to topography, on the day of the charge, to the left of the horse lines the alleged Elliott picture, there should by signs of many thousands of men on horses as well as field guns in place. The below photograph illustrates this principle of visually picking up horsemen in the distance.


3rd LHB at Marakeb Beach, July 1917


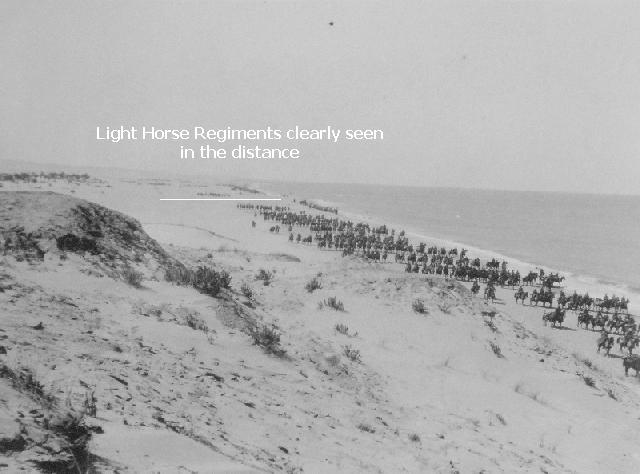
Had the alleged Elliott photograph been taken at Beersheba, the presence of 12,000 cavalrymen would have left even the slightest trace in the picture. It is impossible to hide such a number of horses and men. These would be picked up as black dots over the picture. The alleged Elliott photograph shows none. In other words, either the two divisions of cavalry disappeared and the war stopped for the sake of the photograph, or the photograph does not describe the charge at Beersheba.

Vast quantities of evidence exists indicating that the Elliott claim to authorship of this photograph is very much in doubt. That is not to say that Elliott did not take a photograph on that day, only that he did not take this photograph. This evidence will progressively be added to the blog.

One of the most bizarre claims is that the photograph was taken by a Turkish soldier in the trenches facing the charge. He was subsequently killed. The film was removed from the camera and this was on that roll. Unless this valiant but unlucky Turk had a telephoto lens attached to his camera and took the charge at its formation, then this photograph is an impossibility. By the time the Turkish trenche shad been reached, the charging horses had broken up into smaller units. While these were coherent fighting units, it would have appeared to be a shambles in front of the trench with horses and men going every which way. 


Further Reading:

9th LHR On Manoeuvres, The Alleged Elliott Photograph Examined, Part 2

Fleas on fleas -The results from careless work - a case study 

Pictures (taken 2006) of the route taken by the 4th LHB charge at Beersheba

Hand drawn map of the 4th LHB prior to charging into Beersheba, 31 October 1917

Official map of the Beersheba Charge 

The Battle of Beersheba

Myths and Legends 


Citation: 9th LHR On Manoeuvres, The Alleged Elliott Photograph Examined, Part 1


Posted by Project Leader at 6:04 PM EADT
Updated: Wednesday, 29 July 2009 9:06 AM EADT

View Latest Entries

Full Site Index


powered by FreeFind
Let us hear your story: You can tell your story, make a comment or ask for help on our forum.

Desert Column Forum

A note on copyright

The Australian Light Horse Studies Centre is a not for profit and non profit group whose sole aim is to write the early history of the Australian Light Horse from 1900 - 1920. It is privately funded and the information is provided by the individuals within the group and while permission for the use of the material has been given for this site for these items by various donors, the residual and actual copyright for these items, should there be any, resides exclusively with the donors. The information on this site is freely available for private research use only and if used as such, should be appropriately acknowledged. To assist in this process, each item has a citation attached at the bottom for referencing purposes.

Please Note: No express or implied permission is given for commercial use of the information contained within this site.

A note to copyright holders

The Australian Light Horse Studies Centre has made every endeavour to contact copyright holders of material digitised for this blog and website and where appropriate, permission is still being sought for these items. Where replies were not received, or where the copyright owner has not been able to be traced, or where the permission is still being sought, the Australian Light Horse Studies Centre has decided, in good faith, to proceed with digitisation and publication. Australian Light Horse Studies Centre would be happy to hear from copyright owners at any time to discuss usage of this item.

Contact

Australian Light Horse Studies Centre

eXTReMe Tracker