« October 2008 »
S M T W T F S
1 2 3 4
5 6 7 8 9 10 11
12 13 14 15 16 17 18
19 20 21 22 23 24 25
26 27 28 29 30 31
You are not logged in. Log in


Search the site:


powered by FreeFind
Volunteer with us.

Entries by Topic All topics  
A Latest Site News
A - Using the Site
AAA Volunteers
AAB-Education Centre
AAC-Film Clips
AAC-Photo Albums
AIF & MEF & EEF
AIF - Lighthorse
AIF - ALH - A to Z
AIF - DMC
AIF - DMC - Or Bat
AIF - DMC - Anzac MD
AIF - DMC - Aus MD
AIF - DMC - British
AIF - DMC - BWI
AIF - DMC - French
AIF - DMC - Indian
AIF - DMC - Italian
AIF - DMC - Medical
AIF - DMC - Remounts
AIF - DMC - Scouts
AIF - DMC - Sigs
AIF - DMC - Sigs AirlnS
AIF - DMC - 1 Sig Sqn
AIF - DMC - 2 Sig Sqn
AIF - DMC - Eng
AIF - DMC - Eng 1FSE
AIF - DMC - Eng 2FSE
AIF - DMC - GSR
AIF - 1B - 1 LHB
AIF - 1B - 6 MVS
AIF - 1B - 1 LHMGS
AIF - 1B - 1 Sig Trp
AIF - 1B - 1 LHFA
AIF - 1B - 1 LHR
AIF - 1B - 2 LHR
AIF - 1B - 3 LHR
AIF - 2B - 2 LHB
AIF - 2B - 7 MVS
AIF - 2B - 2 LHFA
AIF - 2B - 2 LHMGS
AIF - 2B - 2 Sig Trp
AIF - 2B - 5 LHR
AIF - 2B - 6 LHR
AIF - 2B - 7 LHR
AIF - 3B - 3 LHB
AIF - 3B - 8 MVS
AIF - 3B - 3 LHB Sigs
AIF - 3B - 3 LHFA
AIF - 3B - 3 LHMGS
AIF - 3B - 3 Sig Trp
AIF - 3B - 8 LHR
AIF - 3B - 9 LHR
AIF - 3B - 10 LHR
AIF - 4B - 4 LHB
AIF - 4B - 4 Sig Trp
AIF - 4B - 9 MVS
AIF - 4B - 4 LHFA
AIF - 4B - 4 LHMGS
AIF - 4B - 4 LHR
AIF - 4B - 11 LHR
AIF - 4B - 12 LHR
AIF - 5B - 5 LHB
AIF - 5B - 10 MVS
AIF - 5B - 5 LHFA
AIF - 5B - 5 Sig Trp
AIF - 5B - ICC
AIF - 5B - 14 LHR
AIF - 5B - 15 LHR
AIF - 5B - 1er Regt
AIF - 5B - 2 NZMGS
AIF - AASC
AIF - Aboriginal LH
AIF - Badges
AIF - Cars
AIF - Chinese LH
AIF - Double Sqns
AIF - Engineers
AIF - Fr - 22 Corps
AIF - Fr - 13 LHR
AIF - Honour Roll
AIF - HQ - 3rd Echelon
AIF - Marching Songs
AIF - Misc Topics
AIF - NZMRB
AIF - NZMRB - AMR
AIF - NZMRB - CMR
AIF - NZMRB - EFT
AIF - NZMRB - NZMFA
AIF - NZMRB - NZMGS
AIF - NZMRB - OMR
AIF - NZMRB - Sig-Trp
AIF - NZMRB - WMR
AIF - Ships
AIF - Ships - Encountr
AIF - Ships - Una
AIF - WFF
AIF - Wireless Sqn
Battles
BatzA - Australia
BatzA - Broken Hill
BatzA - Liverpool
BatzA - Merivale
BatzB - Boer War
BatzB - Bakenlaagte
BatzB - Belmont
BatzB - Bothaville
BatzB - Buffels Hoek
BatzB - Coetzees Drift
BatzB - Diamond Hill
BatzB - Driefontein
BatzB - Elands
BatzB - Graspan
BatzB - Grobelaar
BatzB - Grootvallier
BatzB - Hartebestfontn
BatzB - Houtnek
BatzB - Karee Siding
BatzB - Kimberley
BatzB - Koster River
BatzB - Leeuw Kop
BatzB - Mafeking
BatzB - Magersfontein
BatzB - Modder River
BatzB - Onverwacht
BatzB - Paardeberg
BatzB - Palmietfontein
BatzB - Pink Hill
BatzB - Poplar Grove
BatzB - Rhenoster
BatzB - Sannahs Post
BatzB - Slingersfontn
BatzB - Stinkhoutbm
BatzB - Sunnyside
BatzB - Wilmansrust
BatzB - Wolvekuil
BatzB - Zand River
BatzG - Gallipoli
BatzG - Anzac
BatzG - Aug 1915
BatzG - Baby 700
BatzG - Evacuation
BatzG - Hill 60
BatzG - Hill 971
BatzG - Krithia
BatzG - Lone Pine
BatzG - Nek
BatzJ - Jordan Valley
BatzJ - 1st Amman
BatzJ - 2nd Amman
BatzJ - Abu Tellul
BatzJ - Es Salt
BatzJ - JV Maps
BatzJ - Ziza
BatzM - Mespot
BatzM - Baghdad
BatzM - Ctesiphon
BatzM - Daur
BatzM - Kurna
BatzM - Kut el Amara
BatzM - Ramadi
BatzN - Naval
BatzN - AE1
BatzN - Cocos Is
BatzN - Heligoland
BatzN - Marmara
BatzN - Zeebrugge
BatzN - Zeppelin L43
BatzNG - Bitapaka
BatzO - Other
BatzO - Baku
BatzO - Egypt 1919
BatzO - Emptsa
BatzO - Karawaran
BatzO - Peitang
BatzO - Wassa
BatzP - Palestine
BatzP - 1st Gaza
BatzP - 2nd Gaza
BatzP - 3rd Gaza
BatzP - Aleppo
BatzP - Amwas
BatzP - Ayun Kara
BatzP - Bald Hill
BatzP - Balin
BatzP - Beersheba
BatzP - Berkusieh
BatzP - Damascus
BatzP - El Auja
BatzP - El Buggar
BatzP - El Burj
BatzP - Haifa
BatzP - Huj
BatzP - JB Yakub
BatzP - Kaukab
BatzP - Khan Kusseir
BatzP - Khuweilfe
BatzP - Kuneitra
BatzP - Megiddo
BatzP - Nablus
BatzP - Rafa
BatzP - Sasa
BatzP - Semakh
BatzP - Sheria
BatzP - Surafend
BatzP - Wadi Fara
BatzS - Sinai
BatzS - Bir el Abd
BatzS - El Arish
BatzS - El Mazar
BatzS - El Qatiya
BatzS - Jifjafa
BatzS - Magdhaba
BatzS - Maghara
BatzS - Romani
BatzS - Suez 1915
BatzSe - Senussi
BatzWF - Westn Front
BW - Boer War
BW - NSW
BW - NSW - 1ACH
BW - NSW - 1NSWMR
BW - NSW - 2NSWMR
BW - NSW - 3ACH
BW - NSW - 3NSWIB
BW - NSW - 3NSWMR
BW - NSW - 5ACH
BW - NSW - A Bty RAA
BW - NSW - AAMC
BW - NSW - Aust H
BW - NSW - Lancers
BW - NSW - NSW Inf
BW - NSW - NSWCBC
BW - NSW - NSWIB
BW - NSW - NSWMR_A
BW - NZ
BW - Qld
BW - Qld - 1ACH
BW - Qld - 1QMI
BW - Qld - 2QMI
BW - Qld - 3ACH
BW - Qld - 3QMI
BW - Qld - 4QIB
BW - Qld - 5QIB
BW - Qld - 6QIB
BW - Qld - 7ACH
BW - QLD - AAMC
BW - SA
BW - SA - 1SAMR
BW - SA - 2ACH
BW - SA - 2SAMR
BW - SA - 3SACB
BW - SA - 4ACH
BW - SA - 4SAIB
BW - SA - 5SAIB
BW - SA - 6SAIB
BW - SA - 8ACH
BW - SA - AAMC
BW - Tas
BW - Tas - 1ACH
BW - Tas - 1TIB
BW - Tas - 1TMI
BW - Tas - 2TB
BW - Tas - 2TIB
BW - Tas - 3ACH
BW - Tas - 8ACH
BW - Vic
BW - Vic - 1VMI
BW - Vic - 2ACH
BW - Vic - 2VMR
BW - Vic - 3VB
BW - Vic - 4ACH
BW - Vic - 4VIB
BW - Vic - 5VMR
BW - Vic - 6ACH
BW - Vic - AAMC
BW - Vic - Scot H
BW - WA
BW - WA - 1WAMI
BW - WA - 2ACH
BW - WA - 2WAMI
BW - WA - 3WAB
BW - WA - 4ACH
BW - WA - 4WAMI
BW - WA - 5WAMI
BW - WA - 6WAMI
BW - WA - 8ACH
BW Gen - Campaign
BW Gen - Soldiers
BW General
Cavalry - General
Diary - Schramm
Egypt - Heliopolis
Egypt - Mena
Gen - Ataturk Pk, CNB
Gen - Australia
Gen - Legends
Gen - Query Club
Gen - St - NSW
Gen - St - Qld
Gen - St - SA
Gen - St - Tas
Gen - St - Vic
Gen - St - WA
Gm - German Items
Gm - Bk - 605 MGC
GW - 11 Nov 1918
GW - Atrocities
GW - August 1914
GW - Biographies
GW - Propaganda
GW - Spies
GW - We forgot
Militia 1899-1920
Militia - Area Officers
Militia - Inf - Infantry
Militia - Inf - 1IB
Militia - Inf - 2IB
Militia - Inf - 3IB
Militia - Inf - NSW
Militia - Inf - Qld
Militia - Inf - SA
Militia - Inf - Tas
Militia - Inf - Vic
Militia - Inf - WA
Militia - K.E.Horse
Militia - LH
Militia - LH - Regts
Militia - LH - 1LHB
Militia - LH - 2LHB
Militia - LH - 3LHB
Militia - LH - 4LHB
Militia - LH - 5LHB
Militia - LH - 6LHB
Militia - LHN - NSW
Militia - LHN - 1/7/1
Militia - LHN - 2/9/6
Militia - LHN - 3/11/7
Militia - LHN - 4/6/16
Militia - LHN - 5/4/15
Militia - LHN - 6/5/12
Militia - LHN - 28
Militia - LHQ - Qld
Militia - LHQ - 13/2
Militia - LHQ - 14/3/11
Militia - LHQ - 15/1/5
Militia - LHQ - 27/14
Militia - LHS - SA
Militia - LHS - 16/22/3
Militia - LHS - 17/23/18
Militia - LHS - 24/9
Militia - LHT - Tas
Militia - LHT - 12/26
Militia - LHV - Vic
Militia - LHV - 7/15/20
Militia - LHV - 8/16/8
Militia - LHV - 9/19
Militia - LHV - 10/13
Militia - LHV - 11/20/4
Militia - LHV - 19/17
Militia - LHV - 29
Militia - LHW - WA
Militia - LHW-18/25/10
Militia - Military Orders
Militia - Misc
MilitiaRC - Rifle Clubs
MilitiaRC - NSW
MilitiaRC - NT
MilitiaRC - Qld
MilitiaRC - SA
MilitiaRC - Tas
MilitiaRC - Vic
MilitiaRC - WA
Militiaz - New Zealand
Tk - Turkish Items
Tk - Army
Tk - Bks - Books
Tk - Bks - 1/33IR
Tk - Bks - 27th IR
Tk - Bks - Air Force
Tk - Bks - Yildirim
Tk - POWs
Wp - Weapons
Wp - Hotchkiss Cav
Wp - Hotchkiss PMG
Blog Tools
Edit your Blog
Build a Blog
RSS Feed
View Profile
Open Community
Post to this Blog
Site Index
Education Centre
LH Militia
Boer War
Transport Ships
LH Battles
ALH - Units
ALH - General
Aboriginal Light H
Weapons
Ottoman Sources

"At a mile distant their thousand hooves were stuttering thunder, coming at a rate that frightened a man - they were an awe inspiring sight, galloping through the red haze - knee to knee and horse to horse - the dying sun glinting on bayonet points..." Trooper Ion Idriess

The Australian Light Horse Studies Centre aims to present an accurate history as chroniclers of early Australian military developments from 1899 to 1920.

The Australian Light Horse Studies Centre site holds over 12,000 entries and is growing daily.

Contact: Australian Light Horse Studies Centre

Let us hear your story: You can tell your story, make a comment or ask for help on our Australian Light Horse Studies Centre Forum called:

Desert Column Forum

WARNING: This site contains: names, information and images of deceased people; and, language which may be considered inappropriate today.

Thursday, 16 October 2008
The Battle of Beersheba, Palestine, 31 October 1917, The Fife and Forfar Yeomanry Account
Topic: BatzP - Beersheba

The Battle of Beersheba

Palestine, 31 October 1917

The Fife and Forfar Yeomanry Account


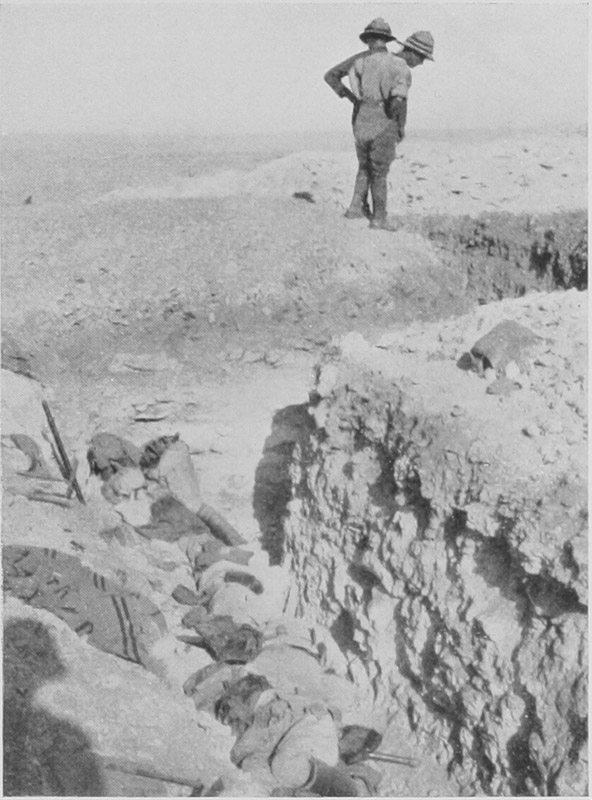
Turkish trench with dead Turks. Hill 1070, near Beersheba

[From: Ogilvie, The Fife and Forfar Yeomanry, plate facing p. 62.]


At the conclusion of the war, Major D Douglas Ogilvie produced a book about the The Fife and Forfar Yeomanry from a mixture of the Official Diaries and a personal diary maintained by Lieutenant Colonel J. Younger, a former CO of the Battalion. The subsequent book published in London, 1921, The Fife and Forfar Yeomanry and 14th (F. & F. Yeo.) Battn. R.H. 1914-1919, included a section specifically related to the battle of Beersheba and is extracted below.  


Ogilvie, DD, The Fife and Forfar Yeomanry and 14th (F. & F. Yeo.) Battn. R.H. 1914-1919, (London 1921), pp. 60-6:


[60] At the moment of kicking off we were as well trained as we were ever likely to be, and, what is more important, were very fit and full of the offensive spirit. The concentration started on 25th October, when we marched some six miles to Abu Sitta. Our transport establishment had been very carefully thought out, and, though both animals and vehicles were undoubtedly overloaded at the start, this soon rectified itself, as consumable stores could not be replaced. We had one camel per battalion for officers' mess, and he started out very fully laden. He was a good deal less heavily loaded towards the end of the operations. Next day we marched on beyond the Wadi at Gamli—a very dusty and tiresome march—and were to have remained there throughout the next day. Word came in, however, that the Turk was attacking our outpost line at El Buggar, some ten miles out, and the Battalion had to move off [61] at a moment's notice about noon. The march through the heat of the afternoon was most trying, and on arrival it was found the enemy were occupying part of the line we were to take up. They withdrew, however, in the evening, and we constructed a series of strong posts from the Beersheba road to south of El Buggar.

During these days of concentration the plain lying between Shellal and Beersheba had been the scene of great activities. Karm had been selected as the position for a forward supply dump, and both light and broad gauge railways were being pushed out towards it at top speed. The first blow of the campaign was to be launched at the defences of Beersheba, which were facing west and extended both north and south of the Wadi Saba. They occupied a commanding position and were continuously wired. The main attack was to be pushed home south of the Wadi Saba by the 74th and 60th Divisions, and at the same time the enemy's extreme left flank was to be turned by the cavalry, who were to make a wide detour through very difficult and waterless country and attack Beersheba from the east, and, if possible, cut off the retreat of the garrison of the Beersheba area. Covering all these preparations an outpost line was established some miles east of Karm and El Buggar, held on the left by the 53rd Division, then the 74th Division, then the Imperial Camel Corps, and, south of [62] the Wadi Saba, where it was much more lightly held, a mere line of cavalry observation posts. These cavalry posts were covering, and slightly in advance of, the positions selected for battle headquarters for the 74th and 60th Divisions.

The preliminary arrangements for the troop movements went like clockwork, as did also the approach marches to the positions of deployment, and at the appointed time on 30th October, the Divisional H.Q. moved up the five or six miles to the battle stations selected. There was no sign of crowding or confusion—the only indication that there was anything unusual on, was the dust which could be seen here and there. The moves of the infantry began just as it was getting dusk, and long before dawn both the 60th and 74th Divisions had their two brigades on the line of deployment, which stretched southwards some three or four miles from the Wadi Saba.

As soon as it was daylight a bombardment of the Turkish advanced position on Hill 1070 was started, smothering the entire landscape in clouds of dust. This first attack, which was carried through by one of the brigades of the 60th Division, was ordered at 8.30 A.M. Hill 1070 was carried at 8.45, and during the next hour all the remaining advanced positions fell, and it was even reported that the enemy was here and there evacuating portions of his main line. There was now another interval for [63] bombardment, whilst the gunners were wire-cutting for the attack on the main positions. During this period of waiting, which was longer than had been expected, our infantry suffered a good deal from shelling, much of which was in enfilade from positions north of the Wadi, and it was with relief that they received the order about 12.15 to proceed with the main attack. In about forty minutes all the trenches opposite the 60th Division were captured, and the 74th completed their task only about twenty minutes later, one brigade having had some difficulty owing to incomplete wire-cutting. The 60th had, by 2 P.M., advanced some way beyond the captured trenches towards Beersheba, and the 74th crossed the Wadi Saba and cleared the trenches northward to the barrier on the Fara-Beersheba road.

Meantime the cavalry had found their detour even lengthier than had been expected, with the result that they were some hours later than they should have been, and were held up for most of the day by trenches at Tel-el-Saba, a mile or more east of Beersheba proper. These were, however, rushed towards evening, and Beersheba was occupied that night. Very few of the troops allotted for the defence of Beersheba escaped, the whole operation being completely successful. The Engineers at first reported that the water supply and wells were intact; but this proved to be far from the fact, and within forty-eight [64] hours the shortage of water was being severely felt. After this smashing success in the first stage of operations all our tails were well up, and everyone was keen to know what was to be the next move.

The next day found the 60th concentrated at Beersheba; the 74th just north of the barrier on the Fara-Beersheba road, while an advance northward had been begun by the 53rd and, in the evening, by a party of the 74th. One brigade group for the former advanced in a northerly direction west of Ain Kohleh, and the remainder in a north-westerly direction on Kuweilfeh. The left advance was successful, and a line was established on the desired objective, a ridge running east and west some five or six miles north of Beersheba. The other advance was not so fortunate; something went wrong with the supplies both of water and ammunition, and strong opposition was encountered. Also, it was impossible country to campaign in; practically roadless, and very much broken up with wadis and rocky precipices, which made it most difficult to maintain communications, even though a mounted brigade was thrown in to help.

The situation up here was much the same next day. No great progress had been made, nor were good communications established, but they had managed to get through both water and ammunition. Other divisions were, however, [65] kept on the move. The 74th were moved up to take over some line from the left of the 53rd, the 60th were concentrated some three miles N.W. of Beersheba, and one brigade of the 10th was moved to Irgeig. This was an anxious day, as the 53rd seemed to be quite held up at Kuweilfeh and not too well provided with supplies, and there was considerable doubt, in view of the general scarcity of water, whether it would be possible to carry on the campaign, which involved rolling up the Sheria and Kuwauka defences from the east.

Our Intelligence Department had for the moment "lost" a Turkish division, which complicated the situation very much as, if it were suddenly to appear on the right flank of our attack on Sheria, a most serious situation would be created. However, on the afternoon of the 5th, word was received from the 53rd Division that they had captured prisoners from numerous different battalions, some of which were known to belong to the missing division. This settled the question, as it was quite clear that the 53rd were keeping them too busy at Kuweilfeh for them to be able to send any serious force to Sheria. The "lost" division it seems was one which had been sent to reinforce the forces defending Beersheba, but by the time it got to Sheria the Beersheba defences were taken, and it was obviously no use going there. It was accordingly then sent to Kuweilfeh [66] in anticipation of an attempt by us to turn their extreme left flank.

 
Further Reading:

The Battle of Beersheba, Palestine, 31 October 1917

Australian and New Zealand Roll of Honour

Battles where Australians fought, 1899-1920


Citation: The Battle of Beersheba, Palestine, 31 October 1917, The Fife and Forfar Yeomanry Account

Posted by Project Leader at 10:22 AM EADT
Updated: Tuesday, 6 October 2009 11:40 AM EADT

View Latest Entries

Full Site Index


powered by FreeFind
Let us hear your story: You can tell your story, make a comment or ask for help on our forum.

Desert Column Forum

A note on copyright

The Australian Light Horse Studies Centre is a not for profit and non profit group whose sole aim is to write the early history of the Australian Light Horse from 1900 - 1920. It is privately funded and the information is provided by the individuals within the group and while permission for the use of the material has been given for this site for these items by various donors, the residual and actual copyright for these items, should there be any, resides exclusively with the donors. The information on this site is freely available for private research use only and if used as such, should be appropriately acknowledged. To assist in this process, each item has a citation attached at the bottom for referencing purposes.

Please Note: No express or implied permission is given for commercial use of the information contained within this site.

A note to copyright holders

The Australian Light Horse Studies Centre has made every endeavour to contact copyright holders of material digitised for this blog and website and where appropriate, permission is still being sought for these items. Where replies were not received, or where the copyright owner has not been able to be traced, or where the permission is still being sought, the Australian Light Horse Studies Centre has decided, in good faith, to proceed with digitisation and publication. Australian Light Horse Studies Centre would be happy to hear from copyright owners at any time to discuss usage of this item.

Contact

Australian Light Horse Studies Centre

eXTReMe Tracker