


Topic: BatzJ - Es Salt
11th Light Horse Regiment, AIF account about its participartion within the Second Es Salt Raid
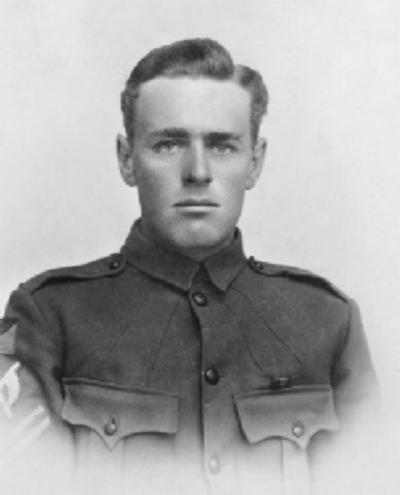
97 Corporal Roger Horatis Lyall Bligh, DCM.
[From: AWM P03265.001]
Ernest W. Hammond, in 1984, produced the unit history for the 11th LHR called the History of the 11th Light Horse Regiment, Fourth Light Horse Brigade, Australian Imperial Forces, war 1914-1919, which included a section specifically related to Second Es Salt Raid and is extracted below.
Hammond, EW, History of the 11th Light Horse Regiment, Fourth Light Horse Brigade, Australian Imperial Forces, war 1914-1919, (Singapore 1984), pp. 108 - 119:
CHAPTER XVI.
JORDAN VALLEY ENGAGEMENTS
Late in March, 1918, a British force comprising the Anzac Mounted Division, the 1st, 2nd and 4th Battalions of the Camel Brigade, the 60th Division of Infantry, the New Zealanders, and other details, crossed the River Jordan and raided the Turkish strongholds in the towns of Es Salt and Amman, nestling in the mountains of Gilead and Moab. The weather at that time was extremely bad, and besides the expedition was fraught with many unforeseen difficulties regarding the transportation of guns and supplies, to say nothing of the fact that our troops were outnumbered to an alarming degree, and in this respect the Turks on the western side of the Jordan, at Nablus, played an important part. The fighting at Es Salt and Amman was scarcely under way before strong detachments of enemy reinforcements were rushed over from the Nablus area, crossing the Jordan at the Jisr ed Damieh bridge, and, following a well defined track across the hills, poured into Es Salt, where our troops suffered many casualties and hardships in the subsequent withdrawal.
On 20th April the Commander-in-Chief's plans for a second raid into Gilead became known. General Allenby's scheme was an ambitious one, directed at gaining control of a large area east of the Jordan, which would mean the isolation and capture of approximately 7,000 Turks said to be in that sector. This history is not concerned with the story of the operation as a whole, but must confine itself to that phase of the battle in which the 11th Regiment played an important and active part.
The 3rd Light Horse Brigade, under the command of General L. C. Wilson, was to move along the Damieh-Es Salt track and ride with all speed on the town of Es Salt and effect its capture. It was estimated that there was a force of 5,000 Turks in the Nablus sector, west of the Jordan, and to prevent reinforcements being sent across to Es Salt, as was done in the last raid, it was decided to seize the Damieh Crossing, deny its use to the enemy, and plant a force astride the road to Es Salt. This task was allotted to General Grant's 4th Light Horse Brigade, which was ordered to gallop up the valley on the eastern side of the river at dawn on the morning of the 30th and to take up the position outlined above.
On the evening of April 27th, the lath Regiment, with other unit; of the 4th Brigade, moved to a bivouac area near Jericho, and preparations were made for the coming offensive. On the 28th steel helmets were issued to all ranks, this being the first occasion on which they were used by this Regiment. That night voluntary - Church parades were held for all denominations, and these undisguised "eve of battle" services lent solemnity to the occasion. The 29th passed gaiety, the men and horses resting as much as possible, and at 7.30 p.m. the Regiment mounted and moving quietly down to the Jordan, crossed the pontoon bridge at Ghoraniye. After assembling on the eastern bank of the ricer, we passed through the wire defences and bivouacked on the outpost line. Here we rested for two hours, and with a fine disregard for the future, immediate or otherwise, the troopers flung themselves down at their horses' feet and were soon fast asleep.
IG-GOR-EE FLAT.
There is an expression in the Arabic language which sounds as near as possible to the arrangement of English syllables shown in the first word of this sub-title. Its English equivalent is "go quickly" or colloquially "hurry up," The Australian soldier ranks high as a nomenclator and the scene of the action in which we are now to take part was for ever afterward, unofficially known as "Ig-gor-ee Flat." Whether or not the scene of the battle was aptly named shall be left to the judgment of the reader.
At 3 a.m. the camp was astir, and mounting we rode forward. From here to our objective-the Damieh Crossing-is 15 miles, and that distance must be covered as silently and as quickly as possible. The plain, which is five miles wide at its southern boundary, is narrowed down to three miles opposite the Damieh bridge by the encroachment of the mountains in the east and a series of low mud hills on the river bank. As, we advanced we encountered patches of scrub and clumps of low bushes but after travelling a distance of three miles the trees and shrubs disappeared and we rode on to open clay flats and low ridges broken up by numerous small wadis. The pace was quickened from a walk to a trot, and as day broke over the valley we were revealed to the Turkish gunners on "Red Hill," a prominence on the river on our left, which dominated that section of the plain. The whole brigade now moved at a steady hand gallop in open formation, and very soon shrapnel shells began to burst over the lines of galloping horsemen. One of the first shells fired wounded General Grant's horse, but he quickly changed to another mount. As we came through the bottle-neck formation opposite "Red Hill," and thus drew clover to the enemy, his machine guns and rifles came into action, but the pace saved us from serious casualties. After passing "Red Hill" the screen of the 11th captured a Turkish officer and two other ranks who were apparently the rearguard of a party which had been patrolling the plain and were unable to escape. A mile further on we encountered a detachment of Turkish Cavalry, which fled in disorder towards the hills. At this time the Regiment drew rein, falling back into supports, whilst the 4th Regiment acted as advance guard. Nursing our horses over the rough and broken ground now encountered, we moved at an easier gait and finally arrived at our objective at 7.30 a.m. That race along the valley of the Jordan in the early hours of 30th April was perhaps this Regiment's most striking example of "running the gauntlet," and in reference to the gallop the official historian says: "The safety of galloping horses in open formation under shell-fire was never more strikingly demonstrated. In the long gallop only six men were killed and seventeen wounded."
After halting for a few minutes on the Damieh-Es Salt road, during which time the telephone lines were destroyed, the Regiment pushed on a further two miles to the Wadi Nahr Zerka, where the horses were watered. We came upon a large Bedouin encampment in the bed of the wadi and found that the male members of the tribe were armed with rifles of English and German pattern, and that they carried a plentiful supply of ammunition. We had heard stories of the ghoulish tendencies of the wandering tribes of Bedouins and Arabs east of the Jordan, and could well believe that many of these murderous looking individuals were qualified for the role.
When we arrived numbers of them were standing in the water holes, filling their goatskin water bags and polluting the small stream unnecessarily. Our men ordered them out of the stream, and as they came to the banks booted them unceremoniously until they slunk off to their camp. Despite this treatment, or perhaps because of it, they showed no signs of hostility towards us, which was fortunate-for them.
During the race up the valley, a mule loaded with signalling gear was wounded by shrapnel, and realising that the valuable equipment must not be abandoned, Sergeant Kempster and Signallers D. Ryan and T. Darcy, acting with great presence of mind, galloped after and captured a spare pack animal that had broken away from one of the brigade sections and was running free on the plain. The packs were changed under intense gunfire, and at the gallop the party overhauled and rejoined its unit. It was a commendable job carried out smartly without the loss of a single article of the equipment.
Incidentally, the blue mule, which had been with the Regiment more than two years and had become a familiar and likeable animal, wandered slowly back to the base camp at Jericho, where a kindly bullet, fired by a veterinary officer, ended its suffering.
At 8.30, the watering of the horses having been completed, "B" Squadron of the Regiment, under Major Costello, was sent to reconnoitre towards the river with instructions to engage the enemy holding the bridge head at Damieh if that were found expedient. A strong force was holding the bridge and the slender line of the squadron was unable to approach nearer than a distance of 2,000 yards. There was much enemy activity at the crossing, and on the slopes beyond the river where detachments of cavalry and infantry could be seen hurrying down to the bridge. Quite suddenly a mixed force of cavalry and infantry, numbering 500, crossed the river and moving northwards through the broken country vigorously attacked the right flank of Major Costello's force. Two troops from "A" Squadron were rushed in to strengthen the line, but the attack on the flank threatened to develop into an enveloping movement and Major Costello decided to withdraw his force eastward while still keeping the enemy engaged. The movement was carried out successfully, our force gaining touch with the left flank of the 4th Regiment, and the combined force checked the enemy advance.
At 1 o'clock the remainder of the Regiment was ordered to return and take up a position on the Damieh-Es Salt road, and while doing so were shelled by the enemy continuously for a distance of two miles. The Brigade now formed a "half-moon" position, with both flanks resting in the foothills and its segment bisecting the Es Salt road on some rising ground. Orders were issued that the men should entrench themselves and build sangars. "B" Squadron was relieved during the afternoon, and rejoining the Regiment remained in reserve. The night outpost line was occupied by "C" Squadron under Major Munro, and patrols were pushed forward towards the river. "A" Squadron, under Major Loynes, occupied the main defence line.
Meanwhile General Wilson's 3rd Brigade had climbed the goat tracks, leading their horses, bound for Es Salt, and every man of the 4th Brigade was conscious of the importance of preventing enemy reinforcements from crossing the hills in their wake.
Late in the afternoon Colonel Bailey, commanding officer of the Regiment, rode through his line inspecting the various posts, and in summing up he informed brigade that the Regiment's position was anything but satisfactory. Early next morning he reported the massing of Germans and Turks at the bridge head and other signs of an impending attack. At that time the brigadier and the commanding officers of other units engaged could not see eye to eye with our commander, but subsequent events rapidly proved his judgment to be correct.
The night of the 30th passed quietly, but at 6 a.m. on the morning of the 1st of May a force of 1,500 Turks attacked a squadron of the 1st Light Horse Regiment near Red Hill, and "B" Squadron of this Regiment under Major Costello was sent to reinforce them. At 7 o'clock our outposts and patrols had fallen back on the main body, reporting decisive movements of enemy troops and that the enemy appeared to be massing at the bridge head preparatory to an attack. At 8 o'clock his artillery went into action and effectively shelled our guns and pack animals. Simultaneously his infantry attacked our line in extended formation in successive waves, and deploying to his right threatened to envelop our left flank. The total enemy force engaged was estimated at 5,000, whilst the 4th Brigade had not more than 800 rifles available for the firing line. The situation was extremely tense and uncomfortable. Every available man was rushed into the firing line. Details from regimental headquarters were formed into a troop to strengthen the left flank. Horseholders took over eight horses each, the practice under ordinary conditions being one man to four horses. Two armoured cars attached to the brigade came into action and one was immediately destroyed by a direct hit from a shell. The other poured a steady stream of fire into the advancing Turks and accounted for many casualties. Our troops at Red Hill were overwhelmed and swept from their position. A message was received from the 12th Regiment that they intended to withdraw from their position to high ground further east, a very necessary move, and that a dismounted rearguard action was being fought. As soon as the 12th completed the movement, the 11th began to retire to conform to the new line. A desperate rearguard action was fought in which the enemy paid dearly for every yard of ground he gained. Whilst the action was at its height, Major Costello, who had led "B" Squadron to the relief of Red Hill, noticed the manner in which the attack was developing, and moving his squadron northwards he engaged the right rear flank of the enemy. This movement was carried out smartly and fearlessly, and though tempered with risk was regarded as a masterpiece of strategy and fulfilled the purpose of its intention-that of easing the pressure on the Regiment's front to enable the main body to withdraw more readily and with less risk of casualties. Eventually the complete withdrawal was accomplished, but not without much hard riding over country that would test the nerve and ability of any horseman.
Major Costello was specially mentioned in despatches for his brilliant field work that day and for the fearless manner in which he led his squadron. He was recommended for the Military Cross. During the engagements Signal Corporal Bligh carried despatches to "B" Squadron under heavy fire across open ground, and although wounded he completed his task, showing great courage and endurance. For this action he was awarded the Distinguished Conduct Medal. Trooper Kirwan was mentioned in despatches for good work and devotion to duty during the engagement, he having carried despatches under fire. Various positions were occupied by the Regiment along the foothills to check the onward rush of the enemy, and on one occasion Major Loynes collected a few men from Regimental Headquarters, who, armed with rifles and one Hotchkiss gun, delayed the enemy advance in that sector for about fifteen minutes. Eventually the Regiment took up a line on a ridge studded with rocky outcrops on the southern bank of the Wadi Abyad, and situated about one mile north of the Umm es Shert - Es Salt road, and here at 12 noon we commenced to establish a definite line of resistance by building sangars and otherwise consolidating the position.
The Es Shert road was now the only one available to the 3rd Brigade in its return to the valley from the Es Salt raid, and there was therefore a deep significance in the Divisional Commander's order that we must hold our present line at all costs. During the afternoon our position was heavily shelled and the Turkish machine guns played a "devil's tattoo" on the rocky defences along the whole of our line. Directly to our front, between the opposing lines, and 300 yards away, there was an isolated fiat-topped hill known as "Table Top," which rose abruptly from the northern bank of the wadi. Its sides were steep but not precipitous, and its isolation prevented it from becoming an integral part of either of the opposing lines. We could not afford to place a strong force on "Table Top" to be directly and openly exposed to the enemy guns, and on the other hand the use of a valuable spring of water at its southern base would be denied to us should the enemy occupy ii. A small force well placed on its summit we reasoned might readily deter the boldest enemy from attempting to storm its heights, and accordingly it was occupied by two troops, one from the 4th Regiment under Lieutenant W. J. Birkett-Vipont and a troop of twenty men of "C" Squadron of this Regiment under Lieutenant L. A. Gordon. The enemy was active throughout the day, and at 4 p.m. a force of about 300 strong, assisted by machine guns on either flank, made a vigorous attack at Table Top. Shortly after the attack commenced a troop from "A" Squadron, under Lieutenant P. McCowan, was sent in to reinforce the position. They had scarcely reached the top when the enemy, creeping up the opposite slopes, rushed the summit, determined to sweep all before him by sheer weight of numbers. As he came into the open our men poured a steady stream of fire into his ranks, and before he could re-form the Light Horsemen leapt from cover and routed him with the bayonet. In a few moments the Turks reorganised and returned to the attack with renewed vigour and fresh reinforcements, but once more he was driven off by a magnificent bayonet charge that almost carried the victors down the north western slope. The enemy left behind more than 100 dead and wounded, grim evidence of the fierce fighting that took place. Both of our officers were wounded but remained on duty. In a short time the enemy came back to the attack for the third time, and being armed with a plentiful supply of hand grenades he succeeded in bombing our men from their position, and our force retired, taking their wounded with them. An extract from Col Bailey’s field report, commenting on the fighting at Table Top, reads:-
"Lieutenant Gordon did magnificent work, showing coolness and determination throughout. Lieutenant McCowan fought brilliantly in a hand-to-hand with the enemy. His work was splendid. Though heavily outnumbered every NCO and man played his part courageously."
The Commonwealth Official Historian refers to the incident in the following terms:
"On the afternoon of the 2nd the enemy heavily assaulted the position (Table Top) under effective covering fire. Twice the stormers reached within bombing distance of the Australians; each time the Light Horsemen advanced and met them with the bayonet in the open, and they were driven off leaving about 100 dead and wounded on the slope. But the third rush was irresistible: the Light Horsemen were forced from their posts and retreated slowly, bearing their wounded. The Australian machine guns then came into play and cut down the Turks in large numbers. One party of 40 was completely wiped out. This little enemy success denied a valuable spring of water to Grant's men, and afterwards the supply ran short and the troops suffered acutely in the intense heat."
Lieutenants Gordon and McCowan were awarded the Military Cross for their gallant conduct and the fearless manner in which they led their men throughout the engagement. During the attack Sergeant George W. Smith was sent in with a troop to reinforce the defenders of Table Top; and he led his troop with dash and determination in a bayonet charge against the enemy. He was awarded the Military Medal for this action. Lance-Corporal C. W. S. Cooper, armed with a Hotchkiss gun, was very prominent in the fighting and accounted for a great number of the enemy. Although hard pressed by the Turks at close range he held his ground until his last round was spent. For his coolness, initiative and daring he was awarded the Distinguished Conduct Medal.
Reporting on the engagement afterwards, Lieutenant McCowan and Lieutenant Gordon both referred in glowing terms to the magnificent courage displayed by every man under their command who clambered up the slopes of "Table Top" on that sweltering afternoon.
Flushed with the ultimate success of their raid on "Table Top," the Turks swarmed over the plateau in full possession, but their triumph was short lived. As soon as our men had rejoined the main body, we opened fire with machine guns and rifles, transforming the plateau into a veritable hell, and presently the enemy deserted the crest and took cover behind boulders on the sloping sides. Throughout the following day our position was heavily shelled, and it was found impossible to water the horses until after darkness had set in. Late that night our horses were withdrawn and hidden in wadis out of range of the Turkish guns.
At 3 o'clock on the morning of the 3rd there was a general "stand to" throughout our line, as we fully expected an attack, but ft did not develop beyond a small and somewhat abortive skirmish on our left, which was quickly quelled by the 12th Light Horse Regiment and a section of machine guns from this Regiment.
At 6 o'clock the leading troops of the 3rd Brigade which had been operating at Es halt, came into view over the crest of the hill at our right flank rear and began their slow and tedious descent to the valley below. We enjoyed some measure of satisfaction in the knowledge chart the purpose of our wild ride across "Ig-gor-ee Flat" had been fulfilled. We had kept faith with our robbers of the 3rd Brigade by giving them safe conduct down the Umm es Shert road, the only one now open to troops retiring from the Es Salt area.
At 8 a.m. great activity was reported in the enemy lines in the vicinity of Table Top, Red Hill and Damieh bridge head, and large parties of troops began massing in the wadis east and north-east of Table Top. An hour later the enemy opened fire with shrapnel and high explosive shells, the marksmanship being excellent. One shell landed in the centre of our forward dressing station, wounding nine other ranks, including the whole of the medical personnel excepting Capt. Murray, medical officer, and one medical orderly. Inspired by the splendid example of their leader, Captain C. W. Murray, medical officer, the men of the A.A.M.C. worked tirelessly throughout the engagement, and it was regrettable that they should meet with disaster in the eleventh hour, or what might be aptly termed "the moment of victory."
The shelling continued without abatement for some time, and when it did finally slacken the enemy machine guns and rifles came into action. At 10 o'clock we heard heavy fighting on the right and were informed by the 4th Regiment that the enemy was attacking their advanced squadron, which was being recalled from its isolated position. "C" Squadron of the 11th Regiment, under the command of Major Munro, was in touch with the 4th Squadron mentioned above, and therefore had to retire also. In doing so they carne under the fire of machine guns On the eastern slope of Table Top and Major Munro and Lieutenant Hiron were both severely wounded.
Lieutenant Gordon then took charge of "C" Squadron and the movement, was completed, Before Major Munro was wounded he appealed for artillery fire to silence a particular machine gun on Table Top which was harassing his retirement. The message was flashed from the squadron to Regimental Headquarters, and from there to brigade, and in less than three minutes our artillery went into action, its shells screeching low over our heads as they peppered the slopes of Table Top. Those of us who had read the message as it passed through marked the position of the bursting shells with interest, and ere long the offending machine gun became ominously quiet. A forward observation post reported a direct hit.
After a time the attack slackened somewhat, although reports continued to arrive stating that the Turks were massing north-east of Table Top. As stated previously, our venture up the valley had fulfilled its purpose and nothing now remained but that we should withdraw as quickly and as secretly as possible. Meanwhile, Lieutenants Farlow and Bartlam had brought the horses to a wadi close to the firing line and the withdrawal began. Major Loynes, Captain Gee and Lieutenant Barton remained with a small party to cover the retirement. Before leaving the line each man was issued with bombs in case the enemy decided on a last minute rush, for he, too, must surely guess at our retirement. Happily enough the bombs were not required that night and the retirement was executed without a casualty, the Regiment arriving at its bivouac area near Jericho at 3.30 a.m.
For conspicuous service during the engagement the undermentioned officers and N.C.O.'s received a special mention in the Commander-in-Chief's despatch:
Captain C. P. Stumm, M.C.
Lieutenant C. J. Clifford, M.C.
Lieutenant A. Y. Bartlam.
Corporal C. W. W. Grieve.
Corporal F. W. Robinson.
In commenting upon the critical stage of the battle on the 1st of May, the Official Historian says: "It was a grim race between Turks marching on the level plain and the men leading (and alternately riding) their horses on the heights. Twice Bailey (Colonel Bailey, officer commanding 11th Regiment) was forced from his ground, but each time, with the assistance of the horses he succeeded in breaking clear of the confident enemy thousands, and in taking tip a fresh position. In these movements he was supported by part of the 12th Regiment in the lower hills. As he was driven to a position in the foothills almost due east of Red Hill, with his left extending towards the river, the men retiring along the side of the range began to emerge to his assistance. A strong firing line, rapidly built up, checked the advance and saved the day."
We were not always fortunate enough to hear an expression of the enemy's point of view of a particular “scrap," and were therefore keenly interested in the remarks of a Turkish officer captured at Nazareth some time later. Referring to this engagement in the Jordan Valley he said: "You know we were sure that we would capture or destroy your whole force in the Jordan Valley in May. We had seen the Australian horses many times; we knew they were big, and our German officers told us they were clumsy and could not travel in rough country, but," he added ruefully, "you Australians rode your `big' horses where Turkish soldiers could not walk."
The Turkish officer's eulogy applied to both horse and rider, but the Light Horseman will tell you that his success at all times depended largely upon the faithful mount that never once failed to respond gallantly despite the terrors and rigours of a hard campaign.
The following is an extract of a letter of appreciation received from the General Officer commanding the Australian Mounted Division on the recent fighting:
"On conclusion of recent operations, I wish to place on record the fine performance of the 4th Brigade from start to finish. The rapid advance in the first instance was of paramount importance and was carried out with exceptional dash and spirit, thereby enabling the objective to be reached without much trouble. The skill and energy shown by leaders in holding a long line with comparatively few troops, the keenness and determination of all ranks to seize every opportunity to make captures and inflict loss to the enemy, kept them at a respectful distance, and no doubt helped in a very difficult operation of withdrawal to he carried through so successfully. "1 thank all ranks for their good work, and fully realise the fatigue and discomfort that the men were put to by moving over long distances on foot, lack of sleep and food, and how cheerfully they all responded.
"(Signed) H. W. HODGSON,
"Major General,
"Commanding Australian Mounted Division."
The succeeding (lay was spent in reorganising the unit, and at 10 p.m., following a report that the enemy had broken through our line west of the Jordan, we saddled our horses in readiness for a ride to the scene of the trouble. After "standing to" for some time we were advised that the enemy had been driven off and we were ordered to return to the bivouac area.
At 5 o'clock on the morning of the 7th, a squadron of enemy aeroplanes, numbering ten, flew over the camp and bombed the Regiment and the whole of the mounted troops in that area. Eventually they were driven off by machine gun and rifle fire, but not before eleven of our men were wounded by bombs and a number of horses were killed or wounded.
The following casualties in personnel and animals were suffered by this Regiment during the operations extending from 29th April, 1918, to 8th May, 1918:
Killed .. .. .. .. 13
Wounded .. .. 68
Wounded and missing .. .. 5
Horses: killed . . 32 and 43 wounded.
The names of those who are mentioned hereunder made the supreme sacrifice:
L/Cpl. J. W. Baxter.
L/Cpl. A. J. Lake.
L/Cpl. C. A. Mausolf.
Trooper W. H. Bain.
Trooper R. Black.
Trooper W. J. Burton.
Trooper H. H. Farlow.
Trooper L. J. P. Golik.
Trooper S. McG. Johnston.
Trooper F. W. Paterson.
Trooper C. Powell.
Trooper J. Waiters.
Trooper T. S. Wright.
Citation: 11th LHR, AIF account about the 2nd Es Salt Raid
