


Topic: Militia - LHN - 3/11/7
AH
Australian Horse
SOUTH AFRICA 1899 to 1902
1st Australian Horse (Boer War) [1899 - 1901]
3rd (Australian Horse) Australian Light Horse [1903 - 1912]
11th (Australian Horse) Australian Light Horse [1912 - 1918]
7th (Australian Horse) Australian Light Horse [1919 - 1935]
7th/21st (Australian Horse) Australian Light Horse [1936-1937]
7th (Australian Horse) Australian Light Horse [1937 - 1942]
7th (Australian Horse) Australian Motor Regiment [1942 - 1943]
7th/21st (Australian Horse) Recce Regiment 1948 - 1937]
7th/21st Australian Horse [1949 - 1957]
![]()
Hearth and Home
Allied with: King Edward's Horse (The King's Overseas Dominions Regiment).
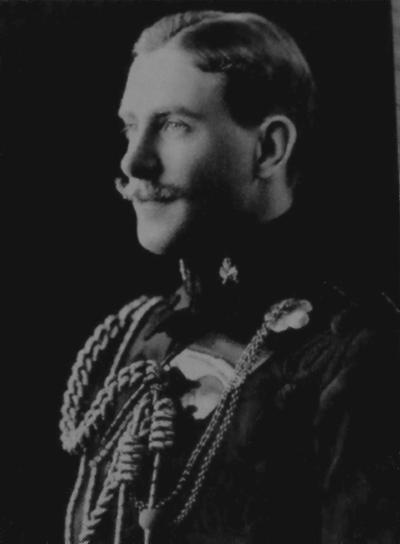
Lieutenant James Banbury Nott Osborne (1878-1934)
[Of "Bowlie" homestead, Gundaroo, Osborne was one of the first two AH officers to serve in South Africa. He is shown above in fill dress in 1902, when he was serving as ADC to the Governor (hence the gold aiguillettes on his right shoulder), wearing; the officers, full dress tunic of mytle green with black lace frogging. From The Boys in Green, p. 13.]
The following article about the 1st Australian Light Horse and the unit's Boer War Service was written by Peter Burness as Chapter 2 in the booklet produced by the Centenary Publications, Harden, August 1997 and produced by Clarion Editions at Binalong called, The Boys in Green - A Centenary History of the 1st Australian Horse and the Light Horse Units of Harden and Murrumburrah, New South Wales, and this extract is from pp. 13 - 21.
Chapter 2
SOUTH AFRICA 1899 - 1902
It is unfortunate that the South African war (1899-1902) has come to be regarded largely as a small, quaint, late Victorian military campaign. In fact it was by any measure a cruel and bitter war of major proportions. In the century before the outbreak of the Great War in 1914 it was the longest, the bloodiest and the costliest war Britain, and her Empire, had engaged in.
Australians were heavily committed during the war. It is estimated that more than 20,000 of them served in the Australian colonial and Commonwealth contingents and in South African irregular units. Despite the fact that it was arguably the third largest war in which Australia has been involved, and that it has been the subject of some very good publications, it remains relatively forgotten.
The very nature of Australia's involvement has discouraged much serious study of the war. Australians served in many units raised under a variety of conditions, circumstances and commands. Australian officers did not hold senior appointments and there was very little direct Australian influence on the conduct of the war. However, some remarkable Australian units, and individuals, saw active service in South Africa. A study of one of these units, the service squadron of the 1st Australian (Volunteer) Horse regiment, consisting of only 143 officers and men, provides an interesting insight into the nature of the war and an Australia response.
The 1st Australian Horse was a regiment of cavalry raised in New South Wales in 1897. It was distinctly Australian in character and composition and was considered to embody all the qualities attributed to the bushmen of the rural districts of Australian. The regiment, initially consisting of four squadrons each of one hundred men, was the creation of James Mackay, a squatter's son, citizen soldier, and Member of Parliament. The towns and districts around Goulburn, Bungendore, Michelago, Braidwood, Cootamundra, Gundagai, Gunnedah, Boggabri, Scone, Mudgee, Rylstone and Quirindi provided the men. "Our recruits are almost entirely young bushmen and they are coming mostly from outside towns - the farmers' sons to a large extent, and, in the pastoral districts, the squatters and station hands", reported Lieutenant Colonel Mackay.
The regiment was raised at the very time that the role of cavalry in modern war was being questioned. Unlike the more familiar regiments of Australian light horse formed after Federation, cavalrymen were trained to fight from horseback with sword, carbine, and sometimes the lance. In 1903 the three mounted regiments in New South Wales, the New South Wales Lancer, the New South Wales Mounted Rifle and the 1st Australian Horse, were each converted to two regiments of light horse.
Service in the Australian Horse was part time and unpaid so social and recreational activities were important inducements to enlistment. Among the attractions that service in the regiment offered were shooting, polo, cricket, football, mounted sports and a smartly made uniform of myrtle green. Following the regiment's first annual encampment during Easter 1898, Major General George French, the commandant of the New South Wales military forces, reported:
Apart from the military point of view, I am informed by persons outside the Force that the formation of this Regiment has had an important social aspect on the stations where there are detachments, bringing masters and men into close intercourse, class prejudice and distrust being supplanted by a feeling of camaraderie and esprit de corps.
All of the partially paid and volunteer regiments serving in New South Wales contributed men to the war in South Africa. However, mounted men were particularly needed so it was the regiments of the Mounted Brigade which were most heavily drawn upon. Although it had only been recently raised, the 1st Australian Horse supplied more men for the war than any other of the pre-war New South Wales regiments, with the exception of the New South Wales Lancers. Of all these regiments it suffered the highest number of casualties.
The Australian troops sent to the Boer war can be considered to have been dispatched in four waves. The first wave, which included the Australian Horse squadron, contained men from the existing regiments in the colonies. These men had some military training in varying degrees. The later waves consisted of contingents specially raised from civilians and dispatched after hasty training. The fourth wave was fortunate in that it was stiffened by many veterans from the earlier contingents returning for further service. The Australian Horse was different from most of the Australian military units because it did contain trained men, although very few were regulars, and it was only small.
During the South African war the Australian Horse regiment provided two contingents of volunteers to maintain one service squadron in the field. The first contingent, the smaller, consisting of two officers and thirty-two other ranks, left Australia from Newcastle on 14 November 1899 and was later joined in South Africa by the second contingent before the battle of Poplar Grove in March 1900. The squadron participated in some of the major battles of the war and the men of the first contingent took part in the actions around Colesberg, the relief of the besieged town of Kimberley, and were present at Paardeberg when the Boer general Pic Cronje and his force of four thousand surrendered.
The Australian Horse and the New South Wales Lancers were the only Australian cavalry regiments to go to South Africa, where they served as squadrons attached to British regiments in the famous Cavalry Division commanded by Lieutenant General John French. Throughout their service they carried both carbines and heavy cavalry swords, the latter "useless except for potato digging". The Lancers also had to carry lances.
On 16 January 1900 a mixed Lancer and Australian Horse patrol under the command of Lieutenant Will Dowling (Australian Horse) was ambushed near Slingersfontein beyond Colesberg. Several men, including the wounded lieutenant, were taken prisoner. Squadron Sergeant Major George Griffin was killed and became the first man from a New South Wales unit to be killed in the war. The news of this first casualty was greeted by a display of public grief and patriotism back in Australia. A memorial tablet bearing the soldier's image was unveiled in the Sydney Town Hall in an impressive public ceremony. Griffin's tablet is still there and his name also appears on the Boer war memorial in his home town, Gundagai.
In January 1900 Field Marshal Lord Roberts arrived at Cape Town to take command of military operations against the Boers. He planned to strike directly at the Boer capitals of Bloemfontein and Pretoria, using Cape Town as his supply port and the northern railway as his main line of communications. His advance, however, would strike across country, relieving the besieged town of Kimberley and drawing the enemy from Cape Colony back to the defence of their homelands. The Cavalry Division was withdrawn from the Colesberg area to play a vital role in the advance on the new front.
On 13 February 1900, after a long train journey and a heavy forty-eight kilometre ride from the Modder River, the cavalry stood outside Kimberley. Two days later they were facing down the valley with the Boers between them and the town. General French acted boldly, ordering a front charge in cavalry style to break the enemy lines. In the face of sword and lance the Boers broke into retreat, sparing heavy casualties on both sides.
The cavalry quickly reorganized after the charge, The Australians had had only a minor role in the action and their horses were still reasonably fresh so they were pushed forward. The Time’s History of the War in South Africa says the first troops to ride into Kimberley were a patrol of the Australian Horse.
Lance Corporal George Firman from Quirindi wrote: “we were they very first troops to enter Kimberley in the relief column, excepting 50 Remington Scouts who acted as guides.”
While some of the British army rested in Kimberley, the Australians were formed into a composite British-Australian cavalry squadron placed under the command of Major E. H. H. Allenby. This thirty-nine-year-old British cavalry officer already had an impressive service record. He was thoroughly professional and impressed many of his Australians with his ability during the next few months. But probably few of them imagined then that this officer would one day hold a field marshal's baton and become one of the famous British leaders of the 1914-18 war.
One of the Australian Horse officers had already been wounded and captured by the Boers. At Kimberley the other officer, Lieutenant James Osborne, left the squadron and was attached to the British 16th Lancers, in which regiment his brother Edwin had been serving when he died in India in 1897. Young Osborne was for a time attached to General French's headquarters.
On 22 February the Australians, as part of the 1st Cavalry Brigade, rode to join the rest of the Cavalry Division who were about thirteen kilometres from Paardeberg Drift where a large Boer force under Cronje had been intercepted and surrounded by a British force which outnumbered him seven to one. On this occasion the wily Boer had been outfought. The cavalry had made their dash into Kimberley and were back to cut him off faster than he had thought possible. Cronje's men were forced to shelter in the river bed where they were attacked and heavily shelled. Trapped and vastly outnumbered, with limited food, their horses and stock killed and with no doctors to tend their sick and wounded, the Boers' morale collapsed. Finally on 27 February Cronje surrendered. It was the first major British victory of the war.
The Australian Horse was represented by only a handful of men in the early actions of the war. In a very short time their horses had been overworked and the numbers of the men themselves reduced by casualties, injury and illness. Only twenty-one of them were still together around Paardeberg when Cronje surrendered. Despite their miserable situation, their reduced numbers and their grudging respect for the defiant Boers, the Australians looked proudly upon their own work, `We boys of the 1st Contingent will be as proud as peacocks when we get back as we were in the Relief of Kimberley and in the capture of Cronje', wrote Corporal Bert Mills of the Australian Horse.
The second Australian Horse contingent consisted of five officers and 104 men. This body, commanded by Captain RR Thompson, reached Cape Town on 24 February 1900. These men were sent up to Modder River station by rail and then rode overland to Osfontein to join the Cavalry Division in time to take part in the battle of Poplar Grove on 7 March. At Osfontein the squadron was attached to the British Royal Scots Greys regiment, and a few days later they were joined by the surviving members of the original contingent. More members of the Australian Horse were present at Popular Grove than at any of the other battles at which the regiment was represented. They suffered one casualty, a man wounded in the head.
The Boers fell back, at Poplar Grove. However, a fortnight later they tried to hold the British advance on Bloemfontein on a line extending from Abrahams' Kraal to Driefontein Farm. The Australian Horse squadron come under heavy fire at the action fought at Driefontein on 10 March. "My word the shot and shell did sing around us today", declared Corporal Mills.
The newly arrived Australian Horse's second contingent was more fortunate than most of the cavalry as its horses were still relatively fresh. AB ('Banjo') Paterson, serving as an Australian war correspondent, reported during the advance on Bloemfontein that:
as we marched up to this camp the First Australian Horse were given the post of honour, right out in the front of the army, ahead of Remington Scouts, ahead of everybody, the nearest men of all to the enemy. They spread out in good style too, theft fresh well-filled-out horses evoking great praise as they swung along with the true Wales stride.
The Boers could not hold the British advance and finally abandoned Bloemfontein to prevent its being fired into. Lord Roberts formally took possession of the town on 13 March. Five officers, 112 other ranks, and only 101 horses of the Australian Horse were present at the entry.
At Bloemfontein the British army halted and rested. The cavalry remained outside the town for over seven weeks although they were called out several times in pursuit of the Boers still active in the district. Captain Thompson heard that some prisoners of war had been found in the local hospital. “To my surprise and pleasure I found Lieutenant Dowling who was taken prisoner six weeks ago at Rensburg. He has lost a thumb, the right one, and the sight of an eye, and his liberty for some time. I took him to camp, to his delight.' Dowling was invalided back to Australia. He transerred to the unattached list after the war and eventually settled at Bringelly, Outside Sydney. He died in 1941. The other original officer, James Osborne, also ended his war service shortly after the entry into Bloemfontein. He fell ill and was invalided to Britain. When he got back to Australia he took up the family property, Bowylie, near Canberra. He died in 1934.
Ruined horses and enteric fever halted the British army in its tracks at Bloemfontein and forced a long delay before the offensive could be resumed. Eventually sickness and disease were to cause more casualties in the army than all of the Boers' bullets or artillery. The horses too were suffering terribly. Those of the Australian Horse had been described as some of the best to be landed in South Africa but between Poplar Grove and Bloemfontein thirty-one were lost.
On 28 March General French ordered some of his cavalry out to a place called The Glen where the Boers were entrenched across the railway. The division was by this time reduced to 650 all ranks because of the shortage of horses. Next day a brief but bitter action was fought during which the Australian Horse was heavily shelled. Trooper Bonnet was hit and killed outright.
The Australians had been badly shaken by the shelling. Shortly after their return to camp the ambulance brought in Bonnet's body wrapped in his pre-war regimental greatcoat. Shoeing-smith J. H. Heazlett wrote:
"Next day we buried poor Bonnor (sic) at Glen Siding, Captain Thompson officiating at the grave. Before he finished he completely broke down, and nearly every soldier in our troop shed a bitter tear over their gallant and luckless comrade."
William Banner and his brother, John, who was alongside him when he was hit, were both stockmen from Rylstone where their family was well known. After the war a monument was erected in the small town to record the sacrifice of Bonnet and three other local men.
Returning to Bloemfontein, the Australians went back into camp. Trooper Harnett noted: “Thompson and staff have tents on the hill, while poor privates are slap in the open and in the wet.” Because the Boers held the waterworks outside the town good water was not available, and this contributed to the wide spread of disease. More than a dozen men of the squadron went into hospital there. The experience impressed itself indelibly on the memory of the suffering soldiers camped with tents and short of supplies in the miserable weeks following the town's capture.
A NCO in the Australian Horse at Bloemfontein was Jack Abbott, the son of Sir Joseph Abbott. Young Abbott was working on a family property when he joined the Scone troop of the regiment shortly before the war. He was a gifted writer and wrote a book, Tommy Cornstalk, about his war experiences. It is still regarded as one of the best published accounts of the war from an Australian soldier's viewpoint. In August 1900 he was commissioned in the Royal Field Artillery but soon afterwards became ill and was invalided home in October.
Of Bloemfontein, Corporal Abbott wrote:
One remembers too well that awful period of waiting at Bloemfontein whilst the army rotted inactive, and the little cemetery under the old fort filled and overflowed; when officer, and comrade, and inferior went down alike before the sickle of the grim reaper - Enteric. There is too sad a memory of the delirious, dying men who babbled, in the close wards, of fag off places where there were peace and love. There is no forgetting the carts that rumbled through the streets loaded with those stiff; blanket-shrouded shapes which had been vigorous men - the dwindling squadrons, the crowded sick-tents, the unfed, unwashed, unhappy men who filled them, will never cease to linger in one's memory.
The dreadful suffering of the soldiers in inadequate and overcrowded hospitals was brought to the attention of the British public by Mr Burdett-Coutts, who was instrumental in having a royal commission appointed to report on the care of sick and wounded in South Africa. In May 1900 he had visited Maitland Hospital near Cape Town where he found twenty-six year old Michael Cummins of the Australian Horse. This soldier had fallen victim to enteric at Bloemfontein and was sent down to Wynberg and then on to Maitland. Here Burdett-Coutts found him in the care of an army sergeant, “not a trained sergeant of the R.A.M.C., but an untrained man, himself recovering from enteric”. Cummings was a young farmer from Michelago who had come to South Africa with his regiment's first contingent. This unfortunate soldier died on 27 June. His suffering was too typical of that endured by many soldiers in South Africa.
In the few months the Australian horse had been in South Africa the squadron had been plunged into hard campaigning and heavy fighting. In a short time their uniforms and equipment were worn out, their horses ruined, and the squadron's numbers depleted through wounds, death and sickness. The horses had been used cruelly and it was often necessary for cavalrymen to do infantry work around Bloemfontein because of the shortage of remounts.
Eighteen year old Geoffrey Harris wrote home:
Out of 120 horses we brought out here there are now only fourteen deft for duty; all the rest have either been killed by shells, like my poor old horse, or died of disease, or have been knocked up and been left behind. About 30 are in the Bloemfontein sick-borne lines with sore backs and other complaints.
Finally in early May remounts arrived as Roberts prepared to resume his offensive by pushing on northwards towards Pretoria.
The Australian Horse marched out of Bloemfontein on 6 May as a distinct squadron of the Royal Scots Greys. Only four days later at Kaalong they suffered casualties and had five men taken prisoner when some of the cavalry squadrons were ambushed while advancing dismounted.
The cavalry went on to Kroonstad before again joining the northwards push.
Captain Thompson was among some men invalided back to Bloemfontein from Kroonstad and command of the squadron passed to Lieutenant PW Vaughan who, before the war, had been a sergeant in the regiment's Braidwood troop. Thompson was sent home to Britain, severing his long association with the cavalry of New South Wales. There was little regret among the Australians about this officer's departure. He had never managed to establish any close rapport between himself and his bushmen and his leadership in South Africa had been criticized. Even as late as 1937 Lieutenant Colonel Donald Cameron, who had served under Thompson, inferred strong criticism of his officer's orders in discussing the Kaalong incident in which he was one of those captured.
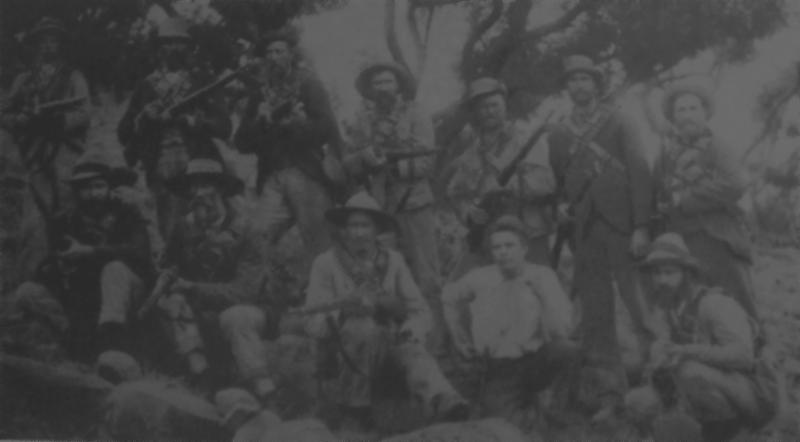
A tough enemy
[The Boer menfolk - fathers and sons often served together - seldom wore any form of uniform. They were not only skilled horsemen and marksmen but were armed with modern weaponry. Many Australians remarked on the similarity of the South African countryside and climate to their own, and adapted quickly to conditions. From The Boys in Green, p. 17.]
Johannesburg fell to the British on 31 May after only token resistance. Forty-five members of the Australian Horse are recorded as having been present at the actions immediately preceding the entry into the town. A few days later Pretoria also fell. French's cavalry were not actively engaged at Pretoria but were sent round the town to Waterval, about twenty-six kilometres away, where the Boers were holding prisoners of war. Among the men released were those of the Australian Horse captured at Kaalong three weeks earlier. Another man, Trooper Wallace Eames, who had been captured with Lieutenant Dowling at Slingersfontein six months earlier, had already escaped overland to Mafeking.
Although there had been no major battles in front of Pretoria, the battle of Diamond Hill fought on 11 and 12 June ensured that the British there would have no rest. Lieutenant Vaughan reported:
We had quite a news experience and one I shall never forget - a camp being shelled. They pumped the shells into us and made things fairly uncomfortable for the time. However our gun horses were harnessed and in the limbers like a shot, and with the Australian Horse, and a troop of the Greys, galloped out into action, the shells falling thick amongst us all the time.
Only thirty-three of the regiment were now still serving at the front. On 23 June they returned to Pretoria and for the first time in six months were accommodated under a solid roof.
After a fortnight's rest the Australian Horse were sent out again patrolling. They were not far away when, on 11 July, some Scots Greys guarding Ziliket's Nek were overrun. The Australians arrived too late on the scene to assist and on their return they were greeted with the sad news that Lieutenant Keith Mackellar had been killed nearby at Derdepoort. This young infantry officer had been attached to the Australian Horse's second contingent and had transferred to the 7th Dragoon Guards in South Africa. His body was brought into Pretoria where Lieutenant Wilkinson and many of the Australian squadron attended the burial. In 1905 the officer's parents, Sir Charles and Lady Mackellar, arranged for his remains to be brought home to Australia to be placed in the family plot at Waverley cemetery in Sydney.
Shortly afterwards, on 23 July, the Australian Horse lost another officer, Lieutenant A Ebsworth, while patrolling near Bronkhorst Spruit. After searching some houses the Australians were told that Boers were approaching. Ebsworth was watching the skyline when he fell back without a sound having been shot through the forehead from long range. The Australians were ordered to retire and the officer's body was recovered later. That evening the men set fire to the grass to provide light to dig their officer's grave. “All our men were very sorry to lose Ebsworth, he was liked by all”, wrote one.
Some days later the Australian Horse was on the march again. However, the squadron's numbers were now so low that it was having difficulty in retaining its identity within the division, One hundred and forty-one officers and men had left Australia (two troopers died at Adelaide en route) in the two contingents. At Driefontein there were still 122 at the front, at Bloemfontein thrice were 117, at Johannesburg there were only 45 lift and at the battle 4f Diamond Hill only 22 all ranks were present. Although numbers occasionally built up as stragglers caught up with the squadron, there was no policy of maintaining the squadron's strength by sending reinforcements from Australia. Some men also responded to appeals for men to serve in police units in the captured territories. Consequently the unit was fading away.
Young trooper Harris, still at the front, wrote to his parents:
I received your letters on the 9th with a lot of others. Mother says she would like to be here to mend my clothes for me. I wish she was. I admit they are pretty ragged. My coat has two buttons on it and my pants have a back door in them. But I would be quite out of place if they were not pretty well worn out. The remounts are a terrible lot of old scrags, they nearly all have sore backs or are lame when we get them.
Harris was a lanky, athletic young man and an accomplished horseman. He served again later as an officer in the Australian Commonwealth Horse. He also fought with the 1st Light Horse regiment in the 1914-18 war and was mentioned in dispatches and awarded the Military Cross. Between 1932 and 1937 he commanded the 7th Light Horse (Australian Horse), the regiment he had originally joined as a trooper.
The Australians rode wearily onwards week after week as the cavalry continued its operations around Barbeton, Carolina and Heidelberg. On 29 October the survivors returned to Pretoria where the Cavalry Division was finally broken up. The Australian Horse squadron was then formed into a column containing some South Australians and Queenslanders. During January it patrolled around Alkmaar, Nelspruit, and Godwan and In February it continued to come under fire in isolated skirmishes. The men rested in Belfast before being ordered back to Pretoria to hand over their horses and prepare for the journey home to Australia. In twelve months they had ridden over 1100 kilometres, fighting most of the way.
The advance on Barbeton, which was an important gold mining centre, had been led by Major Allenby: This British officer's association with the two Australian cavalry squadrons concluded a few weeks later. It was resumed in a remarkable manner after seventeen years when he assumed command of the Egyptian Expeditionary Force in June 1917 with the rank of general. His command then included the Australian Light Horsemen of the Desert Mounted Corps. His terse no-nonsense manner had been further tempered by the years. "Within a week of his arrival, Allenby had stamped his personality on the mind of every trooper of the horse and every infantryman of the line."
There were many Boer war veterans serving with the Light Horse, and upon the sight of a medal ribbon on an old soldier Allenby would often stop to inquire about the man's South African service. A number of these men, including Banjo Paterson who was with the AIF's Remount Service, he remembered from his own days with the Cavalry Division. Unfortunately an incident at Surafend, at the end of the war, marred relations between Allenby and the Australians. Some Anzacs had responded to the murder of a New Zealand soldier by attacking an Arab suspect's village in a violent manner which the general condemned in the strongest terms. Things were smoothed out in June 1919 when Allenby was persuaded to deliver a generous farewell message to the Australians. This message commenced with a recollection of the old South African days: "I knew the New South Wales Lancers and the Australian Horse well in the Boer War and I was glad to meet same of my old friends of those days when the Light Horse came under my command just two years ago", he said. In 1925 Field Marshal Viscount Allenby visited Australia and was well received by thousands of ex-servicemen who had served under him in two wars.

Map of the principal area of operations in South Africa
[From: The Boys in Green, p. 19.]
[Click on map for larger version.]
The Australian Horse squadron officially concluded its service in South Africa on 1 May 1901 with the arrival back in Sydney of Captain Jack Wilkinson and twenty-nine veterans. Thirty men had already returned with Lieutenant Vaughan while a slow trickle of men had been invalided home daring the preceding months. The regiment had been represented in South Africa since the arrival of the first contingent in December 1899, and members had been present at all the major engagements in which the Cavalry Division had fought, from the relief of Kimberley to the entry into Pretoria and the early anti-guerrilla phase operations.
The two Australian cavalry squadrons both established very good reputations on active service. General French wrote to Colonel Mackay: “I consider that the squadron of Australian Horse did excellent work with the Cavalry Division and I shall always remember it with gratitude”. The Historical Records of the Royal Scots Greys described the Australian Horse as a “fine squadron, and did excellent work on all occasions”. The Australians too considered that they did good work. Corporal Abbott described his squadron's work alongside the Royal Scots Greys:
Isn't it something for a one-horse volunteer crowd like you to be a squadron of such a regiment as the one you are with - a regiment which was fighting before there was an Australia, a regiment which saw Waterloo and Balaclava? And another thing - isn't it something to have shown a regiment like that how to scout, how to take cover; how to ride, how to shoot, how, in short, to play this particular game as it should he played.
Opinions of the nature of service in South Africa varied among members of the squadron. Trooper Eames certainly did not think highly of South Africa: “What with malaria, fever, and disease of all sorts in stock and locusts to eat up all the crops, I have come to the conclusion that it is no country for a white man”. Trooper Heazlett, writing home in June 1900, expressed no regrets at having volunteered for war service: “A soldier's life is a stirring one and I have never once regretted the step I took six months ago”. Trooper Parry, who had been wounded in March, was less impressed: “Few regarded with complacency the personal discomfort inseparable from forced marches, insufficient food, unwholesome water, and dirt and filth generally”. Corporal Abbott probably summed up the majority of opinions when he wrote:
Why did we ever come? This isn't charging into battle. This isn't racing through flying foe. This isn't getting the Victoria Cross. Where is all the `pomp and circumstance of war'?... Where's anything but dirt, and discomfort, and starvation, and nigger-driving? Who wants to participate shabby war like this?
Military service nevertheless must have had its attractions. At least twenty-nine members of the Australian Horse squadron are known to have returned to South Africa for a second period of service with other units. Some, like Sergeant Curtis Masters from Bungendore, served almost continuously through to the war's end in 1902. There were other members of the regiment, unable to accompany the original service squadron, who were accepted in later units. These numbered at least sixty-five and included several officers. Colonel Mackay was too senior in rank to accompany his own regiment and eventually commanded the New South Wales Imperial Bushmen.
Many of the South African war veterans also served again during the 1914-18 war. Among those from the Australian Horse was Horace Gilchrist, who was later a young lieutenant with the 3rd Battalion, Australian Commonwealth Horse and in 1915 was commissioned in the 7th Light Horse Regiment, AIF. He saw service on Gallipoli and died on a hospital ship on 29 June 1915 from wounds received on Anzac.
About thirty men of the Australian Horse's service squadron are known to have served in the AIF and eight, all from the ranks, are known to have held commissions. Two attained the rank of lieutenant colonel and commanded Light Horse regiments in action. They were Lieutenant Colonel D. C. Cameron and Lieutenant Colonel C. H. Granville, both of whom were awarded the Distinguished Service Order. There were other men, and they were a high proportion, who were prevented by their age, or wounds, or the injuries and sickness they suffered in South Africa, from enlisting for any further active service.
Cecil Granville, who had been a trooper in the second contingent, later served in the light horse militia after the Boer war. Following the outbreak of the First World War he joined the 1st Light Horse Regiment and eventually served on Gallipoli and in Sinai and Palestine. He commanded the regiment between 1916 and 1919 and was awarded the Distinguished Service Order and the Order of the Crown of Romania.
Donald Cameron was serving in the Belltrees troop of the Australian Horse when he volunteered for service as a trooper in South Africa. He travelled to Sydney to enlist with his cousin William Cameron from the same troop. After serving in South Africa William went to London in 1902 as a member of the Australian contingent to the nation of King Edward Vll. He was later elected to the New South Wales state parliament and retained his seat until his death in 1931. While William went to London, Donald returned to South Africa with a commission in the 3rd New South Wales Imperial Bushmen 's regiment and commanded a squadron on active service during the guerrilla phase of the war.
Following the commencement of the First World War Donald Cameron enlisted in the AIF and embarked in June 1915 as a Major commanding C Squadron of the 12th Light Horse. He served on Gallipoli and in Sinai and Palestine. After the second battle of Gaza he was appointed to command the 12th, and promoted to lieutenant colonel. Cameron trained as a cavalryman in his youth and in the desert campaigns urged the use of the Light Horse in a cavalry role. It was fitting that he was to be involved in both the planning and the execution of the historic mounted charge of the Light Horse at Beersheba on 31 October 1917.
When the Australian Hose became in time the 7th Light Horse, it proudly bore the battle honour (an `honorary distinction') of `South Africa 1899-1902' granted to the Australian Horse, on its guidon. It was an honour hard won. In the words of Corporal Abbott: “Some of us have "gone droving", some of us have "humped bluey". Most of us have "roughed it" somewhere in Australia at some time - but none of us as we did in Africa”.
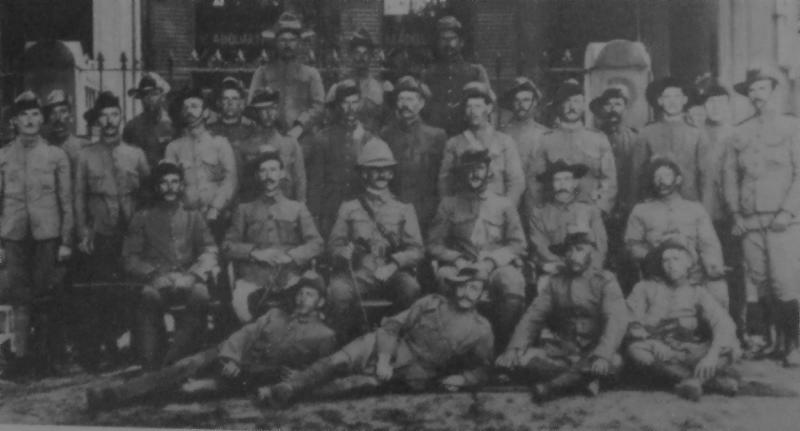
1st Australian Horse arrive in Australia, January 1901.
[Lieutenant P. W. Vaughan and men of the Australian Horse who arrived back in Sydney on the transport Orient, outside the regiment's headquarters in Sydney in January 1901. From The Boys in Green, p. 21.]
Further Reading:
3rd/11th/7th Australian Light Horse
Militia Light Horse, New South Wales
Australian Militia Light Horse
Citation: 1st Australian Horse Boer War Service - The Boys in Green
