


Topic: BatzP - Rafa
The Battle of Rafa
Sinai, 9 January 1917
9th Light Horse Regiment Unit History Account
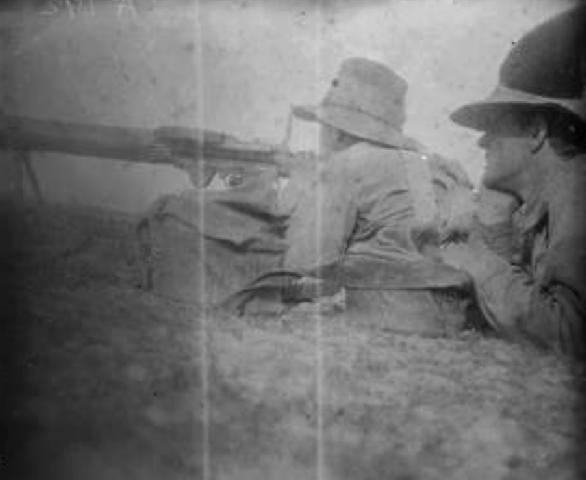
9th Light Horse Regiment Lewis Gunners in action at Rafa
The following is an extract from Darley, TH, With the Ninth Light Horse in the Great War, Adelaide, Hassell Press, 1924, pp 64 - 69., about the role of the 9th Light Horse Regiment at the Battle of Rafa, Sinai, 9 January 1917.
Rafa
Christmas Day of 1916 was spent under the beautiful date palms of Hod Masaid, which runs parallel with the beach of the Mediterranean at a distance of about 200 yards from the water. A good supply of provisions being on hand, the Christmas dinner was marred only by memories of absent friends. In the evening, fuel being plentiful, several fires were lit, and sitting round them the men swapped lies about their past deeds. Many of these yarns would not bear investigation, but were evidently the result of the good cheer dispensed during the day. Naturally the recent fight at El Magdhaba was the chief topic, and if the number of prisoners stated to have been captured by different men had been totalled, it would have considerably outnumbered the whole Turkish army.
On the following day Chetwode, Lieutenant General Sir Philip, accompanied by Chauvel, Major General Sir HG, attended a full parade of the Brigade, and warmly congratulated all ranks on the splendid work done by them during the El Magdhaba operations. He also dropped a hint that there were prospects of more work of a similar nature at an early date.
The Regiment remained at Hod Masaid until the 1st January, 1917, when, owing to the difficulty of transport, orders were issued, and the Brigade moved down to railhead, at Kilo 139. The weather conditions became very bad, day after day being cold and wet. As the troops had no tents, shelters were made from blankets and palm fronds but these only afforded partial protection.
A few days later, the line having been carried as far as Hod Masaid, the Brigade moved back to the shelter of the Hod, much to the satisfaction of all concerned. Camel convoys passed through from Kilo 139 daily on their way to El Arish, carrying stores of all descriptions, and it became evident that a new move was pending.
Information now came through to the effect that the enemy, driven from his position at El Arish, had retired to a line marking the boundary between Egypt and Palestine, running from the sea to the Gulf of Akabar. His chief position on this line consisted of a series of redoubts at Rafa, and it was evident that he was prepared at this point to offer a stout resistance to our further advance, whilst stronger lines of resistance were being prepared in the rear.
The fall of El Magdhaba, which had been considered an exceptionally strong position, and the capture of its entire garrison, had been a great blow to the enemy, and made him a bit doubtful as to his ability to hold the Rafa position against a sudden onslaught by our mounted force. He also considered that having been once caught napping such a surprise could not possibly occur again in view of the dispositions made to guard against it. The position of the redoubts had been well chosen, having a splendid field of fire on all sides, and they were manned by, roughly 3,000 men, supported by a number of well-placed guns.
Considering the exposed nature of the approaches, an attack on this position presented many problems; still the General Officer in Command decided that it must be taken without delay. The force available for this enterprise consisted of the Anzac Mounted Division [less the 2nd Light Horse Brigade], the 5th Mounted Brigade [Yeomanry], and the Imperial Camel Corps, with three batteries of Royal Horse Artillery, and one Mountain Battery, a total of roughly 3,500 rifles and 16 guns.
Taking all things into consideration, the General Officer Commanding, Chetwode, Lieutenant General Sir Philip, was taking considerable risk in marching 30 odd miles from his base to attack so strong a position with so small a force, added to which was the possibility that the enemy would be able to rush forward reinforcements from El Shellal as soon as information of the attack reached there.
The element of surprise was not overlooked, and if successful in this direction the effect on the nerves of the enemy, which had already been sorely tried, would count for much. It can safely be said that not a man of our force had the slightest doubt but that Rafa, with its whole garrison, would be taken whenever the General gave the order to attack. A sure sign that the enemy were a bit nervy was the constant visit of their planes to make sure that we were still in camp.
Shortly after mid-day on the 8th January, 1917, the Regiment, with the rest of the Brigade, under the command of Royston, Brigadier General JR, moved to the Divisional rendezvous about one mile east of the Wadi El Arish, each man carrying three days' rations for himself and horse. Horses were watered and the whole force moved off in the direction of Rafa at 4 p.m., reaching Sheikh Zowaiid at 9.30 p.m. A halt was made at this place until 1 a.m., the men being instructed to get as much rest as possible. The night, however, was the coldest that had been experienced in the desert, and sleep was almost impossible, the men having no cover.
At 1 a.m. sharp the advance on Rafa was commenced, and from then till daylight talking and smoking were forbidden. These orders were implicitly obeyed, everyone recognizing their importance. One troop of A Squadron, under Sharp, Lieutenant RC, was pushed out as a right flank guard to the Brigade, whilst one troop under Luxmoore, Lieutenant EM, guarded the left flank.
About 6 a.m. the column reached a point two miles south-east of the redoubts on El Magruntein, and the left flank guard was fired on by the Turkish outposts, who fired a few Very lights as a signal. This post was immediately rushed and captured. A short halt was now ordered whilst Royston, Brigadier General JR, and staff, together with certain regimental officers reconnoitred the position. As the light improved the strength of the enemy positions could be clearly seen as they stood out prominently on the hillside, the approaches being absolutely void of cover, whilst practically every inch of the ground for a distance of 2,000 yards could be swept by rifle and machine gun fire.
To the east, at about 800 yards from their main position, stood a solitary tree which acted as a reference mark for the remainder of the day. The surrounding country was pleasing to the eye, being firm and grassy, whilst standing crops of barley were plentiful and formed a great contrast to the sandy desert which had been our home for the past year. A few Bedouin encampments scattered about added a finish to the picture.
After a hasty meal the Brigade moved further east, and passed two large stone pillars making the boundary between Sinai and Palestine, and at last we were operating on enemy territory. The thoughts of all ranks as they passed into the oldest historical country in the world can be better imagined than described, whilst the fact that a successful conclusion to the day's operations would clear the enemy from a British Protectorate had undoubtedly a great moral effect on the men.
The Brigade halted at this point and dismounted, remaining in reserve until 11 a.m. New Zealanders could be seen working round the enemy's eastern flank, with the 1st Light Horse Brigade moving to a position on the left. As these troops came under fire, they extended, and the sight was one to thrill the observer, the troops moving into position as calmly as if carrying out a peace manoeuvre. The Inverness Battery Royal Horse Artillery had by this time got into position and were placing a well-directed fire on some parties of the enemy who were endeavouring to escape to the east.
The enemy position had been split into four groups for the purpose of the attack; A and B groups were allotted to the Imperial Camel Corps, C to the 3rd Light Horse Brigade, and "D" to the 1st Light Horse Brigade, whilst the New Zealanders were to make an enveloping movement round the eastern flank, to cut off all possibility of escape.
At 11 a.m. the 9th and 10th Light Horse Regiments and the 3rd Machine Gun Squadron were ordered into action. The Regiments advanced mounted in extended order, each leaving one squadron to act as support. At 11.40 a.m. the leading troops came under fire and, dismounting, sent their horses to the cover of a small ridge, continuing the advance on foot. A Squadron's Lewis gun was placed on the extreme left of the line and after advancing about 800 yards the Regiment took up a position on a slight rise which afforded slight cover to men, and opened a brisk fire on the enemy trenches to our immediate front.
Our batteries were sweeping the enemy position with shrapnel and high explosive shells, whilst the machine guns were raking their trenches with bursts of rapid fire. The enemy's fire was extremely heavy but a little erratic, evidently due to nerves, but this proved a great blessing for otherwise our casualties must have been very heavy. At 2.30 p.m. the situation remained unchanged on our immediate front, but away on our right the 1st Light Horse Brigade was seen to be advancing, small parties of the enemy being seen to surrender. The Imperial Camel Corps, like ourselves, appeared to be unable to make any headway without incurring heavy casualties, and the Artillery were ordered to concentrate their fire on our objective, whilst the heaviest possible rifle and machine gun fire was poured into the group, with the result that the enemy's fire slackened considerably.
At 3.20 p.m., a message was received from Brigade Headquarters ordering a general advance to commence at 3.30 p.m. Royston, Brigadier General JR, rode along the line and gave instructions that the advance should be timed by the 10th Light Horse on our right. Brown, Lieutenant, 3rd Machine Gun Squadron, brought two guns into the line, to give covering fire to the advance.
At 3.45 p.m. the extreme right of the line, 1st Light Horse Brigade were seen to be falling back and the enemy's fire at once greatly increased. Many of the enemy stood up in the trenches in order to get better aim, thus affording our Lewis gunners a splendid target, which was taken full advantage of. At 4.10 p.m. Fulton, Lieutenant Colonel D, 3rd Light Horse Regiment, asked for covering fire, as his Regiment was hard pressed. A message was also received from Robertson, Major, 10th Light Horse Regiment, to the effect that two troops of that Regiment were retiring, and asked the Regiment to cover the retirement of the 10th Light Horse Regiment if necessary.
The Turks were putting up a great fight, and for the moment appeared to have the upper hand. Their aeroplanes were constantly flying overhead dropping light bombs on every available target. They were able to accurately estimate the strength of the attacking force. The information thus obtained and transmitted to the trenches teemed to give the defenders fresh heart. They became confident that they could hold out and wait for the large reinforcements which were hurrying to their assistance from El Shellal and Khan Yunis.
Our gunners fought splendidly; the Hong Kong and Singapore Battery bringing their small guns into the advanced line.
About this time men were seen moving about on the sand hills north of the enemy position, waving discs, painted black and white, which had been issued to all units for the purpose of disclosing their position to our artillery, as shells from one of our batteries were falling close to their front line. A message was therefore sent to the Brigade, drawing attention to this, and the shelling ceased.
The order was now given to fix bayonets, and the Regiment advanced by short rushes, accompanied by the Imperial Camel Corps, but after a short advance orders were received for the whole force to retire, the Regiment to cover the retirement. Before this order could be obeyed the whole situation suddenly changed. The New Zealanders, under Chaytor, Brigadier General EWC, had steadily worked round the enemy's flank without attracting much attention, and having already received information that strong enemy reinforcements were approaching, he immediately closed on the enemy left flank, and attacked with the bayonet.
Seeing this move, Royston, Brigadier General JR, galloped out in front of the Brigade, and ordered them to advance. With loud cheers the men rushed forward with the bayonet and the position was won, white flags making their appearance in large numbers. At the moment when things looked blackest and the men were unwillingly preparing to retire the whole situation changed like a flash, to the great delight of all ranks.
Rafa had been captured with small loss to us, and the whole of its garrison were prisoners in our hands, together with their guns and considerable stores. The splendid fight put up by the enemy was testified by the heaps of dead and wounded in their trenches, which also spoke volumes for the coolness and accuracy of our fire. Chanter, Captain JC, of C Squadron, with a few members of the Imperial Camel Corps pushed on and took a battery of four guns, together with a number of prisoners.
Enemy reinforcements, estimated at 2,000 men, with guns, were actually within sight during the latter part of the engagement. They sent up several flare signals, but receiving no reply evidently decided to take no risks by coming to closer quarters. Had their commander pushed forward with his large force he may have been able seriously to interfere with our plans and save some of the garrison.
On the rally signal being blown the Regiment assembled and moved off to take up an outpost line facing east, covering the ambulance and stretcher bearers in their work of mercy amongst the enemy. At 9 p.m. the Regiment, less A Squadron which had been detailed to escort the prisoners, moved off to Sheikh Zowaiid, arriving there at 2 a.m. on the 10th. Horses were watered after having been 36 hours without a drink, and the troops bivouacked for the night.
At 7.30 a.m. on the 10th the column commenced the return journey, arriving at Hod Masaid at 1.30 p.m., A Squadron with all available wagons being left to clear up the battle area and collect the stores. They also searched the whole area for any wounded who may have been missed in the dark, and buried the dead. One of our aeroplanes flew from El Arish and dropped parcels of medical comforts at Sheikh Zowaiid for the small field hospital which had been erected.
On the 12th January Chauvel, Major General Sir HG, addressed the Brigade and congratulated all ranks on their magnificent effort at Rafa.
At last Egyptian territory was free of all enemy forces, and the war could now be taken into enemy country.
Further Reading:
The Battle of Rafa, Sinai, 9 January 1917
The Battle of Rafa, Sinai, 9 January 1917, Roll of Honour
The Palestine Campaign, 1917 - 1918
Battles where Australians fought, 1899-1920
Citation: The Battle of Rafa, Sinai, 9 January 1917, 9th Light Horse Regiment Unit History Account
Posted by Project Leader
at 12:01 AM EAST
Updated: Saturday, 15 January 2011 7:27 AM EAST
