"At a mile distant their thousand hooves were stuttering thunder, coming at a rate that frightened a man - they were an awe inspiring sight, galloping through the red haze - knee to knee and horse to horse - the dying sun glinting on bayonet points..." Trooper Ion Idriess
The Australian Light Horse Studies Centre aims to present an accurate history as chroniclers of early Australian military developments from 1899 to 1920.
The Australian Light Horse Studies Centre site holds over 12,000 entries and is growing daily.
Contact:Australian Light Horse Studies CentreLet us hear your story:
You can tell your story, make a comment or ask for help on our Australian Light Horse Studies Centre Forum called:
This Table is based on the "War Establishments of the Australian Military Forces, 1912." Provision is made for an Armourer as a Staff Sergeant of the Regiment. No other "Attached" Officers, N.C.O.'s, or Men have been provided for. This latter personnel should come to the Regiment fully equipped.
"All Ranks" does not include Officers unless specially mentioned.
Gallipoli Campaign - 1915, Questions to the Turkish General Staff, Part 1 Topic: BatzG - Gallipoli
Gallipoli Campaign - 1915
Questions to the Turkish General Staff, Part 1
The Turkish General Staff Answers
During 1919, after the defeat of Turkey, a unique opportunity was opened up for CEW Bean to question the members of the Turkish General Staff about the Gallipoli Campaign. Bean presented a list of 111 questions. In June 1919, he received the answers. In the following transcription, the answers given by the Turkish General Staff will be qualified by the questions asked by Bean.
Questions 1 – 4
1. Where were the Turks expecting us to land?
2. Were they expecting us to land troops at Gaba Tepe?
3. Were they expecting us to land at Ari Burnu?
4. What did they think our intentions as to landing were?
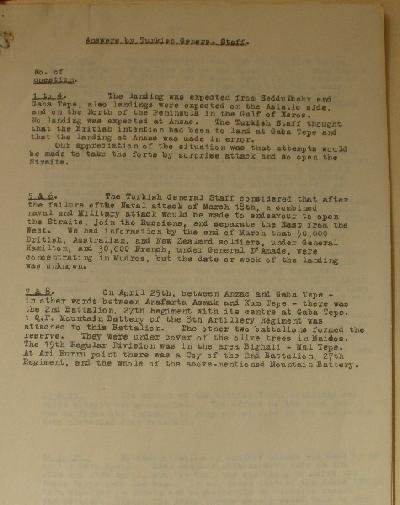
The landing was expected from Seddulbahr and Gaba Tepe, also landings were expected a n the Asiatic side, and on the North of the Peninsula in the Gulf of Xeros. No landing was expected at Anzac. The Turkish Staff thought that the British intention had been to land at Gaba Tepe and that the landing at Anzac was made in error.
Our appreciation of the situation was that attempts would be made to take the forts by surprise attack and so open the Straits.
Questions 5 - 6
5. Approximately at what date did they first hear of our proposed landings?
6. When were they expecting the force at Mudros to land?
The Turkish General Staff considered that after the failure of the Naval attack of March 18th, a combined naval and Military attack would be made to endeavour to open the Straits, join the Russians, and separate the East from the West. We had information by the end of March that 50,000 British, Australian, and New Zealand soldiers, under General Hamilton, and 30,000 French, under General D'Amade, were concentrating in Mudros, but the date or week of the landing was unknown.
Questions 7 - 8
7. On April 25th what forces were there between Ari Burnu and Gaba Tepe? And where?
8. How many troops did they amount to in all and what were the numbers in reserve, and where were the reserves?
On April 25th, between Anzac and Gaba Tepe - in other words between Anafarta Asmak and Kum Tepe - there was the 2nd Battalion, 27th Regiment with its centre at Gaba Tepe. 1 Q.F. Mountain Battery of the 8th Artillery Regiment was attached to this Battalion. The other two battalions formed the reserve. They were under cover of the olive trees in Maidos. The 19th Regular Division was in the area Bighali - Mal Tepe. At Ari Burnu point there was a Coy of the 2nd Battalion, 27th Regiment, and the whole of the above-mentioned Mountain Battery.
Order Of Battle of the Egyptian Expeditionary Force, April 1917, Part 3, 52nd (Lowland) Division Topic: AIF & MEF & EEF
Order Of Battle of the Egyptian Expeditionary Force, April 1917
Part 3, 52nd (Lowland) Division
As part of the Official British War History of the Great War, Captain Cyril Falls and Lieutenant General George MacMunn were commissioned to produce a commentary on the Sinai, Palestine and Syrian operations that took place. In 1928, their finished work, Military Operations, Egypt and Palestine - From the outbreak of war with Germany to June 1917, was published in London. Their book included Appendix 3 which specifically detailed the Order Of Battle of the Egyptian Expeditionary Force, April 1917 and is extracted below.
MacMunn, G. & Falls, C., Military operations: Egypt and Palestine, (London 1930), pp. 397 - 398:
52nd (Lowland) Division.
G.O.C. -
Brevet Colonel (temp. Major General) W. E. B. Smith, C.B., C.M.G.
G.S.O. 1 -
Major (temp. Lieut. Colonel) G. W. V. Holdich, D.S.O.
C.R.A. -
Lieut. Colonel (temp. Brig. General) E. C. Massy, D.S.O.
C.R.E. -
Temp. Major (temp. Lieut. Colonel) L. F. Wells.
155th Infantry Brigade. G.O.C. -
Lieut. Colonel (temp. Brig. General) J. B. Pollok-McCall.
1/4th Royal Scots Fusiliers;
1/5th Royal Scots Fusiliers;
1/4th King's Own Scottish Borderers;
1/5th King's Own Scottish Borderers;
155th Brigade Machine-Gun Company.
156th Infantry Brigade.
G.O.C. -
Temp. Lieut. Colonel (temp. Brig, General) A. H. Leggett, D.S.O.
1/4th Royal Scots;
1/7th Royal Scots;
1/7th Scottish Rifles;
1/8th Scottish Rifles;
156th Brigade Machine-Gun Company.
157th Infantry Brigade.
G.O.C. -
Brevet Colonel (temp. Brig. General) C. D. H. Moore, D.S.O.
1/5th Highland Light Infantry;
1/6th Highland Light Infantry;
1/7th Highland Light Infantry;
1/5th Argyll and Sutherland Highlanders;
157th Brigade Machine-Gun Company.
Divisional Troops.
Mounted Troops -
H.Q. and "C" Squadron, Royal Glasgow Yeomanry.
Artillery -
1/2nd Lowland Brigade, R.F.A.
261st Brigade, R.F.A.
262nd Brigade, R.F.A.
263rd Brigade, R.F.A.
52nd Divisional Ammunition Column (1 officer and 35 other ranks).
Engineers -
2/1st Lowland Field Company, R.E.
2/2nd Lowland Field Company, R.E.
1/2nd Lowland Field Company, R.E.
Signal Service -
52nd Divisional Signal Company.
A.S.C. -
52nd Divisional Train.
Medical Units -
1/1st, 1/2nd, 1/3rd Lowland Field Ambulances.
Attached -
1st Dismounted Brigade.
G.O.C. -
Temp. Brig. General the Marques of Tullibardine, M.V.O., D.S.O.
1/1st Scottish Horse;
1/2nd Scottish Horse;
1/3rd Scottish Horse;
1/1st Ayr Yeomanry;
1/1st Lanark Yeomanry;
Machine-Gun Company;
1st Dismounted Brigade Signal Troop;
1/1st Scottish Horse and 1/1st Lowland Field Ambulances.
This Table is based on the "War Establishments of the Australian Military Forces, 1912." Provision is made for an Armourer as a Staff Sergeant of the Regiment. No other "Attached" Officers, N.C.O.'s, or Men have been provided for. This latter personnel should come to the Regiment fully equipped.
"All Ranks" does not include Officers unless specially mentioned.
Accoutrements
Section 1a.
Belts, shoulder, sword, "Sam Browne," Mark II. pairs
23
1 per officer
Belts, waist, sword, brown, " Sam Browne," Mark II.
23
1 per officer
Bottles, water, enamelled
531
1 per officer and all ranks
Cases, brown, pistol, L.S. or "Sam Browne "
23
1 per pistol
Carriers, water-bottle, with shoulder-strap
531
1 per officer and all ranks
Frogs, brown-
Bayonet, C.P.
508
1 per sword-bayonet
Wire-cutter, Mark 111.
303
1 per wire-cutter. Includes 1 per officer
Straps, with buckle
303
1 per wire-cutter. Includes 1 per officer
Straps, with stud
303
1 per wire-cutter. Includes 1 per officer
Haversacks, G.S.
531
1 per officer and all ranks
Knots, sword, brown, G.S.
23
1 per officer
Lanyards
Pistol
23
1 per officer
Whistle
57
1 per officer, W.O., staff sergeant, and sergeant, except O.R. sergeant, armourer, and artificers
Pouches, ammunition, brown, pistol, infantry or " Sam Browne "
23
1 per officer
Slings, rifle, web
502
1 per rifle
Straps, mess-tin
531
1 per officer and all ranks
Tins, mess, M.S.
531
1 per officer and all ranks
Whistles, cavalry
57
1 per officer, W.O., sergeant, staff sergeant, and sergeant, except armourer and artificers
Gallipoli Campaign - 1915, Questions to the Turkish General Staff, Part 2 Topic: BatzG - Gallipoli
Gallipoli Campaign - 1915
Questions to the Turkish General Staff, Part 2
The Turkish General Staff Answers
During 1919, after the defeat of Turkey, a unique opportunity was opened up for CEW Bean to question the members of the Turkish General Staff about the Gallipoli Campaign. Bean presented a list of 111 questions. In June 1919, he received the answers. In the following transcription, the answers given by the Turkish General Staff will be qualified by the questions asked by Bean.
Questions 11 - 14
11. On April 25th what was the first report of the Ari Burnu landing?
12. Were our troops seen in the boats before reaching the shore?
13. What was the first sign seen? What was the alarm?
14. How did the news come to the reserves?
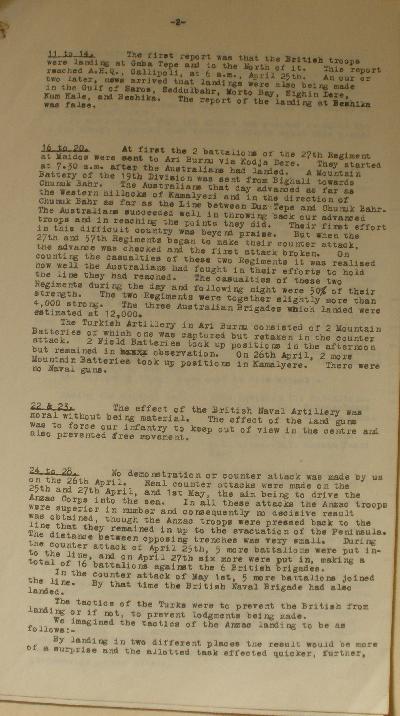
The first report was that the British troops were landing at Gaba Tepe and to the North of it. This report reached A.H.Q., Gallipoli, at 6 a.m., April 25th. An hour or two later, news arrived that landings were also being made in the Gulf of Saros, Seddulbahr, Morto Bay, Sighin Dere, Kum Kale, and Beshika. The report of the landing at Beshika was false.
Questions 16 - 20.
16. How far did the Australian troops advance at ARI BURNU or, April 25th, and how did they fight?
17. What were the casualties of the Turks?
18. What reserves were sent to CAPE HELLES and what was the strength of these reserves?
19. What Turkish artillery was there at CAPE HELLES?
20. What was the Turkish artillery at ARI BURNU on April 25th? How many land guns and ships guns were used, respectively?
At first the 2 battalions of the 27th Regiment at Maidos were sent to Ari Burnu via Kodja Dere. They started at 7.30 a.m. after the Australians had landed. A Mountain Battery of the 19th Division was sent from Bighali towards Chunuk Bahr. The Australians that day advanced as far as the Western hillocks of Kamalyeri and in the direction of Chunuk Bahr as far as the Line between Duz Tepe and Chunuk Bahr. The Australians succeeded well in throwing back our advanced troops and in reaching the points they did. Their first effort in this difficult country was beyond praise. But when the 27th and 57th Regiments began to make their counter attack, the advance was checked and the first attack broken. On counting the casualties of these two Regiments it was realised how well the Australians had fought in their efforts to hold the line they had reached. The casualties of these two Regiments during the day and following night were 50% of their strength. The two Regiments were together slightly more than 4,000 strong. The three Australian Brigades which landed were estimated at 12,000.
The Turkish. Artillery in Ari Burnu consisted of 2 Mountain Batteries of which one was captured but retaken in the counter attack. 2 Field Batteries took up positions in the afternoon but remained in observation. On 26th April, 2 more Mountain Batteries took up positions in Kamalyere. There were no Naval guns.
Questions 22 - 23
22. Where were the guns stationed later?
23. What did they think of our Naval Artillery? What did they think of our land guns?
The effect of the British Naval Artillery was moral without being material. The effect of the land guns was to force our infantry to keep out of view in the centre and also prevented free movement.
Questions 24 - 28
24. What were the first counter attacks delivered by the Turkish Force at Anzac on April 25th, April 26th, April 27 - May 1?
25. What was the idea of the Turkish Staff as to the plan and motive of our attack at ARI BURNU?
26. When did they estimate that our attack was checked?
27. What apprehension had they of any further attacks?
28. When did they realise that the British attack at Helles had been checked?
No demonstration or counter attack was made by us on the 26th April. Real counter attacks were made on the 25th and 27th April, and 1st May, the aim being to drive the Anzac Corps into the sea. In all these attacks the Anzac troops were superior in number and consequently no decisive result was obtained, though the Anzac troops were pressed back to the line that they remained in up to the evacuation of the Peninsula. The distance between opposing trenches was very small. During the counter attack of April 25th, 5 more battalions were put in to the line, and on April 27th six more were put in, making a total of 16 battalions against the 6 British brigades.
In the counter attack of May 1st, 5 more battalions joined the line. By that time the British Naval Brigade had also landed.
The tactics of the Turks were to prevent the British from landing or if not, to prevent lodgements being made.
We imagined the tactics of the Anzac landing to be as follows :
By landing in two different places the result would be more of a surprise and the allotted task effected quicker, further, by drawing more troops to Anzac the task at Seddulbahr would be more easily effected.
By holding the Kavak Tepe - Sanjak Tepe - Chunuk Bahr - Koja Chimen - Abdul Rahman Bahr line, communication between Gallipoli and the rest of the Peninsula would be cut. The command of the Straits would also be gained. The above mentioned line was marked on maps found on dead Australian or New Zealand officers.
It was realised that the attack was checked in April but it was always expected that further attacks would take place.
The Australian Light Horse Studies Centre is a not for profit and non profit group whose sole aim is to write the early history of the Australian Light Horse from 1900
- 1920. It is privately funded and the information is provided by the individuals within the group and while permission for the use of the material has been given for this
site for these items by various donors, the residual and actual copyright for these items, should there be any, resides exclusively with the donors. The information on
this site is freely available for private research use only and if used as such, should be appropriately acknowledged. To assist in this process, each item has a citation
attached at the bottom for referencing purposes.
Please Note: No express or implied permission is given for commercial use of the information contained within this site.
A note to copyright holders
The Australian Light Horse Studies Centre has made every endeavour to contact copyright holders of material digitised for this blog and website and where
appropriate, permission is still being sought for these items. Where replies were not received, or where the copyright owner has not been able to be traced, or where
the permission is still being sought, the Australian Light Horse Studies Centre has decided, in good faith, to proceed with digitisation and publication. Australian Light
Horse Studies Centre would be happy to hear from copyright owners at any time to discuss usage of this item.