« April 2008 »
S M T W T F S
1 2 3 4 5
6 7 8 9 10 11 12
13 14 15 16 17 18 19
20 21 22 23 24 25 26
27 28 29 30
You are not logged in. Log in


Search the site:


powered by FreeFind
Volunteer with us.

Entries by Topic All topics  
A Latest Site News
A - Using the Site
AAA Volunteers
AAB-Education Centre
AAC-Film Clips
AAC-Photo Albums
AIF & MEF & EEF
AIF - Lighthorse
AIF - ALH - A to Z
AIF - DMC
AIF - DMC - Or Bat
AIF - DMC - Anzac MD
AIF - DMC - Aus MD
AIF - DMC - British
AIF - DMC - BWI
AIF - DMC - French
AIF - DMC - Indian
AIF - DMC - Italian
AIF - DMC - Medical
AIF - DMC - Remounts
AIF - DMC - Scouts
AIF - DMC - Sigs
AIF - DMC - Sigs AirlnS
AIF - DMC - 1 Sig Sqn
AIF - DMC - 2 Sig Sqn
AIF - DMC - Eng
AIF - DMC - Eng 1FSE
AIF - DMC - Eng 2FSE
AIF - DMC - GSR
AIF - 1B - 1 LHB
AIF - 1B - 6 MVS
AIF - 1B - 1 LHMGS
AIF - 1B - 1 Sig Trp
AIF - 1B - 1 LHFA
AIF - 1B - 1 LHR
AIF - 1B - 2 LHR
AIF - 1B - 3 LHR
AIF - 2B - 2 LHB
AIF - 2B - 7 MVS
AIF - 2B - 2 LHFA
AIF - 2B - 2 LHMGS
AIF - 2B - 2 Sig Trp
AIF - 2B - 5 LHR
AIF - 2B - 6 LHR
AIF - 2B - 7 LHR
AIF - 3B - 3 LHB
AIF - 3B - 8 MVS
AIF - 3B - 3 LHB Sigs
AIF - 3B - 3 LHFA
AIF - 3B - 3 LHMGS
AIF - 3B - 3 Sig Trp
AIF - 3B - 8 LHR
AIF - 3B - 9 LHR
AIF - 3B - 10 LHR
AIF - 4B - 4 LHB
AIF - 4B - 4 Sig Trp
AIF - 4B - 9 MVS
AIF - 4B - 4 LHFA
AIF - 4B - 4 LHMGS
AIF - 4B - 4 LHR
AIF - 4B - 11 LHR
AIF - 4B - 12 LHR
AIF - 5B - 5 LHB
AIF - 5B - 10 MVS
AIF - 5B - 5 LHFA
AIF - 5B - 5 Sig Trp
AIF - 5B - ICC
AIF - 5B - 14 LHR
AIF - 5B - 15 LHR
AIF - 5B - 1er Regt
AIF - 5B - 2 NZMGS
AIF - AASC
AIF - Aboriginal LH
AIF - Badges
AIF - Cars
AIF - Chinese LH
AIF - Double Sqns
AIF - Engineers
AIF - Fr - 22 Corps
AIF - Fr - 13 LHR
AIF - Honour Roll
AIF - HQ - 3rd Echelon
AIF - Marching Songs
AIF - Misc Topics
AIF - NZMRB
AIF - NZMRB - AMR
AIF - NZMRB - CMR
AIF - NZMRB - EFT
AIF - NZMRB - NZMFA
AIF - NZMRB - NZMGS
AIF - NZMRB - OMR
AIF - NZMRB - Sig-Trp
AIF - NZMRB - WMR
AIF - Ships
AIF - Ships - Encountr
AIF - Ships - Una
AIF - WFF
AIF - Wireless Sqn
Battles
BatzA - Australia
BatzA - Broken Hill
BatzA - Liverpool
BatzA - Merivale
BatzB - Boer War
BatzB - Bakenlaagte
BatzB - Belmont
BatzB - Bothaville
BatzB - Buffels Hoek
BatzB - Coetzees Drift
BatzB - Diamond Hill
BatzB - Driefontein
BatzB - Elands
BatzB - Graspan
BatzB - Grobelaar
BatzB - Grootvallier
BatzB - Hartebestfontn
BatzB - Houtnek
BatzB - Karee Siding
BatzB - Kimberley
BatzB - Koster River
BatzB - Leeuw Kop
BatzB - Mafeking
BatzB - Magersfontein
BatzB - Modder River
BatzB - Onverwacht
BatzB - Paardeberg
BatzB - Palmietfontein
BatzB - Pink Hill
BatzB - Poplar Grove
BatzB - Rhenoster
BatzB - Sannahs Post
BatzB - Slingersfontn
BatzB - Stinkhoutbm
BatzB - Sunnyside
BatzB - Wilmansrust
BatzB - Wolvekuil
BatzB - Zand River
BatzG - Gallipoli
BatzG - Anzac
BatzG - Aug 1915
BatzG - Baby 700
BatzG - Evacuation
BatzG - Hill 60
BatzG - Hill 971
BatzG - Krithia
BatzG - Lone Pine
BatzG - Nek
BatzJ - Jordan Valley
BatzJ - 1st Amman
BatzJ - 2nd Amman
BatzJ - Abu Tellul
BatzJ - Es Salt
BatzJ - JV Maps
BatzJ - Ziza
BatzM - Mespot
BatzM - Baghdad
BatzM - Ctesiphon
BatzM - Daur
BatzM - Kurna
BatzM - Kut el Amara
BatzM - Ramadi
BatzN - Naval
BatzN - AE1
BatzN - Cocos Is
BatzN - Heligoland
BatzN - Marmara
BatzN - Zeebrugge
BatzN - Zeppelin L43
BatzNG - Bitapaka
BatzO - Other
BatzO - Baku
BatzO - Egypt 1919
BatzO - Emptsa
BatzO - Karawaran
BatzO - Peitang
BatzO - Wassa
BatzP - Palestine
BatzP - 1st Gaza
BatzP - 2nd Gaza
BatzP - 3rd Gaza
BatzP - Aleppo
BatzP - Amwas
BatzP - Ayun Kara
BatzP - Bald Hill
BatzP - Balin
BatzP - Beersheba
BatzP - Berkusieh
BatzP - Damascus
BatzP - El Auja
BatzP - El Buggar
BatzP - El Burj
BatzP - Haifa
BatzP - Huj
BatzP - JB Yakub
BatzP - Kaukab
BatzP - Khan Kusseir
BatzP - Khuweilfe
BatzP - Kuneitra
BatzP - Megiddo
BatzP - Nablus
BatzP - Rafa
BatzP - Sasa
BatzP - Semakh
BatzP - Sheria
BatzP - Surafend
BatzP - Wadi Fara
BatzS - Sinai
BatzS - Bir el Abd
BatzS - El Arish
BatzS - El Mazar
BatzS - El Qatiya
BatzS - Jifjafa
BatzS - Magdhaba
BatzS - Maghara
BatzS - Romani
BatzS - Suez 1915
BatzSe - Senussi
BatzWF - Westn Front
BW - Boer War
BW - NSW
BW - NSW - 1ACH
BW - NSW - 1NSWMR
BW - NSW - 2NSWMR
BW - NSW - 3ACH
BW - NSW - 3NSWIB
BW - NSW - 3NSWMR
BW - NSW - 5ACH
BW - NSW - A Bty RAA
BW - NSW - AAMC
BW - NSW - Aust H
BW - NSW - Lancers
BW - NSW - NSW Inf
BW - NSW - NSWCBC
BW - NSW - NSWIB
BW - NSW - NSWMR_A
BW - NZ
BW - Qld
BW - Qld - 1ACH
BW - Qld - 1QMI
BW - Qld - 2QMI
BW - Qld - 3ACH
BW - Qld - 3QMI
BW - Qld - 4QIB
BW - Qld - 5QIB
BW - Qld - 6QIB
BW - Qld - 7ACH
BW - QLD - AAMC
BW - SA
BW - SA - 1SAMR
BW - SA - 2ACH
BW - SA - 2SAMR
BW - SA - 3SACB
BW - SA - 4ACH
BW - SA - 4SAIB
BW - SA - 5SAIB
BW - SA - 6SAIB
BW - SA - 8ACH
BW - SA - AAMC
BW - Tas
BW - Tas - 1ACH
BW - Tas - 1TIB
BW - Tas - 1TMI
BW - Tas - 2TB
BW - Tas - 2TIB
BW - Tas - 3ACH
BW - Tas - 8ACH
BW - Vic
BW - Vic - 1VMI
BW - Vic - 2ACH
BW - Vic - 2VMR
BW - Vic - 3VB
BW - Vic - 4ACH
BW - Vic - 4VIB
BW - Vic - 5VMR
BW - Vic - 6ACH
BW - Vic - AAMC
BW - Vic - Scot H
BW - WA
BW - WA - 1WAMI
BW - WA - 2ACH
BW - WA - 2WAMI
BW - WA - 3WAB
BW - WA - 4ACH
BW - WA - 4WAMI
BW - WA - 5WAMI
BW - WA - 6WAMI
BW - WA - 8ACH
BW Gen - Campaign
BW Gen - Soldiers
BW General
Cavalry - General
Diary - Schramm
Egypt - Heliopolis
Egypt - Mena
Gen - Ataturk Pk, CNB
Gen - Australia
Gen - Legends
Gen - Query Club
Gen - St - NSW
Gen - St - Qld
Gen - St - SA
Gen - St - Tas
Gen - St - Vic
Gen - St - WA
Gm - German Items
Gm - Bk - 605 MGC
GW - 11 Nov 1918
GW - Atrocities
GW - August 1914
GW - Biographies
GW - Propaganda
GW - Spies
GW - We forgot
Militia 1899-1920
Militia - Area Officers
Militia - Inf - Infantry
Militia - Inf - 1IB
Militia - Inf - 2IB
Militia - Inf - 3IB
Militia - Inf - NSW
Militia - Inf - Qld
Militia - Inf - SA
Militia - Inf - Tas
Militia - Inf - Vic
Militia - Inf - WA
Militia - K.E.Horse
Militia - LH
Militia - LH - Regts
Militia - LH - 1LHB
Militia - LH - 2LHB
Militia - LH - 3LHB
Militia - LH - 4LHB
Militia - LH - 5LHB
Militia - LH - 6LHB
Militia - LHN - NSW
Militia - LHN - 1/7/1
Militia - LHN - 2/9/6
Militia - LHN - 3/11/7
Militia - LHN - 4/6/16
Militia - LHN - 5/4/15
Militia - LHN - 6/5/12
Militia - LHN - 28
Militia - LHQ - Qld
Militia - LHQ - 13/2
Militia - LHQ - 14/3/11
Militia - LHQ - 15/1/5
Militia - LHQ - 27/14
Militia - LHS - SA
Militia - LHS - 16/22/3
Militia - LHS - 17/23/18
Militia - LHS - 24/9
Militia - LHT - Tas
Militia - LHT - 12/26
Militia - LHV - Vic
Militia - LHV - 7/15/20
Militia - LHV - 8/16/8
Militia - LHV - 9/19
Militia - LHV - 10/13
Militia - LHV - 11/20/4
Militia - LHV - 19/17
Militia - LHV - 29
Militia - LHW - WA
Militia - LHW-18/25/10
Militia - Military Orders
Militia - Misc
MilitiaRC - Rifle Clubs
MilitiaRC - NSW
MilitiaRC - NT
MilitiaRC - Qld
MilitiaRC - SA
MilitiaRC - Tas
MilitiaRC - Vic
MilitiaRC - WA
Militiaz - New Zealand
Tk - Turkish Items
Tk - Army
Tk - Bks - Books
Tk - Bks - 1/33IR
Tk - Bks - 27th IR
Tk - Bks - Air Force
Tk - Bks - Yildirim
Tk - POWs
Wp - Weapons
Wp - Hotchkiss Cav
Wp - Hotchkiss PMG
Blog Tools
Edit your Blog
Build a Blog
RSS Feed
View Profile
Open Community
Post to this Blog
Site Index
Education Centre
LH Militia
Boer War
Transport Ships
LH Battles
ALH - Units
ALH - General
Aboriginal Light H
Weapons
Ottoman Sources

"At a mile distant their thousand hooves were stuttering thunder, coming at a rate that frightened a man - they were an awe inspiring sight, galloping through the red haze - knee to knee and horse to horse - the dying sun glinting on bayonet points..." Trooper Ion Idriess

The Australian Light Horse Studies Centre aims to present an accurate history as chroniclers of early Australian military developments from 1899 to 1920.

The Australian Light Horse Studies Centre site holds over 12,000 entries and is growing daily.

Contact: Australian Light Horse Studies Centre

Let us hear your story: You can tell your story, make a comment or ask for help on our Australian Light Horse Studies Centre Forum called:

Desert Column Forum

WARNING: This site contains: names, information and images of deceased people; and, language which may be considered inappropriate today.

Friday, 11 April 2008
The Jifjafa Raid, Sinai, April 10 to 14, 1916, Operation Order No. 6
Topic: AIF - 3B - 3 LHB

The Jifjafa Raid

Sinai, 10 - 14 April 1916

 Operation Order No. 6


Operation Order No. 6 by Brigadier General JM Antill, CB, GOC, 3rd ALH Brigade


The transcription:


Secret

Third Light Horse Brigade

Operation Order No. 6

By Brigadier General JM Antill, CB, GOC, 3rd ALH Brigade

1. Information and Intention

To verify the reports of Agents and Air Service as to the existence of a small Turkish Post at Jifjafa (not exceeding 40 men, including workmen.)

To destroy at least two wells over which gyns have been erected, and if possible capture the Post.

A telephone line has been observed which apparently stops about 1 mile north east of the main post.

To report further upon:-

(a) Water in vicinity of country traversed.

(b) Works and defences if any.

(c) Further information of military value.

(d) Effect capture if possible of enemy personnel or inhabitants.

2. Detail of Troops

Commanding Officer - WH Scott, 9th Light Horse

Staff Officer, Captain AE Wearne, 8th Light Horse

(1) One Squadron of 117 all ranks of 9th Light Horse and 5 spare horses. (1 Officer and 12 Other Ranks - 8th Light Horse.)

(2) 24 Bikanir Camel Corps and 1 Interpreter, for escort duty and despatch riding.

(3) Detachment of Engineers, for demolition and water duties.

(4) WT Wireless Pack Detachment(to be provided by General Headquarters as a self contained unit, carrying 5 days water and supplies.)

(5) Detachment Royal Flying Corps for communication with Air-Craft. This detachment will require 2 horses, 2 riding camels and 2 pack camels, to be supplied by Officer Commanding 10th Light Horse, and Camel Transport Corps respectively.

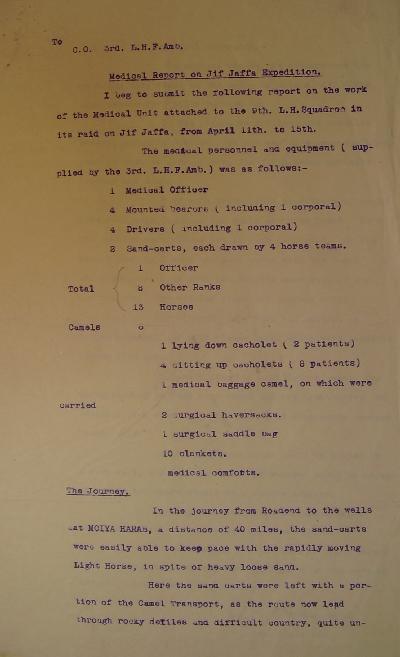
(6) Officer Commanding 3rd Light Horse Field Ambulance will detail one Medical Officer and Orderly to accompany the Column. 5 Camels equipped with sitting up cacolets will accompany this unit, also 2 sand carts furnished complete by Assistant Director of Medical Services 4th Infantry Division (less 8 horses and 2 Drivers furnished by 3rd Light Horse Brigade).

(7) Officer Commanding 9th Light Horse will detail a Machine Gun Detachment of 1 Officer and 4 Other Ranks as part of the command, but to be included in the above numbers. (Pack Equipment for carrying the Gun is being arranged for.)

(8) Captain Macaulay (GSO 3, 2nd Anzac) will accompany the Column as Intelligence Officer and Arabic Interpreter.

3. Camel Transport.

Officer Commanding Camel Transport Corps will provide:-

Camels to carry food, forage, and water for the whole of the Column (less Wireless Detachment). The numbers required for this detail are being communicated direct to the Officer Commanding Camel Transport.

4. Starting Points

Road head east of Railhead for Fighting Troops, No's 1, 3, 6, 7, and 8.

Supply Depot at Railhead for Camel Transport and other Details No. 2, 4, and 5. (Times hereafter.)

5. Movement of Troops

1st Day, 11 April 1916

Column will assemble at Starting Point at 1345, leaving at 1400 to reach the Bivouac occupied by Reconnaissance Party of 21 March 1916 situation in the Wadi um Muksheib, some 6-8 miles from Moiya Harab at 0200 12 March 1916. There is will rest until 0800.

At the above point the Camel Transport should be in waiting.

2nd Day, 12 April 1916

Leave Bivouac at 0800 and proceed to the water at Moiya Harab or north east of that place, where it will rest until 1400, when the Column will continue its march to Point 1340 north east of Moiya Harab and bivouac for the night

3rd Day, 13 April 1916

From Point 1340 the objects of the Reconnaissance will be carried out, returning to Point 1340 on completion - Bivouac, and if the circumstances permit, remain until early morning, thence to water by 0700.

4th Day, 14 April 1916

Feed and water at cistern, and continue march to Bivouac of 11 April 1916, arriving about noon, rest until evening, and continue return march.

5th Day, 15 April 1916

Arrive at Starting Point early hours of 15 April 1916.

6. Movement of Camel Transport

With an escort of 20 Bikanir Camel Corps and Interpreter, the Camel Train will leave the Starting Point at 1400 on 10 April 1916, and following a Programme compiled by Officer Commanding Camel Transport reach the Bivouac mentioned in Paragraph 5. 1st Day at 0200 on 12 April 1916.

From here it will move under orders of Officer Commanding Column, and in conjunction with the same.

It will accompany the Column as far as Point 1340 (less Camels it has dropped at Posts formed). As soon as possible after the return of the Reconnaissance to Point 1340 all Camels will be started on return march and every effort made to move them out of danger zone.

Note:-

The above itinerary (once on the move) is subject to circumstances.

7. Ammunition

200 rounds Small Arms Ammunition per man will be carried, and 5 boxes for the Machine Gun.

8. Supplies and Water

Officer Commanding Supply Depot will arrange for the following:-

(1) Rations and forage for Men, Horses, Natives and Camels, for 5 (five) days.

(2) Water for European personnel for the whole period, one day's water for Natives and Horses at 5 gallons. Native personnel, horses and camels, will depend on water supply at Moiya Harab after the first day.

(3) One emergency ration will be carried by all ranks, which is not to be used without order from Officer Commanding Column.

(4) Water Bottles will be filled.

(5) One feed will be carried on the horse.

9. Tools, etc.

10 Shovels and one Bale Sand Bags will be carried on Camel Transport, to be supplied by Royal Engineers.

A Rotary pump, 20 feet hosing, and 40 feet canvas troughing will be taken. To be supplied by Commanding Officer, Royal Engineers.

10. Dress

Marching Order - one empty sand bag will be carried in lieu of picket bag.

11. Communications

By Wireless and 3 Signallers carrying Helios, Lamp and Flags.

(The above 3 men will be included in the 130 all ranks.)

A Post will be arranged for, and to be situated on the front line to communicate with the Column on its return. Brigade Headquarters to be advised as soon as in touch.

12. Aeroplanes

Co-operation by Aeroplane is being arranged for.

13. Reports

Officer Commanding Column will report to Headquarters by Wireless as opportunity offers, his movements, result of enterprise, and time of return start.

Signed CC Dangar, Captain

Brigade Major, 3rd Australian Light Horse Brigade.


Further Reading:

Reconnaissance to Muksheib by Captain Wearne

The Jifjafa Raid, Sinai, April 10 to 14

Battles where Australians fought, 1899-1920


Citation: The Jifjafa Raid, Sinai, April 10 to 14, 1916, Operation Order No. 6

Posted by Project Leader at 12:01 AM EADT
Updated: Sunday, 29 November 2009 8:51 AM EAST
9th LHR AIF War Diary, 11 April
Topic: AIF - 3B - 9 LHR

9th LHR, AIF

9th Light Horse Regiment

War Diary, 11 April

Pro Gloria et Honore - For Glory and Honour

Regimental March -  Marching Through Georgia


The following entries are extracted and transcribed from the 9th Light Horse Regiment War Diary, the originals of which are held by the Australian War Memorial. There are 366 entries on this site. Each day has entries as they occurred from 1914 to 1919. In addition to the 9th Light Horse Regiment War Diary, when appropriate, entries from the 3rd Light Horse Brigade War Diary and other regiments with the Brigade will also appear. Entries from the unit history, Darley, TH, With the Ninth Light Horse in the Great War, Adelaide, Hassell Press, 1924 will also appear from time to time. The aim is to give the broadest context to the story and allow the reader to follow the day to day activities of the regiment. If a relative happened to have served in the regiment during the Great War, then this provides a general framework in which the individual story may be told.


The Diary


1914

Saturday, April 11, 1914

See 4th Military District, South Australia for militia activities.


1915

Sunday, April 11, 1915

9th Light Horse Regiment Location - Mena Camp, Egypt.

9th Light Horse Regiment War Diary -  No entry.

Carew Reynell Diary - No entry.


1916

Tuesday, April 11, 1916

9th Light Horse Regiment Location - Serapeum, Egypt.

9th Light Horse Regiment War Diary - No entry.


Jifjafa

At 1407 (2.07 pm) a Squadron of the 9th LHR (130 men and 138 horses) under the command of Major W. H. Scott, left Railhead, Serapeum, for raid on a Turkish force reported by British aircraft to be undertaking work on sinking wells at Bir el Jifjaffa, about 52 miles east of the Suez Canal.

Capt A. E. Wearne with 12 other ranks of the 8th LHR accompanied this column to act as scouts, in light of the knowledge and experience of the country gained from the previous reconnaissance mission out to Wadi um Muksheib. Of the 12 men of the 8th LHR, Sergeants George W. Fuzzard No. 50 and Paul J. McGinness No. 324. LCpl John W. J. Miles No. 418, Tpr's Stephen F. Monaghan No. 976, and Alfred W. H. Copley No. 1496, were known members.

The column had attached, Capt MacCaulay, 2nd A&NZ Staff, 3rd Anzac Division, as intelligence officer. Capt Ayrie, 10th LHR, ADC to GOC, 3rd LH Bdge, as Major Scott's Staff officer. Both these officers took 2 horses each.

Two Native guides and one Interpreter, 3 horses.
Army Medical Corps, one officer and 8 other ranks, 13 horses, two sand carts, 6 camels, five of which carrying Cacolets.
One Warrant Officer, Army Service Corps, 1 horse.
2nd Lt Colghlan and 9 other ranks, Australian Engineers, 10 horses and 4 camels. To carry out intelligence and demolition work at the Turkish wells.

Lt Eggar and four other ranks of the Royal Engineers, Wireless Section, 5 Sudanese drivers, 1 horse and 15 camels.
Lt Snooks and Lt Pitman, Royal Flying Corps, Signalling Apparatus, 2 horses and 4 camels. Communications with aircraft of the Royal Flying Corps undertaking forward reconnaissance.

Major Scott's report states that the column proceeded in a South Westerly direction from the Railhead Camp at a formal walk, with a halt at 10 minutes to every hour, resuming march on the hour. At 1700 hours, the column halted to feed the horses. As the column had moved further out the ground gradually got firmer for the horses and the pass had quickened. The commanding officer of the Field Ambulance requested that the pace of the head of the column be slackened, as his horses pulling the sand carts, had to trot in places to keep up and even then had to travel three or four minutes at every halt just to catch up with the column.
The column moved off again at 1930 hours and set a course for the Wadi um Muksheib, travelling on a fairly strait rout except for having to skirt occasional sand hills. The Wadi was reached at 2130 hours and the column proceeded to move down along the Wadi floor until camp was struck at 2230 hours. Here the Camel Train of the Camel Transport Corps was met.

The Camel Transport Corps was under the command of one officer, along with two Warrant officers. 29 Light Horse drivers were attached, riding camels. A detachment of the Bikanir Camel Corps, under the command of Lt Knir Singh, with 25 other ranks and 12 camels for rations and forage, escorted the Camel Transport Train.

The column bivouacked here until the following morning.


1917

Wednesday, April 11, 1917
9th Light Horse Regiment Location - Deir el Belah
9th Light Horse Regiment War Diary - The Regiment undertook routine work for the day.
 

1918

Thursday, April 11, 1918
9th Light Horse Regiment Location - Selmieh
9th Light Horse Regiment War Diary - Commanding Officer attended aeroplane contact work at Sarona aerodrome from 1000 to 1130.
Mounted bayonet training at 1430.
At 1430, Williamson, 1050 Driver G, whilst driving a half limber of grain between A and C Squadrons was thrown from the limber and onto the ground with the wheel passing over his head with fatal results.
Driver Williamson died within a few minutes.
Football final between 9th and 10th Light Horse Regiments with 10th Light Horse Regiment winning by 3 Points - Australian Rules Football.
Williamson, 1050 Trooper G, accidentally killed.


1919

Friday, April 11, 1919
9th Light Horse Regiment Location - Zagazig
9th Light Horse Regiment War Diary - One mounted troop patrolled to Ghazalet - El Khis - El Ghar reporting all quiet.


Previous: 9th LHR AIF War Diary, 10 April

Next: 9th LHR AIF War Diary, 12 April


Sources:

See: 9th Australian Light Horse Regiment, Contents
Australian Light Horse Studies Centre, AIF War Diaries of the Great War, Site Transcription Policy


Further Reading:

9th Light Horse Regiment AIF

Bert Schramm Diary

9th Australian Light Horse Regiment, Roll of Honour 

Battles where Australians fought, 1899-1920


Citation: 9th LHR AIF War Diary, 11 April

Posted by Project Leader at 12:01 AM EADT
Updated: Saturday, 31 July 2010 11:46 AM EADT
The Jifjafa Raid, Sinai, April 10 to 14, 1916, White Account
Topic: AIF - 3B - 3 LHFA

The Jifjafa Raid

Sinai, 10 - 14 April 1916

White Account


White account of the 3rd LHFA, AIF.


The Transcription:

 To: Commanding Officer, 3rd Light Horse Field Ambulance

Medical Report on Jif Jaffa Expedition

I beg to submit the following report on the work of the Medical Unit attached to the 9th Light Horse Squadron in its raid on Jif Jaffa from April 11th to 15th.

The medical personnel and equipment (supplied by the 3rd Light Horse Field Ambulance) was as follows:

1 Medical Officer

4 Mounted bearers (including 1 Corporal)

4 Drivers (including 1 Corporal)

2 Sand Carts, each drawn by 4 horse teams.

Total

1 Officer

8 Other Ranks

13 Horses

Camels 6

1 lying down cacholet (2 patients)

4 sitting up cacholets (8 patients)

1 medical baggage camel, on which were carried:

2 surgical haversacks

1 surgical saddle bag

10 blankets

Medical comforts

The Journey

In the journey from Road Head to the wells at Moiya Harab, a distance of 40 miles, the sand carts were easily able to keep pace with the rapidly moving Light Horse, in spite of heavy loose sand.

Here the sand carts were left with a portion of the Camel Transport, as the route now led through rocky defiles and difficult country, quite unsuitable for any wheel transport.

The medical camels now accompanied the fighting body right to the point of attack, Jif Jaffa, some twenty five miles further on.

In the attack we suffered one casualty killed, and none wounded. We dressed five wounded Turks, four of whom we carried off, the fifth being mortally wounded and dying.

They were transported on sitting up cacholets on camels, back to the wells at Moiya Harab. Here the wounded were placed two in each sand cart. On the return journey I kept the sand carts with the camel transport, so as to move the wounded more quietly and comfortably. The wounded stood the journey well.

The distance both ways was covered by forced marches, and only eleven hours sleep were possible during five days.

The combination of cacholet on camel, for conveyance of wounded over rough country prohibitive to vehicles, and sand carts for transport over sandy country worked well.

Three laying down cases could be placed in a sand cart, and a large number of wounded could be accommodated on transport camels on a return journey.

Specimens of water from different wells along the route, were obtained for examination.

In conclusion, I would like to bring before your notice, the good work done throughout by the medical details, both bearers and drivers.

ER White, Major

3rd Light Horse Field Ambulance

17 April 1916.


Further Reading:

3rd Light Horse Field Ambulance

3rd Australian Light Horse Field Ambulance, Roll of Honour 

The Jifjafa Raid, Sinai, April 10 to 14

Battles where Australians fought, 1899-1920


Citation: The Jifjafa Raid, Sinai, April 10 to 14, 1916, White Account

Posted by Project Leader at 12:01 AM EADT
Updated: Sunday, 29 November 2009 5:28 PM EAST
The Jifjafa Raid, Sinai, April 10 to 14, 1916, Roll of Honour, 3rd Australian Light Horse Brigade
Topic: AIF - 3B - 3 LHB

The Jifjafa Raid

Sinai, 10 - 14 April 1916

Roll of Honour

3rd Australian Light Horse Brigade


Poppies on the Roll of Honour, Australian War Memorial, Canberra


The Roll of Honour contains the names of all the men from the 3rd Australian Light Horse Brigade known to have served and lost their lives during the Battle of Magdhaba.


Roll of Honour

Stephen Frederick MONAGHAN, 8th Light Horse Regiment.

Lest We Forget


Further Reading:

Reconnaissance to Muksheib by Captain Wearne

The Jifjafa Raid, Sinai, April 10 to 14

Battles where Australians fought, 1899-1920


Citation: The Jifjafa Raid, Sinai, April 10 to 14, 1916, Roll of Honour, 3rd Australian Light Horse Brigade

Posted by Project Leader at 12:01 AM EADT
Updated: Sunday, 29 November 2009 10:19 AM EAST
The Jifjafa Raid, Sinai, April 10 to 14, 1916, 3rd LHFA, AIF, War Diary Account
Topic: AIF - 3B - 3 LHFA

The Jifjafa Raid

Sinai, 10 - 14 April 1916

3rd LHFA, AIF, War Diary Account


War Diary account of the 3rd LHFA, AIF.


The Transcription:

 
7 April 1916

1600 - Received orders from Assistant Director of Medical Services 4th Division to

(a) Detail Major White of the unit for special duty

(b) Hand over to him 5 men "to be picked by him"

(c) "Hand over such medical equipment as Major White requires."


13 April 1916

Wrote to Assistant Director of Medical Services Anzac Mounted Division drawing attention to above and stating that granted the regular issue of such orders the nominal command of the Ambulance could be carried on by the most junior officer.


18 April 1916

Forwarded to Assistant Director of Medical Services 4th Division report by Major White stating that the medical work had been successful. Major White informed me that he had difficulty in arranging to have any escort when attending to wounded enemy but  ultimately obtained it.

If medical details are to be left alone unarmed in the desert they are at the mercy of a few wandering armed Bedouin.


Further Reading:

3rd Light Horse Field Ambulance

3rd Australian Light Horse Field Ambulance, Roll of Honour 

The Jifjafa Raid, Sinai, April 10 to 14

Battles where Australians fought, 1899-1920


Citation: The Jifjafa Raid, Sinai, April 10 to 14, 1916, 3rd LHFA, AIF, War Diary Account

Posted by Project Leader at 12:01 AM EADT
Updated: Sunday, 29 November 2009 6:21 PM EAST

Newer | Latest | Older

Full Site Index


powered by FreeFind
Let us hear your story: You can tell your story, make a comment or ask for help on our forum.

Desert Column Forum

A note on copyright

The Australian Light Horse Studies Centre is a not for profit and non profit group whose sole aim is to write the early history of the Australian Light Horse from 1900 - 1920. It is privately funded and the information is provided by the individuals within the group and while permission for the use of the material has been given for this site for these items by various donors, the residual and actual copyright for these items, should there be any, resides exclusively with the donors. The information on this site is freely available for private research use only and if used as such, should be appropriately acknowledged. To assist in this process, each item has a citation attached at the bottom for referencing purposes.

Please Note: No express or implied permission is given for commercial use of the information contained within this site.

A note to copyright holders

The Australian Light Horse Studies Centre has made every endeavour to contact copyright holders of material digitised for this blog and website and where appropriate, permission is still being sought for these items. Where replies were not received, or where the copyright owner has not been able to be traced, or where the permission is still being sought, the Australian Light Horse Studies Centre has decided, in good faith, to proceed with digitisation and publication. Australian Light Horse Studies Centre would be happy to hear from copyright owners at any time to discuss usage of this item.

Contact

Australian Light Horse Studies Centre

eXTReMe Tracker