"At a mile distant their thousand hooves were stuttering thunder, coming at a rate that frightened a man - they were an awe inspiring sight, galloping through the red haze - knee to knee and horse to horse - the dying sun glinting on bayonet points..." Trooper Ion Idriess
The Australian Light Horse Studies Centre aims to present an accurate history as chroniclers of early Australian military developments from 1899 to 1920.
The Australian Light Horse Studies Centre site holds over 12,000 entries and is growing daily.
Contact:Australian Light Horse Studies CentreLet us hear your story:
You can tell your story, make a comment or ask for help on our Australian Light Horse Studies Centre Forum called:
The following entries are extracted and transcribed from the 9th Light Horse Regiment War Diary, the originals of which are held by the Australian War Memorial. There are 366 entries on this site. Each day has entries as they occurred from 1914 to 1919. In addition to the 9th Light Horse Regiment War Diary, when appropriate, entries from the 3rd Light Horse Brigade War Diary and other regiments with the Brigade will also appear. Entries from the unit history, Darley, TH, With the Ninth Light Horse in the Great War, Adelaide, Hassell Press, 1924 will also appear from time to time. The aim is to give the broadest context to the story and allow the reader to follow the day to day activities of the regiment. If a relative happened to have served in the regiment during the Great War, then this provides a general framework in which the individual story may be told.
5. Native Syces. All orders to the native syces are to be issued to their Jemadar. In case of any misunderstanding the head Jemadar is always available at Brigade Headquarters. Non commissioned officers and men are especially warned not to ill treat these natives. Latrine accommodation for the natives will be supplied as soon as possible.
7. Extract from General Order No. 20 - Discipline - The attention of the GOC has been drawn to cases in which officers have been consorting with NCOs and men in hotels, in the street, and other places. Such a practice is contrary to the regulations and customs of the service and is entirely subversive to discipline, and the GOC will hold Commanding Officers responsible that it is put a stop to. All ranks should be reminded that a strict observance of the proper relationship between officers and men reflects credit on a private soldier and his regiment, as much as on the Officers.
Carew Reynell Diary - There is every comfort for the majority of officers on this transport as she is a passenger boat but the men are terribly crowded as there are so many more than she is meant to carry.
We have our Regiment, the 8th Regiment, Brigade Headquarters, Royal Engineers, New Zealand dismounted Light Horse and a collection of various details most of whom are wounded men who have recovered and are returning. Altogether 1700 men, 90 Officers and ships crew.
We have a guard posted on the upper deck day and night for aeroplane or submarine but at night they couldn't see 50 yards anyway - there is no moon.
9th Light Horse Regiment War Diary - 0700 Two deserters, Turks, surrendered to “B” Squadron.
1800 Relieved by 10th Light Horse Regiment. Regiment moved by squadrons to led horses bivouac west of Jordan River. Orders received to supply daily two, day patrols, each strength of one troop and two night patrols each strength one Officer and nine Other Ranks.
2030 Brigade issued orders for practice turnout, the Regiment parading mounted in fighting order within 36 minutes.
1919
Saturday, May 17, 1919
9th Light Horse Regiment Location - Tel el Kebir
9th Light Horse Regiment War Diary - 0900 Took over camping ground lately occupied by 3rd Ghurkhas, 400 yards north of Tel el Kebir Railway Station.
9th LHR, AIF, The peculiar case of Arthur Carrington Smedley Topic: AIF - 3B - 9 LHR
9th LHR, AIF
9th Australian Light Horse Regiment
The peculiar case of Arthur Carrington Smedley
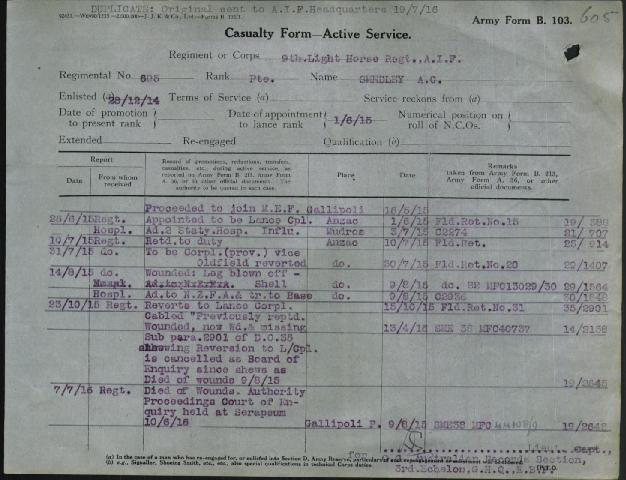
The Casualty Form for Arthur Carrington Smedley
Introduction
The disappearance of Arthur Carrington Smedley from Gallipoli creates an intriguing mystery that lingers to this day. His circumstances were covered by much contradictory testimony gathered from eye witnesses at Gallipoli. Because of the diverse nature of each item of testimony, the fate of Corporal Smedley remains as one of the more peculiar stories from Gallipoli.
The Family
Telegram from Alice Smedley to the Department of Defence, 21 October 1915
The underlying story is the slow and protracted torture of Smedley's family which they underwent, not knowing the fate of their relative. The letters from the various family members are horrowing and point to the daily, and ongoing anguish they suffered until the matter was put to rest, if indeed it ever was for the family.
Enlistment Details
Enlisted on 28 December 1914 as 605 Private Arthur Carrington Smedley, 28, an auctioneer by trade and single. He lived with his mother North Adelaide South Australia Mother Alice C Mrs Smedley at a house called “Ranfurley” in Brougham Place, North Adelaide in the state of South Australia. His denomination was Church of England.
Service
He embarked on A10 "Karoo", 11 February 1915 from Melbourne as part of D Troop, B Squadron, 9th Light Horse Regiment. Sometime in 1915 he was promoted to Corporal.
Events
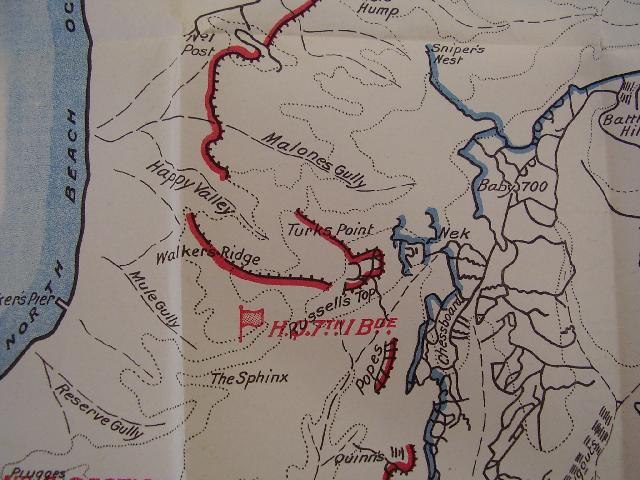
Walkers Ridge at Gallipoli, August 1915.
It was on the main track of Walker’s Ridge that Smedley was struck by a high calibre shell which tore off an arm and a leg and left another leg in a precarious situation.
Witness Reports
Below are the witness reports of the situation.
287 Private Alfred John Jolliffe
287 Private Alfred John Jolliffe, 9 ALHR, 25 November 1915: Statement re Smedley 605:
"Saw him after he had been badly wounded one leg blown off at thigh, the other lower down, was taken to Clearing Station. Informant heard he was dead."
331 Private Louis William Saler
331 Private Louis William Saler, 9 ALHR, 25 November 1915:
"Report on Smedley 605 - Informant said that Smedley was struck by a shell which destroyed both his legs. He died on the Peninsula but informant could not say exactly where."
562 Sergeant E Collette
562 Sergeant E Collette, 1st ALH, Gezira Hospital, Cairo, 9 December 1915:
"Informant states that about the 8th or 9th of August an 11.3 shell landed amongst four men together on the main track of Walker’s Ridge. He saw Smedley soon afterwards in a dying condition with an arm and a leg blown off. He was taken abourd a hospital ship."
341 Sergeant Stephen Henry
341 Sergeant Stephen Henry, 9 ALHR, Ghain Tuffieha, 14 December 1915:
"He was promoted Corporal. He was wounded on Walker’s Ridge by a 9” shell, and his left leg blown off. He died on the way down to the base hospital. The stretcher bearers told witness this. He came from Adelaide, S. Australia."
"About August 10 Smedley was badly wounded by a shell and stretcher bearer J Forman of B Squad who took him down told witness he lost both legs, one having been taken off by doctor on the beach before putting him on Hosp Ship."
244 Trooper CT Cotton
Letter written by 244 Trooper CT Cotton, Abbey Wood, Kent, 5 February 1916.
Hut K.2. Australian Camp, Abbey Wood, Kent. Feb. 5th 1916.
The late Corporal Smedley joined the 9th Light Horse Regiment while we were in training at Broadmeadows Camp, Victoria, where I got to know him well, being in the same troop and tent.
He was promoted to Lance Corporal at Heliopolis Camp a few days before he left Egypt for the Dardanelles with the regiment and on July 30th, in the rest camp below Walker's Ridge, he was promoted to fall Corporal, and on August 9th on Walker's Ridge he was badly wounded by 9 inch shell while in charge of fatigue party. Smedley although badly wounded seemed to be suffering very little pain and was as cheerful as ever when he was taken down to the dressing station by stretcher party and he passed way at the dressing station at Anzac Cove. The last man I know to have seen Corporal Smedley was Trooper Wainwright of the same troop and of Corporal Smedley's section and he would no doubt be able to give more information than myself. Trooper Wainwright was still with the Regiment when I saw him last on August 27th.
244 Trooper CT Cotton 9th Austrailian Light Horse
Testimony from Letters
Correspondence was also examined where references were made to Smedley.
218 Trooper George Ernest Aikeman
Extract from letter from - George Aikeman, 9th Light Horse, King George Hospital. 12.9.15. Waterloo, London.
"Well Floss poor Arthur Smedley had his leg blown off and reported wounded. He died some time later."
148 Lance Corporal Edmund Neville London
Extract from letter received by Mr. McEwin, C/o Dalgety & Co. Adelaide, from Lance Corporal London of the 4th Aust. Field Ambulance
"You mention seeing a letter from Arthur Smedley. The poor fellow was severely wounded by a shell - eventually died from its effects. He was terribly, knocked about I believe receiving a goodly share- of the force of the shell."
Mr G.W.F. Prince Coulter
Extract from, letter from G.W.F. Prince Coulter, 28 Grenfell St. Adelaide. (Dalgety & CO. Ltd.)
"It was only a few days ago that in conversation with Mr. A. Codlee of Prospect he mentioned that his son Lister was with Arthur and knows he was wounded badly - one leg lost - and died 5 days later."
260 Corporal Francis Arnold Gillen
Extract of letter from 260 Corporal Francis Arnold Gillen, No. 3 General Hospital Lemnos Island, dated 21.8.15. (Letter from Brother P.S. Gillen, 36 Ward St. North. Adelaide).
"He, Arthur Smedley, and I were in a main trench ---- without any warning, the shell - a big 8 inch from the Turkish forts - burst right in front of Smed, hurled him into the air and dropped him over a chain away into another trench. Poor old Smed did'nt live long, both his legs and right arm were terribly injured and had to be amputated. He was conscious after the amputations but never knew he lost his limbs. Before he died he was talking about seeing the Flemington National next year".
Mr Ray Turner
Extract from letter from Ray Turner, Rayville Park, Snowtown,
"I had a letter from Frank Rice the other day telling me that poor old Smed had died of wounds at Gallipoli they were friends, also a boy named Cameron said he and Frank buried dear old Smed and had put a little wooden cross with a few words on it on his grave Rice's address is - Q.M.S. F.E. Rice C. Cc. 10th Infantry Bat. 1st. A.I.F. (No. 10135).
Official Treatment
On 22 January 1916, he was declared absent from unit on account of wounds for a period of over three months and placed on the super-numerary list. Later on a Board of Enquiry found that Corporal Smedley had died of wounds on the 9 August 1915.
This all seems rather straight forward although rather peculiar that he should be considered missing when he was in the hands of the medical authorities. Missing is usually attributed to someone who is either obliterated by a bomb or dies in some unknown place. But not in this case. Yet he went missing.
Apparently he was recorded as having boarded the ship and placed under medical care. Then nothing. Smedley disappears and so does his record. Everything just vanishes. No one has the slightest idea where Smedley is except that he wasn’t where the schedule stated – in Cairo. It was the cross to Cairo in which the disappearing act occurred.
This statement of account was sent to the grieving family:
"We have received your inquiry for 605 Tpr AC Smedley, 9 ALH. The 3rd AGH infom us by telephone he was never in their hospital. We already had an inquiry for him and on our evidence he must have died on board a hospital ship about 10th Aug. He had been promoted to Cpl and was badly wounded on Walker’s Ridge by a shell, one of his legs being afterwards amputated by the Dr on the beach. Though we have no evidence by an eye witness of his death, several men told us he was already in dying condition when he was carried to the beach, and he was so badly wounded – both an arm and a leg being blown off – that no one could wish him to have lived."
This is indeed one case of nobody being there. It was conjectured that he died while at sea and they buried him at sea, a common practice. It is one thing to lose a body but quite another to lose his papers. The reality is that no one knew what happened to Smedley, a poor fellow doomed to roam the Mediterranean like the Marie Celeste, finding no home and no answers from and to the living.
Despite all the information available, it still remains a mystery today as to what actually happened to Smedley. We can only guess at the truth but no more than that.
Source of Information
Service File of Arthur Carrington Smedley held at National Archives of Australia, Bar Code - 8086630.
The following entries are extracted and transcribed from the 9th Light Horse Regiment War Diary, the originals of which are held by the Australian War Memorial. There are 366 entries on this site. Each day has entries as they occurred from 1914 to 1919. In addition to the 9th Light Horse Regiment War Diary, when appropriate, entries from the 3rd Light Horse Brigade War Diary and other regiments with the Brigade will also appear. Entries from the unit history, Darley, TH, With the Ninth Light Horse in the Great War, Adelaide, Hassell Press, 1924 will also appear from time to time. The aim is to give the broadest context to the story and allow the reader to follow the day to day activities of the regiment. If a relative happened to have served in the regiment during the Great War, then this provides a general framework in which the individual story may be told.
9th Light Horse Regiment War Diary - Entrained for Alexandria with 25 Officers and 454 Other Ranks. All horses and transport left at Heliopolis under Veterinary Officer with 30 Other Ranks of Regiment. The 1st Reinforcements less 20 men were absorbed as were also 50% of the 2nd Reinforcements. The balance of these together with the 3rd Reinforcement and 4th Reinforcements and sick of the Regiment were left at Heliopolis as a Regimental Depot.
One Other Rank and three storemen were left at the Ordnance Base, Alexandria. Saddlery removed at Heliopolis and kit bags were taken to Alexandria and stored. The Regiment embarked from Bunkers Quay on Transport X2 by 1800.
3rd Light Horse Brigade War Diary - 0430 Arrived at Alexandria. Embarked Minominee [X2].
Headquarters, 8th Light Horse Regiment, 9th Light Horse Regiment, Signalling Troop, B Train, Field Ambulance and other details.
In all, 91 Officers 1,461 Other Ranks = 1,552 men and 3 interpreters.
Carew Reynell Diary - Train left at 0120 arriving Alexandria at 0730 on 16 May.
We were not allowed to embark until about 1500 or 1600 so sat on the wharf most of the day.
The ship didn't leave till about 0400 on 17 May.
It was decided at the last to bring bicycles and officers' sleeping valises but half expect to lose both.
9th Light Horse Regiment Location - Abasan el Kebir
9th Light Horse Regiment War Diary - “C” Squadron marched in from El Gamli at 1300 being relieved by “A” Squadron from the 10th Light Horse Regiment.
At 1400 Chauvel, Major General Sir HG, KCMG, CB [Anzac Mounted Division] and Hodgson, Major General W, CMG, OB [Division Commander] inspected the Brigade. [Column commander] Chauvel, Major General Sir HG, KCMG, CB, expressed his appreciation of the work done by the Regiment in polishing up bits, spurs and stirrup irons and cleanliness of the camp.
9th Light Horse Regiment War Diary - Quiet day with the usual wiring and digging parties.
Reserve trenches now called Inner Bridgehead Defences now being constructed by parties from 8th and 10th Light Horse Regiments under direct supervision of Daly, Major TJ.
1919
Friday, May 16, 1919
9th Light Horse Regiment Location - Zagazig
9th Light Horse Regiment War Diary - 0900 Regiment less transport and escort of one Non Commissioned Officer and eight Other Ranks moved to Tel el Kebir. Mounted Squadron B proceeded by road.
1300 A and “C” Squadrons, dismounted, entrained at ASC siding.
Commanding Officer and Adjutant proceeded by motor car. 1630 Arrived at Tel el Kebir and bivouacked.
Rifle Clubs, Question 11, and the 9th Light Horse Regiment Topic: MilitiaRC - Rifle Clubs
Australian Rifle Clubs
Attestation Paper 1914 - 1918
Question 11
Question 11 on the AIF Attestation Paper reads as follows:
An interesting question which set off a trail of interest with me a few years ago when the children's GGF listed the following on his attestation papers:
2823 Private Herbert Leslie Schramm, Served 2 years with Tumby Bay Rifle Club.
Of course, the curiosity is raised as to why a person would include a rifle club as part of military service. My nephew and myself were members of a rifle club in WA and apart from all the regulation things that had to be dealt with as par for the course, there was nothing martial about it. So the connection is tenuous. A puzzler indeed for the person in the 21st century.
A bit more digging and we find rifle clubs being listed in the Commonwealth General Military Orders as they become active or are deactivated. In addition to shooting, their main task, they also undertook rudimentary drills and led by a captain, usually a nominal position a la Captain Mainwaring in "Dad's Army".
There was a very serious side to the Rifle Clubs which is missed by most historians of the Great War, but one which laid the underpinnings for the Australian defence posture from 1901 - 1910 and the roll on effects into the Kitchener Report.
My understanding is that Hutton was asked to put together a low cost military model for the defence of Australia upon Federation. The state's model - producing Imperial formations which would slot into the British Army seamlessly - proved to be outrageously expensive and far beyond the resources of the Commonwealth. Boer War commitments nearly ruined the state governments and it certainly crippled the growth of the Commonwealth for many years. So Hutton was assigned the task of coming up with a solution that fit the funding ability from the states' empty coffers. With little money, the soolution was relatively simple.
Hutton selected the Boer Commando system as the best model for the defence of Australia. This was the greatest accolade that could be paid to Oom Paul and his methodology of fighting the British. Hutton aped the Boer system of defence while ironically being committed to fight against it and stamp out the Boer Republics. To get trained cells of men without actually incurring too much cost the notion of Rifle Clubs came into play. The Commonwealth would provide the rifles and ammunition while the members would pay the rest. The clubs would be an integral part of the military with the Australian Instructional Staff taking care of the drills and shooting training for the leadership cadres of the clubs. In essence, if Australia had been invaded during this period, one would have seen a replay of the Boer War although this time Australians riding in the commandos.
After the Kitchener reforms where the posture was to be changed from a guerrilla force to a military that would once again fit seamlessly into an Imperial Expeditionary Force, massive battalions and regiments were formed, and while not stated, appeared to be slotted into an Imperial scheme with 7 infantry divisions and 2 cavalry divisions. We can see how this played out in the Great War with 5 Infantry Divisions, 2 Cavalry Divisions and 1 Training Division - just one division short of the Kitchener Plan and that was only because the PM, Billy Hughes could not get his desire for another division through cabinet.
For regions not able to be adequately served by this structure or for those not eligible to serve, the rifle clubs remained an integral part of the landscape in their quasi military role.
Here are a few other members of the 9th LHR who also answered Question 11 regarding Rifle Club service:
552 Pte Albert Ernest King, Served 3 years in the Tumby Bay Rifle Club
689 Pte John Diamond, Served 7 years with Appollo Bay Rifle Club
717 Pte Arthur Harry Charles Jackson, Served 3 years in the Sandringham Rifle Club
895 Pte Edgar Ernest Mathews, Served 3 years in the Crystal Brook Rifle Club
943 Pte Carl Martin Steicke, Served 10 years in the Caltowie Rifle Club
1000 Pte Edgar William Gifford, Served in the Port Germain Rifle Club
2475 Pte John Thomas Ward, Served 3 years with Red Bank Rifle Club, Victoria
2803 Pte Guthrie Hugh Lipson Baillie, Served 1.5 years with Tumby Bay Rifle Club
2824 Pte Frederick Harry Schwartz, Served 2 years with Mannum Rifle Club
2986 Pte William Bumett Willison, Served 2 years with the Salisbury Rifle Club
Great War, Queensland History, Great War, Queensland History, The Rockhampton Military Parade, August 1914 Topic: Gen - St - Qld
Great War
Queensland History
The Rockhampton Military Parade, August 1914
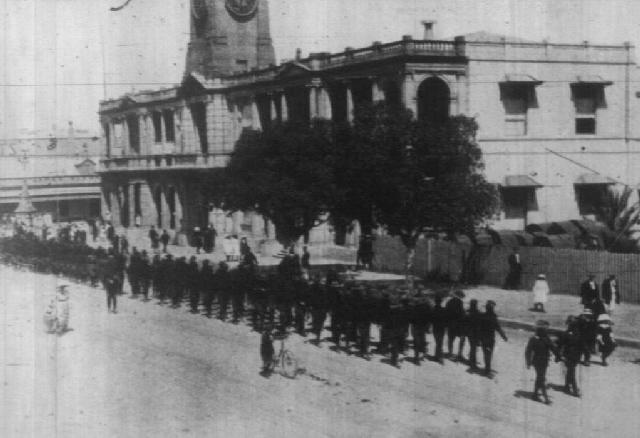
The Citizens Military forces march past the Post Office.
[From: The Queenslander, 5 September 1914, p. 23.]
At Rockhampton, the response was a bit more subdued. To build up the patriotic fervour and demonstrate the town's military prowess, by the middle of August 1914, the town put on a military parade. The express purpose was to demonstrate the quality of the two military formations - the army and navy - give a few speeches and send the Naval volunteers on their way to Papua.
In the above picture we see the Citizens Military forces march past the Post Office. This pic was taken near the intersection of East and William Streets. The purpose of this march past was to send the men to their Church Parade.
It has all the quality of a novelty for the public. On the main street, you can see a mother walk along with her child, looking at the men marching, although I suspect the child wanted to see Daddy marching and Mum has taken the child along for that occasion. There is also a fellow by himself, holding his bicycle and standing in the middle of the street, fascinated by the spectacle. These people show no obvious fear of traffic which tells us something about traffic movements along the streets of Rocky with Sunday morning coming down. On the footpath, desultory groups of people are walking along with the troops.
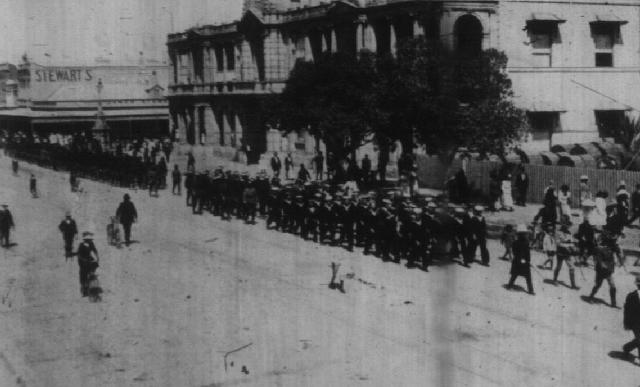
The Naval forces march past the Post Office.
[From: The Queenslander, 5 September 1914, p. 23.]
In the background is the signage announcing Stewarts - over the road from the Post Office. This departmental store still exists at the same spot in Rocky - it is a landmark institution.
The crowds are a bit thicker. The fellow with his bicycle is now moving towards Stewarts. Another woman in a black dress is standing with her daughter watching the parade. The one thing never missing from these parades are the little boys marching along pretending to be soldiers. At the bottom right hand corner it is possible to see half a dozen doing just that much to the annoyance of the officer marching in front.
The Australian Light Horse Studies Centre is a not for profit and non profit group whose sole aim is to write the early history of the Australian Light Horse from 1900
- 1920. It is privately funded and the information is provided by the individuals within the group and while permission for the use of the material has been given for this
site for these items by various donors, the residual and actual copyright for these items, should there be any, resides exclusively with the donors. The information on
this site is freely available for private research use only and if used as such, should be appropriately acknowledged. To assist in this process, each item has a citation
attached at the bottom for referencing purposes.
Please Note: No express or implied permission is given for commercial use of the information contained within this site.
A note to copyright holders
The Australian Light Horse Studies Centre has made every endeavour to contact copyright holders of material digitised for this blog and website and where
appropriate, permission is still being sought for these items. Where replies were not received, or where the copyright owner has not been able to be traced, or where
the permission is still being sought, the Australian Light Horse Studies Centre has decided, in good faith, to proceed with digitisation and publication. Australian Light
Horse Studies Centre would be happy to hear from copyright owners at any time to discuss usage of this item.