"At a mile distant their thousand hooves were stuttering thunder, coming at a rate that frightened a man - they were an awe inspiring sight, galloping through the red haze - knee to knee and horse to horse - the dying sun glinting on bayonet points..." Trooper Ion Idriess
The Australian Light Horse Studies Centre aims to present an accurate history as chroniclers of early Australian military developments from 1899 to 1920.
The Australian Light Horse Studies Centre site holds over 12,000 entries and is growing daily.
Contact:Australian Light Horse Studies CentreLet us hear your story:
You can tell your story, make a comment or ask for help on our Australian Light Horse Studies Centre Forum called:
The following weeks will see the various pages of the Hotchkiss Machine Gun Pack for Cavalry. The Hotchkiss Gun was introduced in the Light Horse formations during the early months of 1917. The introduction of this robust and portable gun gave the Light Horse Regiments additional mobile fire power which considereably added to their ability to sustain light combat situations and defend against vastly numerically superior forces. Apart from being an excellent weapon, it was in much demand by the Turkish forces who considered the capture of a Hotchkiss Gun well worth any risks involved in the process. This is a manual produced in 1917 and illustrates the method by which the Hotchkiss Gun was packed and moved throughout the Palestine campaign.
Another entry from the book written by Lieutenant Colonel Hüseyin Hüsnü Emir, called Yildirim. Every day, one page of the book will be posted. This is Page 34.
Colonel Hüsnü, Yildirim, Page 34.
[Turkish edition: Genelkurmay Basim Evi, Ankara 2002, p. 20]
Although the name is a dead give away that the information is going to be spurious at best, this claim has far more solid followers in various ways than this site betrays. Those accounts will also be considered in other posts. However, let us deal with the outrageous allegations as they need to be put to bed immediately. To do justice to the Tall Armenian Tale site, the claim made will be reproduced in full. That way there is no fear of misinterpretation. The term British should include Australian as Australians were very much involved in the guarding and maintenance of Ottoman POW's.
Turkish POW Treatment by the British
We often hear how badly British POWs were treated by the Turks. (Sometimes we even hear how well they were treated in Gallipoli.) But how were Turkish POWs treated by the Brits?
Dispersed Armenians’ defamation campaigns are spreading with full speed.
However, there is no reaction but a few weak objections from the accused (1) Turkish Republic Government.
Yet we have such important documents…
For example, I don’t think most of us know the things I am going to tell in this article. From the book “Katran Kazanýnda Sterilize” ("Sterilized in Tar Cauldron") by Imge Publications, written by Ahmet Duru who revealed the diary of the sub-lieutenant (2) Ahmet Altinay from Karaman…
In WWI, 150 thousand of our soldiers were captured by the British. And some of these soldiers were imprisoned in Seydibesir Useray-i Harbiye Camp (3) near the city of Alexandria in Egypt. The full name of the camp was “Seydibesir Kuveysna Osmanli Useray-i Harbiye (4) Kampi”. In this camp, the Ottoman soldiers of 16th Division’s 48th Regiment who were captured at the Palestine fronts in 1918 were interned. For two years until June 12th, 1920, they were subjected to any kind of torture, oppression, heavy insults and humiliation.
The reason for this inhumane treatment was the Armenians.
The British commanders of the camp, because of the wrong, mendacious translations and provocations of Armenian translators who knew Turkish, had become fierce Turk enemies.
***
The war was over. Nevertheless, to release the soldiers besides the ones who died because of heavy conditions in the camp was not to the benefit of the British. Because the British were brainwashed by Armenians, being told that in a potential new war they could come up against these soldiers again. The solution was massacre…
Our soldiers, forced by bayonets, were put in disinfection pools with the excuse of wiping out germs. But the chemical, krizol, was added a lot more than normal in the water. Even just when they put their feet, our soldiers got scalded. However, the British troops didn’t let them get out of the pool by threatening with rifles (5).
Our soldiers didn’t want to put their heads under the water that reached waist level. But then the British started shooting in the air. Our soldiers knelt and put their heads under water not to die.
But the ones who got their heads out of the water couldn’t see any more. Because the eyes were burned…The resistance of our soldiers who saw what happened to the ones that got out was no use and our 15 thousand men got blinded.
***
This savagery was discussed in May 25th, 1921, in the Turkish Great National Assembly. The congressmen Mr. Faik and Mr. Seref proposed that 15 thousand sons of this country were blinded in Egypt by being put in the “krizol” pool; and wanted the Assembly to make an attempt for punishment of the British physicians, commanders and soldiers who were guilty of this act.
Of course the newly founded government had a thousand other problems. Demanding an explanation for this act was easily forgotten.
This of course is an impassioned plea filled with populist anti-Armenian conspiracy themes but contains no evidence, no evidence whatsoever. The claims are rhetorical but not evidentiary. To be taken seriously by anyone in the mainstream of the global community, the article has to go beyond the rhetorical iteration of an unsubstantiated claim, it has to cite sources that are not part of this circular in logic.
For example, Fred says Jim is a crook because he was told this by George. Of course George found out that Jim was a crook because Fred told him. This notion is popularly known as "fleas on fleas". And so we have a circular argument of sources quoting each other but not substantiating the primary allegation that Jim is a crook. No evidence is offered, just a rhetorical statement. So too is it with the sources quoted above. Non proffer evidence except by way of citing another source which agrees with the proposition which is citing another source which made the same allegation without substantiation. This is rhetoric, not evidence.
To substantiate a claim, the commentary needs to go a bit further than in the article. Here are some basic issues to examine.
Where are the British files detailing this systematic blinding by the Armenians? Every injured Turkish POW in Egypt would have generated a medical report regardless of how crude the report. To my knowledge, all British files are open and available for reading so there is no excuse for sloppy research. No shredding of medical files could have erased this many cases. However, within the British files there is no evidence to substantiate these claims and the reason why this is so is because the claims are a fantasy.
A search of the Australian archives - every single available file relating to POWs is very much available and they provide information with the good and the bad. Nothing is covered up. The worst case regarded the 12,000 Ottoman soldiers who surrendered at the Berramke Barracks in Damascus after its fall on 1 October 1918. These men were deserted by their own support teams and left to fend for themselves without any resources with neither food nor medicines. After a few days being held as POWs, cholera broke out amongst this group. Over a two week period many hundreds of men died through cholera, the worst day recording over 150 deaths. By dint of hard work, the POWs were put to work to provide a satisfactory sanitation and drinking water system. Some men had to be coerced into working towards the common good. The result - cholera was brought under control. The deaths from cholera did not only effect the Turks but also the Australian, Indian, French and British soldiers in the area with many of these troops also dying.
So the cholera outbreak at Damascus was not a sinister British plot to kill Turks, it was a problem brought on by the neglect of the Turkish command for the health of their soldiers and citizens in Damascus. The ordinary soldier in both the Allied forces and the Turkish army paid a high price for this neglect.
Again, in Damascus, the commander of the 3rd LH Brigade ordered, at gun point, a British ambulance unit to tend to Australian casualties as a priority. All British medical resources had been diverted to the clearing up and care of the Turkish soldiers that none were available for the Allied soldiers still fighting in the field. This does not have the ring of a British plot to kill Turkish soldiers. All as it tells me is that the British medical services were stretched to breaking point trying to cope with Allied casualties and the some 65,000 Turks captured by the Australian Mounted Division - an awesome task in anyone's book.
We have evidence for all of the above. The public archives contain many files with independently produced documents that substantiate this story.
In contrast, to date, in the above quotations and expositions, not seen one shred of documentary evidence to substantiate the claims has come to light. There is a lot of recitation of arcane allegations which never had legs in 1920 and still have no legs despite the archives of Britain, France, Australia and New Zealand being thrown open to all comers who have agendum that match the above wild allegations. None have come forth despite decades of free availability. Now the Turkish military archives are being gradually made open to the public. No one who has access to them has made these allegations. Not a whimper. De nada. Zip. The reason why no documentary evidence is proffered by those making these exaggerated claims is because none exists. It never existed.
However, in the background we can hear the standard anti-Armenian conspiracy theorist respond to these comments with the standard and very hackneyed claims:
1. The Allies naturally would want to cover up this episode and so stripped all the files of any mention.
2. Medical practitioners who attended to the victims were threatened with death or paid off not to make any reports.
3. The cunning Armenians played the Allies like marionettes who did their bidding and thus did everything the Armenians ordered without question.
The following entries are extracted and transcribed from the 9th Light Horse Regiment War Diary, the originals of which are held by the Australian War Memorial. There are 366 entries on this site. Each day has entries as they occurred from 1914 to 1919. In addition to the 9th Light Horse Regiment War Diary, when appropriate, entries from the 3rd Light Horse Brigade War Diary and other regiments with the Brigade will also appear. Entries from the unit history, Darley, TH, With the Ninth Light Horse in the Great War, Adelaide, Hassell Press, 1924 will also appear from time to time. The aim is to give the broadest context to the story and allow the reader to follow the day to day activities of the regiment. If a relative happened to have served in the regiment during the Great War, then this provides a general framework in which the individual story may be told.
9th Light Horse Regiment War Diary - Bursts of fire continued in support of troops on our left.
Carew Reynell Diary - After four days continuous scrapping there has been a lull today and both sides seem fairly tired. Our Brigade made an attack on the trenches in front of us at 0430 on the morning of the 7th. It failed and the 8th Regiment which found the first line was wiped out - all the officers on the spot with the exception of the 2nd in Command and a couple subalterns being killed or wounded, mostly the former. The Regiment lost 240 out of 400 and most of them were killed. The 10th Regiment were to follow but when the first line were cut down they remained on the edge of the trenches and although their casualties were heavy they were light in comparison. We were to cover the attack on the first trenches with fire and then to attack the trenches further off which was really the worst job of the lot, but owing to the first failing our attack of course never came off and we have got off with only 30 killed and wounded in four days. The former included Colonel Miell and the latter Captain Code and Lieutenant McLoughry. The night previous to this attack the New Zealanders and the 4th Infantry Brigade and two British Brigades had moved up to the Sari Bair ridge from No. 3 Outpost but didn't succeed in establishing themselves on the top and in the four subsequent days they have had a devil of a lot of scrapping and still haven't got there. In the evening preceding our attack, that is 6 August, the 1st Australian Infantry Brigade assaulted and took the trenches in their front and have since repulsed several counter attacks and consolidated themselves and opened their communications with the rear. The Turks have counter attacked all our new front and we have been expecting a counter attack here but it hasn't come yet. The 1st Light Horse Brigade attacked from Pope's and Quinn's and gained four lines but were driven out and their losses were very heavy - nearly 50%. The 2nd Light Horse Brigade attacked German Officer's Trench and failed and lost heavily. Our left column had no continuous line to take of course and operated over rough country which favoured the attackers and they succeeded well but lost heavily, but now seem to have come to a full stop some 5 or 600 yards below the ridge.
In spite of everyone's exhaustion I hoped for another effort would have been made to gain the ridge while it was still comparatively unfortified and the Turks must be also very exhausted and have lost very heavily. Also they appeared to have run short of gun ammunition yesterday and were doing no shelling to speak of.
I am afraid they will be receiving more reinforcements than we and in time make their position impregnable as it is naturally very strong. If our attack had been properly arranged and carried out it should not have failed so egregiously. In the first place the artillery bombardment was a joke and such as it was not made in cooperation with the attack. There was just a desultory bombardment and then an attack. Moreover the attack in my opinion ought to have got into part of the trenches and when it was glued I felt so strongly that it could get forward that I reported to the Brigade Major that if he gave me authority to do so I would guarantee to get the trenches with the men of the 8th and the 10th that were there. However an order was sent to them to rush the trenches but the officers on the spot considered it impossible and they were withdrawn. I am inclined to think the attackers had not satisfactorily reconnoitred their objective as their direction was wrong. They were making too much of their right and thus obliquely passing the nearest part of the trench. However, owing to the lay of the ground the reconnaissance of the trenches was most difficult and I was only able to get the lay of them by taking bearings and measurements and plotting out a plan of them. After six weeks of influenza and dysentery I wasn't very fit when the attack started and trusted to excitement to keep me going. However after five very strenuous days and nights we are still in the trenches and haven't had a wash or our boots or any other clothing off and I am feeling very limp with a headache, neuralgia, sore throat, cold in head and chest and pant like grampus with the least exertion. I have had to five it best today and just lay in a dugout and am afraid I shall have to five it best altogether soon. However, I want to see this out and believe that we ought to make a supreme effort now and get on to Sari Bair - some where. However, I expect mental and physical weariness will win the day as usual and that the Turks will be given time to consolidate. Today at any rate has been very quiet.
By the way I forgot to mention that the main cause of failure of our Brigade's attack was machine gun fire - some men's legs were completely severed by this fire.
The distance to be covered was approximately 30 feet and the machine gun was 200 feet in the rear and above and on flank in front of trenches.
The 9th Corps have occupied ground on our Corps left but we don't know much of what they are doing yet.
1916
Thursday, August 10, 1916
9th Light Horse Regiment Location - Hod Hasanein
9th Light Horse Regiment War Diary - 0100 “B” Squadron ordered up to support 10th Light Horse Regiment and at 0200 the remainder of the Regiment moved out and remained in support for the day.
Everything quiet but Turks still in strength.
1800 Took over line from 10th Light Horse Regiment, “C” Squadron on right and “B” Squadron on left and “A” Squadron in reserve.
No movement of enemy during night.
1917
Friday, August 10, 1917
9th Light Horse Regiment Location - Tel el Marakeb
9th Light Horse Regiment War Diary - Second party for Port Said Rest Camp left under Parsons, Major HM.
Syllabus of Training for week ending 16 August 1917 issued.
1918
Saturday, August 10, 1918
9th Light Horse Regiment Location - Madhbeh
9th Light Horse Regiment War Diary - Sentences of the following promulgated.
Lindsay, 439 Shoeing Smith Corporal [temporary Farrier Sergeant] B, 9th Light Horse Regiment who was charged with: "When on Active Service, absenting himself without leave." The Court found the accused "Guilty" and sentenced him to revert to substantive rank of Shoeing Smith Corporal.
Waldon, 827 Lance Corporal [Temporary Corporal] JW, 9th Light Horse Regiment who was charged with: "When on Active Service, absenting himself without leave." The Court found the accused "Guilty" and sentenced him to Temporary rank of Corporal.
Virgo, 916 Sergeant [Temporary Staff Sergeant Major] RA, 9th Light Horse Regiment who was charged with: "When on Active Service, absenting himself without leave." The Court found the accused "Guilty" and sentenced him to revert to the substantive rank of Sergeant.
General Officer in Command Brigade sent a letter of appreciation of work carried out by Lane, Lieutenant BGB.
1400 Regimental Order No 5 issued.
1930 Regiment moved out to F Section Defence to relieve 8th Light Horse Regiment as garrison. Relief completed by 2200. Led Horses under Ragless, Captain BB, returned to 3rd Brigade Led Horse Camp, Wadi Nueiameh.
3rd Light Horse Brigade War Diary - On 10th August No. 4 sub sector was added to command of General Officer in Command 3rd Light Horse Brigade. 1st Battalion, British West Indies Regiment took over the garrison from 9th and 10th Light Horse Regiments in F and G sections on night 13th August 1918.
9th Light Horse Regiment to Ain Ed Duk and 10th Light Horse Regiment to cover of high ground south west of El Madhbeh ridge as supports and 8th Light Horse Regiment as sector reserve.
The relief of the sub sector caused increased movement in the area and enemy - artillery was active day and night. El Musallabeh received special attention from enemy guns, but the trenches and dugouts of this position were so prepared that artillery effect was very slight.
The troops had been called upon for continuous night digging as well as for the garrisoning of the defences. The dust and heat was still great with temperatures averaging from 108 to 117 degrees Fahrenheit. From casualties and sickness the strength of all units of the Brigade was now considerably reduced.
1919
Sunday, August 10, 1919
9th Light Horse Regiment Location - Adelaide
9th Light Horse Regiment War Diary - 0900 All available original members of the Regiment were mustered on the forecastle and photographed. Total 39.
Pulled into wharf, Outer Harbour, Adelaide and commenced disembarking at about 1100.
There was a large crowd of welcomers including the State Commandant, Antill, Brigadier General JM, - one time General Officer in Command 3rd Light Horse Brigade. A band also helped proceedings.
1300 Disembarkation completed. Total disembarked 14 Officers 309 Other Ranks.
This leaves Parsons, Major HM; and, Darley, Major TH [Ship's Staff] to return on completion of duty in Eastern Ports. Two Officers 36 Other Ranks for repatriation in Victoria, three Other Ranks in NSW, and two Other Ranks in Queensland.
Leave was granted to all ranks of 4th Military District until 0900 following morning - Rendezvous at the Cheer Up Hut, Adelaide.
In evening "Welcome Home" by the Cheer Up Society and by the Women of the 9th and 11th Light Horse Regimental Club and St Peters 9th Light Horse Regiment Trench Comforts Fund, were well attended and very much appreciated.
Kantara Memorial, Kantara War Memorial Cemetery, Egypt
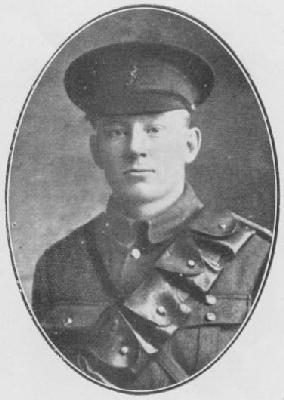
Biographical Notes:
Son of Mrs J. Mason, of 38 River Bank, Wanganui.
According to Luxford (1923), Trooper Mason was buried at Oghratina, Sinai.
"Entered the School in 1909, and left after the second term of the following year. Remaining at home till 1912, he worked on his father s farm, subsequently going on to a station at Waipiro Bay in order to gain further experience. He returned home in 1915, waiting to be called up, and left with the 6th Reinforcements, joining the Wellington Mounted Rifles. While in Egypt he was transferred to the machine gun corps, and was killed on August 9th, 1916, while in pursuit of the Turks after the battle of Romani." (In Memoriam, 1914-1918 [Wanganui Collegiate School])
Description of Image:
Portrait
Further References:
Luxford, J.H., 1923, With the Machine Gunners in France and Palestine : The Official History of the New Zealand Machine Corps in the Great World War 1914-1918, Whitcombe and Tombs, Auckland, p. 251.
The Australian Light Horse Studies Centre is a not for profit and non profit group whose sole aim is to write the early history of the Australian Light Horse from 1900
- 1920. It is privately funded and the information is provided by the individuals within the group and while permission for the use of the material has been given for this
site for these items by various donors, the residual and actual copyright for these items, should there be any, resides exclusively with the donors. The information on
this site is freely available for private research use only and if used as such, should be appropriately acknowledged. To assist in this process, each item has a citation
attached at the bottom for referencing purposes.
Please Note: No express or implied permission is given for commercial use of the information contained within this site.
A note to copyright holders
The Australian Light Horse Studies Centre has made every endeavour to contact copyright holders of material digitised for this blog and website and where
appropriate, permission is still being sought for these items. Where replies were not received, or where the copyright owner has not been able to be traced, or where
the permission is still being sought, the Australian Light Horse Studies Centre has decided, in good faith, to proceed with digitisation and publication. Australian Light
Horse Studies Centre would be happy to hear from copyright owners at any time to discuss usage of this item.