« August 2008 »
S M T W T F S
1 2
3 4 5 6 7 8 9
10 11 12 13 14 15 16
17 18 19 20 21 22 23
24 25 26 27 28 29 30
31
You are not logged in. Log in


Search the site:


powered by FreeFind
Volunteer with us.

Entries by Topic All topics  
A Latest Site News
A - Using the Site
AAA Volunteers
AAB-Education Centre
AAC-Film Clips
AAC-Photo Albums
AIF & MEF & EEF
AIF - Lighthorse
AIF - ALH - A to Z
AIF - DMC
AIF - DMC - Or Bat
AIF - DMC - Anzac MD
AIF - DMC - Aus MD
AIF - DMC - British
AIF - DMC - BWI
AIF - DMC - French
AIF - DMC - Indian
AIF - DMC - Italian
AIF - DMC - Medical
AIF - DMC - Remounts
AIF - DMC - Scouts
AIF - DMC - Sigs
AIF - DMC - Sigs AirlnS
AIF - DMC - 1 Sig Sqn
AIF - DMC - 2 Sig Sqn
AIF - DMC - Eng
AIF - DMC - Eng 1FSE
AIF - DMC - Eng 2FSE
AIF - DMC - GSR
AIF - 1B - 1 LHB
AIF - 1B - 6 MVS
AIF - 1B - 1 LHMGS
AIF - 1B - 1 Sig Trp
AIF - 1B - 1 LHFA
AIF - 1B - 1 LHR
AIF - 1B - 2 LHR
AIF - 1B - 3 LHR
AIF - 2B - 2 LHB
AIF - 2B - 7 MVS
AIF - 2B - 2 LHFA
AIF - 2B - 2 LHMGS
AIF - 2B - 2 Sig Trp
AIF - 2B - 5 LHR
AIF - 2B - 6 LHR
AIF - 2B - 7 LHR
AIF - 3B - 3 LHB
AIF - 3B - 8 MVS
AIF - 3B - 3 LHB Sigs
AIF - 3B - 3 LHFA
AIF - 3B - 3 LHMGS
AIF - 3B - 3 Sig Trp
AIF - 3B - 8 LHR
AIF - 3B - 9 LHR
AIF - 3B - 10 LHR
AIF - 4B - 4 LHB
AIF - 4B - 4 Sig Trp
AIF - 4B - 9 MVS
AIF - 4B - 4 LHFA
AIF - 4B - 4 LHMGS
AIF - 4B - 4 LHR
AIF - 4B - 11 LHR
AIF - 4B - 12 LHR
AIF - 5B - 5 LHB
AIF - 5B - 10 MVS
AIF - 5B - 5 LHFA
AIF - 5B - 5 Sig Trp
AIF - 5B - ICC
AIF - 5B - 14 LHR
AIF - 5B - 15 LHR
AIF - 5B - 1er Regt
AIF - 5B - 2 NZMGS
AIF - AASC
AIF - Aboriginal LH
AIF - Badges
AIF - Cars
AIF - Chinese LH
AIF - Double Sqns
AIF - Engineers
AIF - Fr - 22 Corps
AIF - Fr - 13 LHR
AIF - Honour Roll
AIF - HQ - 3rd Echelon
AIF - Marching Songs
AIF - Misc Topics
AIF - NZMRB
AIF - NZMRB - AMR
AIF - NZMRB - CMR
AIF - NZMRB - EFT
AIF - NZMRB - NZMFA
AIF - NZMRB - NZMGS
AIF - NZMRB - OMR
AIF - NZMRB - Sig-Trp
AIF - NZMRB - WMR
AIF - Ships
AIF - Ships - Encountr
AIF - Ships - Una
AIF - WFF
AIF - Wireless Sqn
Battles
BatzA - Australia
BatzA - Broken Hill
BatzA - Liverpool
BatzA - Merivale
BatzB - Boer War
BatzB - Bakenlaagte
BatzB - Belmont
BatzB - Bothaville
BatzB - Buffels Hoek
BatzB - Coetzees Drift
BatzB - Diamond Hill
BatzB - Driefontein
BatzB - Elands
BatzB - Graspan
BatzB - Grobelaar
BatzB - Grootvallier
BatzB - Hartebestfontn
BatzB - Houtnek
BatzB - Karee Siding
BatzB - Kimberley
BatzB - Koster River
BatzB - Leeuw Kop
BatzB - Mafeking
BatzB - Magersfontein
BatzB - Modder River
BatzB - Onverwacht
BatzB - Paardeberg
BatzB - Palmietfontein
BatzB - Pink Hill
BatzB - Poplar Grove
BatzB - Rhenoster
BatzB - Sannahs Post
BatzB - Slingersfontn
BatzB - Stinkhoutbm
BatzB - Sunnyside
BatzB - Wilmansrust
BatzB - Wolvekuil
BatzB - Zand River
BatzG - Gallipoli
BatzG - Anzac
BatzG - Aug 1915
BatzG - Baby 700
BatzG - Evacuation
BatzG - Hill 60
BatzG - Hill 971
BatzG - Krithia
BatzG - Lone Pine
BatzG - Nek
BatzJ - Jordan Valley
BatzJ - 1st Amman
BatzJ - 2nd Amman
BatzJ - Abu Tellul
BatzJ - Es Salt
BatzJ - JV Maps
BatzJ - Ziza
BatzM - Mespot
BatzM - Baghdad
BatzM - Ctesiphon
BatzM - Daur
BatzM - Kurna
BatzM - Kut el Amara
BatzM - Ramadi
BatzN - Naval
BatzN - AE1
BatzN - Cocos Is
BatzN - Heligoland
BatzN - Marmara
BatzN - Zeebrugge
BatzN - Zeppelin L43
BatzNG - Bitapaka
BatzO - Other
BatzO - Baku
BatzO - Egypt 1919
BatzO - Emptsa
BatzO - Karawaran
BatzO - Peitang
BatzO - Wassa
BatzP - Palestine
BatzP - 1st Gaza
BatzP - 2nd Gaza
BatzP - 3rd Gaza
BatzP - Aleppo
BatzP - Amwas
BatzP - Ayun Kara
BatzP - Bald Hill
BatzP - Balin
BatzP - Beersheba
BatzP - Berkusieh
BatzP - Damascus
BatzP - El Auja
BatzP - El Buggar
BatzP - El Burj
BatzP - Haifa
BatzP - Huj
BatzP - JB Yakub
BatzP - Kaukab
BatzP - Khan Kusseir
BatzP - Khuweilfe
BatzP - Kuneitra
BatzP - Megiddo
BatzP - Nablus
BatzP - Rafa
BatzP - Sasa
BatzP - Semakh
BatzP - Sheria
BatzP - Surafend
BatzP - Wadi Fara
BatzS - Sinai
BatzS - Bir el Abd
BatzS - El Arish
BatzS - El Mazar
BatzS - El Qatiya
BatzS - Jifjafa
BatzS - Magdhaba
BatzS - Maghara
BatzS - Romani
BatzS - Suez 1915
BatzSe - Senussi
BatzWF - Westn Front
BW - Boer War
BW - NSW
BW - NSW - 1ACH
BW - NSW - 1NSWMR
BW - NSW - 2NSWMR
BW - NSW - 3ACH
BW - NSW - 3NSWIB
BW - NSW - 3NSWMR
BW - NSW - 5ACH
BW - NSW - A Bty RAA
BW - NSW - AAMC
BW - NSW - Aust H
BW - NSW - Lancers
BW - NSW - NSW Inf
BW - NSW - NSWCBC
BW - NSW - NSWIB
BW - NSW - NSWMR_A
BW - NZ
BW - Qld
BW - Qld - 1ACH
BW - Qld - 1QMI
BW - Qld - 2QMI
BW - Qld - 3ACH
BW - Qld - 3QMI
BW - Qld - 4QIB
BW - Qld - 5QIB
BW - Qld - 6QIB
BW - Qld - 7ACH
BW - QLD - AAMC
BW - SA
BW - SA - 1SAMR
BW - SA - 2ACH
BW - SA - 2SAMR
BW - SA - 3SACB
BW - SA - 4ACH
BW - SA - 4SAIB
BW - SA - 5SAIB
BW - SA - 6SAIB
BW - SA - 8ACH
BW - SA - AAMC
BW - Tas
BW - Tas - 1ACH
BW - Tas - 1TIB
BW - Tas - 1TMI
BW - Tas - 2TB
BW - Tas - 2TIB
BW - Tas - 3ACH
BW - Tas - 8ACH
BW - Vic
BW - Vic - 1VMI
BW - Vic - 2ACH
BW - Vic - 2VMR
BW - Vic - 3VB
BW - Vic - 4ACH
BW - Vic - 4VIB
BW - Vic - 5VMR
BW - Vic - 6ACH
BW - Vic - AAMC
BW - Vic - Scot H
BW - WA
BW - WA - 1WAMI
BW - WA - 2ACH
BW - WA - 2WAMI
BW - WA - 3WAB
BW - WA - 4ACH
BW - WA - 4WAMI
BW - WA - 5WAMI
BW - WA - 6WAMI
BW - WA - 8ACH
BW Gen - Campaign
BW Gen - Soldiers
BW General
Cavalry - General
Diary - Schramm
Egypt - Heliopolis
Egypt - Mena
Gen - Ataturk Pk, CNB
Gen - Australia
Gen - Legends
Gen - Query Club
Gen - St - NSW
Gen - St - Qld
Gen - St - SA
Gen - St - Tas
Gen - St - Vic
Gen - St - WA
Gm - German Items
Gm - Bk - 605 MGC
GW - 11 Nov 1918
GW - Atrocities
GW - August 1914
GW - Biographies
GW - Propaganda
GW - Spies
GW - We forgot
Militia 1899-1920
Militia - Area Officers
Militia - Inf - Infantry
Militia - Inf - 1IB
Militia - Inf - 2IB
Militia - Inf - 3IB
Militia - Inf - NSW
Militia - Inf - Qld
Militia - Inf - SA
Militia - Inf - Tas
Militia - Inf - Vic
Militia - Inf - WA
Militia - K.E.Horse
Militia - LH
Militia - LH - Regts
Militia - LH - 1LHB
Militia - LH - 2LHB
Militia - LH - 3LHB
Militia - LH - 4LHB
Militia - LH - 5LHB
Militia - LH - 6LHB
Militia - LHN - NSW
Militia - LHN - 1/7/1
Militia - LHN - 2/9/6
Militia - LHN - 3/11/7
Militia - LHN - 4/6/16
Militia - LHN - 5/4/15
Militia - LHN - 6/5/12
Militia - LHN - 28
Militia - LHQ - Qld
Militia - LHQ - 13/2
Militia - LHQ - 14/3/11
Militia - LHQ - 15/1/5
Militia - LHQ - 27/14
Militia - LHS - SA
Militia - LHS - 16/22/3
Militia - LHS - 17/23/18
Militia - LHS - 24/9
Militia - LHT - Tas
Militia - LHT - 12/26
Militia - LHV - Vic
Militia - LHV - 7/15/20
Militia - LHV - 8/16/8
Militia - LHV - 9/19
Militia - LHV - 10/13
Militia - LHV - 11/20/4
Militia - LHV - 19/17
Militia - LHV - 29
Militia - LHW - WA
Militia - LHW-18/25/10
Militia - Military Orders
Militia - Misc
MilitiaRC - Rifle Clubs
MilitiaRC - NSW
MilitiaRC - NT
MilitiaRC - Qld
MilitiaRC - SA
MilitiaRC - Tas
MilitiaRC - Vic
MilitiaRC - WA
Militiaz - New Zealand
Tk - Turkish Items
Tk - Army
Tk - Bks - Books
Tk - Bks - 1/33IR
Tk - Bks - 27th IR
Tk - Bks - Air Force
Tk - Bks - Yildirim
Tk - POWs
Wp - Weapons
Wp - Hotchkiss Cav
Wp - Hotchkiss PMG
Blog Tools
Edit your Blog
Build a Blog
RSS Feed
View Profile
Open Community
Post to this Blog
Site Index
Education Centre
LH Militia
Boer War
Transport Ships
LH Battles
ALH - Units
ALH - General
Aboriginal Light H
Weapons
Ottoman Sources

"At a mile distant their thousand hooves were stuttering thunder, coming at a rate that frightened a man - they were an awe inspiring sight, galloping through the red haze - knee to knee and horse to horse - the dying sun glinting on bayonet points..." Trooper Ion Idriess

The Australian Light Horse Studies Centre aims to present an accurate history as chroniclers of early Australian military developments from 1899 to 1920.

The Australian Light Horse Studies Centre site holds over 12,000 entries and is growing daily.

Contact: Australian Light Horse Studies Centre

Let us hear your story: You can tell your story, make a comment or ask for help on our Australian Light Horse Studies Centre Forum called:

Desert Column Forum

WARNING: This site contains: names, information and images of deceased people; and, language which may be considered inappropriate today.

Saturday, 30 August 2008
Militia Distribution in Australia, 1914, 4th Military District, Part 3
Topic: Militia - LH


4TH MILITARY DISTRICT- continued


INFANTRY - 19TH INFANTRY BRIGADE - continued


78th Infantry (Adelaide Rifles).


Headquarters - Adelaide

Machine Gun Section -  Adelaide East

"A" Company - Adelaide East

"B" Company - Adelaide East

"C" Company - St Peters

"D" Company - St Peters, Adelaide University

"E" Company - Goodwood

"F" Company - Glenelg

"G" Company - Mitcham, Edwardstown, Victor Harbour, McLaren Vale

"H" Company - Mile End, Thebarton


79th (Torrens) Infantry.


(Attached for training 1913-14, to 19th Infantry Brigade.)

Head-Quarters - Norwood

Machine Gun Section - Norwood

"A" Company - North Norwood

"B" Company - Norwood

"C" Company - North Adelaide

"D" Company - Prospect

"E" Company - Gawler, Angaston, Nuriootpa, Tanunda, Kapunda

"F" Company - Magill, Ashton, Paradise, Tea Tree Gully, Lobethal, Blumberg

"G" Company - North Norwood

"H" Company - Walkerville


81st (Wakefield) Infantry.


(Attached for training, 1913-14, to 19th Infantry Brigade

Head-Quarters (less Signallers and Band) - Wallaroo

Signallers - Broken Hill

Band - Moonta

Machine Gun Section - Broken Hill

"A" Company - Moonta, Moonta Mines, Maitland

"B" Company - Wallaroo, Kadina, Wallaroo Mines, Clare, Balaklava

"C" Company - Port Pirie, Jamestown

"D" Company - Petersburg, Quorn, Port Augusta, Burra

"E" Company - Broken Hill

"F" Company - Broken Hill

"G" Company - Broken Hill

"H" Company - Broken Hill


Further Reading:

Militia Structure in Australia from 1903 to 1914

For the South Australian Light Horse Militia establishment, see:

Light Horse structure 1903

1903 Reorganisation, South Australia

1903 Reorganisation, SA, 16th ALHR

1903 Reorganisation, SA, 17th ALHR

South Australian Light Horse location list 1910

Light Horse structure 1914

Militia Distribution in Australia, 1914, 4th Military District

For 22nd Australian Light Horse details, see:

22nd Australian Light Horse 

22nd Australian Light Horse, HQ, MGS and "A" Sqn, 1912

22nd Australian Light Horse, "B" Sqn, 1912

22nd Australian Light Horse,  "C" Sqn, 1912

For 23rd (Barossa) Australian Light Horse details, see:   

23rd (Barossa) Light Horse

For 24th (Flinders) Australian Light Horse details, see:

24th (Flinders) Australian Light Horse

Peacetime and Wartime Regimental Establishments, see:

Peace establishment of Australian Light Horse, 1903-14  

4th Military District Staff Roster and Allocations, see:

Militia Distribution in Australia, 1914, 4th Military District, Part 4

Militia Distribution in Australia, 1914, 4th Military District, Part 5

For 1914 Infantry, Artillery and other service arms distribution, see:

Militia Distribution in Australia, 1914, 4th Military District, Part 2 

Militia Distribution in Australia, 1914, 4th Military District, Part 3 

Militia Distribution in Australia, 1914, 4th Military District, Part 4


Additional reference:

RK Peacock, Evolution of Australian Light Horse Regiments 1841-1935,  Unpublished MSS, c.1936. 


Citation: Militia Distribution in Australia, 1914, 4th Military District, Part 3

Posted by Project Leader at 4:26 PM EADT
Updated: Wednesday, 8 October 2008 9:02 AM EADT
9th LHR On Manoeuvres, The Alleged Elliott Photograph Examined, Part 2
Topic: BatzP - Beersheba

9th LHR On Manoeuvres

The Alleged Elliott Photograph Examined, Part 2


 Journal of the Australian War Memorial, October 1983, p. 33.

[Click on page for a larger print version.]


The Alleged Elliott Photograph Examined

In an earlier article called:

9th LHR On Manoeuvres

the proposition was raised that the alleged Elliott photograph claimed to be the charge of the 4th LHB at Beersheba. By a number of posts, each dealing with discrete sections of knowledge, it will be demonstrated that the alleged Elliott photograph was actually a picture taken by Captain Hurley of the 9th LHR on manoevres near Deir el Belah in February 1918. This is Part 2 of the discussion. The internal evidence of the alleged Elliott photograph.

One of the most fundamental methods of research is to allow the document or photgraph tell its own story. It is a process of examining the internal evidence. In this post, the alleged Elliott photograph will be examined on its own merits with the same picture available to Professor Ian Jones when he wrote his article in 1983. In that manner we can establish if the research and conclusions were accurate or deficient in dilligence prior to publication. Thus we will examine the internal evidence of the photograph.

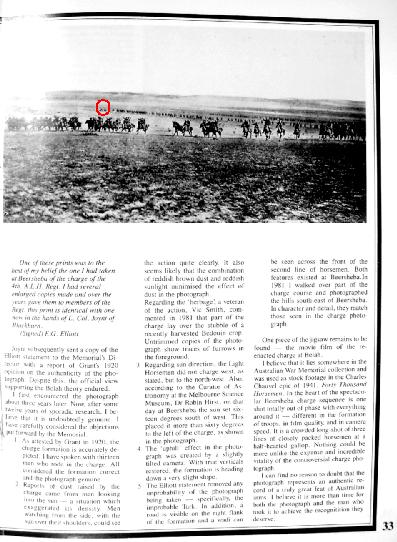
In supporting this claim by Elliott was an article written by Ian Jones called: Is This The Charge At Beersheba? and published in the Journal of the Australian War Memorial, October 1983. Page 33 of the Journal is reproduced at the top of this article.

The reason for reproducing this page is to highlight the material available to Elliott and Jones which is available to everyone else through this article. So to that end, it is important to use this as the starting point to analyse the quality of scholarship produced by Jones in supporting the Elliott claim. This will allow all protagonists in this argument to begin from a common point - the published claim and reproduced photograph.

One item noticable on this copy is a red circle in the background. Below is an enlargement of the scene it describes.


Second Line, Charge Picture enlarged, 1.


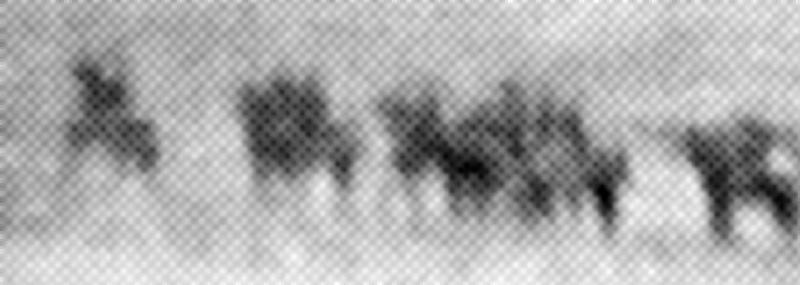
This picture is extracted from that found in the Journal of the Australian War Memorial, October 1983, p. 33, the same facilities available to Jones then and now. The picture describes two dismounted men overviewing the 2nd line. Two empty saddles indicates that the riders have dismounted.

But what is going on here? What are these three men looking at?

If the focus is moved to the first section of horsemen in the second line, the answer becomes clear.


Second Line, Charge Picture enlarged, 2.


The horsemen of the sections immediately adjacent to the two dismounted horsemen are facing towards those men. The legs of the various horses indicates that there is no movement occurring at all. They are stationary. While it is beyond the ken to know exactly the actions that are occurring at the moment this picture was taken, it appears as though the men of this section are taking instructions from the dismounted soldiers.

If this is the thundering charge picture as described by Elliott, then the men in the second row are behaving quite casually and indeed are not charging at all.

Below is the whole section summed up.


Second Line, Charge Picture enlarged, 3.

[Click on picture for larger version.]


These men are not charging at all. Quite the contrary, they are standing around seemingly awaiting orders.

Now here is the problem confronted by those who believe that the picture was taken by Elliott. If the answer is that the picture represents the formation of the charge rather than the total charge, as has been put forward by some, then there is contradiction with the positioning of the third line. This relates to the hand drawn map by Massie indicating that the third line was assembled in line of column prior to the charge of the 4th LHB. The map and description may be located here:


Hand drawn map of the 4th LHB prior to charging into Beersheba, 31 October 1917


In other words, the logic doesn't allow an each way description. If, as those who believe it is the Elliott photograph, this is the commencement of the charge, then the absence of the third line being in line of column militates against it being the Elliott photograph as it does not reflect the conditions at that moment. If this is then a picture of the full blown charge, then the second line does not appear to be charging at all and thus it cannot be the charge scene described by Elliott in his declaration:

I hastened to complete my job under the impression that this was what my charts were required for, at the same time keeping my eye on the Brigade area, to to my surprise it seemed to be within minutes, I saw horsemen in extended order coming over the crest of the ridge, I packed my gear, and then came another line of troops in the same order, I then moved around to the other side of the knoll, and by this time the third line appeared, bewildered by what was happening I just lay there and gazed in astonishment, as the front line drew nearer I saw that their bayonets were drawn and that they were approaching at a hard gallop, having a camera in my haversack I got it out and took a shot 


BEERSHEEBA... THE CONTROVERSIAL PHOTOGRAPH OF THE CHARGE 


Further compounding this situation is that of the third line. The aspect of the horses' stance indicates that the line too is standing still or not engaged in any charging action.

The internal evidence of the photograph leads one only to a single conclusion, it cannot possibly be the photograph of the charge at Beersheba by the 4th LHB as alleged by Elliott and supported by Jones.  It would appear as though the examination of the picture by Jones was not conducted on the merits of the picture but introducing extraneous factors that have no bearing upon the subject. An examination of the internal evidence was not beyond the ability of Jones for the screening of the picture for the article meant that he had a high quality reproduction available to him. The enlargements in this post come directly from the screened photograph he had available to him at the time of publication in 1983. Nothing new has been added. The only difference between these two dates is a rigorous examination of the background in the picture, something that was absent in the initial article.

One final reflection. In the latest coffee table book produced by Jones called: A Thousand Miles of Battles, it is essentially a rehash of the Time Life book from 1986 with no attempt at a serious examination of this issue and others in light of recent scholarship. While no doubt becoming a popular version of the story, its inherent inaccuracies of detail make it risible for the purposes of scholarship. Indeed, it compounds the difficulties in telling an accurate story to the public when it is shrouded in solid myth. It is this mythology that debases the contribution of the men and women to our nation during these terrible years. It makes a mockery of their sacrifice and turns them into cartoon characters. But what else can one expect from a film script writer whose job is to sell fantasy. There is no problem with people producing fictional films but there is a major problem when fiction is produced under the guise of a book written by an "academic" and then sold to the public as reality. 

When examining various works, indeed even this blog, it is essential to test all the information to ascertain its veracity. Elliott made a claim about a photograph which has been sustained by many over the years. When examined under forensic conditions, the claim seems to fade away. So too do the claims of Elliott's supporters.


Acknowledgement: This ground breaking study would not have been possible without the expert assistance of Chris Horvath and Steve Becker, both of whom contributed their own expertise. Chris and I discussed in detail the issues related to this photograph during my visit to Perth in July 2008 while Steve Becker added a depth of technical information regarding the movement of mounted cavalry. Of course, any errors, mistakes or omissions are mine alone. Bill Woerlee.


Further Reading:

9th LHR On Manoeuvres

Fleas on fleas -The results from careless work - a case study 

Pictures (taken 2006) of the route taken by the 4th LHB charge at Beersheba

Hand drawn map of the 4th LHB prior to charging into Beersheba, 31 October 1917

Official map of the Beersheba Charge 


Citation: 9th LHR On Manoeuvres, The Alleged Elliott Photograph Examined, Part 2

Posted by Project Leader at 10:47 AM EADT
Updated: Monday, 27 July 2009 6:21 PM EADT
Colonel Husnu, Yildirim, Page 54
Topic: Tk - Bks - Yildirim

Another entry from the book written by Lieutenant Colonel Hüseyin Hüsnü Emir, called Yildirim. Every day, one page of the book will be posted. This is Page 54.


Colonel Hüsnü, Yildirim, Page 54.
[Turkish edition: Genelkurmay Basim Evi, Ankara 2002, p. 40]

[Click on page for a larger print version.]


Citation: Colonel Hüsnü, Yildirim, Page 54

Posted by Project Leader at 9:50 AM EADT
Updated: Saturday, 30 August 2008 9:54 AM EADT
22nd Corps Cavalry Routine Order 558, 23 January 1918
Topic: AIF - Fr - 22 Corps

Apart from the War Diary which presents a reflected view of Regimental history, one of the best sources of understanding the immediate challenges facing a regiment is to be found in the Routine Orders. They are a wealth of detail.

In this case, the  22nd Corps Cavalry Routine Orders for 1918 have been highlighted to illustrate the tempo of this formation from the beginning of the year towards the end of the war. The aim is to illustrate the tumultuous year that followed ending in the defeat of Germany. Too little is known of the role regarding the Light Horse in the drama on the Western Front. This should address some shortfalls of information.


 22nd Corps Cavalry Routine Order 558, 23 January 1918


22nd Corps Cavalry Routine Order 558, 23 January 1918, p. 1.

[Click on page for a larger print version.] 


Citation: 22nd Corps Cavalry Routine Order 558, 23 January 1918


Posted by Project Leader at 1:01 AM EADT
Updated: Sunday, 31 August 2008 4:34 PM EADT
Memorandum on proposed Reconnaissance to Bir el Abd, 5 May 1916, Page 2
Topic: AIF - DMC - Anzac MD

Memorandum on proposed Reconnaissance to Bir el Abd, 5 May 1916, Page 2


Memorandum on proposed Reconnaissance to Bir el Abd, 5 May 1916, Page 2
[Click on page for a larger print version.]

Posted by Project Leader at 1:01 AM EADT
Updated: Sunday, 31 August 2008 2:38 PM EADT

Newer | Latest | Older

Full Site Index


powered by FreeFind
Let us hear your story: You can tell your story, make a comment or ask for help on our forum.

Desert Column Forum

A note on copyright

The Australian Light Horse Studies Centre is a not for profit and non profit group whose sole aim is to write the early history of the Australian Light Horse from 1900 - 1920. It is privately funded and the information is provided by the individuals within the group and while permission for the use of the material has been given for this site for these items by various donors, the residual and actual copyright for these items, should there be any, resides exclusively with the donors. The information on this site is freely available for private research use only and if used as such, should be appropriately acknowledged. To assist in this process, each item has a citation attached at the bottom for referencing purposes.

Please Note: No express or implied permission is given for commercial use of the information contained within this site.

A note to copyright holders

The Australian Light Horse Studies Centre has made every endeavour to contact copyright holders of material digitised for this blog and website and where appropriate, permission is still being sought for these items. Where replies were not received, or where the copyright owner has not been able to be traced, or where the permission is still being sought, the Australian Light Horse Studies Centre has decided, in good faith, to proceed with digitisation and publication. Australian Light Horse Studies Centre would be happy to hear from copyright owners at any time to discuss usage of this item.

Contact

Australian Light Horse Studies Centre

eXTReMe Tracker