« October 2008 »
S M T W T F S
1 2 3 4
5 6 7 8 9 10 11
12 13 14 15 16 17 18
19 20 21 22 23 24 25
26 27 28 29 30 31
You are not logged in. Log in


Search the site:


powered by FreeFind
Volunteer with us.

Entries by Topic All topics  
A Latest Site News
A - Using the Site
AAA Volunteers
AAB-Education Centre
AAC-Film Clips
AAC-Photo Albums
AIF & MEF & EEF
AIF - Lighthorse
AIF - ALH - A to Z
AIF - DMC
AIF - DMC - Or Bat
AIF - DMC - Anzac MD
AIF - DMC - Aus MD
AIF - DMC - British
AIF - DMC - BWI
AIF - DMC - French
AIF - DMC - Indian
AIF - DMC - Italian
AIF - DMC - Medical
AIF - DMC - Remounts
AIF - DMC - Scouts
AIF - DMC - Sigs
AIF - DMC - Sigs AirlnS
AIF - DMC - 1 Sig Sqn
AIF - DMC - 2 Sig Sqn
AIF - DMC - Eng
AIF - DMC - Eng 1FSE
AIF - DMC - Eng 2FSE
AIF - DMC - GSR
AIF - 1B - 1 LHB
AIF - 1B - 6 MVS
AIF - 1B - 1 LHMGS
AIF - 1B - 1 Sig Trp
AIF - 1B - 1 LHFA
AIF - 1B - 1 LHR
AIF - 1B - 2 LHR
AIF - 1B - 3 LHR
AIF - 2B - 2 LHB
AIF - 2B - 7 MVS
AIF - 2B - 2 LHFA
AIF - 2B - 2 LHMGS
AIF - 2B - 2 Sig Trp
AIF - 2B - 5 LHR
AIF - 2B - 6 LHR
AIF - 2B - 7 LHR
AIF - 3B - 3 LHB
AIF - 3B - 8 MVS
AIF - 3B - 3 LHB Sigs
AIF - 3B - 3 LHFA
AIF - 3B - 3 LHMGS
AIF - 3B - 3 Sig Trp
AIF - 3B - 8 LHR
AIF - 3B - 9 LHR
AIF - 3B - 10 LHR
AIF - 4B - 4 LHB
AIF - 4B - 4 Sig Trp
AIF - 4B - 9 MVS
AIF - 4B - 4 LHFA
AIF - 4B - 4 LHMGS
AIF - 4B - 4 LHR
AIF - 4B - 11 LHR
AIF - 4B - 12 LHR
AIF - 5B - 5 LHB
AIF - 5B - 10 MVS
AIF - 5B - 5 LHFA
AIF - 5B - 5 Sig Trp
AIF - 5B - ICC
AIF - 5B - 14 LHR
AIF - 5B - 15 LHR
AIF - 5B - 1er Regt
AIF - 5B - 2 NZMGS
AIF - AASC
AIF - Aboriginal LH
AIF - Badges
AIF - Cars
AIF - Chinese LH
AIF - Double Sqns
AIF - Engineers
AIF - Fr - 22 Corps
AIF - Fr - 13 LHR
AIF - Honour Roll
AIF - HQ - 3rd Echelon
AIF - Marching Songs
AIF - Misc Topics
AIF - NZMRB
AIF - NZMRB - AMR
AIF - NZMRB - CMR
AIF - NZMRB - EFT
AIF - NZMRB - NZMFA
AIF - NZMRB - NZMGS
AIF - NZMRB - OMR
AIF - NZMRB - Sig-Trp
AIF - NZMRB - WMR
AIF - Ships
AIF - Ships - Encountr
AIF - Ships - Una
AIF - WFF
AIF - Wireless Sqn
Battles
BatzA - Australia
BatzA - Broken Hill
BatzA - Liverpool
BatzA - Merivale
BatzB - Boer War
BatzB - Bakenlaagte
BatzB - Belmont
BatzB - Bothaville
BatzB - Buffels Hoek
BatzB - Coetzees Drift
BatzB - Diamond Hill
BatzB - Driefontein
BatzB - Elands
BatzB - Graspan
BatzB - Grobelaar
BatzB - Grootvallier
BatzB - Hartebestfontn
BatzB - Houtnek
BatzB - Karee Siding
BatzB - Kimberley
BatzB - Koster River
BatzB - Leeuw Kop
BatzB - Mafeking
BatzB - Magersfontein
BatzB - Modder River
BatzB - Onverwacht
BatzB - Paardeberg
BatzB - Palmietfontein
BatzB - Pink Hill
BatzB - Poplar Grove
BatzB - Rhenoster
BatzB - Sannahs Post
BatzB - Slingersfontn
BatzB - Stinkhoutbm
BatzB - Sunnyside
BatzB - Wilmansrust
BatzB - Wolvekuil
BatzB - Zand River
BatzG - Gallipoli
BatzG - Anzac
BatzG - Aug 1915
BatzG - Baby 700
BatzG - Evacuation
BatzG - Hill 60
BatzG - Hill 971
BatzG - Krithia
BatzG - Lone Pine
BatzG - Nek
BatzJ - Jordan Valley
BatzJ - 1st Amman
BatzJ - 2nd Amman
BatzJ - Abu Tellul
BatzJ - Es Salt
BatzJ - JV Maps
BatzJ - Ziza
BatzM - Mespot
BatzM - Baghdad
BatzM - Ctesiphon
BatzM - Daur
BatzM - Kurna
BatzM - Kut el Amara
BatzM - Ramadi
BatzN - Naval
BatzN - AE1
BatzN - Cocos Is
BatzN - Heligoland
BatzN - Marmara
BatzN - Zeebrugge
BatzN - Zeppelin L43
BatzNG - Bitapaka
BatzO - Other
BatzO - Baku
BatzO - Egypt 1919
BatzO - Emptsa
BatzO - Karawaran
BatzO - Peitang
BatzO - Wassa
BatzP - Palestine
BatzP - 1st Gaza
BatzP - 2nd Gaza
BatzP - 3rd Gaza
BatzP - Aleppo
BatzP - Amwas
BatzP - Ayun Kara
BatzP - Bald Hill
BatzP - Balin
BatzP - Beersheba
BatzP - Berkusieh
BatzP - Damascus
BatzP - El Auja
BatzP - El Buggar
BatzP - El Burj
BatzP - Haifa
BatzP - Huj
BatzP - JB Yakub
BatzP - Kaukab
BatzP - Khan Kusseir
BatzP - Khuweilfe
BatzP - Kuneitra
BatzP - Megiddo
BatzP - Nablus
BatzP - Rafa
BatzP - Sasa
BatzP - Semakh
BatzP - Sheria
BatzP - Surafend
BatzP - Wadi Fara
BatzS - Sinai
BatzS - Bir el Abd
BatzS - El Arish
BatzS - El Mazar
BatzS - El Qatiya
BatzS - Jifjafa
BatzS - Magdhaba
BatzS - Maghara
BatzS - Romani
BatzS - Suez 1915
BatzSe - Senussi
BatzWF - Westn Front
BW - Boer War
BW - NSW
BW - NSW - 1ACH
BW - NSW - 1NSWMR
BW - NSW - 2NSWMR
BW - NSW - 3ACH
BW - NSW - 3NSWIB
BW - NSW - 3NSWMR
BW - NSW - 5ACH
BW - NSW - A Bty RAA
BW - NSW - AAMC
BW - NSW - Aust H
BW - NSW - Lancers
BW - NSW - NSW Inf
BW - NSW - NSWCBC
BW - NSW - NSWIB
BW - NSW - NSWMR_A
BW - NZ
BW - Qld
BW - Qld - 1ACH
BW - Qld - 1QMI
BW - Qld - 2QMI
BW - Qld - 3ACH
BW - Qld - 3QMI
BW - Qld - 4QIB
BW - Qld - 5QIB
BW - Qld - 6QIB
BW - Qld - 7ACH
BW - QLD - AAMC
BW - SA
BW - SA - 1SAMR
BW - SA - 2ACH
BW - SA - 2SAMR
BW - SA - 3SACB
BW - SA - 4ACH
BW - SA - 4SAIB
BW - SA - 5SAIB
BW - SA - 6SAIB
BW - SA - 8ACH
BW - SA - AAMC
BW - Tas
BW - Tas - 1ACH
BW - Tas - 1TIB
BW - Tas - 1TMI
BW - Tas - 2TB
BW - Tas - 2TIB
BW - Tas - 3ACH
BW - Tas - 8ACH
BW - Vic
BW - Vic - 1VMI
BW - Vic - 2ACH
BW - Vic - 2VMR
BW - Vic - 3VB
BW - Vic - 4ACH
BW - Vic - 4VIB
BW - Vic - 5VMR
BW - Vic - 6ACH
BW - Vic - AAMC
BW - Vic - Scot H
BW - WA
BW - WA - 1WAMI
BW - WA - 2ACH
BW - WA - 2WAMI
BW - WA - 3WAB
BW - WA - 4ACH
BW - WA - 4WAMI
BW - WA - 5WAMI
BW - WA - 6WAMI
BW - WA - 8ACH
BW Gen - Campaign
BW Gen - Soldiers
BW General
Cavalry - General
Diary - Schramm
Egypt - Heliopolis
Egypt - Mena
Gen - Ataturk Pk, CNB
Gen - Australia
Gen - Legends
Gen - Query Club
Gen - St - NSW
Gen - St - Qld
Gen - St - SA
Gen - St - Tas
Gen - St - Vic
Gen - St - WA
Gm - German Items
Gm - Bk - 605 MGC
GW - 11 Nov 1918
GW - Atrocities
GW - August 1914
GW - Biographies
GW - Propaganda
GW - Spies
GW - We forgot
Militia 1899-1920
Militia - Area Officers
Militia - Inf - Infantry
Militia - Inf - 1IB
Militia - Inf - 2IB
Militia - Inf - 3IB
Militia - Inf - NSW
Militia - Inf - Qld
Militia - Inf - SA
Militia - Inf - Tas
Militia - Inf - Vic
Militia - Inf - WA
Militia - K.E.Horse
Militia - LH
Militia - LH - Regts
Militia - LH - 1LHB
Militia - LH - 2LHB
Militia - LH - 3LHB
Militia - LH - 4LHB
Militia - LH - 5LHB
Militia - LH - 6LHB
Militia - LHN - NSW
Militia - LHN - 1/7/1
Militia - LHN - 2/9/6
Militia - LHN - 3/11/7
Militia - LHN - 4/6/16
Militia - LHN - 5/4/15
Militia - LHN - 6/5/12
Militia - LHN - 28
Militia - LHQ - Qld
Militia - LHQ - 13/2
Militia - LHQ - 14/3/11
Militia - LHQ - 15/1/5
Militia - LHQ - 27/14
Militia - LHS - SA
Militia - LHS - 16/22/3
Militia - LHS - 17/23/18
Militia - LHS - 24/9
Militia - LHT - Tas
Militia - LHT - 12/26
Militia - LHV - Vic
Militia - LHV - 7/15/20
Militia - LHV - 8/16/8
Militia - LHV - 9/19
Militia - LHV - 10/13
Militia - LHV - 11/20/4
Militia - LHV - 19/17
Militia - LHV - 29
Militia - LHW - WA
Militia - LHW-18/25/10
Militia - Military Orders
Militia - Misc
MilitiaRC - Rifle Clubs
MilitiaRC - NSW
MilitiaRC - NT
MilitiaRC - Qld
MilitiaRC - SA
MilitiaRC - Tas
MilitiaRC - Vic
MilitiaRC - WA
Militiaz - New Zealand
Tk - Turkish Items
Tk - Army
Tk - Bks - Books
Tk - Bks - 1/33IR
Tk - Bks - 27th IR
Tk - Bks - Air Force
Tk - Bks - Yildirim
Tk - POWs
Wp - Weapons
Wp - Hotchkiss Cav
Wp - Hotchkiss PMG
Blog Tools
Edit your Blog
Build a Blog
RSS Feed
View Profile
Open Community
Post to this Blog
Site Index
Education Centre
LH Militia
Boer War
Transport Ships
LH Battles
ALH - Units
ALH - General
Aboriginal Light H
Weapons
Ottoman Sources

"At a mile distant their thousand hooves were stuttering thunder, coming at a rate that frightened a man - they were an awe inspiring sight, galloping through the red haze - knee to knee and horse to horse - the dying sun glinting on bayonet points..." Trooper Ion Idriess

The Australian Light Horse Studies Centre aims to present an accurate history as chroniclers of early Australian military developments from 1899 to 1920.

The Australian Light Horse Studies Centre site holds over 12,000 entries and is growing daily.

Contact: Australian Light Horse Studies Centre

Let us hear your story: You can tell your story, make a comment or ask for help on our Australian Light Horse Studies Centre Forum called:

Desert Column Forum

WARNING: This site contains: names, information and images of deceased people; and, language which may be considered inappropriate today.

Sunday, 19 October 2008
The Battle of Beersheba, Palestine, 31 October 1917, 7th ALHR, AIF, War Diary Account
Topic: AIF - 2B - 7 LHR

The Battle of Beersheba

Palestine, 31 October 1917

7th LHR, AIF, War Diary Account


War Diary account of the 7th LHR, AIF.


The transcription:


30 October 1917

Regiment moved out of camp at 1700 as Advance Guard to Brigade.

4 Other Ranks evacuated to hospital.

31 October 1917

Arrived Cross roads 4 miles West of Arara at 0030.

At Bir Arara at 0200 halting till Brigade arrived at 0400.

Moving forward the in the direction of Bir el Hamam (Square E7).

Enemy outpost occupying Hill 1390 1 mile south West Hamam, fired on screen and NZMR Brigade.

Regiment occupied line Hill 1220 to Hill 1150 1 1/2 miles North of Hamam at 0700, halting till 0930.

Moving from this position to occupy a line Bir Sakaty (Square E6) to position of these roads due South of "EL" in Tel el Sakaty astride the Beersheba Hebron Road. On covering half the distance the Regiment was ordered to push on rapidly to capture Turkish Convoy and cut Hebron road. Convoy of 10 waggons, 8 horses and 2 mules captured.

Regiment came under heavy shell fire at point blank range just south of the Hebron Road. Good cover was found in the Wadi Aujan where the Regiment remained till evening.

39 Prisoners being captured by one section in this Wadi under 207 Corporal Edward Benjamin Picton.

Regiment withdrew at 1800 to position 1 mile South bivouacking for the night.

5th LH Regiment on the right. One Squadron being sent at a time to water at Bir el Hamam. Total number of prisoners captured during the day was 49.

2 men injured and 1 wounded in action, wounded to hospital.


Posted by Project Leader at 5:49 PM EADT
Updated: Thursday, 8 October 2009 7:21 AM EADT
The Battle of Beersheba, Palestine, 31 October 1917, 2nd ALHR, AIF, War Diary Account
Topic: AIF - 1B - 2 LHR

The Battle of Beersheba

Palestine, 31 October 1917

2nd LHR, AIF, War Diary Account


War Diary account of the 2nd LHR, AIF.


The transcription:


31 October 1917

Bir el Hamman

1200 Regiment got orders to be prepared to meet Cavalry advancing in the left flank of the 1st Regiment.

At 1400 orders came for the remainder of the Regiment to go up on left flank at the trot and help the assault on Tel el Saba. As we advanced Major William Ernest Markwell DSO was killed by shrapnel. We occupied some mud huts but our own Artillery shelled us out of them. After having some casualties, amongst whom was Lieutenant John Wasson.

The assault on Tel el Saba was successful and at dark the Regiment bivouacked on banks of Wadi Sabe near Hill 960.

Our total casualties for the day 1 Officer and 1 Other Rank killed and 2 Officers and eleven Other Ranks wounded.


Roll of Honour

Frank ANSELL
 
Carl BECK
Thomas Stevenson DINSDALE
George Thomas DURHAM


Lest we forget


Map detailing the movement of the 2nd LHR as per the War Diary, 31 October 1917
 
 
Further Reading:

2nd Australian Light Horse Regiment, AIF

2nd Australian Light Horse Regiment, Roll of Honour

The Battle of Beersheba, Palestine, 31 October 1917

Australian and New Zealand Roll of Honour

Battles where Australians fought, 1899-1920


Citation: 2nd ALHR, AIF, War Diary, account about the fall of Beersheba

Posted by Project Leader at 2:12 PM EADT
Updated: Sunday, 18 October 2009 12:38 PM EADT
The Battle of Beersheba, Palestine, 31 October 1917, 3rd ALHR, AIF, War Diary Account
Topic: AIF - 1B - 3 LHR

The Battle of Beersheba

Palestine, 31 October 1917

3rd LHR, AIF, War Diary Account


War Diary account of the 3rd LHR, AIF.


The transcription:


30 October 1917

Asluj

Joined up with Brigade and moved off at 1930.

31 October 1917

Trekked till 0300 when horses were fed and a halt of 1/2 an hour was made. Having resumed our journey a halt was made at point 1390 at 0800.

Tel el Saba

"A" Squadron (Major Archibald Dick) and "C" Squadron (Captain William Thomas Tackaberry) pushed forward - their objective being Tel el Saba which was strongly held by enemy machine guns and rifles. The regiment moved with Brigade to a point on 1100 conture line west of "K" in Khasan Zanna.

There received orders to take up a position near Khirbit el Watan. Advance scouts got in touch with the enemy near bend in Wadi Saba - Auckland Mounted Rifles co-operating on our right. Conferred with Commanding Officer Auckland Mounted Rifles at bend in Wadi - south of Tel el Saba and we agreed to attack Tel el Saba. Auckland Mounted Rifles operating north of Wadi and 3rd LH Regiment on south. The Regiment advanced in the open from the point in bend of Wadi to last "A" in Wadi el Saba. The whole of the wadi being swept by enemy machine gun fire.

"A" and "C" Squadrons advanced to bank of wadi - south of and immediately opposite point 1007. "B" Squadron (Major Edwin Cooper Derrington) remaining in support.

The regiment with slight cover was able to bring Hotchkiss Gun and rifle fire to bear on the enemy trench and under Second Lieutenant Roy Gordon Garvie operated with the regiment and were able to bring heavy fire to bear on the enemy positions. One Squadron of 2nd LH Regiment (Major Robert Mackey Stodart) also operated with the Regiment in the final advance on Tel el Saba.

At 1400 3rd Regiment and Auckland Mounted Rifles commenced to assault the enemy position which was occupied at 1530, the New Zealanders converging from the north-east, one Squadron of 3rd Regiment ("A" Squadron) crossing the wadi to Tel el Saba, the remainder of the Regiment with one Squadron 2nd LH Regiment following the retiring enemy to fork in wadi west of Tel el Saba and were able to bring heavy fire to bear on the enemy as they retired over higher ground in north westerly direction. Throughout the advance the Inverness Battery gave excellent and accurate covering fire.

Casualties for the day were - Personnel - killed: 1 Officer and 4 Other Ranks. Wounded: 24 Other Ranks; 1 Other Ranks missing. Horses killed or wounded 11.

One transport "A" Echelon was bombed at Point 1300 at 1715 by enemy aircraft the casualties being 4 Other Ranks killed, 5 Other Ranks wounded. 10 horses killed and 7 wounded. (These figures are included in casuatlies for day shown above).

Regiment watered in wadi near Tel el Saba at 1700 whilst watering the Regiment was heavily shelled by enemy.

Regiment formed up under cover at Wadi bank and at 1830 moved down Wadi Saba to Point 960 and bivouaced for night. "B" Squadron (Major Edwin Cooper Derrington) before bivouacking proceeded to outpost line 1020 - 970 - the Mosque to ensure the outpost line was connected and various units were in communication. "B" Squadron returned to camp at 2200 and reported all correct.


Roll of Honour

John Richard BOUNDEY
 
Robert Raymond DAWSON
 
Thomas Roydon HOGARTH
 
Francis KELLY
 
Walter LITCHFIELD
John OSBORN alias Harry GREEN
 
Clem Lidsan RANFORD
 
Morton Reginald SANDLAND

Archibald Stuart TRELIGAS
 
Henry Charles TROWBRIDGE
 
Lest we forget


Map detailing the movement of the 3rd LHR as per the War Diary, 31 October 1917
 
 
Further Reading:

3rd Light Horse Regiment, AIF

3rd Australian Light Horse Regiment, Roll of Honour

The Battle of Beersheba, Palestine, 31 October 1917

Australian and New Zealand Roll of Honour

Battles where Australians fought, 1899-1920


Citation: 3rd ALHR, AIF, War Diary, account about the fall of Beersheba

Posted by Project Leader at 1:08 PM EADT
Updated: Thursday, 8 October 2009 7:55 PM EADT
The Battle of Beersheba, Palestine, 31 October 1917, "Chook" Fowler Account
Topic: BatzP - Beersheba

The Battle of Beersheba

Palestine, 31 October 1917

"Chook" Fowler Account


John Ernest (Chook) Fowler

[From: Treasure, C., Perc Treasure Light Horseman, p. 110.]


In the mid 1970's, John Ernest (Chook) Fowler was urged to record his life story. His manuscript was completed but sadly he died in 1978, just before his story was published in Canberra, 1979. "Chook" Fowler's book was called: Looking backward,  in which included a section specifically related to his role in the battle of Beersheba and extracted below.


Fowler, JE "Chook", Looking backward, (Canberra 1979), pp. 21-7:


[21] The afternoon of October 29th, 1917, was a busy period for all mounted troops on the Palestine front. The 4th Light Horse Brigade, which comprised the 4th, 11th and 12th Regiments, moved off from their camp west of Beersheba on the Wadi Ghuzze, near Tel el Fara. We carried four days rations for ourselves and three days rations for our horses. We were armed with rifles and bayonets, and also with a Hodgekiss machine gun to each troop. We rode all night in a south easterly direction and at dawn arrived at Khalasa, where we found water for horses and men. The day was spent trying to sleep, and dodging the hot sun, which in this part of the world knows how to shine. Our ordinary method to provide a shelter was to fix bayonets on four rifles, and drive the bayonets into the ground, then fasten a blanket on the upturned butts of the rifles.

From Khalasa we travelled approximately north, again an all night [22] ride, with as always five minutes rest each hour, and we arrived at our destination, on the eastern side of Beersheba, after daylight.

We explored some stacks of tibbin (straw from the wheat harvest). Our horses were too thirsty to eat, and most of us filled our horses' nose bags, and tied some to the saddles.

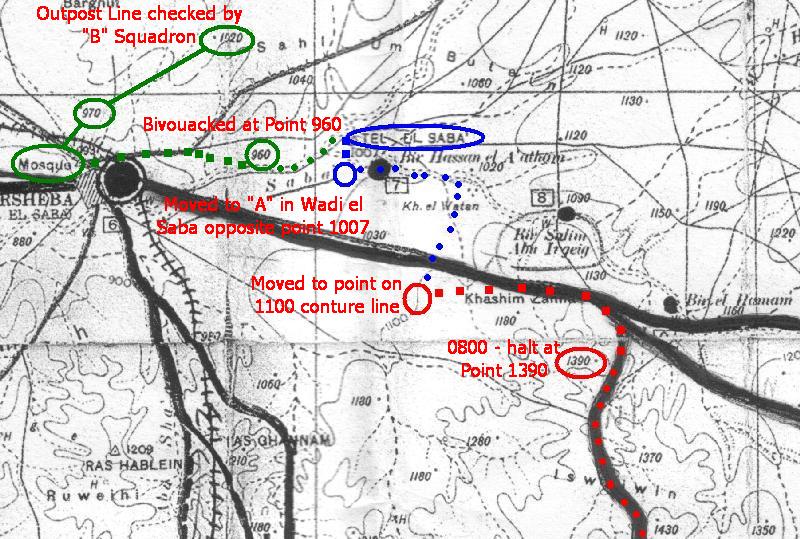
For many hours during the day we could hear heavy artillery and machine gun fire on our right flank. We were told it was the Anzac Mounted Division in action at Tel-el-Saba.

We were beginning to think it would be our lucky day as the shadows were lengthening. I heard some remarks: "It's getting too late now to do anything" etc. and when we were beginning to congratulate ourselves on our good fortune for the day, the order was given: "B Squadron, all pack horses to the rear. Remainder prepare for action. See that all equipment is secured tightly on your saddles." We heard that order many times, and knew what it meant. A tingling feeling ran down my spine. "Wind up", I suppose but we were too busy getting things ready to worry much. Not long after came the order "B Squadron Mount" and we were on the way to WHAT?

We joined the other Troops of the Squadron and Regiment and on the way our Troop leader told us: "We expect to water our horses in Beersheba tonight, and take as many prisoners as possible in the process." The date was October 31st, 1917.

It seemed that time was now the big factor in all our movements. Soon we came to the top of the ridge, and from there we looked down on Beersheba, about two miles away, with the sun behind the spire of the Mosque. I will always remember the sight of that spire, with the sun behind it.

Each Squadron advanced in line and at the "trot". "A" Squadron followed by "B" and then "C" Squadrons, each about 50 yards apart with about four yards between each horseman and the 4th Regiment on our right. The Regiment, still moving at the trot. I passed quite close to Colonel Cameron (C.O. of the 12th Regiment) a well-liked leader, and his staff surveying the land in front through binoculars. The Colonel said, "Pass the word to Featherstonehaugh to look out for the little hill on the left." The man acknowledged the message when he received it, but we kept the same pace all the time.

Soon the first artillery shells came over, and they landed in front of "A" Squadron. Some riders yelled, and coo-eed, and then broke into a gallop, and the wild ride had started.

We could see the country we were riding into was broken by dry gullies that had been torn out by the winter rains. The first gully we came to was about four feet deep, and straight sides. My horse was hesitating, not knowing what to do, when I hit him over the butt of the tail with the rifle, he partly fell, and jumped to the bottom. We found a way out a little distance down the gully and away we galloped again. This cut out all idea of a [23] straight line for the Squadron but the troop kept together fairly well. We had five or six gullies to cross, but all were as bad as the first one.

The level country near the trenches was deep in dust. This was one of the worst features of the Palestine Front, for six months each year without rain. The horses in front stirred up the dust and we could see only a few yards, our eyes almost filled with dust, and filling the mouth.

The artillery fire had been heavy for a while. Many shells passed over our heads, and then the machine gun and rifle fire became fierce as we came in closer to the trenches some of the Turks must have incorrectly ranged the sights on their rifles, as many bullets went overhead. “B” Squadron was drawing closer to "A" Squadron. Looking down I saw a hole with Turks lying on the ground, and firing their rifles; my horse had to jump to one side to miss them. The Turks were big men, too big for me to tangle with. Glancing around I saw the nose bag tied to George Cook's saddle was dragging along the ground. Someone yelled, "Cut it and let it go Cookie". The machine gun fire was now very heavy. I felt something hit my haversack and trousers and later, on inspection, I found a hole through my haversack and two holes in my trousers. One bullet left a black mark along my thigh. Some horses and riders were now falling near me. All my five senses were working overtime, and a "sixth sense" came into action; call it the "sense of survival" or common sense. This said, "If you want to survive, keep moving, keep moving," etc. So I urged my horse along, and it wasn't hard to do so as he was as anxious as I was to get past those trenches. I am certain my horse knew what those bullets meant, judging by his reaction to them, at Beersheba, and many times before and after Beersheba. No horseman ever crouched closer to his mount than I did. Suddenly through the dust, I saw the trenches, very wide with sand bags in front; I doubt if my horse could have jumped them with the load he was carrying, and after galloping two miles. The trench was full of Turks with rifle and fixed bayonets, and hand grenades. I heard many grenades crash and ping-g-g-g-g over the noise of rifle and machine gun fire. About 20 yards to my left, I could just see as a blur through the dust some horses and men of the 12th Regiment passing through a narrow opening in the trenches. I turned my horse and raced along that trench. I had a bird's eye view of the Turks below me throwing hand grenades etc. but in a flash we were through with nothing between us and Beersheba, and the sound of machine guns and grenades behind.

I counted five horsemen from the 12th Regiment galloping in front and urged my horse on, and crouched low, for a few hundred yards as some one may have wanted to try his skill as a marksman.

We passed two guns with six horses attached to each gun, and riders mounted, ready to move off. The guns were on the bed of a wide, sandy, dry gully. They could not escape, and so we rode on, and into the main street of Beersheba.

There were no other troops from our Brigade in sight and with no dust [24] we could see a considerable distance across the flat open country. I felt certain those five horsemen in front were the first of our troops to enter Beersheba. The official history of the war implied that the 4th Regiment were the first of our troops to enter Beersheba and the whole of the 4th Regiment had dismounted at the trenches.

I heard galloping horses behind, it was Captain Davies who was swinging his sword. I had eased my horse to a slower gallop and said to him as I stroked his neck, "Steady old boy, you have done a great job, no sense in killing yourself now." So Captain Davies passed on ahead. Half way up the main Street, a terrific sustained roar broke out from more than one building. I thought it was machine guns firing at us, so down went the head again, along the horse's neck, and we were full gallop again. It turned out to be the Turkish ammunition dumps going up in smoke.

At the top end of the street the six horsemen in front (including Captain Davies) went straight ahead. To the right I could see some Turks walking away; some of these were unarmed and I galloped after them. I stopped a few, and ahead I saw an armed, and well dressed officer riding a small pony. We had been told a few Turkish words, but this officer wouldn't stop, and I knocked him off his pony with a hit from the bayonet to the side of the neck, and told him to stop where he was with the other Turks.

I could see one rider from the 12th Regiment coming my way, so I went after more Turks. I was surprised when I came across a 12 foot square hole dug in the ground. Tents were erected over similar dug outs by both Australian and Turkish troops to lessen the dust nuisance. There were twelve Turks in this dug out, and when they saw me they jumped up, and pulled back the bolts of their rifles. Many thoughts flashed through my mind: "This is the finish", "No good running away", etc. I jumped off my horse and said, "I'll do as much damage as I can before they get me." No one ever heaved a bigger sigh of relief when they threw their rifles away. I took these and a few more back to the other prisoners and found one of my troop mates, Sel Ziems of Albion Park. New South Wales, had arrived and had relieved the officer of his gold coins, binoculars, revolver etc.

The sun had now set and we were pushing our 25 to 30 prisoners along. We caught up with a lad from the 4th Regiment (the only one I saw that day) and we invited him to put his one prisoner in with our lot. He was quite insulted, and said, "You're not taking my prisoner, this is mine, etc." Sel, who stuttered a little, said, "Get to hell while your luck's in", and so he vanished. It was dark before we joined the others from the 12th Regiment and they had many prisoners. We found the water troughs after scouting in the dark and had started to give our horses a drink, when a stream of machine gun bullets whistled overhead. A 12th Regiment Officer said, "Every man for himself, but our Regimental Sergeant Major said, "Steady boys, I think it is only our guns." He sent someone around and the firing stopped in a few minutes. [24] A place was selected between a built up triangle, about 8 ft. deep in the railway line, where the prisoners and horses were put for the night, and we prepared to fight off any attack, as we could hear foreign voices from all sides. About 10 p.m. we were told to "off saddle" We couldn't believe it at first, but found the order was genuine. The original order was good this time, as other Regiments had followed the retreating Turks. We had to find guards for the prisoners, our horses and our defence but we had some sleep. Everyone considered we were mighty lucky as we passed those trenches, and all agreed that success was due mainly to the pace we travelled, and to the dust.

Next morning parties were arranged to search every home m Beersheba. Dan Moon from Wagga New South Wales, and I were allotted an area to search. Dan was a big front row forward, and I a half back m our Rugby League team. Dan and I collected two sick Turks. The first capture amused Dan. As we entered the room, I saw the Turk on my side of the room. I don't know how it happened, but I found myself with the bayonet only a few inches from him before I realised he was a sick man. Dan burst out laughing. I said, "What's there to laugh at?" Dan replied, "That's the fastest I have ever seen anyone move." I remarked, "Well, I had the 'wind up' ". The Troop mates all had a "go" at me for a day or so over this. When they knew I could hear, they would say to each other, "Would you bayonet a poor sick Turk?" Another mate would say, "Yes, I'd bayonet the bastard." Others would say, "No, no, not a poor sick Turk."

We went out to the trenches. Parties were digging graves and collecting the dead. Our mates were lying as they fell, their faces hardly recognisable for the dust. Some had lingered and had dug holes in the ground in their last agony. Great mates all of them — Sergeant Bill Flood, Tibby Cotter (the famous Australian test cricketer and fast bowler) George Cook, and many others — I have forgotten some of their names. George Cook had dismounted to fix his horse's nosebag, and his horse had been killed. He fixed his bayonet, and had been shot through the stomach whilst charging the trenches. Others had their horses killed and, firing their rifles from where they fell, had kept the Turks' heads down, and bad gradually crawled closer, and the Turks had surrendered.

We cursed the Turks, but, as someone said, we would have treated them the same way, so we cursed those who started the war. When will the human race be sensible, and ban all wars?

No one spoke as we looked down on those silent and dusty forms in their common graves, but everyone thought as I did, "They were great soldiers and the best of mates."

Casualties at Beersheba as taken from "The Official History of Sinai and Palestine" — 4th Regiment had 11 killed and 17 wounded. Total of 28. The 12th Regiment had 20 killed and 19 wounded. Total 39.

It was common knowledge amongst our troops what the Turkish [26] command thought of the Light Horsemen. An intercepted wireless message sent by the Turkish commander, as he hurried from Beersheba, said the Turkish troops had broken because "they were terrified of the Australian cavalry." A captured German Staff Officer said that the move by the mounted troops was thought by the Staff to be only a demonstration at first. "We thought the idea of charging right through to Beersheba was impossible. I have heard a great deal of the fighting qualities of Australian soldiers. They are not soldiers; they are madmen."

Next day, as we waited our turn for the very scarce drinking water, a big crowd from many Regiments had assembled. We could see quite clearly the country we had galloped over the previous day. A sergeant from the Yeomanry Division said to his mates: "Did you see the 'Dinkums' gallop over that country yesterday?" They replied, "No." The sergeant said, "Well, I did, and it's a sight I’ll never forget. Just fancy galloping over that ground. They were mad. Absolutely mad." We did not feel quiet so tired after hearing that remark. It was widely known that owing to the stalemate in France, the strategy was to come in at the back door of Germany, through Turkey.

After the costly mistakes at the Dardanelles a way was planned through Palestine, but a formidable Line (helped by German might) was built between Gaza and Beersheba, a distance of 30 miles.

Many big Allied offensives were defeated, both at Gaza and frontal attacks on Beersheba, with the loss of MANY thousands of good men.

After General Allenby had taken command of the whole front, I'm not sure who thought of the idea of sending the Light Horse through the waterless desert country, and into the back door of Beersheba, but the result is now history; and it was exactly one year from the "break-through" at Beersheba, to the end of the war with Turkey, and the road was open to Germany.

Some of the Beersheba wells had been destroyed by the enemy and water was very scarce, as thousands of horses and men depended on it. After dark, as hundreds of horses and men were crowded around one of these wells, that the Engineers had restored, some enemy planes came over and dropped some bombs a short distance away, and then flew at tree top level over our heads. I'm sure no one breathed for a long time, as those planes flew over. What a disaster if those horses had stampeded!

The capture of Beersheba on the first day (as Allenby's General Staff had planned) was a big blow to the enemy; not only on their morale, but it prevented many troops and supplies from evading capture. This "forlorn hope" charge may have meant the difference between success and failure of the whole campaign.

The second day after the ride into Beersheba, our Troop started out with more than 500 prisoners to Karm, on the Wadi Ghuzze. My advice to anyone droving prisoners is, "Don't ride at the rear of the column". All the [27] sick, sore and sorry found their way to the rear, they drank all water, and we finished up walking and two or three Turks rode on our horses. The Turks just won't help one another.


Further Reading:

The Battle of Beersheba, Palestine, 31 October 1917

Australian and New Zealand Roll of Honour

Battles where Australians fought, 1899-1920


Citation: The Battle of Beersheba, Palestine, 31 October 1917, "Chook" Fowler Account

Posted by Project Leader at 9:56 AM EADT
Updated: Thursday, 8 October 2009 8:31 AM EADT
The Battle of Beersheba, Palestine, 31 October 1917, ICC, AIF, Unit History Account
Topic: AIF - 5B - ICC

The Battle of Beersheba

Palestine, 31 October 1917

ICC, AIF, Unit History Account


ICC GOC Brigadier General CL Smith and Staff looking over the Gaza position after its capture.

[From:  Langley, Sand, Sweat and Camels, plate facing p. 96.]


In 1976 George F and Edmee M Langley produced a unit history about the Imperial Camel Corps called: Sand, Sweat and Camels - The Story of the Australian Camel Corps, in which included a section specifically related to the battle of Beersheba and extracted below.

Langley, GF & EM, Sand, Sweat and Camels - The Story of the Australian Camel Corps, (Melbourne 1976), pp.  99 - 100:


[99] General Allenby realised the cost of a frontal attack on Gaza and the advantages of a flank attack. His aim was to occupy Beersheba on the left of the Turkish line, which would leave their flank exposed. He would then disorganise the Turk's whole plan of defence by hurling in his 20th Corps of infantry, four divisions strong, together with his Desert Mounted Corps and Camel Brigade. The 21st Corps was to move against the Gaza end of the line. The country to be covered was a bare rolling plain, without a single plantation, fence or hedgerow to shelter movements from a watchful apprehensive enemy and his German airmen.

Our railway line from Kantara was only eleven miles from Gaza and growing daily. The pipelines from the 'sweetwater' Canal had reached Rafa, providing a daily supply of hundreds of thousands of gallons of filtered, chlorinated water. Allenby's army (including Egyptian labourers) was close upon two hundred thousand men, in addition to some twenty thousand camels, forty-six thousand horses, fifteen thousand mules and a few thousand donkeys, all dependent on foodstuffs and water from outside sources. These railway and pipelines were being continued towards Beersheba. At Shellal a dam was constructed to hold five hundred thousand gallons-here arrangements were made to fill and load onto camels every hour two thousand fantassies, each containing ten or twelve gallons of water.

The Turks on the other hand presented a contrast highly favourable to the invading force. The Turkish army at this stage was ill-fed, wretchedly clothed, uncertain of its supply of munitions, and very low in spirit. Von Falkenhayn, the German leader of the Baghdad expedition was at dangerous variance with 'the mighty Djemal' as he contemptuously called the Turkish Governor of Syria. The `Young Turk' administration at Constantinople, with the Germans in full support had resolved to recapture Baghdad, which had been so brilliantly won by General Maude. On the other hand Djemal realised that Palestine must be cleared of the British before Baghdad could be taken. He also bitterly resented any interference or advice from the Germans, though, he had to appreciate the arms, and planes and technical services they gave him, which alone made his campaign possible. Neither Djemal nor [100] the German leaders believed it would be possible for Allenby to make his attack on the Beersheba flank, but fully expected the first blow to be made on Gaza, combined with a landing from the sea, north of that town. They were encouraged in this belief by the sham preparations made for a landing on the coast. When the Turks did decide to divert substantial forces from the Mesopotamia Expedition and send them to anticipate and frustrate Allenby’s assault, it was too late.

The Camel Corps dug in after dark on the hillsides, but during the night moved forward a mile and again would dig in . Under cover of darkness the Light Horse, Camel Corps, Artillery and London and Welsh Infantry congregated at the rendezvous within striking distance of Beersheba. The Londoners, at dawn, dashed forward and seized the Turks’ advanced position. Throughout the day, the Camel Corps Brigade took no active part in the battle and soon after dark it seemed probable that they would be wanted to clear the defences between the Gaza and Karm roads. However, the success of the main attack was soon evident and the works were evacuated.


Further Reading:
 
Imperial Camel Corps, AIF
 
Imperial Camel Corps, Roll of Honour 

The Battle of Beersheba, Palestine, 31 October 1917

Australian and New Zealand Roll of Honour

Battles where Australians fought, 1899-1920


Citation: The Battle of Beersheba, Palestine, 31 October 1917, ICC, AIF, Unit History Account

Posted by Project Leader at 8:20 AM EADT
Updated: Thursday, 8 October 2009 8:36 AM EADT

Newer | Latest | Older

Full Site Index


powered by FreeFind
Let us hear your story: You can tell your story, make a comment or ask for help on our forum.

Desert Column Forum

A note on copyright

The Australian Light Horse Studies Centre is a not for profit and non profit group whose sole aim is to write the early history of the Australian Light Horse from 1900 - 1920. It is privately funded and the information is provided by the individuals within the group and while permission for the use of the material has been given for this site for these items by various donors, the residual and actual copyright for these items, should there be any, resides exclusively with the donors. The information on this site is freely available for private research use only and if used as such, should be appropriately acknowledged. To assist in this process, each item has a citation attached at the bottom for referencing purposes.

Please Note: No express or implied permission is given for commercial use of the information contained within this site.

A note to copyright holders

The Australian Light Horse Studies Centre has made every endeavour to contact copyright holders of material digitised for this blog and website and where appropriate, permission is still being sought for these items. Where replies were not received, or where the copyright owner has not been able to be traced, or where the permission is still being sought, the Australian Light Horse Studies Centre has decided, in good faith, to proceed with digitisation and publication. Australian Light Horse Studies Centre would be happy to hear from copyright owners at any time to discuss usage of this item.

Contact

Australian Light Horse Studies Centre

eXTReMe Tracker