Topic: AIF - 4B - 4 LHR
The Battle of Beersheba
Palestine, 31 October 1917
4th LHR, AIF Unit History Account
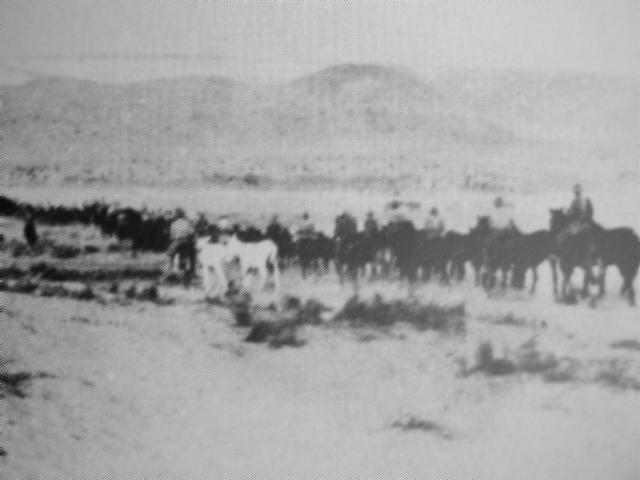
En route to Beersheba
[From: Smith, Men of Beersheba, p. 137.]
Lieutenant Colonel Neil C. Smith AM produced the unit history of the 4th Light Horse Regiment in 1993 and published the story in Melbourne, 1993 called Men of Beersheba: a history of the 4th Light Horse Regiment, 1914-1919 in which included a major section specifically related to the battle of Beersheba and extracted below.
Smith AM, Lieut-Col NC, Men of Beersheba : a history of the 4th Light Horse Regiment, 1914-1919, (Melbourne 1993), pp. 111 - 132:
CHAPTER 7 THE CHARGE AT BEERSHEBA
[111] Two aspects of Australian military history in particular have etched themselves indelibly in the annals of Australia's heritage; that is, the landing at Gallipoli and the Light Horse charge at Beersheba. Concentrating on the second matter which; it should be noted; was a victory by Australians led by Australians, we find all elements of what Australian folklore and true Australian nationalism is about. No wonder that, like kinship to the first fleeters, many Australians and other observers have a fascination for identifying the men of the 4th and 12th Light Horse regiments who composed the charge. This history makes inroads into the vexing question of who did charge from the former Regiment. But before this is examined further, let us taste the heat and excitement of the Charge.
In the middle of 1917 General F.M. Edmund Allenby took over command of the Egyptian Expeditionary Force from Murray. Allenby had come directly from the 3rd Army in France and knew that the Allies needed victories in the Middle East to shore up waning morale both within the Force and at home. Prestige had been sorely wounded in the area following the withdrawal from Gallipoli, losses in Mesopotamia and in the battles at Gaza and Romani. Ideally he needed to take Jerusalem which would shake the very foundations of the then existing Moslem hierarchy and its jubilant masses. But there was much territory to be fought over before Allenby could present himself at the gates of Jerusalem. Allenby therefore set to as soon as he arrived and commenced planning and preparation for the capture of Gaza and its associated defensive line extending eastwards to the precious water sources at Beersheba. Allenby's first major Operation Order was issued on 22nd October 1917.
Allenby required General Phillip Chetwood's XX Corps to thrust at Beersheba with a hook from the south west while Chauvel, with his two divisions of Desert Mounted Corps would assault the town from the east and north west. Both forces would attack Beersheba on 31st October 1917. Thus a force of [112] almost 60,000 well equipped Allied troops would be pitted against about 4,500 Turks defending Beersheba and its precious water wells.
To distract the Turkish defenders of Beersheba Allenby arranged for a fleet of small craft to assemble off Belah about five miles south west of Gaza in view of the Turks, and for British troops to march towards the beach late in the day. Allenby's deception plan also called for the small craft to withdraw, thus suggesting that troops had been landed and for the Navy and XX Corps to commence bombardment of the Turks from the mouth of the Hesi on the 27th. Thus the Turks would believe that a major attack on Gaza was imminent. As an added precaution Allenby blocked advance routes to thwart any attempt to bring reinforcements from Syria. British intelligence also planted fake documents indicating that Gaza and not Beersheba was the objective.
Returning to Allenby's objectives at Beersheba, a major factor in his plan was for Chauvel to capture the town of Beersheba on the first day of the offensive and hence secure the water supply imperative for subsequent operations.
Chauvel faced many problems in carrying out his part of the commander's requirements. He had little time but above all he needed water for his men and horses. Happily his troops were in good shape and according to Captain Jack Payte, one of the 4th Light Horse Regiment chargers at Beersheba, morale had never been better with everyone in optimistic spirits, especially after the arrival of Allenby. Moreover the Australians were confident after enjoying an aggressive patrolling and reconnaissance program. This had given them a strong knowledge of their enemy and a measure of self esteem in being able to move about the potential and often realized battle fields with some impunity. It also meant that the Turks were somewhat accustomed to the Australians moving about and made it all the more difficult for them to determine when and where a major attack might occur.
As a consequence of 'Bull' Allenby's orders the huge force of Australian, New Zealand and imperial troops began [113] their advance in the third week of October. In preparation for the advance Allenby had constructed a railway and a water pipeline to help establish his troops and equipment closer to their objective. Wells were re-opened at two staging locations - Khalassa and Asluj.
At this stage the 4th Light Horse Regiment was commanded by Murray Bourchier, a grazier from Strathmerton and an original A Squadron officer. A. B and C Squadrons were commanded respectively by Major J. Lawson, Captain Albert Reid and Captain John Parkin. James Lawson, a portly and affable hotelier from Rupanyip in Victoria would display his usual outstanding leadership qualities demonstrated since the early days on Gallipoli and lead the charge with Bourchier. For detail of the next few days the 4th Light Horse Regiment's War Diary will be followed closely.
On October 28th at about 4.00pm the Regiment with the rest of the Light Horse Brigade moved out from the forward base camp at Tel el Fara over twenty miles west of Beersheba carrying three day's rations and fodder. All ranks were in full marching order. C Troop, A Squadron furnished the right flank guard. The column halted and bivouacked for the night at 2000 about one mile East of Esani. George French, who had worked for the Agricultural Department at Maffra before the war is reported to have said that he had not been back long from leave at Port Said when rumour had it that a move was imminent: 'We soon got rid of all unnecessary equipment; I remember this part of the business, for I was acting SQMS'. French continued: 'We were told Beersheba was our objective, I remember Alex Wilson remarking that he was sure there was a bullet for him at BeersHeba. Lieutenant Jim Hickey and I discussed the probability of battle, what my job would be, and how long the ammunition would last, and how we would get fresh supplies into the firing line. Little we knew what kind of battle it was to be, but we still had to show we were keen, and it passed many a long hour.'
During the afternoon of 29th October the column moved on to Khalassa, which was merely a mass of ruins. Reaching there about 9.00pm, the troops bivouacked for the night. A Squadron put out an outpost line. The next day the [114] Regiment moved out in a south easterly direction to Asluj and made a long enflanking movement under the worst conditions as regards heavy going, with a particularly dark night and even very hot weather. D Troop A Squadron under Lieutenant Nelson Hemmons from Warrnambool furnished the right flank guard and C Troop B Squadron under Lieutenant Len Gooding, a former Melbourne barman, provided the left. These flank guards were carried out by a system of patrols working in bounds or a line of flankers in a single file according to the nature of the country. This duty was carried out in an exceptionally fine manner, communication with the main body being at all times maintained. Taking into consideration the difficult and unknown nature of the country and being a very dark night it reflects great credit on the officers in charge and those under their command. These troops remained out as flank guards until about 8.00am on October 31st when the main body reached the vicinity of Goz El Shegeib, near the Iswaiwin Road, they being then recalled to rejoin their unit.
The column had marched through the nights over rough ground, at first by the light of full moon. The white chalk and sandstone cliffs between Esani and Khalassa stood out conspicuously in the moonlight and presented a picture of exquisite grandeur. As the columns moved forward all hearts were gay, and in each face could be discerned an appearance of eagerness for contact with the enemy. The months of quiescence had been monotonous for the men, and now that operations were to commence, all were keen and alert in anticipation of striking a blow on the enemy. But it was hard going. Ten miles per night was the requirement with a much larger effort the third, dark night to ensure the western and eastern formations were in position. Security needs meant that no fires could be lit at night and by the time the troops reached the assembly areas a few miles distant from Beersheba, both men and beasts were in desperate need of having their thirsts slaked. In fact Vic Smith succinctly noted that the horses were just about 'all in' prior to the charge, so it was a real do or die.
[115] French continues his story of the last night's march. '1 was able to light my pipe under my greatcoat and keep it smothered, but the poor cigarette smoker had no hope. We moved steadily. The night was dark and dusty and we marched in column of route. The dust from the horses ahead blotted out everything. Dawn broke somewhere out behind Beersheba. We looked a strange sight, every face was thickly covered with grey dust, making each man look like the next. I addressed Padre Weir, (the Brigade Chaplain), as Bill, taking him for a trooper under all the dust. About 9.00 am we halted, merely stopped in our tracks, and wondered for how long, as we had dreams of a cup of tea. With a few pieces of deal, (we always carried wood we could get it), I managed to get the quart pot boiling and was one of the few who tasted tea that day.'
The Regiment's War Diary entries at this point read: 'We rested here until about 1500 when orders were received to move; from then on followed the charge on Beersheba of which full reports have been written. After the charge the Regt formed up in the bed of the Wadi near the bridge and watered the horses who had been without a drink for thirty hours. An outpost line was then taken up on the NE side of the town.' Clearly the significance of the charge was lost to the writer of the diary at the time. But we shall pay a little more attention to the charge itself before moving on. Such scant entries throughout the Regiment's War Diary testify to the continual pace of movement in a Regiment with little time for the niceties of in-depth documentation of its activities.
The Official Historian says: 'But Chauvel could have no misgivings about the capacity of his troops. In the sheer quality of their grand young manhood, in their brigade and regimental leadership, in their experience gained over eighteen months' hard fighting in all sorts of rough conditions, the men of the 1st and 2nd Light Horse Brigades and the New Zealand Brigade were then without peer among the mounted troops engaged anywhere in the war. Of the Australian Mounted Division, the men of the 3rd Light Horse Regiment were veterans like the ANZACs, and the Yeomanry of the 5th mounted Brigade, if their performance in Sinai had not been altogether satisfactory, were [116] now, under sound leadership, to be counted as first class British cavalry. The 4th Light Horse had fought convincingly at the second Gaza engagement.
Both the 3rd and 4th Brigades were under new leaders. Brigadier General J.B. Meredith, who had commanded the 1st Brigade with much distinction in its critical fight at Romani, and had afterwards led the 4th, had been invalided home to Australia, and was succeeded by forty seven years old William Grant of the 11th Regiment. The new Brigadier, like so many of Australia's commanders in the war was a Queenslander. A surveyor and pastoralist from the Darling Downs, he had learned on the wide plains that bushcraft which made him famous in Sinai as a guide on night marches over the maze of sand dunes. Somewhat more excitable and impulsive than most of the light horse leaders, Grant possessed the temperament for ‘The charge' which was to give lasting distinction to his name and the men and horses of 'Grant's Mob.'
To return to Allenby's overall plan. The desert columns linked up at 5.10 am and 45 minutes later British artillery started preparatory fire. F.D. Davidson in his book The Wells of Beersheba describes the situation of the 4th Light Horse Brigade as it rested roughly as it had halted from the previous night's order of march it in this way: 'Men breakfasted hastily, standing; chewing biscuit and bully. The order to mount and advance might come at any moment: A sparing mouthful was drunk from water bottles. There was no water for the horses, although an inquiring whinny came from their patient line. There was corn, eaten with saddles still on and with bitted mouths. The horses, with thirty miles behind them, looked lean, dusty and hollow in the morning light. Below the edges of the saddle blankets the dried sweat was caked, a reddish grey, and wet hair gleamed under the cloths as heads went down to the feed bags.
The attack commenced and the defenders with determination resisted the onslaught. The heat became intense, the din rose and felt and the men became more and more tired. A [117] terrific roll of musketry sounded from the slopes of Tel el Saba to the east of Beersheba, where the New Zealanders and Australians, dismounted, stormed entrenched heights. A brigade of light horse debouched from a valley and moved across the plain towards the hills where Hebron road gleamed whitely. Guns roared at them from the Turkish ridges. Shells flashed at their ranks. Splashes of earth and fame shot up as if the ground was erupting beneath them. Their path was littered with fallen men and horses. They seemed only to crawl across the wide, exposed place; but they were moving at a fast gallop. That faint drumming was the beat of their racing horses.
A brigade galloped for the foot of Tel el Sakaty. The guns were on them as they swept along, squadron by squadron. Behind them riderless horses and horseless men ran around with seeming aimlessness. One wondered why those who lay still did not get up. Everywhere, men and horses moved to their objectives. Wherever they passed columns of red dust rose to stand between earth and sky. The pattering of hooves spread far into the distance and came back, soft and continuous, like the sound of running water.
Gun teams passed at a laboured gallop between hill and hill - little gun teams dragging toy guns and ridden by little men, crouched with arms as they plied the flaying whips. Little ammunition limbers followed them nimbly, rolling and bounding, with shells bursting in their path. The little guns wheeled into action below the crests of the ridges. The little teams were unhooked and departed for cover at a trot. From he muzzles of the guns tongues of flame, half seen in the bright sunshine shot out and back. Little men toiled beside the breech blocks.
Into the middle distance a regiment galloped. (A hand at arm's length would have covered most of it.) It stopped. Something took place. Its horses, most of them riderless, turned and were led away at a canter. The field they had occupied was taken by little men running toward the foot of the hill. From the top came a volley of rifle and machine gunfire. The little men lay down among the rocks and bushes. They got up and ran forward a short way, then dropped down again. They seemed to [117] have some desperate need of attaining the top of that ridge. Half way up, they were still dodging and running, but not all of them. There were some who lay still among the rocks and bushes of the lower slope. They looked as if they had forgotten about the battle.
The horizon, where it could be seen between the pillars of dust, was blotted with shrapnel bursts - grey cloudlets developing out of bright sparks. They opened like seed pods and widened until they were soft and loose, like ladies' powder pin's' then they floated along, dispersing as they went, and the blue air gave birth to new ones. Beneath them the earth was being thrashed by a shrill hail of iron. All the hilltops were spouting earth and flame tame as the shells found their billets. It was like the splashing of water when rocks are thrown into it. As yet no action had been made towards taking the town. Vigorous action was now imperative. Action that would require the best that the 4th Light Horse Brigade could master.
Allenby's plan required British infantry to capture Turkish positions about three miles West and South of Beersheba. This was achieved by 1.00 pm. New Zealanders from the Anzac Mounted Division and the 2nd Light Horse Brigade were to capture Turkish defence positions at Tel el Saba and Tel el Sakaty to the north east. Repeated bayonet charges and heavy casualties brought some success, but valuable time was lost as the Turks, aided by their aircraft, pushed reserves into trenches in the open ground to the east, slowing down further the advance of the 1st Light Horse Brigade now dismounted at Tel el Saba. Little did the Allied commanders know that the Turks had decided to relinquish their hold on Beersheba and, after destroying its water sources intended to consolidate nearer Gaza. Had they known, it would have made little difference as time was ever crucial in view of the need to obtain water in Beersheba that very day. Most of the Australian Mounted Division including the 4th Light Horse Regiment remained in reserve to the east and south east. Certainly some were conscious of the fact that once again, the Regiment faced the prospect of seeing little action from its reserve position.
[119] Major Albert Reid, MC and later the MLA for Young in NSW, gave as his recollection that late in the afternoon of the 31st, Brigadier Grant took the commanding officers and squadron leaders of the 4th, 11th and 12th Light Horse Regiments to General Chauvel's headquarters, where they were told that things were not going to plan. The general advance had been held up, and unless Beersheba fell that night the plan of battle would fail; it was imperative that it should fall before dark. Grant said that his reserve 4th Brigade would take it if it was given a free hand. Chauvel asked how he proposed to do it, pointing out that he was responsible. Grant replied that his brigade should act as cavalry and not mounted infantry. Chauvel agreed despite protests from General P.D. Fitzgerald, the British Commander of mounted yeomanry. No doubt Chauvel realised that the time was now 4.00pm and that the sun would set in less than an hour.
Major Norman Rae, an original Sergeant with. C Squadron, recalled that Colonel Bourchier had asked three pertinent questions: Had there been any reconnaissance, was anything known of the intervening ground over which the mounted light horsemen would advance and attack and finally, was there any barbed wire entanglements? The answer had been a disturbing negative or at least inconclusive in each case, thus making Grant's proposal all the more audacious.
Major Reid goes on with his account along the following lines. Squadron leaders were taken to the top of the hill and told Beersheba was there in the distance, about three and a half miles away. Also that the ANZAC Division had been held up all day, unable to take it and that the 4th Brigade was to take it in the role of cavalry. It was added that as soon as the troops crossed the hill they would come under artillery fire, and no matter what happened they were to get into the town. The 4th Light Horse Regiment would be on the right flank of the assault and the 12th under Lieutenant Colonel Donald Cameron on the left, although Bourchier would lead the two Regiments. This arrangement would allow Cameron to concentrate on areas of defended high ground to the left with [120] his C Squadron and attached Vickers Machine Gunners. Each squadron of the two Regiments would be in line with A Squadron leading, followed by B and C each about 120 yards behind. The 11th Light Horse Regiment was to be kept in reserve as it was furthermost away. The squadron leaders rushed back to prepare their men and horses for immediate movement while Grant and the commanding officers selected a forming up place in a wadi and decided on the axis of assault.
Sunset was due at 5.00 pm and so minutes counted towards success or failure and whether the men and particularly the horses would be made ineffective due the severe lack of water, known to be so tantalizingly near in Beersheba. The officers quickly realized that shock tactics would decide the outcome of the day. Grant and his officers galloped back to their men. Orders were barked for immediate movement, and pack horses were pulled to the rear. The tired and thirsty troopers were ordered to mount. Some troops at least were ordered to draw their bayonets and flash them in the sunlight in the absence of cavalry swords.
The two regiments and their squadrons shook out into formation on the move and started off at a walk. They established formation, direction and pace in true cavalry style, just like the exercises conducted in Egypt two years earlier. To their rear was an English artillery battery, the 'Notts' Battery whose gunners provided support as soon as possible, also the Brigade headquarters and machine gunners plus elements of the Brigade Field Ambulance. Almost immediately after clearing the wadi shells began to fall. Only thirty yards from the start line Colin McLean was wounded and his horse killed by an exploding shell - McLean lost his arm as a result. Cameron and his men were forced to peel off as anticipated and engage the Turk positions to their left on foot. The remainder of the 12th with the 4th thundered on with more and more shells bursting around them.
The assaulting formation broke into a steady canter till about a mile or a mile and a half out from Beersheba itself. Then they galloped over clear undulating ground covered by a [121] crop stubble along the Iswaiwin Road axis. Vic Smith recalled hearing no order to charge with bayonets, the blokes just used them for something to hold onto, as their heavy rifles were slung. Artillery fire continued to fall among the attackers and some men noticed two German aircraft which swooped down to meet them with machine guns blazing and with a few hand dropped bombs which appeared to explode harmlessly. Some men had been told that it was believed that trenches existed, but it was not known whether they were deep, and so on. The dust which rose from the pounding of thousands of hooves formed a thick, swirling cloak which enveloped the scene so that, except for those at the very front of the charge, the men could not see beyond their horse's ears, the only guide for direction being the minarets of the mosques in the town.
Trooper Alfred Healey galloped ahead as a ground scout and reconnoitred the going and identified enemy positions in advance of the attacking lines. Tom O'Leary performed a similar service and minutes later personally rounded up 30 prisoners in the thinly defended forward trenches single handed, holding them until his dismounted colleagues caught up. O'Leary then galloped off and assisted in the capture of a field gun. As a Regimental stretcher bearer James Offord's task began the moment the first Light Horseman fell and needed to have wounds dressed amidst the falling shells and small arms fire. Offord was a thirty five years old saw mill manager from Barham, NSW but he understood his new Army trade well. Bill Scott was badly wounded during the charge but still insisted on helping with the ammunition horses and bringing led horses out of action, personally leading six back to cover where he collapsed.
The artillery fire which they had ridden through no longer gapped the ranks, but rifle fire now took its toll. A horse would rear and fall. A rider would drop out of the saddle and lie inert. But on and on the horses raced, straining to get ahead of their fellows, maintaining a surprising speed which individually they could not have done. The spirit of the thing entered into them, despite their thirst and heavy load of up to twenty stone in weight. Perhaps they sensed that they would be rewarded [122] with water if the attack was successful. The shouts and cooed of the riding men added to the excitement and din.
Suddenly the rifle fire caused no casualties, this was explained afterward when the captured rifles were seen to be sighted at 1600 yards, permitting the attackers to ride in under the bullet's trajectory. From the flank, another New South Welshman, Arrnourer Sergeant Arthur Cox spied a machine gun with crew of five near a viaduct and without hesitation attacked and captured the offending strong point which could have taken a heavy toll of the Light Horsemen.
Now within yards of the trenches, the first wave with Lawson and Bourchier in the lead, meet a fusillade of stick hand grenades and the small arms fire at point blank range brings down several men and horses. Someone yells "Action Front. Dismount!' Some men charge across the trenches, scattering equipment and tents to the rear. Others dismount to throw themselves bodily at individual Turks as they engage in fierce hand to hand combat. A few troopers like Jim Henderson try to gather and hold their mounts and those of some of their mates as is Light Horse doctrine. The troopers lash at the Turks with their bayonets, some unsung their rifles and use them as clubs in the confined space, others manage to fix their bayonet and lunge at the Turks, many get away a few quickly aimed shots and those with hand guns fire repeatedly at fleeting glimpses of targets. There is Pandemonium, men shouting, screaming and cursing, bodies writhing in hand to hand combat, horses rearing and even lashing at the foe, other slumping to the ground, dust pervades the scene, as does smoke and noise. But in the forward trenches it is over within seconds, a minute or two at the most.
A large percentage of the A Squadron men leapt straight over the forward trenches, probably as previously arranged, while some dismounted and attacked with rifle and bayonet. One troop ran into a machine gun redoubt and lost heavily. But the dust left little to be seen of what was happening elsewhere. Troops took the trenches in their stride and often didn't realize that they had passed through the Turkish defences until they were virtually in the town itself. They were [123] surprised to see the ground they had covered the next day and the thought uppermost in many minds was well expressed by General Hodgson, who exclaimed: 'How the hell you got over. I don't know.'
Now in the town, a group of men chased and captured a fleeing field gun that went after an escaping bunch of dishevelled infantry; others tried to quell the firing from the street. Norman Rae single handed captured over 60 Turks. Trooper John Burley personally captured some field guns and many prisoners. Sergeant Birkett-Vipont, having lost his troop leader killed, led a party of men after the charge and captured over 60 prisoners in the Beersheba redoubt. Major George Rankin, as Second in Command of the Regiment was quick to commence reorganisation of the unit and consolidation of the positions taken on the outskirts of Beersheba. A farmer and part-time soldier from Rochester, Rankin was an original C Squadron officer who fully understood the need for the second in charge to attend to such detail thus freeing his commander to command. It was soon over and it was dark. Shock tactics had decided the day. A momentous cavalry exploit had been added to military history.
The enemy, on seeing the fierceness of the attack had begun to blow up ammunition dumps and wells and the railway station was set on fire. The curling black smoke drifting towards the attackers was incorrectly believed to be poison gas. There was much indiscriminate shooting when the town was entered, but there was an outstanding figure, calm and alone. He was Murray Bourchier, the commander of the 4th Regiment, whose bravery and imperturbability did much to bring about quiet and order. Phil Moon, a trooper in A Squadron had vivid recollections of the charge many years after the war. This is his story as originally recorded by Cyril Smith, an original member invalided home from Gallipoli but who returned to the Regiment with a commission in France:
'At a slow trot for half a mile or so, and a squadron of what we find out later is the 12th Regiment joists up on our left, thus there are now two squadrons in tine. The pace is getting [124] hotter and Jacko realises that there is something doing. We can hear his rifle and machine gun -fire, but it does not seem to be coming anywhere near us. I have a hazy recollection of a plane badly missing us with bombs. Tim Healey of C Troop is about 50 yards in front, acting as ground scout. Getting fairly close now, and we realise that this is going to be serious and think about barbed wire. We can feel the concussion of the fire in our faces, but not a man or horse seems to have been hit. I got my head well down on Jerry's neck, and was doing some mighty deep thinking. Next to me Johnson's horse gets it through the heart and Johnson takes a tumble. We are among a succession of shallow pits full of Turks, and Jerry and I barge through one of these before we can pull up. Harold Wickham, with the Hotchkiss gun pack horse follows me, and Wickham is badly wounded.
I have neither seen nor heard any order to dismount, Lieutenant Ben Meredith, our troop leader, is off his horse, so I do likewise. He hands his reins over to me and turns with his revolver on one of these pits full of Turks.
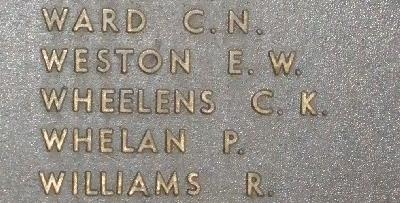
They throw up their hands at once, but as he turns away one of them picks up a rifle and shoots him in the back. Corporal Cliff Wheelans is down, shot through the side. There seem to be Turks everywhere, but they seem bewildered and few of them are putting up any sort of fight. Jerry annoys me considerably by looking for grass to eat. Bombs make a hell of a noise, but don't seem to do much damage. We can catch up to the rest of the troop before reaching the town near the railway station which is very shortly inflames and a railway engine goes skywards.
There is some conflict in descriptive detail about the loss of C Troop's Ben Meredith. Vic Smith recollected that one of the surrendered Turks rolled a grenade straight at Meredith and 'blew him to bits'. Further, Phil Moon immediately despatched the Turk with his bayonet. The Regiment's War Diary notes that there were three or four incidents where surrendered Turks, taking advantage of their situation, again took up arms. Although not documented there is a hint among some survivor's recollections that the bloody fighting in the forward trenches was bitter and sometimes vengeance [125] consumed the troopers involved. Perhaps not surprising as Ben Meredith, a grazier from Terang, seems to have been a particularly popular officer with experience in the Militia's 11th Light Horse Regiment as an officer before the war. Eager to answer the call to arms he had been accepted as an original member of the Regiment with the rank of Trooper. After Gallipoli Meredith received another commission with the Regiment.
Moon continues: Turks seem completely demoralised and prisoners are roaming around as they please. Bill Watkins, (there were two men of that name with the Regiment at the time), and myself are sent up to the minaret of the mosque to see if any snipers are up there. Thank God there are not. Stephen Loughman and I decided to go back and see if we can do anything for Wheelans, who was left where we dismounted. It is dark now, but we eventually find him. He is in a bad way and died at El Arish on his way to hospital We cannot locate our squadron when we get back to town, but join up with a couple of machine gunners and decided to spend the night with them and find our own crowd in the morning. We collected about thirty prisoners before reaching their position about a mile or more up the Hebron Road.
We discovered our own squadron about half a mile away the next morning, and learnt we were posted missing. Advance parties of the 60th Division were coming in. We visited the scene of the previous night's excitement, and looked up an old acquaintance in the shape of a bald headed Turk I had met the night before. The man who shot Ben Meredith. I saw a dead Turk with his hand held up over his head. Some wag had put a piece of paper in his hand bearing the words "Gib it backsheesh". I would like to mention the incident of Corporal Alec Cotter as he told it to me. His horse was shot as we reached the Turks, and he was pinned by one leg underneath. He and Turk had a private duel, firing five shots at each other in rotation Cotter won. Cotter was accidentally killed playing football. The irony of fate.'
The bearers and sandcarts of the Mobile Section of the 4th Light Horse Brigade Field Ambulance had followed close behind the mounted assault troops. The medical orderlies tended to and carried the wounded back to the Dressing Station at Khashim Zannia. They made the return trip many times through the evening and into the night until about 4.00am the next morning. Forty six Australian patients were treated. As most of the wounds were severe, the dressing staff were kept working continuously until that time without respite. When all the patients had been dressed and fed most of the stair snatched a little sleep although a hostile aircraft bombed the Dressing Station about two hours later without causing further casualties. As soon as the Receiving Station received the news that Beersheba had fallen they came up from Asluj and occupied the Turkish Hospital which they found in a very dirty condition and infested with vermin. As a result the Field Ambulance established itself in the Beersheba Town Hall. By lunchtime on the 1st November the Ambulance-men brought up five men who died in the Dressing Station by Cacolet Camels and interned the deceased in the Military Cemetery at Beersheba. Later that day the Field Ambulance was again targeted by enemy aircraft and direct hits killed and maimed many of the ambulance-men.
Corporal Alex Anderson, a farmer turned Army signaller, wrote to his Mother in Egerton on 4th November: 'I think the charge we did at Beersheba the other night was as well carried out as was possible for soldiers to do. We had to gallop across a couple of miles of open country under shrapnel and high explosive gunfire and there wasn't a man faltered or the line broken.' The reader may recall that Anderson was to lose his life needlessly in the turbulent aftermath of the war whilst still in Egypt.
Trooper Sloane Bolton, who had galloped straight through the trenches and dug-outs into Beersheba told how he and Trooper Hudson 'Saw a German officer who seemed to be working a switchboard. He was blowing up buildings of importance in the town (ammunition dumps, headquarters, etc).
We rode over to him and gave a yell, upon which he [127] immediately Jumped to his feet', very much surprised we were already iii the town'. The interrupted demolition programme had already done considerable damage. But of the town's seventeen wells, only two had been demolished and two damaged. Two reservoirs holding 90,000 gallons of water were intact and the thirsty troopers and their mounts feverishly drank their fill from the various water points, some to the extent that they immediately vomited up the water. Prisoners, many wandering around in a confused or dazed state were rounded up and counted. Bolton, a young engine-driver from Geelong, would continue campaigning with the Regiment for some months until severely wounded with the loss of both legs at the Table Top action. Ray Hudson, a clerk from NSW, survived the war unscathed and returned as a Squadron Sergeant Major.
It was found that the Light Horse had captured 1,200 men as well as 14 guns. Including those taken by the infantry, about 2,000 prisoners in all were taken and over 500 Turkish corpses were buried on the battlefield. The casualties in the two Light Horse Regiments who made the charge were only 32 killed and 36 wounded, mainly in the trenches. Bourchier himself recorded that his Regiment had suffered the loss of two officers killed - Meredith and Frank Burton who had been shot by a German machine gunner, five troopers killed plus four who died as a result of their wounds and thirteen wounded. Very light casualty figures indeed given the numbers and defensive disposition of the enemy. The English historian Colonel Preston sums up the achievement as follows:
'General Grant's action forms a notable landmark in the history of cavalry, in that it initiated that spirit of dash which thereafter dominated the whole campaign. When he received the orders for the attack, he had to consider that the enemy was known to be in strength, well posted in trenches and adequately supplied with guns and machine guns. In order to reach the town itself, it would be necessary to cross the Wadi Saba, of unknown depth and possibly with precipitous banks. The character of the intervening country was known only in so far as it had been revealed by field glasses. It was not even certain [128] that there was no wire in front of the enemy's Position. On the other hand the town had to be in our hands by nightfall or the whole plan failed. He weighed the chances and made up his mind instantly to risk all in the charge, and the success he achieved surprised even the most ardent votaries of the white arm'.
The besieging force urgently needed 400,000 gallons of water and got it, because of the charge. Without that water, the capture of Beersheba would have been something less than a victory and thousands of Allied men and horses would have been placed in jeopardy, although by a quirk of fate rain fell later during the night of 31st October. Failure to gain this water supply would have impacted adversely on the conduct of the entire campaign. It could have for instance delayed the fall of Gaza until the wet season, with dire results. The conquest of Palestine and Syria would not have been completed before the end of the war and Mustafa Kemal might have then been able to retain his rich and powerful Ottoman Empire.
Among those taking part in the charge was Sergeant Ted Seagher. During the ensuing engagement with the Turks he is reputed to have returned under fire, lifted a badly wounded comrade onto the front of his horse, turned again and galloped out, leading his section and the wounded man to safety. There must have been at least 400 such stories to be told by survivors of the 4th Light Horse Regiment. What do men, taken at random, remember as being outstanding on such a notable occasion? John Cantwell, a young farmer from Yarram, recalled that an officer had a pot shot with his revolver at a mangy dog when galloping past. Albert Newell, nicknamed 'Papa', probably because of his rather advanced age of 43 years was a clerk in St Kilda, Melbourne before enlistment; Bert's vivid recollection was of the squelch made when his horse put its hoof on the stomach of a dead Turk. Corporal Bill Todd, a man well over six feet in height, joined his comrades in the town riding a donkey. Corporal A.S. (Phil) Moon, another clerk in civilian life, remained bitter over the treachery of the Turk who had put up his hands in surrender, then killed Ben Meredith.
[129] Bitterness can be understandable as can fear. A few men seem to have actually enjoyed the charge, but most were like trooper Vic Smith from Maldon who, when asked by historian Ian Jones, 'What were you thinking?', replied, 'Oh, I dunnoo. Wishing to Christ it was over. Yeah... and out of it!'. Asked if he was scared, he commented, 'Oh, I s'pose there was a certain amount of fear there. But you had to keep going; you couldn't drop out.' Jim Henderson who had ridden in the second or third wave of chargers remembered the sobering task of being detailed the next morning to identify and collect the Australian dead. His lasting memory was having found the still warm body of a trooper who had just died from loss of blood. Apparently the wounded man had been missed by the Field Ambulance men following closely behind the chargers, and had lingered on the battlefield throughout the night.
On a lighter note Henderson recalled finding a mass of Turkish money and medals in the enemy offices within the railway station at Beersheba. Henderson and his mates grabbed piles of this booty but ended up using most of the paper money as lavatory paper. Much to their chagrin they later found that the money could have been redeemed for a handsome sum. Les Amiet was another charger, albeit with the Machine Gun Section which assaulted from the flank. Amiet was interested to see the movie The Lighthorsemen' almost seventy years after the charge and grumbled good naturedly that the movie did not depict the initial dip in the ground that the chargers rode in and out of.
Alex Wilson, who had ridden over to Farrier Sergeant 'Bulger' Williams from Traralgon, his home town, as soon as the move began was found dead in a trench, sitting astride his horse. His premonition had been fulfilled. What a strange supper that night in Beersheba. Black Turkish bread for the men while the horses munched Turkish barley. Cyril Smith mentions other men who had participated in the charge in the Biblical land which had once flowed with milk and honey; he lists: Major Vicar' Lawson, Major Jack Parkin from Kingston, [130] Lieutenants Frank Phillips and Ewen Cameron who later worked for the Lands Department, Syd Vialls who was a member of the orchestra in Melbourne's Capitol Theatre, Lieutenant Tom Murray a Geelong baker, and Lieutenant Len Gooding from South Melbourne. All men who made history.
Returning to Major James Lawson special note should be made. Official records actually state that this gallant officer was very largely responsible for the fall of Beersheba. This assertion was made in view of Lawson's courage in leading his squadron over the first small Turkish trenches upon which he dismounted a few yards in front of the second line and commenced to kill and capture the occupants and their machine gun. Lawson then led his men against a strong Turkish trench about 9 feet deep and protected by enemy infantry and machine guns. This trench was rushed by Lawson and his men and nearly 100 prisoners were taken. Lawson's actions were recognised by the recommendation for a Victoria Cross, a unique honour for the 4th Light Horse Regiment. Sadly the recommendation finally resulted in the lesser award of a Distinguished Service Order.
The hero of it all though would have to be Murray Bourchier an officer who had performed well at Gallipoli and earned the respect of his command. One should also acknowledge the months of unrewarding soldiering the 4th Light Horse Regiment endured through 1916 and 1917 when it seemed as if they would never again have the opportunity to face the enemy, when it seemed that the 'brass' were hell bent on keeping the 4th away from any action and always in a reserve position. To have maintained the integrity and effectiveness of the Regiment through these trying times speaks highly enough of the competent Murray Bourchier and his loyalty. But we must add to that the dash and brilliance of the charge of Beersheba which Bourchier led. Not only did Bourchier display magnificent courage and determination, but he handled his command, including the bulk of the 12th Light Horse Regiment with great skill. On top of all that he personally involved himself in the fighting and actually shot 6 [131] Turks with his own revolver. Truly a feat without parallel in Australian military history.
Captain Cyril Smith discussed the Beersheba action at length with veterans of the charge. He reported that it emerged in conversation that the Turks had never contemplated hand to hand fighting, as those who carried bombs had them wired to their belts. Men asked themselves what would have been the position if the Australians had been in defence and the Turks the attackers. They are certain the town would not have fallen. It was poorly defended, though strongly garrisoned; the troops were badly used and should have been sited more effectively. Furthermore, it should be noted that there was an absence of friendly covering fire from artillery during the Australian attack. None of this detracts from the glorious outcome of the action by the Australians.
There has been considerable debate even controversy concerning the sole photograph of the charge at Beersheba taken by Trooper E.G. Elllott. Ian Jones argues the case convincingly that the photograph is genuine and veterans such as Bill Scott who knew Elliott personally were similarly convinced of its authenticity. Scott, who became a strong supporter of the Regiment's association after the war, and well known Brighton real estate salesman in his aging Rolls Royce defended the Elliott photograph on many occasions. Records indicate by the way that Eric George Elliott was a Permanent Military Force soldier from Bendigo who served with the 4th Light Horse Regiment as a reinforcement before being transferred to the 4th Machine Gun Squadron who were certainly in the area at the time. Another aspect which arose in the course of research for this work was the mention by veterans on more than one occasion of an 'Army newsreel' taken the following day in which the charge, at least in part, was reconstructed, even while some of the dead still lay where they had fallen. Also that some months later, near Belah further footage was taken of another reconstruction of the charge. No official confirmation of these matters has been
found.
[132] In conclusion it must be acknowledged that not only the 4th and 12th Light Horse Regiments were involved in the charge. While the place of these two regiments has been made clear there were other players who charged, such as the staff of the Brigade, at least some machine gunners, elements of the Field Ambulance and probably others as well. Trooper J.T. Clark from the 3rd Light Horse Regiment for example is adamant that he also participated in the charge and perhaps he did, as it is likely that men from other Regiments would have been attached or inadvertently found themselves with the 4th at the time of the charge. Furthermore, it is likely that elements of the mounted troops at places like Tel el Saba also 'charged' from their positions as the finale of the action at Beersheba took place. Investigation and academic analysis will no doubt continue. But there will surely be little debate over the tactical significance of this action and the high place of importance the charge enjoys in Australia's heritage.
4th Australian Light Horse Regiment, AIF
4th Australian Light Horse Regiment, Roll of Honour
The Battle of Beersheba, Palestine, 31 October 1917
Australian and New Zealand Roll of Honour
Battles where Australians fought, 1899-1920
Citation: The Battle of Beersheba, Palestine, 31 October 1917, 4th LHR, AIF Unit History Account