« March 2009 »
S M T W T F S
1 2 3 4 5 6 7
8 9 10 11 12 13 14
15 16 17 18 19 20 21
22 23 24 25 26 27 28
29 30 31
You are not logged in. Log in


Search the site:


powered by FreeFind
Volunteer with us.

Entries by Topic All topics  
A Latest Site News
A - Using the Site
AAA Volunteers
AAB-Education Centre
AAC-Film Clips
AAC-Photo Albums
AIF & MEF & EEF
AIF - Lighthorse
AIF - ALH - A to Z
AIF - DMC
AIF - DMC - Or Bat
AIF - DMC - Anzac MD
AIF - DMC - Aus MD
AIF - DMC - British
AIF - DMC - BWI
AIF - DMC - French
AIF - DMC - Indian
AIF - DMC - Italian
AIF - DMC - Medical
AIF - DMC - Remounts
AIF - DMC - Scouts
AIF - DMC - Sigs
AIF - DMC - Sigs AirlnS
AIF - DMC - 1 Sig Sqn
AIF - DMC - 2 Sig Sqn
AIF - DMC - Eng
AIF - DMC - Eng 1FSE
AIF - DMC - Eng 2FSE
AIF - DMC - GSR
AIF - 1B - 1 LHB
AIF - 1B - 6 MVS
AIF - 1B - 1 LHMGS
AIF - 1B - 1 Sig Trp
AIF - 1B - 1 LHFA
AIF - 1B - 1 LHR
AIF - 1B - 2 LHR
AIF - 1B - 3 LHR
AIF - 2B - 2 LHB
AIF - 2B - 7 MVS
AIF - 2B - 2 LHFA
AIF - 2B - 2 LHMGS
AIF - 2B - 2 Sig Trp
AIF - 2B - 5 LHR
AIF - 2B - 6 LHR
AIF - 2B - 7 LHR
AIF - 3B - 3 LHB
AIF - 3B - 8 MVS
AIF - 3B - 3 LHB Sigs
AIF - 3B - 3 LHFA
AIF - 3B - 3 LHMGS
AIF - 3B - 3 Sig Trp
AIF - 3B - 8 LHR
AIF - 3B - 9 LHR
AIF - 3B - 10 LHR
AIF - 4B - 4 LHB
AIF - 4B - 4 Sig Trp
AIF - 4B - 9 MVS
AIF - 4B - 4 LHFA
AIF - 4B - 4 LHMGS
AIF - 4B - 4 LHR
AIF - 4B - 11 LHR
AIF - 4B - 12 LHR
AIF - 5B - 5 LHB
AIF - 5B - 10 MVS
AIF - 5B - 5 LHFA
AIF - 5B - 5 Sig Trp
AIF - 5B - ICC
AIF - 5B - 14 LHR
AIF - 5B - 15 LHR
AIF - 5B - 1er Regt
AIF - 5B - 2 NZMGS
AIF - AASC
AIF - Aboriginal LH
AIF - Badges
AIF - Cars
AIF - Chinese LH
AIF - Double Sqns
AIF - Engineers
AIF - Fr - 22 Corps
AIF - Fr - 13 LHR
AIF - Honour Roll
AIF - HQ - 3rd Echelon
AIF - Marching Songs
AIF - Misc Topics
AIF - NZMRB
AIF - NZMRB - AMR
AIF - NZMRB - CMR
AIF - NZMRB - EFT
AIF - NZMRB - NZMFA
AIF - NZMRB - NZMGS
AIF - NZMRB - OMR
AIF - NZMRB - Sig-Trp
AIF - NZMRB - WMR
AIF - Ships
AIF - Ships - Encountr
AIF - Ships - Una
AIF - WFF
AIF - Wireless Sqn
Battles
BatzA - Australia
BatzA - Broken Hill
BatzA - Liverpool
BatzA - Merivale
BatzB - Boer War
BatzB - Bakenlaagte
BatzB - Belmont
BatzB - Bothaville
BatzB - Buffels Hoek
BatzB - Coetzees Drift
BatzB - Diamond Hill
BatzB - Driefontein
BatzB - Elands
BatzB - Graspan
BatzB - Grobelaar
BatzB - Grootvallier
BatzB - Hartebestfontn
BatzB - Houtnek
BatzB - Karee Siding
BatzB - Kimberley
BatzB - Koster River
BatzB - Leeuw Kop
BatzB - Mafeking
BatzB - Magersfontein
BatzB - Modder River
BatzB - Onverwacht
BatzB - Paardeberg
BatzB - Palmietfontein
BatzB - Pink Hill
BatzB - Poplar Grove
BatzB - Rhenoster
BatzB - Sannahs Post
BatzB - Slingersfontn
BatzB - Stinkhoutbm
BatzB - Sunnyside
BatzB - Wilmansrust
BatzB - Wolvekuil
BatzB - Zand River
BatzG - Gallipoli
BatzG - Anzac
BatzG - Aug 1915
BatzG - Baby 700
BatzG - Evacuation
BatzG - Hill 60
BatzG - Hill 971
BatzG - Krithia
BatzG - Lone Pine
BatzG - Nek
BatzJ - Jordan Valley
BatzJ - 1st Amman
BatzJ - 2nd Amman
BatzJ - Abu Tellul
BatzJ - Es Salt
BatzJ - JV Maps
BatzJ - Ziza
BatzM - Mespot
BatzM - Baghdad
BatzM - Ctesiphon
BatzM - Daur
BatzM - Kurna
BatzM - Kut el Amara
BatzM - Ramadi
BatzN - Naval
BatzN - AE1
BatzN - Cocos Is
BatzN - Heligoland
BatzN - Marmara
BatzN - Zeebrugge
BatzN - Zeppelin L43
BatzNG - Bitapaka
BatzO - Other
BatzO - Baku
BatzO - Egypt 1919
BatzO - Emptsa
BatzO - Karawaran
BatzO - Peitang
BatzO - Wassa
BatzP - Palestine
BatzP - 1st Gaza
BatzP - 2nd Gaza
BatzP - 3rd Gaza
BatzP - Aleppo
BatzP - Amwas
BatzP - Ayun Kara
BatzP - Bald Hill
BatzP - Balin
BatzP - Beersheba
BatzP - Berkusieh
BatzP - Damascus
BatzP - El Auja
BatzP - El Buggar
BatzP - El Burj
BatzP - Haifa
BatzP - Huj
BatzP - JB Yakub
BatzP - Kaukab
BatzP - Khan Kusseir
BatzP - Khuweilfe
BatzP - Kuneitra
BatzP - Megiddo
BatzP - Nablus
BatzP - Rafa
BatzP - Sasa
BatzP - Semakh
BatzP - Sheria
BatzP - Surafend
BatzP - Wadi Fara
BatzS - Sinai
BatzS - Bir el Abd
BatzS - El Arish
BatzS - El Mazar
BatzS - El Qatiya
BatzS - Jifjafa
BatzS - Magdhaba
BatzS - Maghara
BatzS - Romani
BatzS - Suez 1915
BatzSe - Senussi
BatzWF - Westn Front
BW - Boer War
BW - NSW
BW - NSW - 1ACH
BW - NSW - 1NSWMR
BW - NSW - 2NSWMR
BW - NSW - 3ACH
BW - NSW - 3NSWIB
BW - NSW - 3NSWMR
BW - NSW - 5ACH
BW - NSW - A Bty RAA
BW - NSW - AAMC
BW - NSW - Aust H
BW - NSW - Lancers
BW - NSW - NSW Inf
BW - NSW - NSWCBC
BW - NSW - NSWIB
BW - NSW - NSWMR_A
BW - NZ
BW - Qld
BW - Qld - 1ACH
BW - Qld - 1QMI
BW - Qld - 2QMI
BW - Qld - 3ACH
BW - Qld - 3QMI
BW - Qld - 4QIB
BW - Qld - 5QIB
BW - Qld - 6QIB
BW - Qld - 7ACH
BW - QLD - AAMC
BW - SA
BW - SA - 1SAMR
BW - SA - 2ACH
BW - SA - 2SAMR
BW - SA - 3SACB
BW - SA - 4ACH
BW - SA - 4SAIB
BW - SA - 5SAIB
BW - SA - 6SAIB
BW - SA - 8ACH
BW - SA - AAMC
BW - Tas
BW - Tas - 1ACH
BW - Tas - 1TIB
BW - Tas - 1TMI
BW - Tas - 2TB
BW - Tas - 2TIB
BW - Tas - 3ACH
BW - Tas - 8ACH
BW - Vic
BW - Vic - 1VMI
BW - Vic - 2ACH
BW - Vic - 2VMR
BW - Vic - 3VB
BW - Vic - 4ACH
BW - Vic - 4VIB
BW - Vic - 5VMR
BW - Vic - 6ACH
BW - Vic - AAMC
BW - Vic - Scot H
BW - WA
BW - WA - 1WAMI
BW - WA - 2ACH
BW - WA - 2WAMI
BW - WA - 3WAB
BW - WA - 4ACH
BW - WA - 4WAMI
BW - WA - 5WAMI
BW - WA - 6WAMI
BW - WA - 8ACH
BW Gen - Campaign
BW Gen - Soldiers
BW General
Cavalry - General
Diary - Schramm
Egypt - Heliopolis
Egypt - Mena
Gen - Ataturk Pk, CNB
Gen - Australia
Gen - Legends
Gen - Query Club
Gen - St - NSW
Gen - St - Qld
Gen - St - SA
Gen - St - Tas
Gen - St - Vic
Gen - St - WA
Gm - German Items
Gm - Bk - 605 MGC
GW - 11 Nov 1918
GW - Atrocities
GW - August 1914
GW - Biographies
GW - Propaganda
GW - Spies
GW - We forgot
Militia 1899-1920
Militia - Area Officers
Militia - Inf - Infantry
Militia - Inf - 1IB
Militia - Inf - 2IB
Militia - Inf - 3IB
Militia - Inf - NSW
Militia - Inf - Qld
Militia - Inf - SA
Militia - Inf - Tas
Militia - Inf - Vic
Militia - Inf - WA
Militia - K.E.Horse
Militia - LH
Militia - LH - Regts
Militia - LH - 1LHB
Militia - LH - 2LHB
Militia - LH - 3LHB
Militia - LH - 4LHB
Militia - LH - 5LHB
Militia - LH - 6LHB
Militia - LHN - NSW
Militia - LHN - 1/7/1
Militia - LHN - 2/9/6
Militia - LHN - 3/11/7
Militia - LHN - 4/6/16
Militia - LHN - 5/4/15
Militia - LHN - 6/5/12
Militia - LHN - 28
Militia - LHQ - Qld
Militia - LHQ - 13/2
Militia - LHQ - 14/3/11
Militia - LHQ - 15/1/5
Militia - LHQ - 27/14
Militia - LHS - SA
Militia - LHS - 16/22/3
Militia - LHS - 17/23/18
Militia - LHS - 24/9
Militia - LHT - Tas
Militia - LHT - 12/26
Militia - LHV - Vic
Militia - LHV - 7/15/20
Militia - LHV - 8/16/8
Militia - LHV - 9/19
Militia - LHV - 10/13
Militia - LHV - 11/20/4
Militia - LHV - 19/17
Militia - LHV - 29
Militia - LHW - WA
Militia - LHW-18/25/10
Militia - Military Orders
Militia - Misc
MilitiaRC - Rifle Clubs
MilitiaRC - NSW
MilitiaRC - NT
MilitiaRC - Qld
MilitiaRC - SA
MilitiaRC - Tas
MilitiaRC - Vic
MilitiaRC - WA
Militiaz - New Zealand
Tk - Turkish Items
Tk - Army
Tk - Bks - Books
Tk - Bks - 1/33IR
Tk - Bks - 27th IR
Tk - Bks - Air Force
Tk - Bks - Yildirim
Tk - POWs
Wp - Weapons
Wp - Hotchkiss Cav
Wp - Hotchkiss PMG
Blog Tools
Edit your Blog
Build a Blog
RSS Feed
View Profile
Open Community
Post to this Blog
Site Index
Education Centre
LH Militia
Boer War
Transport Ships
LH Battles
ALH - Units
ALH - General
Aboriginal Light H
Weapons
Ottoman Sources

"At a mile distant their thousand hooves were stuttering thunder, coming at a rate that frightened a man - they were an awe inspiring sight, galloping through the red haze - knee to knee and horse to horse - the dying sun glinting on bayonet points..." Trooper Ion Idriess

The Australian Light Horse Studies Centre aims to present an accurate history as chroniclers of early Australian military developments from 1899 to 1920.

The Australian Light Horse Studies Centre site holds over 12,000 entries and is growing daily.

Contact: Australian Light Horse Studies Centre

Let us hear your story: You can tell your story, make a comment or ask for help on our Australian Light Horse Studies Centre Forum called:

Desert Column Forum

WARNING: This site contains: names, information and images of deceased people; and, language which may be considered inappropriate today.

Monday, 9 March 2009
Times, 25 November 1899, Account
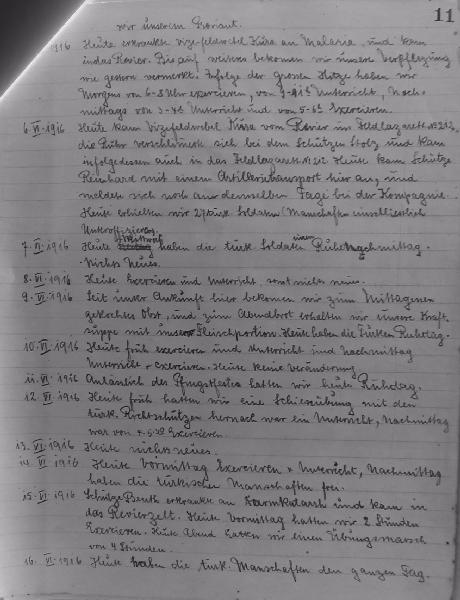
Topic: BatzB - Belmont

Belmont

South Africa, 23 November 1899

Times, 25 November 1899, Account


Times, 25 November 1899, p. 7, col a.


LATEST INTELLIGENCE.  

THE VICTORY AT BELMONT. GUARDS' BAYONET CHARGE

GERMAN COMMANDANT CAPTURED.

(FROM OUR SPECIAL CORRESPONDENT.)

BELMONT, Nov. 23.


After an artillery duel yesterday, a battle was fought at Belmont this morning. It opened at 3.56. The general idea was as follows:

The Guards' Brigade attacked the first position after a five-mile night march. It would be difficult to praise too highly the way in which they climbed the kopjes under an extremely heavy fire, which was reserved till they were within 250 yards. The Guards did not fire in reply, but used the bayonet only. It was one of the finest achievements of the Brigade.

After Clearing the position at 410 the Grenadier  Guards, Scots Guards, and and Coldstream Guards covered the advance, clearing consecutively the' second and third positions. They suffered some casualties while approaching the second position. The 9th Brigade, supported by the Yorkshire Light Infantry and the Northumberland Fusiliers, was especially exposed to the concentrated Boer fire. The Naval Brigade with four guns was engaged in demolishing a lunette opposite our left centre and protecting their rear. Our artillery severely damaged the Boer laager in the rear.

After the battle the laager was burnt and the ammunition destroyed. The cavalry and mounted  infantry on both flanks pursued the enemy, but were unable to overtake the retreating Boers, who got away with their transport. A considerable quantity of stores was captured, and a large number of horses.

Our losses were 226 killed and wounded, including Lieutenant and Adjutant Fryer. Lieutenant willoughby was treacherously shot at by an ambush which raised the white flag. Lieutenant Blundell was shot by a wounded Boer whom he was tending.

Especial gallantry was displayed by Major Milton, King's Own Yorkshire Light Infantry. At the close of the action the mounted infantry which he was leading fell into an ambush, and, whilst his men were making good their escape, he supplied a trooper whose horse had been killed with his own, and then walked away under heavy fire. Chaplain Hills also showed absolute carelessness of personal danger.

The Boer rout was complete. Their losses are estimated to be equal to ours, and 50 prisoners ware taken.

Our wounded include General Fetherstonhaugh, Colonel Crabbe, Major Dalrymple Hamilton, and Lieutenant Blundell.

Everything was in favour of the Boers to-day. It is rumoured that there have been threats of assassination of recalcitrant burghers who are growing tired of the war and deserting.

The prisoners say that before the fight the Boers thought that not all the European armies could drive them out from their position.

After the battle Lord Methuen made the following address to the troops :

"Comrades, I congratulate you on the complete success achieved by you this morning. The ground over which we have to fight presents exceptional difficulties, and we had as an enemy a past master in the tactics of mounted infantry. With troops such as you are, a commander can have no fear as to the result.

"There is a sad side, and you and I are thinking as much of those who have died for the honour of their country and of those who are suffering as we are thinking of our victory."


The Boers used some Dum Dum bullets.

The following telegram from the General Commanding Lines of Communication, dated Cape Town, Nov. 24, has been received at the War Office:

Methuen further reports this morning that wounded are going on well.

Over fifty prisoners, including German commandant and six field cornets-19 of these prisoners wounded. Unable to estimate Boer losses.
Prisoners say yesterday's attack was a surprise and the only beating they have had. A large amount of correspondence secured.

Reservists have done well.

Colonel Pole-Carew replaces Fetherstonhaugh in the command of 9th Brigade.


A second telegram says :

General First Division reports from Belmont Lieutenant W. A. Blundell, 3rd Grenadier Guards, died last night.


(FROM our correspondent.)

ORANGE RIVER, Nov. 23, Noon, via CAPE TOWN, Nov. 23.

Artillery firing began at 4.45 a.m. in the hills bearing east-north-east from Orange River, at an estimated distance of 12 miles. It ceased at 7 a.m. The enemy appeared to be retiring to the hills on the skyline bearing east-north-east, at an estimated distance of 15 miles from Orange River. The artillery is firing again now.

(THROUGH REUTER'S AGENCY.)

BELMONT, Nov. 24, 9.55 am.

The entire western division moved out from Orange River on Tuesday and bivouacked at Witteputs.

Two companies of Mounted Infantry and a detachment of the New South Wales Lancers were sent to hold Thomas's Farm. Pickets prevented the enemy from advancing. The Boers fired a cannon, but our artillery came up and silenced the enemy's fire.

At 2 o'clock on Thursday morning the Guards Brigade moved steadily forward to a kopje a few miles east of Belmont Station. The Scots Guards and Grenadier Guards advanced to within 50 yards of the enemy's base. The Boers sent in a scathing fire staggering the Guards momentarily, but the next instant they poured a deadly fire into the enemy.

At daybreak a rifle duel bean, and after it had been maintained for half an hour the artillery commenced practice. The Boers then relinquished their front position, and the Scots Guards rushed the kopje, carrying it at the point of the bayonet with a grand British cheer.

The 9th Brigade next moved forward in extended order, and the enemy started a terrible cross-fire from the surrounding kopjes.

The Coldstream Guards, supported by the Scots Guards, the Grenadier Guards, the Northumberland Fusiliers, and the Northampton Regiment; stormed the second position in the face of the enemy's fire, which was constant and effective.

The 9th Brigade advanced, covered by the artillery, which maintained excellent practice The infantry never wavered, and raised a tre
mendous cheer as they charred. The Boers fled

Times, 25 November 1899, p. 7, col b.


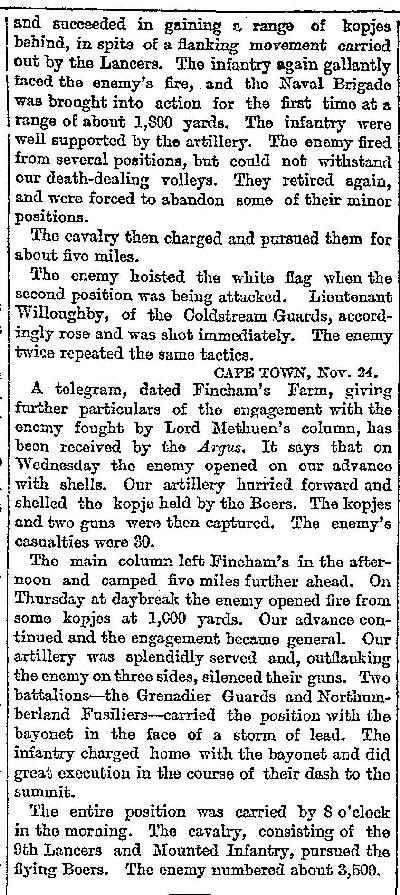
and succeeded in gaining r range of kopjes I behind, in spite of a flanking movement carried out by the Lancers. The infantry again gallantly faced the enemy's fire, and the Naval Brigade was brought into action for the first time at a range of about 1,800 yards. The infantry were well supported by the artillery. The enemy fired from several positions, but could not withstand our death-dealing volleys. They retired again, and were forced to abandon some of their minor positions.

The cavalry then charged and pursued them for about five miles.

The enemy hoisted the white flag when the second position was being attacked. Lieutenant Willoughby, of the Coldstream Guards, accordingly rose and was shot immediately. The enemy twice repeated the same tactics.

CAPE TOWN, Nov. 24.

A telegram, dated Fincham's Farm, giving further particulars of the engagement with the enemy fought by Lord Methuen's column, has been received by the Argus. It says that on Wednesday the enemy opened on our advance with shells. Our artillery hurried forward and shelled the kopje held by the Boers. The kopjes and two guns were hen captured. The enemy's casualties were 30.

The main column left Fincham's in the afternoon and camped five miles further ahead. On Thursday at daybreak the enemy opened fire from some kopjes at 1,000 yards. Our advance continued and the engagement became general. Our artillery was splendidly served and, outflanking the enemy on three sides, silenced their guns. Two battalions-the Grenadier Guards and Northumberland Fusiliers-carried the position with the bayonet in the face of a storm of lead. The infantry charged home with the bayonet and did great execution in the course of their dash to the summit.
The entire position was carried by 8 o'clock in the morning. The cavalry, consisting of the 9th Lancers and Mounted Infantry, pursued the flying Boers. The enemy numbered about 3,500.


Further Reading:

Boer War - Battle of Belmont

Battles where Australians fought, 1899-1920


Citation: Times, 25 November 1899, Account 

Posted by Project Leader at 11:01 PM EADT
Updated: Friday, 3 April 2009 10:47 AM EADT
Bert Schramm's Diary, 9 March 1919
Topic: Diary - Schramm

Diaries of AIF Servicemen

Bert Schramm


During part of the course of his military service with the AIF, 2823 Private Herbert Leslie Schramm, a farmer from White's River, near Tumby Bay on the Eyre Peninsular, kept a diary of his life. Bert was not a man of letters so this diary was produced with great effort on his behalf. Bert made a promise to his sweetheart, Lucy Solley, that he would do so after he received the blank pocket notebook wherein these entries are found. As a Brigade Scout since September 1918, he took a lead part in the September 1918 breakout by the Allied forces in Palestine. Bert's diary entries are placed alongside those of the 9th Light Horse Regiment to which he belonged and to the 3rd Light Horse Brigade to which the 9th LHR was attached. On this basis we can follow Bert in the context of his formation.

 Bert Schramm's Diary, 9 March 1919


Bert Schramm's Handwritten Diary, 8 - 10 March 1919

[Click on page for a larger print version.]

Diaries

Bert Schramm

Sunday, March 9, 1919

Bert Schramm's Location - Moascar, Egypt.

Bert Schramm's Diary - Nothing doing. There is some talk of drill starting tomorrow and the whole of the Brigade have sworn to refuse to do it.


9th Light Horse Regiment War Diary

9th Light Horse Regiment Location - Moascar, Egypt.

9th Light Horse Regiment War Diary -  Voluntary church services. Syllabus of training issued.


Darley

Darley, TH, With the Ninth Light Horse in the Great War, Adelaide, Hassell Press, 1924.

No Entry


Previous: Bert Schramm's Diary, 8 March 1919

Next: Bert Schramm's Diary, 10 March 1919


Further Reading:

9th Light Horse Regiment AIF War Diary - Complete day by day list

Bert Schramm Diary 

Bert Schramm Diary - Complete day by day list


Additional Reading:

Darley, TH, With the Ninth Light Horse in the Great War, Adelaide, Hassell Press, 1924.


Citation: Bert Schramm's Diary, 9 March 1919


Posted by Project Leader at 12:01 AM EADT
Updated: Wednesday, 6 May 2009 12:11 PM EADT
1st Australian Armoured Car Section - The Motor Dash on Aleppo - Part 1
Topic: AIF - Cars

1st AUSTRALIAN ARMOURED CAR SECTION, AIF

THE MOTOR DASH ON ALEPPO

Part 1


This is a transcription from a manuscript submitted by Captain E.H. James called "The Motor Patrol". It is lodged in the AWM as AWM 224 MSS 209. This is Part 1.


The Motor Dash on Aleppo - Part 1

When Major General MacAndrew left Damascus with the 5th Cavalry Division with Aleppo as his objective it was known that he had a pretty tough proposition in hand. Aleppo was a Turkish military depot where several divisions were stationed with large supply and ammunition reserves. It was also a Railway Depot and junction of the two Railway Systems to Baghdad and Damascus and was in direct communication with Constantinople.

On the other hand the 5th Division was only about half its strength on account of the losses through disease and battle etc. The horses were more or less done on account of the strenuous operations preceding the taking of Damascus and there was over 200 miles to go before reaching the objective with perhaps the prospect of strong enemy resistance anywhere on the route. Nevertheless, the division made excellent progress considering the conditions for over a third of the distance when it was realised that progress was getting considerably slower and the horses were becoming more or less done.

General MacAndrew, or fighting Mac as he was known, realised that something else would have to be done if the operations were to be successful as speed was one of the main factors necessary for success. The General than decided when the division reached Homs to collect all the available motors together and make a rush for the enemy's base leaving the division to follow on as soon as possible. Three Armoured Car batteries (Nos. 2, 11 and 12 L. A.M.B.S.) and three Light Car Patrols (Nos. 1, 2 and 7 L.C.P.S.) were hastily collected together with their necessary transport vehicles. Each armoured car battery consisted of four 50 h.p. Rolls Royce armoured care, each mounted with a Vickers Machine Gun and each Light Car Patrol consisted of four light care each mounted with a Lewis Gun.

Both units of course had necessary tenders accompanying them with extra patrol, oil, water, actions end ammunition. Thus the fleet counted between them twenty four machine guns with their crews and transport. The armoured cars were the battle ships of the fleet, but owing to their weight they were more or less compelled to stick to the hard ground. The cars of the Light Car Patrols while they did not have the protection of the larger vehicles could venture on to places where the others could not go and were like the light cruisers of the fleet.

This little mobile army, with General MacAndrew in command himself, left Hama at daybreak on the morning of the 22nd of October, 1918 and said good-bye to the rest of the division.

After driving due north for an hour or two a fleet of enemy motor vehicles hove into view. phase vehicles consisted of a German armoured our and a number of German motor lorries fitted-with steel tyres and each mounting a machine gun and than, began one of the prettiest little fights that has probably ever bean witnessed. This was probably the first occasion on record of a battle between two fleets of motor vehicles. The German vehicles saw that they were outnumbered and were making all haste to get away north firing frantically with their machine was from the rear of the lorries as they bounced and jolted over the rough ground. The big German armoured car endeavoured to cover the retreat of the other vehicles. Our armoured cars rushed up alongside the enemy vehicles and a running fight ensued at a speed of about thirty miles per hour with the Light Car Patrols hovering round to get a shot in now and then, while some of them rushed ahead in order to cut off the enemy vehicles. The shooting from the German lorries was very erratic as owing to the roughness of the ground, the speed at which they were travelling and the unsuitableness of the vehicles for fast travelling, the gunners one minute would be firing into the ground and the next into the clouds. After a few minutes of this running fight the German armoured car suddenly stopped, a door opened at the side and the crew rushed out towards some barley crops growing alongside the track only to be shot down as they ran. The other lorries were then gradually surrounded and captured and some caught fire and were burnt. On examining the enemy armoured car we found that the engine was still running and we soon discovered why the crew left it so hurriedly. The fact being that it was a very unhealthy place to be as the bullets from our vehicles were penetrating the supposed armour plating and going clean through both sides at close range. The bullets from the German cars only fell harmlessly from the plating of our armoured care, so the fight was more or less a one sided one.


Previous section: 1st Australian Armoured Car Section - Megiddo - Part 4

Next section: 1st Australian Armoured Car Section - The Motor Dash on Aleppo - Part 2


Further Reading:

1st AUSTRALIAN ARMOURED CAR SECTION, AIF, Contents 

Australian Light Horse Order of Battle - Outline 

The Australian Light Horse - Structure

Australian Light Horse Order of Battle

Battles where Australians fought, 1899-1920


Citation: 1st Australian Armoured Car Section - The Motor Dash on Aleppo - Part 1

Posted by Project Leader at 12:01 AM EADT
Updated: Monday, 13 April 2009 11:25 PM EADT
605th Machine Gun Company War Diary - 5 to 16 June 1916
Topic: Gm - Bk - 605 MGC

 German 605th Machine Gun Company (MGC)

War Diary, 5 June to 16 June 1916 


605th Machine Gun Company War Diary - 5 to 16 June 1916


The entries


5.VI.16:    

Today Act. Sergt-Major Kura fell sick with malaria and was sent to the sick tent. Till further orders we get our rations as noted yesterday. On account of the great heat we drill from 6-8 a.m., instruction from 9-11 a.m., instruction 3-4 p.m. and drill from 5-6 p.m.


6.VI.16:    

Today Act. Sergt Major Kura was transferred from the sick tent to No. 212 Field Ambulance; dysentery got worse with Pte. Stolz who in consequence was also sent to No. 212 Field Ambulance. Today Pte. Reinhard arrived here with an artillery train and reported to the company the same day. Today we received 27 Turkish soldiers (other ranks including, N.C.O.'s.)


7.VI.16:    

Today (Wednesday) the Turkish soldiers have an afternoon off. Nothing new.


8.VI.16:    

Today drill and instruction. Otherwise, nothing new.


9.VI.16:    

Since our arrival here we got cooked fruit for dinner, and in the evening we bet our strong soup with our meat ration. Today the Turks have a day off.


10.VI.16:

This morning drill and instruction, and in the afternoon instruction and drill. No change to-day.


11.VI.16:    

Being Whitsuntide we had a holiday.


12.VI.16:    

Early this morning we bad target practice with the Turkish gunlayers, Instruction afterwards, and drill from 4. to 5.30 p.m.


13.VI.16:    

Nothing new to-day.


14.VI.16:    

This morning drill and exercise. The Turkish details have the afternoon off.


15-VI-16:    

Pte. Beuth reported nick with stomach catarrh and was sent to the sick tent. This morning we had 2 hours drill and this evening we had a route march of 4 hours.


16.VI.16:    

To-day the Turkish troops have the day off excepting bathing and washing clothes. The German troops bathed this morning and in the afternoon some fatigues.


Previous Page: 605th Machine Gun Company War Diary - 1 to 4 June 1916

Next Page: 605th Machine Gun Company War Diary - 16 to 24 June 1916


Further Reading:

German 605th Machine Gun Company (MGC) , Contents 

The Battle of Romani

Light Horse Battles

Battles where Australians fought, 1899-1920


Citation: 605th Machine Gun Company War Diary - 5 to 16 June 1916


Posted by Project Leader at 12:01 AM EADT
Updated: Wednesday, 15 April 2009 3:45 PM EADT
Suez Canal Attack, Egypt, Official British History Account, Pt 4
Topic: BatzS - Suez 1915

Suez Canal Attack

Egypt, January 28 - February 3, 1915

 Official British History Account, Pt 4


The following is an extract from:

MacMunn, G., and Falls, C., Military Operations Egypt & Palestine - From the Outbreak of War with Germany to June 1917, London, 1928, pp. 28 -  31.


Chapter II


ADVANCE OF THE TURKS

Egypt was watchful and fairly well informed. The British aeroplanes available were incapable of long flights. [The detachment under Major S. D. Massy, 29th Punjabis, consisted of three Maurice Farmans sent from Avonmouth in November, two Henri Farmans taken over in Egypt, and one B3.E2a which arrived from India in December. The aerodrome was at Ismailia, with a landing ground at Qantara. For long reconnaissances into Sinai it was found necessary to send out troops to prepare temporary landing grounds some miles east of the Suez Canal. The longest flight ever carried out was 176 miles, for which a specially large petrol tank had to be fitted to the machine. This, however, was after the Turkish attack on the Suez Canal.] The French seaplanes, put at Sir J. Maxwell's disposal in November, of which there were seven in the Aenne Rickmers - a captured cargo steamer equipped as a seaplane carrier at Port Said, were better, though far from powerful enough for the work they were called upon to perform. Hard driven Jan, by an energetic commander, Lieutenant de Vaisseau de l'Escaille, they carried out reconnaissance flights which were remarkable, particularly in view of the fact that the forced descent of a seaplane on land meant almost certain death for pilot and observer. [Thus in December Lieutenant de Vaisseau Destrem, with a British officer as observer, on two occasions flew up the Wadi Arabi from Aqaba and strove to surmount the steep range east of the valley, in order to reconnoitre Ma'an, on the Hejaz Railway. The task was beyond the power of the 80 h.p. engine, but attempts were continued by him and others until Sir J. Maxwell ordered them to stop, fearing that they would cost him one of his invaluable pilots. In the same month Lieutenant de Vaisseau Delage took off from the Doris off El Arish, flew over Gaza, then turned south-east to Beersheba. On his return his engine stopped while he was still ten miles from the sea. The wind just carried the seaplane over the water, but it was in a sinking condition when the Doris steamed up from Al Erish (a distance of 35 miles) to its rescue.] From information obtained by them and from the reports of agents it became clear that the attack would not be much longer delayed, and almost certain that it would come through Central Sinai. It was known to the headquarters of the Force in Egypt that a large force, including the 10th, 23rd, and 27th Divisions, was assembled close to the frontier about Beersheba.

On the 11th January it was thought desirable to issue to the Egyptian Press a statement that an attack was imminent, in order that excitement might be, so far as possible, discounted and allayed. Nekhl had by this date been held by a small body of the enemy for more than a week. On the 25th a force, estimated at one regiment, was reported to be marching on Qantara.

The trenches prepared on the west bank had not been occupied till the 22nd, and then only by small detachments. When, on the 26th, Moiya Harab, 25 miles east of the Little Bitter Lake, was reported to be occupied by some 6,000 men, and at the same time, 40 miles to the north-west, the British covering troops exchanged fire in front of Qantara with an enemy who fell back in the afternoon, it was decided to take up the positions for the defence.

Two battalions of the 32nd Indian Brigade were sent to hold the trenches along the west bank from Bench Mark Post, north of Lake Timsah, to Ballah, of which sector Br.-General H. D. Watson was put in command. All along the front the trenches on the west bank were reinforced from local reserves. The New Zealand Infantry Brigade was brought up the same day from Cairo, the Otago and Wellington Battalions being sent to El Kubri in the 1st Sector, while headquarters with the Auckland and Canterbury Regiments detrained at Ismailia, where they were held in reserve. H.M.S. Swiftsure, Clio, Minerva, the armed merchant cruiser Himalaya, and H.M.S. Ocean entered the Canal, taking stations near Qantara, Ballah, Shallufa, Gurkha Post, and Esh Shatt respectively. The French coastguard ship Requin was already in Lake Timsah, where the Canal Company had dredged a berth for her east of the main channel.

Next day (the 27th) the enemy was found to have established himself astride the El Arish-Qantara road, 5 miles east of Qantara, in the 3rd or northern Sector ; while in the early hours of the morning he also approached the Canal in the 1st or southern Sector, making slight attacks on the Baluchistan and Kubri posts. Major-General Wilson appreciated these feints at their proper value and, confident that the main attack would fall on some part of the 2nd Sector, reinforced Serapeum, its central post, by the 2nd Raj puts from Moascar.

Additional warships now entered the Canal, the French cruiser D'Entrecasteaux taking station just north of the Great Bitter Lake and the Proserpine at Port Said. On the 1st February the Royal Indian Marine ship Hardinge took station just south of Lake Timsah and north of Tussum. The ships defending the 2nd Sector were, it will be seen, stationed either at the extremities of the section of the Canal forming it or; in the Requin's case, in Lake Timsah, since from these points only, owing to the height of the eastern bank about Tussum, could they bring oblique fire to bear upon an enemy advancing on that front. The Canal was now closed each night and reopened each morning, so that the interruption to traffic was not serious.

On the 28th aeroplanes located a force of between three and four thousand 8 miles east of Deversoir in the central Sector, which was next day observed to have increased considerably. A reconnaissance by the enemy on the morning of the 28th against the Qantara bridgehead, on the east bank, which reached the barbed wire, resulted in six casualties among the Sepoys of the 14th Sikhs and the 1/6th Gurkhas in the post. The Turks left three dead in front of the wire and dragged away several wounded.

On the 30th January the enemy closed in generally, the greatest concentration being observed east of Bir Habeita, about nine miles east of the Canal at Serapeum. He had been unable to disguise his intentions, and General Wilson awaited the main attack upon the 2nd or central Sector, with sufficient forces deployed upon the Canal and with strong reserves.


Previous Chapter: Suez Canal Attack, Egypt, SYRIA AND SINAI, Official British History Account, Pt 3

Next Chapter: Suez Canal Attack, Egypt, DISPOSITION OF TROOPS IN THE CANAL DEFENCES, Official British History Account, Pt 5


Further Reading:

Suez Canal Attack, Egypt, Contents

Where Australians Fought, Sinai, 1916-1917

Light Horse Battles

Battles where Australians fought, 1899-1920


Citation: Suez Canal Attack, Egypt, Official British History Account, Pt 4


Posted by Project Leader at 12:01 AM EADT
Updated: Sunday, 26 April 2009 11:07 PM EADT

Newer | Latest | Older

Full Site Index


powered by FreeFind
Let us hear your story: You can tell your story, make a comment or ask for help on our forum.

Desert Column Forum

A note on copyright

The Australian Light Horse Studies Centre is a not for profit and non profit group whose sole aim is to write the early history of the Australian Light Horse from 1900 - 1920. It is privately funded and the information is provided by the individuals within the group and while permission for the use of the material has been given for this site for these items by various donors, the residual and actual copyright for these items, should there be any, resides exclusively with the donors. The information on this site is freely available for private research use only and if used as such, should be appropriately acknowledged. To assist in this process, each item has a citation attached at the bottom for referencing purposes.

Please Note: No express or implied permission is given for commercial use of the information contained within this site.

A note to copyright holders

The Australian Light Horse Studies Centre has made every endeavour to contact copyright holders of material digitised for this blog and website and where appropriate, permission is still being sought for these items. Where replies were not received, or where the copyright owner has not been able to be traced, or where the permission is still being sought, the Australian Light Horse Studies Centre has decided, in good faith, to proceed with digitisation and publication. Australian Light Horse Studies Centre would be happy to hear from copyright owners at any time to discuss usage of this item.

Contact

Australian Light Horse Studies Centre

eXTReMe Tracker