« April 2009 »
S M T W T F S
1 2 3 4
5 6 7 8 9 10 11
12 13 14 15 16 17 18
19 20 21 22 23 24 25
26 27 28 29 30
You are not logged in. Log in


Search the site:


powered by FreeFind
Volunteer with us.

Entries by Topic All topics  
A Latest Site News
A - Using the Site
AAA Volunteers
AAB-Education Centre
AAC-Film Clips
AAC-Photo Albums
AIF & MEF & EEF
AIF - Lighthorse
AIF - ALH - A to Z
AIF - DMC
AIF - DMC - Or Bat
AIF - DMC - Anzac MD
AIF - DMC - Aus MD
AIF - DMC - British
AIF - DMC - BWI
AIF - DMC - French
AIF - DMC - Indian
AIF - DMC - Italian
AIF - DMC - Medical
AIF - DMC - Remounts
AIF - DMC - Scouts
AIF - DMC - Sigs
AIF - DMC - Sigs AirlnS
AIF - DMC - 1 Sig Sqn
AIF - DMC - 2 Sig Sqn
AIF - DMC - Eng
AIF - DMC - Eng 1FSE
AIF - DMC - Eng 2FSE
AIF - DMC - GSR
AIF - 1B - 1 LHB
AIF - 1B - 6 MVS
AIF - 1B - 1 LHMGS
AIF - 1B - 1 Sig Trp
AIF - 1B - 1 LHFA
AIF - 1B - 1 LHR
AIF - 1B - 2 LHR
AIF - 1B - 3 LHR
AIF - 2B - 2 LHB
AIF - 2B - 7 MVS
AIF - 2B - 2 LHFA
AIF - 2B - 2 LHMGS
AIF - 2B - 2 Sig Trp
AIF - 2B - 5 LHR
AIF - 2B - 6 LHR
AIF - 2B - 7 LHR
AIF - 3B - 3 LHB
AIF - 3B - 8 MVS
AIF - 3B - 3 LHB Sigs
AIF - 3B - 3 LHFA
AIF - 3B - 3 LHMGS
AIF - 3B - 3 Sig Trp
AIF - 3B - 8 LHR
AIF - 3B - 9 LHR
AIF - 3B - 10 LHR
AIF - 4B - 4 LHB
AIF - 4B - 4 Sig Trp
AIF - 4B - 9 MVS
AIF - 4B - 4 LHFA
AIF - 4B - 4 LHMGS
AIF - 4B - 4 LHR
AIF - 4B - 11 LHR
AIF - 4B - 12 LHR
AIF - 5B - 5 LHB
AIF - 5B - 10 MVS
AIF - 5B - 5 LHFA
AIF - 5B - 5 Sig Trp
AIF - 5B - ICC
AIF - 5B - 14 LHR
AIF - 5B - 15 LHR
AIF - 5B - 1er Regt
AIF - 5B - 2 NZMGS
AIF - AASC
AIF - Aboriginal LH
AIF - Badges
AIF - Cars
AIF - Chinese LH
AIF - Double Sqns
AIF - Engineers
AIF - Fr - 22 Corps
AIF - Fr - 13 LHR
AIF - Honour Roll
AIF - HQ - 3rd Echelon
AIF - Marching Songs
AIF - Misc Topics
AIF - NZMRB
AIF - NZMRB - AMR
AIF - NZMRB - CMR
AIF - NZMRB - EFT
AIF - NZMRB - NZMFA
AIF - NZMRB - NZMGS
AIF - NZMRB - OMR
AIF - NZMRB - Sig-Trp
AIF - NZMRB - WMR
AIF - Ships
AIF - Ships - Encountr
AIF - Ships - Una
AIF - WFF
AIF - Wireless Sqn
Battles
BatzA - Australia
BatzA - Broken Hill
BatzA - Liverpool
BatzA - Merivale
BatzB - Boer War
BatzB - Bakenlaagte
BatzB - Belmont
BatzB - Bothaville
BatzB - Buffels Hoek
BatzB - Coetzees Drift
BatzB - Diamond Hill
BatzB - Driefontein
BatzB - Elands
BatzB - Graspan
BatzB - Grobelaar
BatzB - Grootvallier
BatzB - Hartebestfontn
BatzB - Houtnek
BatzB - Karee Siding
BatzB - Kimberley
BatzB - Koster River
BatzB - Leeuw Kop
BatzB - Mafeking
BatzB - Magersfontein
BatzB - Modder River
BatzB - Onverwacht
BatzB - Paardeberg
BatzB - Palmietfontein
BatzB - Pink Hill
BatzB - Poplar Grove
BatzB - Rhenoster
BatzB - Sannahs Post
BatzB - Slingersfontn
BatzB - Stinkhoutbm
BatzB - Sunnyside
BatzB - Wilmansrust
BatzB - Wolvekuil
BatzB - Zand River
BatzG - Gallipoli
BatzG - Anzac
BatzG - Aug 1915
BatzG - Baby 700
BatzG - Evacuation
BatzG - Hill 60
BatzG - Hill 971
BatzG - Krithia
BatzG - Lone Pine
BatzG - Nek
BatzJ - Jordan Valley
BatzJ - 1st Amman
BatzJ - 2nd Amman
BatzJ - Abu Tellul
BatzJ - Es Salt
BatzJ - JV Maps
BatzJ - Ziza
BatzM - Mespot
BatzM - Baghdad
BatzM - Ctesiphon
BatzM - Daur
BatzM - Kurna
BatzM - Kut el Amara
BatzM - Ramadi
BatzN - Naval
BatzN - AE1
BatzN - Cocos Is
BatzN - Heligoland
BatzN - Marmara
BatzN - Zeebrugge
BatzN - Zeppelin L43
BatzNG - Bitapaka
BatzO - Other
BatzO - Baku
BatzO - Egypt 1919
BatzO - Emptsa
BatzO - Karawaran
BatzO - Peitang
BatzO - Wassa
BatzP - Palestine
BatzP - 1st Gaza
BatzP - 2nd Gaza
BatzP - 3rd Gaza
BatzP - Aleppo
BatzP - Amwas
BatzP - Ayun Kara
BatzP - Bald Hill
BatzP - Balin
BatzP - Beersheba
BatzP - Berkusieh
BatzP - Damascus
BatzP - El Auja
BatzP - El Buggar
BatzP - El Burj
BatzP - Haifa
BatzP - Huj
BatzP - JB Yakub
BatzP - Kaukab
BatzP - Khan Kusseir
BatzP - Khuweilfe
BatzP - Kuneitra
BatzP - Megiddo
BatzP - Nablus
BatzP - Rafa
BatzP - Sasa
BatzP - Semakh
BatzP - Sheria
BatzP - Surafend
BatzP - Wadi Fara
BatzS - Sinai
BatzS - Bir el Abd
BatzS - El Arish
BatzS - El Mazar
BatzS - El Qatiya
BatzS - Jifjafa
BatzS - Magdhaba
BatzS - Maghara
BatzS - Romani
BatzS - Suez 1915
BatzSe - Senussi
BatzWF - Westn Front
BW - Boer War
BW - NSW
BW - NSW - 1ACH
BW - NSW - 1NSWMR
BW - NSW - 2NSWMR
BW - NSW - 3ACH
BW - NSW - 3NSWIB
BW - NSW - 3NSWMR
BW - NSW - 5ACH
BW - NSW - A Bty RAA
BW - NSW - AAMC
BW - NSW - Aust H
BW - NSW - Lancers
BW - NSW - NSW Inf
BW - NSW - NSWCBC
BW - NSW - NSWIB
BW - NSW - NSWMR_A
BW - NZ
BW - Qld
BW - Qld - 1ACH
BW - Qld - 1QMI
BW - Qld - 2QMI
BW - Qld - 3ACH
BW - Qld - 3QMI
BW - Qld - 4QIB
BW - Qld - 5QIB
BW - Qld - 6QIB
BW - Qld - 7ACH
BW - QLD - AAMC
BW - SA
BW - SA - 1SAMR
BW - SA - 2ACH
BW - SA - 2SAMR
BW - SA - 3SACB
BW - SA - 4ACH
BW - SA - 4SAIB
BW - SA - 5SAIB
BW - SA - 6SAIB
BW - SA - 8ACH
BW - SA - AAMC
BW - Tas
BW - Tas - 1ACH
BW - Tas - 1TIB
BW - Tas - 1TMI
BW - Tas - 2TB
BW - Tas - 2TIB
BW - Tas - 3ACH
BW - Tas - 8ACH
BW - Vic
BW - Vic - 1VMI
BW - Vic - 2ACH
BW - Vic - 2VMR
BW - Vic - 3VB
BW - Vic - 4ACH
BW - Vic - 4VIB
BW - Vic - 5VMR
BW - Vic - 6ACH
BW - Vic - AAMC
BW - Vic - Scot H
BW - WA
BW - WA - 1WAMI
BW - WA - 2ACH
BW - WA - 2WAMI
BW - WA - 3WAB
BW - WA - 4ACH
BW - WA - 4WAMI
BW - WA - 5WAMI
BW - WA - 6WAMI
BW - WA - 8ACH
BW Gen - Campaign
BW Gen - Soldiers
BW General
Cavalry - General
Diary - Schramm
Egypt - Heliopolis
Egypt - Mena
Gen - Ataturk Pk, CNB
Gen - Australia
Gen - Legends
Gen - Query Club
Gen - St - NSW
Gen - St - Qld
Gen - St - SA
Gen - St - Tas
Gen - St - Vic
Gen - St - WA
Gm - German Items
Gm - Bk - 605 MGC
GW - 11 Nov 1918
GW - Atrocities
GW - August 1914
GW - Biographies
GW - Propaganda
GW - Spies
GW - We forgot
Militia 1899-1920
Militia - Area Officers
Militia - Inf - Infantry
Militia - Inf - 1IB
Militia - Inf - 2IB
Militia - Inf - 3IB
Militia - Inf - NSW
Militia - Inf - Qld
Militia - Inf - SA
Militia - Inf - Tas
Militia - Inf - Vic
Militia - Inf - WA
Militia - K.E.Horse
Militia - LH
Militia - LH - Regts
Militia - LH - 1LHB
Militia - LH - 2LHB
Militia - LH - 3LHB
Militia - LH - 4LHB
Militia - LH - 5LHB
Militia - LH - 6LHB
Militia - LHN - NSW
Militia - LHN - 1/7/1
Militia - LHN - 2/9/6
Militia - LHN - 3/11/7
Militia - LHN - 4/6/16
Militia - LHN - 5/4/15
Militia - LHN - 6/5/12
Militia - LHN - 28
Militia - LHQ - Qld
Militia - LHQ - 13/2
Militia - LHQ - 14/3/11
Militia - LHQ - 15/1/5
Militia - LHQ - 27/14
Militia - LHS - SA
Militia - LHS - 16/22/3
Militia - LHS - 17/23/18
Militia - LHS - 24/9
Militia - LHT - Tas
Militia - LHT - 12/26
Militia - LHV - Vic
Militia - LHV - 7/15/20
Militia - LHV - 8/16/8
Militia - LHV - 9/19
Militia - LHV - 10/13
Militia - LHV - 11/20/4
Militia - LHV - 19/17
Militia - LHV - 29
Militia - LHW - WA
Militia - LHW-18/25/10
Militia - Military Orders
Militia - Misc
MilitiaRC - Rifle Clubs
MilitiaRC - NSW
MilitiaRC - NT
MilitiaRC - Qld
MilitiaRC - SA
MilitiaRC - Tas
MilitiaRC - Vic
MilitiaRC - WA
Militiaz - New Zealand
Tk - Turkish Items
Tk - Army
Tk - Bks - Books
Tk - Bks - 1/33IR
Tk - Bks - 27th IR
Tk - Bks - Air Force
Tk - Bks - Yildirim
Tk - POWs
Wp - Weapons
Wp - Hotchkiss Cav
Wp - Hotchkiss PMG
Blog Tools
Edit your Blog
Build a Blog
RSS Feed
View Profile
Open Community
Post to this Blog
Site Index
Education Centre
LH Militia
Boer War
Transport Ships
LH Battles
ALH - Units
ALH - General
Aboriginal Light H
Weapons
Ottoman Sources

"At a mile distant their thousand hooves were stuttering thunder, coming at a rate that frightened a man - they were an awe inspiring sight, galloping through the red haze - knee to knee and horse to horse - the dying sun glinting on bayonet points..." Trooper Ion Idriess

The Australian Light Horse Studies Centre aims to present an accurate history as chroniclers of early Australian military developments from 1899 to 1920.

The Australian Light Horse Studies Centre site holds over 12,000 entries and is growing daily.

Contact: Australian Light Horse Studies Centre

Let us hear your story: You can tell your story, make a comment or ask for help on our Australian Light Horse Studies Centre Forum called:

Desert Column Forum

WARNING: This site contains: names, information and images of deceased people; and, language which may be considered inappropriate today.

Friday, 3 April 2009
Graspan, South Africa, November 25, 1899
Topic: BatzB - Graspan

Graspan

South Africa, 25 November 1899


British soldiers charging up a kopje during the Battle of Graspan


Graspan, an action also referred to as the Battle of Enslin, was fought on 25 November 1899 (during the Second South African War) by a British force of 8,500 men under Lieut.-General Lord Methuen while attempting to break the Boer siege of Kimberley. After an earlier engagement at Belmont (q.v.), eighteen kilometres to the south along the single-track railway line which formed the axis of the British advance, Methuen found the Boers occupying a line of kopjes (small hills) about 60 metres high to the east of the railway station at Graspan. Information from British reconnaissance parties indicated that only about 400 enemy were present, supported by two guns.

To prevent the enemy escaping as had happened at Belmont, Methuen decided to engage the Boer position first with artillery fire while working the 900 mounted troops available to him around both flanks. Once these were in position, a frontal assault was to be mounted by the small Naval Brigade operating with his force. Unfortunately for this plan of attack, unknown to Methuen - whose scouts were unable to observe into the enemy position from closer than about two kilometres - the original Boer defenders were reinforced late on the afternoon of 24 November by 2,000 Free State burghers under Commandant Jacobus Prinsloo.


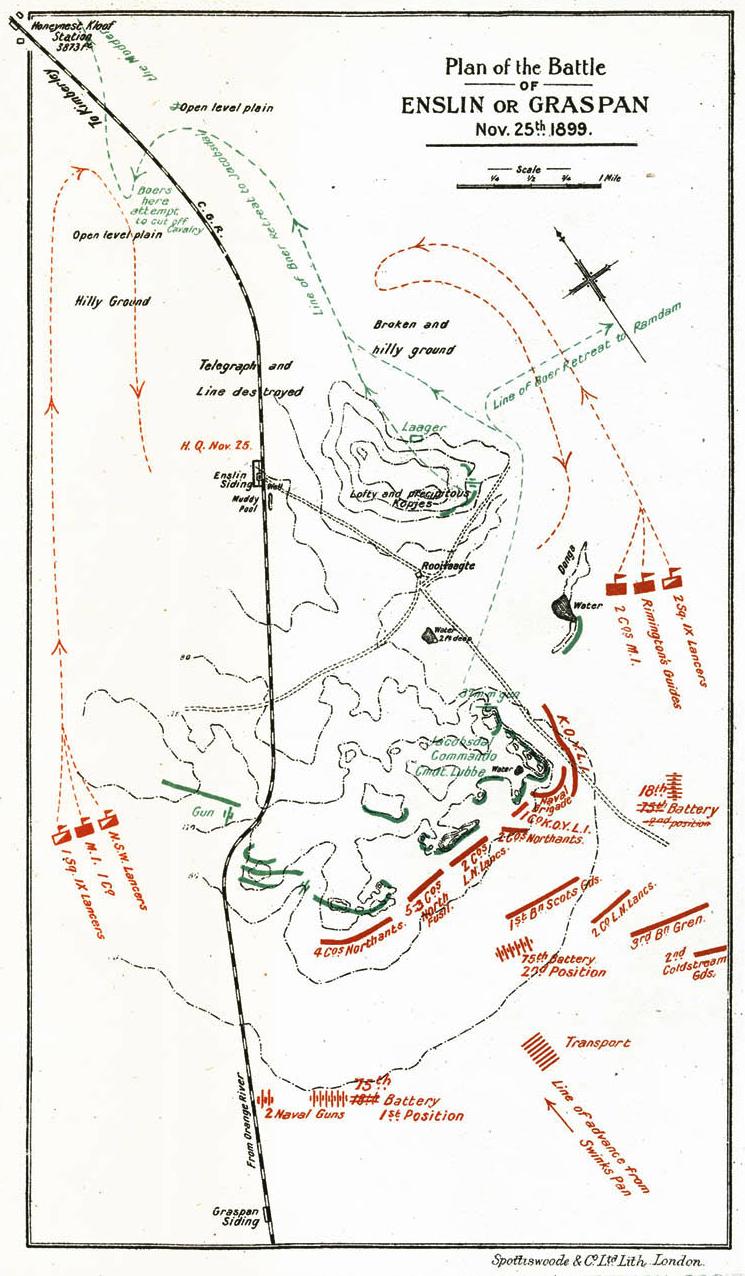
Map showing the Battle of Graspan, 25 November 1899 

[From: The Times History of the War in South Africa, II, London, 1902.]


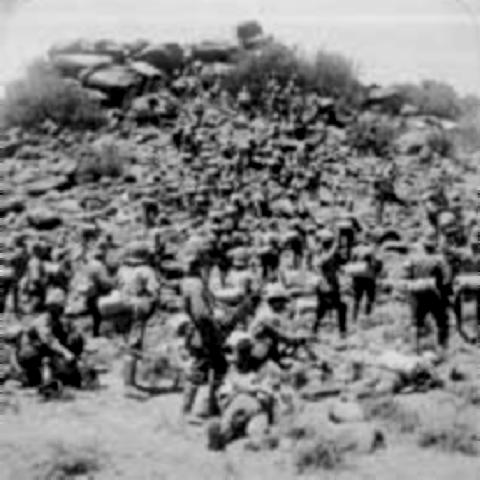
When the British field batteries opened up soon after 6 a.m. the next morning, the answering fire from the Boers came from five guns instead of two - not including a Hotchkiss quick-fire weapon and a Maxim machine-gun. Realising that his original scheme was unworkable, Methuen promptly opted for an all-out attack on conventional lines. This effort would pit the Naval Brigade with some infantry detachments against the Boers eastern (left) flank, while the rest of the British force sought to immobilise the enemy elsewhere and prevent reinforcement of the sector under attack. This plan worked, but not before the 245 strong assault force had lost 15 killed and 79 wounded. By the time the crest of the hill was reached, the enemy had all gone except for a small group which resisted until only one man remained alive.

The British could observe the Boris retiring in good order across the plain back into Free State territory, but a shortage of mounted troops meant that a vigorous pursuit was not possible. The British weakness in this regard was graphically demonstrated at one point during the Boer retreat, when a large body of burghers suddenly turned and attempted to ride down the lesser number of British horsemen from the 9th Lancers trying to follow them. The threat was averted by the response of some Mounted infantry who, along with a detachment of 29 members of the New South Wales Lancers under Lieut. S.F. Osborne, occupied a fold in the ground and poured a heavy fire into the advancing Boers. The incident reportedly won for Osborne and his men the nickname of ‘The Fighting Twenty-Nine.'.

The engagement had demonstrated once again that the Boers were more than a match for Methuen despite his numerical superiority. While he responded by complaining about the deficiency in the number of mounted troops available to him, and confirmed his disappointment in the part played by his cavalry by removing the commander of the 9th Lancers, nothing could disguise his own tactical incompetence which saw his force suffer total casualties at Graspan of seventeen dead and 168 wounded. Among the dead of the Naval Brigade was 19-year-old Midshipman C. I. Huddart of Ballarat, Victoria.


Midshipman Cymberline Alonso Edric Huddart

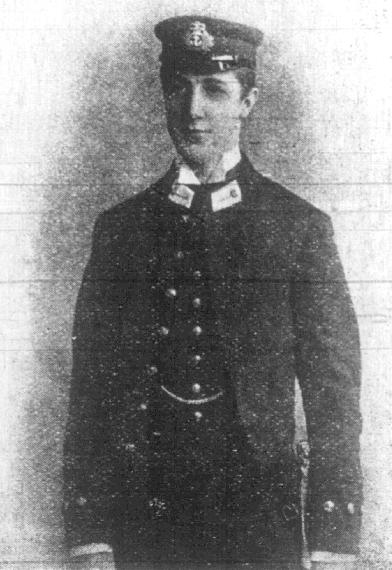
[From: Sydney Mail, 13 January 1900, p. 89.]


Extracted from the book produced by Chris Coulthard-Clark, Where Australians Fought - The Encyclopaedia of Australia's Battles, Allen and Unwin, Sydney, 1998, pp. 58-59.


Additional References cited by Chris Coulthard-Clark:

W. Baring Pemberton (1964) Battles of the Boer War, London.

R.L. Wallace (1976) The Australians at the Boer War, Canberra: Australian War Memorial & Australian Government Publishing Service.

L.M. Field (1979) The forgotten War, Carlton, Vic. Melbourne University Press.


Further Reading:

Midshipman Cymberline Alonso Edric Huddart 

Battles where Australians fought, 1899-1920


Citation: Graspan, South Africa, November 25, 1899

Posted by Project Leader at 11:01 PM EADT
Updated: Sunday, 5 April 2009 11:17 AM EADT
Victoria Light Horse Militia
Topic: Militia - LHV - Vic

Victorian Militia

Light Horse 


For the Victoria Light Horse Militia establishment, see:

Light Horse structure 1903

1903 Reorganisation, Victoria

Light Horse structure 1914

Militia Distribution in Australia, 1914, 3rd Military District, Part 1
Militia Distribution in Australia, 1914, 3rd Military District, Part 2
Militia Distribution in Australia, 1914, 3rd Military District, Part 3

Individual Light Horse Regiments

13th (Gippsland) Australian Light Horse Regiment
13th Light Horse
15th (Victorian Mounted Rifles) Australian Light Horse Regiment
15th Light Horse
16th (Indi) Australian Light Horse Regiment
16th Light Horse
17th (Campaspe Valley) Australian Light Horse Regiment
17th Light Horse
19th (Yarrowee) Australian Light Horse Regiment
19th Light Horse
20th (Corangamite) Australian Light Horse Regiment
20th Light Horse
29th (Port Phillip Horse) Australian Light Horse Regiment
29th Light Horse

Port Phillip Light Horse Officers, 1914


Peacetime and Wartime Regimental Establishments

Peace establishment of Australian Light Horse, 1903-14

3rd Military District Staff Roster and Allocations

3rd Military District Staff Roster and Allocations, 1914, Part 1
3rd Military District Staff Roster and Allocations, 1914, Part 2
3rd Military District Staff Roster and Allocations, 1914, Part 3
3rd Military District Staff Roster and Allocations, 1914, Part 4
3rd Military District Staff Roster and Allocations, 1914, Part 5

1914 Infantry, Artillery and other service arms distribution

Militia Distribution in Australia, 1914, 3rd Military District, Part 3
Militia Distribution in Australia, 1914, 3rd Military District, Part 4
Militia Distribution in Australia, 1914, 3rd Military District, Part 5
Militia Distribution in Australia, 1914, 3rd Military District, Part 6
Militia Distribution in Australia, 1914, 3rd Military District, Part 7
Militia Distribution in Australia, 1914, 3rd Military District, Part 8
Militia Distribution in Australia, 1914, 3rd Military District, Part 9
Militia Distribution in Australia, 1914, 3rd Military District, Part 10


Citation: Victoria Light Horse Militia

Posted by Project Leader at 11:01 PM EADT
Updated: Sunday, 5 April 2009 8:41 AM EADT
Emptsa, North Russia, The Times, 6 October 1919
Topic: BatzO - Emptsa

Emptsa

North Russia, 29 August 1919

The Times, 6 October 1919


The Times, 6 October 1919, p. 7.


The account is transcribed below.

The Times, 6 October 1919, p. 7.


Further Reading:

North Russian Campaign, Contents

Battles where Australians fought, 1899-1920


Citation: Emptsa, North Russia, The Times, 6 October 1919

Posted by Project Leader at 12:01 AM EADT
Updated: Sunday, 3 May 2009 10:09 AM EADT
Bert Schramm's Diary, 3 April 1919
Topic: Diary - Schramm

Diaries of AIF Servicemen

Bert Schramm


During part of the course of his military service with the AIF, 2823 Private Herbert Leslie Schramm, a farmer from White's River, near Tumby Bay on the Eyre Peninsular, kept a diary of his life. Bert was not a man of letters so this diary was produced with great effort on his behalf. Bert made a promise to his sweetheart, Lucy Solley, that he would do so after he received the blank pocket notebook wherein these entries are found. As a Brigade Scout since September 1918, he took a lead part in the September 1918 breakout by the Allied forces in Palestine. Bert's diary entries are placed alongside those of the 9th Light Horse Regiment to which he belonged and to the 3rd Light Horse Brigade to which the 9th LHR was attached. On this basis we can follow Bert in the context of his formation.

 Bert Schramm's Diary, 3 April 1919


Bert Schramm's Handwritten Diary, 31 March - 3 April 1919

[Click on page for a larger print version.]

Diaries

Bert Schramm

Thursday, April 3, 1919

Bert Schramm's Location - Zagazig, Egypt.

Bert Schramm's Diary - Have been out all day today. Went out on a patrol to a village called Saft but things are quiet. The natives are being forced to repair the damages done to the railway lines.


9th Light Horse Regiment War Diary

9th Light Horse Regiment Location - Zagazig, Egypt.

9th Light Horse Regiment War Diary - 0530, One troop patrolled streets of Zagazig 0530 - 0630.

Luxmoore, Captain EM, MC, two troops Mounted Squadron proceeded on 5 days reconnaissance along Simbillawein Light Railway to enforce Proclamation issued a few days previous, ordering all material removed from railway to be returned and placed in position. Two members of this patrol lost their rifles, one was subsequently recovered.


Darley

Darley, TH, With the Ninth Light Horse in the Great War, Adelaide, Hassell Press, 1924.

No Entry


Previous: Bert Schramm's Diary, 2 April 1919

Next: Bert Schramm's Diary, 4 April 1919


Further Reading:

9th Light Horse Regiment AIF War Diary - Complete day by day list

Bert Schramm Diary 

Bert Schramm Diary - Complete day by day list


Additional Reading:

Darley, TH, With the Ninth Light Horse in the Great War, Adelaide, Hassell Press, 1924.


Citation: Bert Schramm's Diary, 3 April 1919


Posted by Project Leader at 12:01 AM EADT
Updated: Saturday, 9 May 2009 9:39 PM EADT
1st Australian Signal Troop, Page 4
Topic: AIF - 1B - 1 Sig Trp

1st Australian Signal Troop, AIF

History


Below is a transcription from a manuscript submitted by by Major R. Smith called 1st Australian Signal Troop. This is Page 4.


History of the Wireless Sections after being detached from 1st Signal Troop.

It did not take the Detachment long to become proficient and on the 8th both sections went on board the H.M.T. Andania and every morning landing practice was carried out by means of rowing ashore and erecting stations, making it more interesting through being competitive tests between No.’s 1 and 2 Detachments, on one occasion both "Dets" tied at erecting from the rowing boats in 4 min 20 secs., easily a record.

On the evening of the 24th both "Dets", were attached to the 29th Inf. Divn. (English) and everyone was exited for we learned the landing was to take place the following day.

That night we steamed out everybody cheering, bands playing, dozens of Transports and Warships were slowly moving out, making in all truly a soul stirring sight. We were advised to take advantage of a full nights rest as we would be at it early in the morning.

The sound of a terrific bombardment awakened everybody, who dressed hurriedly and went on deck, it was still dark and. one could see the Men-O-War by the light of their own salvoes.

Dawn revealed to us a most fantastic sight, there stood Achi Baba wreathed in mist and smoke, every few seconds it seemingly caught alight, while the foreshores were defined by the sea ending in smoke, dust and flame, it seemed impossible that human beings could live in such an inferno.

Rowing boats were being towed shorewards by naval pinnaces and would discharge their human cargo and return for more.

At 0500 the Andania anchored off "X" Beach and we saw one Batt. of Royal Fusiliers land and make good the cliffs.

Our Wireless Detachments then followed next with the G.O.C. of 87 Inf. Bde and Staff.

Landed O.K. but was exposed to a bit of sniping.

At 0645 the No.2 Detachment had erected and was carrying on directing the fire of H.M.S. Implacable who was very and doing splendid work.

Rest was impossible during the day also far into the night and we were feeling the strain, when the Turks counter heavily. Every available man was ordered to line the ridge above and we took up our position on top minus two men i.e. Operator on duty and the Engine Driver.

The Andania lowered her boats in readiness to take us on board if necessary.

There seemed to be no likelihood of our party having to hold the Cliff so it was decided to carry up ammunition to the support line, this was made very hard by the drizzling rain making the steep cliffs very slippery and two boxes of ammunition did not allow one the freedom of ones hands to take advantage of the bushes growing there and which were stout enough for one to pull up by.

The attack was repulsed by 01.30 and at dawn all was fairly quiet, during the day our Troops gained ground.

Our main job was directing the fire of various men-o-war receiving the corrections from the aeroplanes and transmitting them on to the Fleet, this kept the Dets, very busy indeed however, we were rewarded for our work by seeing the effect of the redirected fire and the Troops gaining ground and lastly through being complimented on our work by the G.O.C. and the Naval Wireless Officer. 


Further Reading:

1st Signal Troop

1st Australian Light Horse Brigade  

Anzac Mounted Division


Citation: 1st Australian Signal Troop, Page 4


Posted by Project Leader at 12:01 AM EADT
Updated: Sunday, 12 April 2009 6:44 PM EADT

Newer | Latest | Older

Full Site Index


powered by FreeFind
Let us hear your story: You can tell your story, make a comment or ask for help on our forum.

Desert Column Forum

A note on copyright

The Australian Light Horse Studies Centre is a not for profit and non profit group whose sole aim is to write the early history of the Australian Light Horse from 1900 - 1920. It is privately funded and the information is provided by the individuals within the group and while permission for the use of the material has been given for this site for these items by various donors, the residual and actual copyright for these items, should there be any, resides exclusively with the donors. The information on this site is freely available for private research use only and if used as such, should be appropriately acknowledged. To assist in this process, each item has a citation attached at the bottom for referencing purposes.

Please Note: No express or implied permission is given for commercial use of the information contained within this site.

A note to copyright holders

The Australian Light Horse Studies Centre has made every endeavour to contact copyright holders of material digitised for this blog and website and where appropriate, permission is still being sought for these items. Where replies were not received, or where the copyright owner has not been able to be traced, or where the permission is still being sought, the Australian Light Horse Studies Centre has decided, in good faith, to proceed with digitisation and publication. Australian Light Horse Studies Centre would be happy to hear from copyright owners at any time to discuss usage of this item.

Contact

Australian Light Horse Studies Centre

eXTReMe Tracker