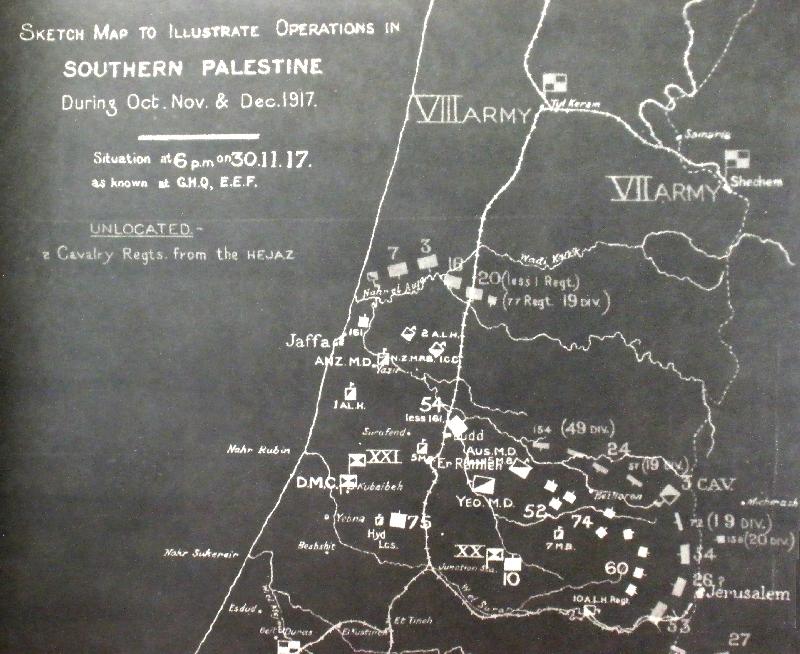
Topic: BatzP - El Burj
El Burj, Palestine, 1 December 1917
Gullett's Account
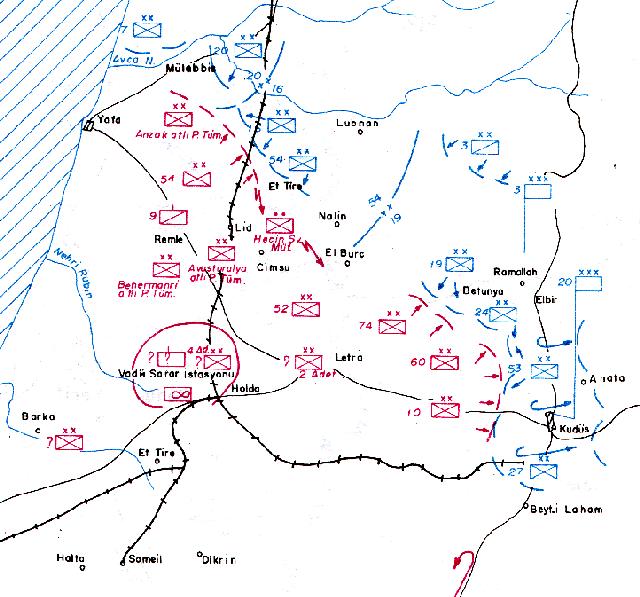
Map detailing the Battle of El Burj, 1 December 1917
[From: Gullett, HS, Sinai and Palestine, p. 507]
The following is extracted from the book written by HS Gullett called Sinai and Palestine, Chapter XXIX, Nahr Auja and El Burj, pp. 504 - 509.
On November 26th Hodgson was ordered to move with the 3rd and 4th Australian Light Horse Brigades and the 7th Mounted Brigade to their relief. The enemy, appreciating the menace to the Nablus road, had been resisting the yeomanry with great stubbornness; his counter-attacks had regained Foka and other ground won by the British horsemen, and after very bitter fighting had driven our infantry out of Suffa and Shiltz, Hodgson's division reached Berfilya on the 28th and 29th. The struggle was still running strongly about Suffa, which, after twice changing hands, became No-Man's Land. The 7th Brigade at once became hotly engaged and General Wigan was wounded. The 3rd and 4th Brigades were put into the line, with the 52nd Division on their right around El Burj, and the 74th on their left about one and a half miles north of Berfilya.
The country was extremely steep and rocky, and the position on the front was obscure. Between the attacks and the counterattacks no Turks or trenches were within sight of the British; though bursts of effective machine-gun fire and very accurate sniping showed that the enemy was not far away. On November 28th the XX Corps had taken over the Jerusalem operations from the XXI, and the Australian Mounted Division was now under Chetwode's orders. All horses except those needed by gallopers were sent back to Ramleh, and the Australians were engaged purely as infantry. Rain was frequent, and the mountain cold intense. Some of the men had secured an issue of winter clothing; but most of them were in summer dress and, like the infantry, suffered acutely. If the regiments of the 3rd and 4th Brigades rode into the hills refreshed, they were also nidi reduced in battle-strength The month's hard fighting, rough living, and lack of sleep had caused heavy wastage by casualties and sickness; and, when one-fourth of the men had been sent back to Ramleh with the horses, there remained a very light force to oppose the enemy. The 8th Regiment, for instance, had only 105 men of all ranks available for the line out of a total of above 400 who had been with the regiment at Beersheba. As the Australians advanced towards the dominating hill on which stands the village of El Burj, they had their first taste of the bitter Judean winter; but when some of them relieved a battalion of the 5th Royal Scots Fusiliers, they realised that they were more fortunate than the infantry. They found the Scotchmen clad in short twill khaki pants, without tunics, with one blanket to four men, very short of rations and without tobacco.
"Our boys," wrote a light horse officer, " supplied the Jocks with matches and cigarettes and the 'Dinkums' as they always called us, were very popular.''
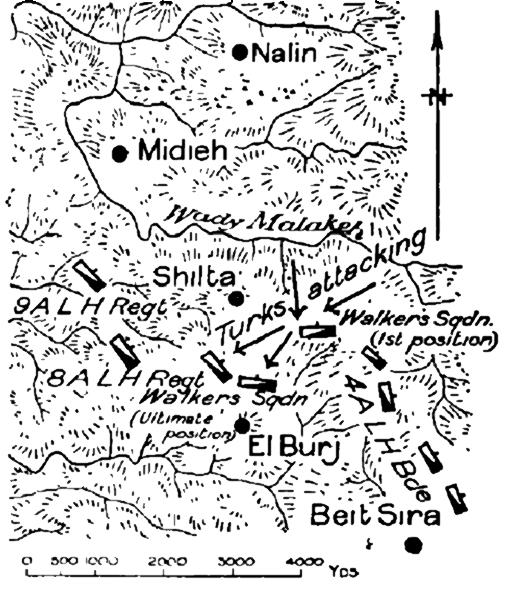
The 3rd Brigade went into the line on the evening of the 29th. As the squadrons were so weak, Hodgson decided on the following day to strengthen them with the 4th Brigade. This necessitated moving Wilson's men about I,000 yards to the left between Shilta and El Burj. The movement was made at dark, and threw the 3rd for the night into strange country. The 8th Regiment, now reduced to two squadrons, each about fifty strong, occupied two positions some 200 yards apart. One under Major Y. H. Walker was on a small hill to the right, and across the valley about 400 yards away was the left flank of the 4th Light Horse Brigade. On Walker's left, and somewhat to the rear, Major A. Crawford was placed on a higher hill with the other squadron of the 8th; still further to the left was the 9th Regiment. All along the front the line was occupied in a similar way, with troops on the knolls and the intervening low ground open. The infantry had built stone sangars to give them protection against both the enemy and the driving rain, and the light horsemen, crouching behind these, and ignorant of the country ahead, prayed for a quiet night. All round them the hills were extremely rocky, with occasional large caves hewn out of the outcrops of limestone.
By 10 PM the change was completed, and for two hours the hills were ominously quiet. Soon after midnight the sentries on Walker's post reported a movement only a few yards away, but could see nothing in the intense darkness. Walker called his men to arms, and began to report to Crawford by telephone. Next moment the post was rushed in great strength by the Turks, who were within bombing distance of the Australians before they were discovered. For a few minutes the light horsemen stood and fought with rifles, bayonets, and hand-grenades; then Walker finding that his post was being enveloped from both flanks, ordered a withdrawal to the post held by Crawford on the higher hill. The vigorous resistance had steadied the enemy, who, like the Australians, were obstructed by the darkness, and Walker was able to fall back in good order to Crawford's hill and take up a position there on the lower slopes to the left. As the two squadrons then waited in the darkness for the next assault, Crawford sent an urgent message to brigade for reinforcements, and at the same time fired flares as a call to the artillery. The guns of the 268th Royal Field Artillery Brigade and the Hong Kong and Singapore Battery promptly responded, and put down a barrage over the enemy approaches. After an interval of complete silence, which was a greater strain on the nerves of the defenders than the fighting itself, about 500 '', Turks, with loud shouts of "Allah," rushed up the hill at Crawford's sangars. The Australians held their fire until the leading men were within twenty yards, and then shot them down in heaps with rifle and Hotchkiss, and at the same time bombed them effectively. Retaliating with bombs, the Turks pressed bravely forward in a desperate effort to bring their greatly superior numbers into a hand-to-hand struggle with the Australians. But the Victorians fought on with splendid steadiness, and had the enemy soundly held, when forty-eight yeomanry of the Gloucester Regiment (which was at that time attached to the 3rd Light Horse Brigade in place of the 10th Regiment) came up under Lieutenant-Colonel Palmer. A few minutes later a company of the Royal Scots Fusiliers under Lieutenant-Colonel Stewart-Richardson also hastened up the hill and joined in the fight, and the Turks, coining under very severe punishment at a few yards' range, were driven to cover. At the same time the 9th Regiment on the left and the 4th Brigade on the right enfiladed their rear and cut off their escape.
The little composite British force remained on the hilltop until dawn, when the Turkish survivors, numbering six officers, including a battalion commander, and 112 other ranks, surrendered. More than 100 enemy dead lay close up to Crawford's sangars, and sixty wounded were collected, most of them badly mutilated by the point-blank fire. Captain Fay and Lieutenant S. V. Moore and five other ranks of the 8th Light Horse were killed, and two officers and thirty-five other ranks wounded; while the Scots had one officer and one man killed and two wounded, and the yeomanry three men wounded. The booty included large quantities of hand-grenades and eight automatic rifles. It was afterwards learned that the attacking force was a battalion of storm-troops," selected in Galicia from the 19th and 20th Divisions, and specially trained by German officers. Physically they were the finest Turks seen by the Australians during the war. The Australian defence was distinguished by the cool leadership of Major Crawford, and by much excellent individual work, including that of Captain Macpherson and Lieutenant T. R. Peppercorn, Sergeant-Major A. H. Carrington,* and Trooper H. W. Beahle.
Had the enemy seized El Burj, the British would have been deprived of the use of the road leading up from Berfilya, and the Beit Nuba-Beit Sira valley would have become untenable. This would have weakened all the pressure towards the Nablus road, and exposed the left flank of the infantry which was making the main advance towards Jerusalem. Hodgson was therefore ordered to watch closely for a second attack. The artillery, which had been slowly advanced up the mountain by doubling the teams, steadily shelled enemy positions, intermittent indirect machine-gun barrage was put down on tracks leading to the Turkish posts, and a second defensive line was prepared to meet emergencies.
But the Turks were satisfied with their one disastrous attempt; from that time until their withdrawal from the hills early in January, the regiments of Australian Mounted Division had little or no fighting at close quarters. At times their stone sangars were freely shelled, and sniping was constant, but the men's chief grievance was against the weather and the conditions of living. Their plight was not extreme, as was that of the infantry, but it imposed sharp suffering, and they were called upon to endure it for many weeks. The tracks were impossible for transport, and rations were frequently short; waterproof sheets were not available; until after the fall of Jerusalem, when the line advanced into country containing olive-groves they were without firewood for cooking. Wet by day and night, with hoots broken and useless, underfed, and protected from the biting mountain winds only by the stone walls they constructed, their thoughts ran constantly on the conditions under which they had been living only five weeks before in the desert. But each day brought them cheering news of the slow but sure approach of the infantry towards Jerusalem, and the worst of hours were the subject of jest.
Further Reading:
Battles where Australians fought, 1899-1920
The Battle of El Burj, 1 December 1917
Citation: El Burj, Palestine, 1 December 1917, Gullett's Account
Posted by Project Leader
at 12:01 AM EADT
Updated: Tuesday, 14 July 2009 12:59 PM EADT