« October 2009 »
S M T W T F S
1 2 3
4 5 6 7 8 9 10
11 12 13 14 15 16 17
18 19 20 21 22 23 24
25 26 27 28 29 30 31
You are not logged in. Log in


Search the site:


powered by FreeFind
Volunteer with us.

Entries by Topic All topics  
A Latest Site News
A - Using the Site
AAA Volunteers
AAB-Education Centre
AAC-Film Clips
AAC-Photo Albums
AIF & MEF & EEF
AIF - Lighthorse
AIF - ALH - A to Z
AIF - DMC
AIF - DMC - Or Bat
AIF - DMC - Anzac MD
AIF - DMC - Aus MD
AIF - DMC - British
AIF - DMC - BWI
AIF - DMC - French
AIF - DMC - Indian
AIF - DMC - Italian
AIF - DMC - Medical
AIF - DMC - Remounts
AIF - DMC - Scouts
AIF - DMC - Sigs
AIF - DMC - Sigs AirlnS
AIF - DMC - 1 Sig Sqn
AIF - DMC - 2 Sig Sqn
AIF - DMC - Eng
AIF - DMC - Eng 1FSE
AIF - DMC - Eng 2FSE
AIF - DMC - GSR
AIF - 1B - 1 LHB
AIF - 1B - 6 MVS
AIF - 1B - 1 LHMGS
AIF - 1B - 1 Sig Trp
AIF - 1B - 1 LHFA
AIF - 1B - 1 LHR
AIF - 1B - 2 LHR
AIF - 1B - 3 LHR
AIF - 2B - 2 LHB
AIF - 2B - 7 MVS
AIF - 2B - 2 LHFA
AIF - 2B - 2 LHMGS
AIF - 2B - 2 Sig Trp
AIF - 2B - 5 LHR
AIF - 2B - 6 LHR
AIF - 2B - 7 LHR
AIF - 3B - 3 LHB
AIF - 3B - 8 MVS
AIF - 3B - 3 LHB Sigs
AIF - 3B - 3 LHFA
AIF - 3B - 3 LHMGS
AIF - 3B - 3 Sig Trp
AIF - 3B - 8 LHR
AIF - 3B - 9 LHR
AIF - 3B - 10 LHR
AIF - 4B - 4 LHB
AIF - 4B - 4 Sig Trp
AIF - 4B - 9 MVS
AIF - 4B - 4 LHFA
AIF - 4B - 4 LHMGS
AIF - 4B - 4 LHR
AIF - 4B - 11 LHR
AIF - 4B - 12 LHR
AIF - 5B - 5 LHB
AIF - 5B - 10 MVS
AIF - 5B - 5 LHFA
AIF - 5B - 5 Sig Trp
AIF - 5B - ICC
AIF - 5B - 14 LHR
AIF - 5B - 15 LHR
AIF - 5B - 1er Regt
AIF - 5B - 2 NZMGS
AIF - AASC
AIF - Aboriginal LH
AIF - Badges
AIF - Cars
AIF - Chinese LH
AIF - Double Sqns
AIF - Engineers
AIF - Fr - 22 Corps
AIF - Fr - 13 LHR
AIF - Honour Roll
AIF - HQ - 3rd Echelon
AIF - Marching Songs
AIF - Misc Topics
AIF - NZMRB
AIF - NZMRB - AMR
AIF - NZMRB - CMR
AIF - NZMRB - EFT
AIF - NZMRB - NZMFA
AIF - NZMRB - NZMGS
AIF - NZMRB - OMR
AIF - NZMRB - Sig-Trp
AIF - NZMRB - WMR
AIF - Ships
AIF - Ships - Encountr
AIF - Ships - Una
AIF - WFF
AIF - Wireless Sqn
Battles
BatzA - Australia
BatzA - Broken Hill
BatzA - Liverpool
BatzA - Merivale
BatzB - Boer War
BatzB - Bakenlaagte
BatzB - Belmont
BatzB - Bothaville
BatzB - Buffels Hoek
BatzB - Coetzees Drift
BatzB - Diamond Hill
BatzB - Driefontein
BatzB - Elands
BatzB - Graspan
BatzB - Grobelaar
BatzB - Grootvallier
BatzB - Hartebestfontn
BatzB - Houtnek
BatzB - Karee Siding
BatzB - Kimberley
BatzB - Koster River
BatzB - Leeuw Kop
BatzB - Mafeking
BatzB - Magersfontein
BatzB - Modder River
BatzB - Onverwacht
BatzB - Paardeberg
BatzB - Palmietfontein
BatzB - Pink Hill
BatzB - Poplar Grove
BatzB - Rhenoster
BatzB - Sannahs Post
BatzB - Slingersfontn
BatzB - Stinkhoutbm
BatzB - Sunnyside
BatzB - Wilmansrust
BatzB - Wolvekuil
BatzB - Zand River
BatzG - Gallipoli
BatzG - Anzac
BatzG - Aug 1915
BatzG - Baby 700
BatzG - Evacuation
BatzG - Hill 60
BatzG - Hill 971
BatzG - Krithia
BatzG - Lone Pine
BatzG - Nek
BatzJ - Jordan Valley
BatzJ - 1st Amman
BatzJ - 2nd Amman
BatzJ - Abu Tellul
BatzJ - Es Salt
BatzJ - JV Maps
BatzJ - Ziza
BatzM - Mespot
BatzM - Baghdad
BatzM - Ctesiphon
BatzM - Daur
BatzM - Kurna
BatzM - Kut el Amara
BatzM - Ramadi
BatzN - Naval
BatzN - AE1
BatzN - Cocos Is
BatzN - Heligoland
BatzN - Marmara
BatzN - Zeebrugge
BatzN - Zeppelin L43
BatzNG - Bitapaka
BatzO - Other
BatzO - Baku
BatzO - Egypt 1919
BatzO - Emptsa
BatzO - Karawaran
BatzO - Peitang
BatzO - Wassa
BatzP - Palestine
BatzP - 1st Gaza
BatzP - 2nd Gaza
BatzP - 3rd Gaza
BatzP - Aleppo
BatzP - Amwas
BatzP - Ayun Kara
BatzP - Bald Hill
BatzP - Balin
BatzP - Beersheba
BatzP - Berkusieh
BatzP - Damascus
BatzP - El Auja
BatzP - El Buggar
BatzP - El Burj
BatzP - Haifa
BatzP - Huj
BatzP - JB Yakub
BatzP - Kaukab
BatzP - Khan Kusseir
BatzP - Khuweilfe
BatzP - Kuneitra
BatzP - Megiddo
BatzP - Nablus
BatzP - Rafa
BatzP - Sasa
BatzP - Semakh
BatzP - Sheria
BatzP - Surafend
BatzP - Wadi Fara
BatzS - Sinai
BatzS - Bir el Abd
BatzS - El Arish
BatzS - El Mazar
BatzS - El Qatiya
BatzS - Jifjafa
BatzS - Magdhaba
BatzS - Maghara
BatzS - Romani
BatzS - Suez 1915
BatzSe - Senussi
BatzWF - Westn Front
BW - Boer War
BW - NSW
BW - NSW - 1ACH
BW - NSW - 1NSWMR
BW - NSW - 2NSWMR
BW - NSW - 3ACH
BW - NSW - 3NSWIB
BW - NSW - 3NSWMR
BW - NSW - 5ACH
BW - NSW - A Bty RAA
BW - NSW - AAMC
BW - NSW - Aust H
BW - NSW - Lancers
BW - NSW - NSW Inf
BW - NSW - NSWCBC
BW - NSW - NSWIB
BW - NSW - NSWMR_A
BW - NZ
BW - Qld
BW - Qld - 1ACH
BW - Qld - 1QMI
BW - Qld - 2QMI
BW - Qld - 3ACH
BW - Qld - 3QMI
BW - Qld - 4QIB
BW - Qld - 5QIB
BW - Qld - 6QIB
BW - Qld - 7ACH
BW - QLD - AAMC
BW - SA
BW - SA - 1SAMR
BW - SA - 2ACH
BW - SA - 2SAMR
BW - SA - 3SACB
BW - SA - 4ACH
BW - SA - 4SAIB
BW - SA - 5SAIB
BW - SA - 6SAIB
BW - SA - 8ACH
BW - SA - AAMC
BW - Tas
BW - Tas - 1ACH
BW - Tas - 1TIB
BW - Tas - 1TMI
BW - Tas - 2TB
BW - Tas - 2TIB
BW - Tas - 3ACH
BW - Tas - 8ACH
BW - Vic
BW - Vic - 1VMI
BW - Vic - 2ACH
BW - Vic - 2VMR
BW - Vic - 3VB
BW - Vic - 4ACH
BW - Vic - 4VIB
BW - Vic - 5VMR
BW - Vic - 6ACH
BW - Vic - AAMC
BW - Vic - Scot H
BW - WA
BW - WA - 1WAMI
BW - WA - 2ACH
BW - WA - 2WAMI
BW - WA - 3WAB
BW - WA - 4ACH
BW - WA - 4WAMI
BW - WA - 5WAMI
BW - WA - 6WAMI
BW - WA - 8ACH
BW Gen - Campaign
BW Gen - Soldiers
BW General
Cavalry - General
Diary - Schramm
Egypt - Heliopolis
Egypt - Mena
Gen - Ataturk Pk, CNB
Gen - Australia
Gen - Legends
Gen - Query Club
Gen - St - NSW
Gen - St - Qld
Gen - St - SA
Gen - St - Tas
Gen - St - Vic
Gen - St - WA
Gm - German Items
Gm - Bk - 605 MGC
GW - 11 Nov 1918
GW - Atrocities
GW - August 1914
GW - Biographies
GW - Propaganda
GW - Spies
GW - We forgot
Militia 1899-1920
Militia - Area Officers
Militia - Inf - Infantry
Militia - Inf - 1IB
Militia - Inf - 2IB
Militia - Inf - 3IB
Militia - Inf - NSW
Militia - Inf - Qld
Militia - Inf - SA
Militia - Inf - Tas
Militia - Inf - Vic
Militia - Inf - WA
Militia - K.E.Horse
Militia - LH
Militia - LH - Regts
Militia - LH - 1LHB
Militia - LH - 2LHB
Militia - LH - 3LHB
Militia - LH - 4LHB
Militia - LH - 5LHB
Militia - LH - 6LHB
Militia - LHN - NSW
Militia - LHN - 1/7/1
Militia - LHN - 2/9/6
Militia - LHN - 3/11/7
Militia - LHN - 4/6/16
Militia - LHN - 5/4/15
Militia - LHN - 6/5/12
Militia - LHN - 28
Militia - LHQ - Qld
Militia - LHQ - 13/2
Militia - LHQ - 14/3/11
Militia - LHQ - 15/1/5
Militia - LHQ - 27/14
Militia - LHS - SA
Militia - LHS - 16/22/3
Militia - LHS - 17/23/18
Militia - LHS - 24/9
Militia - LHT - Tas
Militia - LHT - 12/26
Militia - LHV - Vic
Militia - LHV - 7/15/20
Militia - LHV - 8/16/8
Militia - LHV - 9/19
Militia - LHV - 10/13
Militia - LHV - 11/20/4
Militia - LHV - 19/17
Militia - LHV - 29
Militia - LHW - WA
Militia - LHW-18/25/10
Militia - Military Orders
Militia - Misc
MilitiaRC - Rifle Clubs
MilitiaRC - NSW
MilitiaRC - NT
MilitiaRC - Qld
MilitiaRC - SA
MilitiaRC - Tas
MilitiaRC - Vic
MilitiaRC - WA
Militiaz - New Zealand
Tk - Turkish Items
Tk - Army
Tk - Bks - Books
Tk - Bks - 1/33IR
Tk - Bks - 27th IR
Tk - Bks - Air Force
Tk - Bks - Yildirim
Tk - POWs
Wp - Weapons
Wp - Hotchkiss Cav
Wp - Hotchkiss PMG
Blog Tools
Edit your Blog
Build a Blog
RSS Feed
View Profile
Open Community
Post to this Blog
Site Index
Education Centre
LH Militia
Boer War
Transport Ships
LH Battles
ALH - Units
ALH - General
Aboriginal Light H
Weapons
Ottoman Sources

"At a mile distant their thousand hooves were stuttering thunder, coming at a rate that frightened a man - they were an awe inspiring sight, galloping through the red haze - knee to knee and horse to horse - the dying sun glinting on bayonet points..." Trooper Ion Idriess

The Australian Light Horse Studies Centre aims to present an accurate history as chroniclers of early Australian military developments from 1899 to 1920.

The Australian Light Horse Studies Centre site holds over 12,000 entries and is growing daily.

Contact: Australian Light Horse Studies Centre

Let us hear your story: You can tell your story, make a comment or ask for help on our Australian Light Horse Studies Centre Forum called:

Desert Column Forum

WARNING: This site contains: names, information and images of deceased people; and, language which may be considered inappropriate today.

Saturday, 17 October 2009
1st Australian Light Horse Regiment, Contents
Topic: AIF - 1B - 1 LHR

1st LHR, AIF

1st Australian Light Horse Regiment

Contents


1st Light Horse Regiment Colour Patch


Formed in August 1914 as part of the 1st Contingent and attached to the Australian Division, the 1st Light Horse Regiment was made up of Light Horsemen from five different Militia Regiments. This was the only New South Wales Regiment recruited from a majority of men drawn immediately from the Militia formations.


Structure

The Australian Light Horse – Structural outline

Australian Light Horse Order of Battle


Corps

Desert Mounted Corps (DMC)


Division

Anzac Mounted Division


Brigade

1st Australian Light Horse Brigade 


Regiment

1st Australian Light Horse Regiment, AIF, History


History

Romani

1st ALHR AIF Unit History account about Romani

1st ALHR, AIF, War Diary, account about the Battle of Romani 

Bir el Abd

Bir el Abd, Sinai, 9 August 1916, 1st LHR, AIF, War Diary Account
Bir el Abd, Sinai, 9 August 1916, 1st LHR, AIF, Unit History Account 

Bir el Mazar

1st Light Horse Regiment Account

1st LHR Unit History Account  

Magdhaba

1st ALHR, AIF, War Diary, account 

1st ALHR AIF account 

Beersheba

1st ALHR AIF Unit History account about the fall of Beersheba

1st ALHR, AIF, War Diary, account about the fall of Beersheba 


Routine Orders

1st LHR Routine Order 80, 16 June 1918 


Embarkation

Full Roll

Roll: A - C

Roll: D - F

Roll: G - J

Roll: K - L

Roll: M - Q

Roll: R - S

Roll: T - Z


Individual Rolls

Regimental Headquarters Section

A Squadron

B Squadron

C Squadron

Machine Gun Section

1st Reinforcement

2nd Reinforcement

3rd Reinforcement

4th Reinforcement

5th Reinforcement

6th Reinforcement

7th Reinforcement

8th Reinforcement

9th Reinforcement

10th Reinforcement

11th Reinforcement - Mashobra Group 

11th Reinforcement - Hawkes Bay Group

12th Reinforcement - Hawkes Bay Group

12th Reinforcement - Beltana Group

13th Reinforcement

14th Reinforcement

15th Reinforcement

16th Reinforcement

17th Reinforcement

18th Reinforcement

19th Reinforcement

20th Reinforcement

21st Reinforcement

22nd Reinforcement

23rd Reinforcement

24th Reinforcement

25th Reinforcement

26th Reinforcement

27th Reinforcement

28th Reinforcement

29th Reinforcement

30th Reinforcement

31st Reinforcement

32nd Reinforcement

33rd Reinforcement

34th Reinforcement

35th Reinforcement


Personnel

2826 Pte Donald McBean 

50  Regimental Quartermaster Sergeant Robert Hamilton, MM, 1st Australian Light Horse Regiment, "C" Squadron.


Roll of Honour

1st Australian Light Horse Regiment, Roll of Honour

Lest we forget


Further Reading:

1st Australian Light Horse Regiment, AIF

1st Australian Light Horse Regiment, Roll of Honour

Battles where Australians fought, 1899-1920


Citation: 1st Australian Light Horse Regiment, Contents

Posted by Project Leader at 12:01 AM EADT
Updated: Tuesday, 19 January 2010 5:24 PM EAST
3rd Light Horse Field Ambulance, Contents
Topic: AIF - 3B - 3 LHFA

3rd LHFA, AIF

3rd Light Horse Field Ambulance

Contents


3rd LHFA Colour Patch


3rd Light Horse Field Ambulance

Originally recruited at Melbourne in October 1914 to form part of the 2nd Light Horse Field Ambulance, when Military Order 575 of 1914 created the 3rd Light Horse Brigade and the unit became the 3rd Light Horse Field Ambulance.


Structure

The Australian Light Horse – Structural outline

Australian Light Horse Order of Battle


Corps

Desert Mounted Corps (DMC)


Division

Anzac Mounted Division

Australian Mounted Division 


Brigade

3rd Australian Light Horse Brigade


Field Ambulance

3rd Light Horse Field Ambulance


History

The Jifjafa Raid, Sinai, April 10 to 14, 1916

The Jifjafa Raid, Sinai, April 10 to 14, 1916, 3rd LHFA, AIF, War Diary Account 

The Jifjafa Raid, Sinai, April 10 to 14, 1916, 3rd LHFA, AIF, Unit History Account 

The Jifjafa Raid, Sinai, April 10 to 14, 1916, White Account 


Battle of Romani, Sinai, August 4 to 5, 1916

Battle of Romani, Sinai, August 4 to 5, 1916, 3rd LHFA, AIF, Unit History Account


Bir el Abd

No Diary Entry


Bir el Mazar, Sinai, 17 September 1916

Bir el Mazar, Sinai, 17 September 1916, 3rd LHFA, AIF, War Diary Account


The Battle of Magdhaba, Sinai, December 23, 1916

The Battle of Magdhaba, Sinai, December 23, 1916, 3rd LHFA, AIF, War Diary Account 

The Battle of Magdhaba, Sinai, December 23, 1916,  3rd LHFA, AIF, Unit History Account 


The Belah Bombing Raid, 4 May 1917 

The Belah Bombing Raid, 4 May 1917

The Belah Bombing Raid, 4 May 1917, Map 

The Belah Bombing Raid, 4 May 1917, The 3rd LHFA Tent 


The Battle of Beersheba, Palestine, 31 October 1917

The Battle of Beersheba, Palestine, 31 October 1917, 3rd LHFA, AIF, Unit History Account 


Embarkations

Full Roll
3rd Light Horse Field Ambulance, AIF, Embarkation Roll, Roll: A - Z
Individual Rolls

"A" Squadron

1st Reinforcement

2nd & 3rd Reinforcement

4th Reinforcement

5th Reinforcement

6th Reinforcement

7th Reinforcement

8th Reinforcement

9th Reinforcement

10th Reinforcement

11th Reinforcement

12th Reinforcement

13th Reinforcement

14th Reinforcement

15th Reinforcement

16th Reinforcement

19th Reinforcement

20th Reinforcement

21st Reinforcement

22nd Reinforcement

23rd Reinforcement

24th Reinforcement

25th Reinforcement

26th Reinforcement


Roll of Honour

3rd Australian Light Horse Field Ambulance, Roll of Honour 

Lest We Forget


Further Reading:

3rd Light Horse Field Ambulance

3rd Australian Light Horse Field Ambulance, Roll of Honour 

Battles where Australians fought, 1899-1920


Citation: 3rd Light Horse Field Ambulance, Contents

Posted by Project Leader at 12:01 AM EADT
Updated: Friday, 23 July 2010 11:41 AM EADT
Brigade Scouts, Scouting or Protective and Tactical Reconnaissance Part 7 The Flank Screen
Topic: AIF - DMC - Scouts

Scouting or Protective and Tactical Reconnaissance, Part 7

The Flank Screen

Frederick Allan Dove


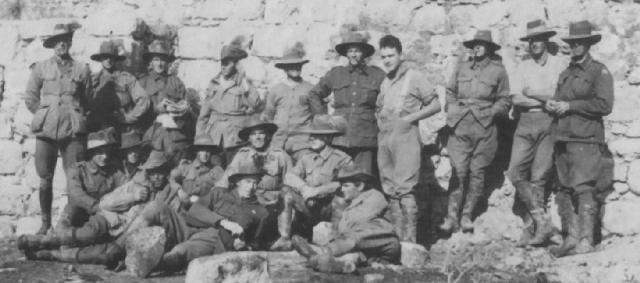
3rd Light Horse Brigade Scouts in the hills at Tripoli, December 1918


In 1910, Major Frederick Allan Dove, DSO, wrote a book on a subject he was very familiar with through practical experience called Scouting or Protective and Tactical Reconnaissance. This book set the intellectual framework for the formation of the Brigade Scouts during the Sinai and Palestine Campaigns as part of the Great War.

Dove, FA, Scouting or Protective and Tactical Reconnaissance, 1910.

 
(B) THE FLANK SCREEN. GENERAL REMARKS.

The Flank Guard protects the main body from a surprise attack from the Flank. In order to do so, it seizes, and hold's as long as may be necessary, a succession of defensive positions. These positions must first be reconnoitred. This is done by the Flank Guard throwing forward a small advanced Screen which will act as already described in Section A. But outside the Flank Guard, i.e., towards the enemy, there must also be a screen of Scouts, and it is their formations movements and defies that are discussed hereunder.

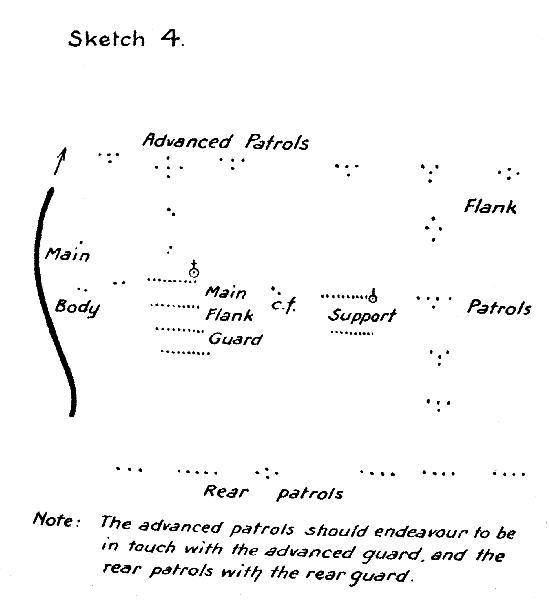
Firstly, I submit the following diagram as an aid to the understanding of the context:-


1. - Preliminary Instructions.


The leader of the troop or section told off for the Flank Screen should get clear directions as to-

(1) The direction of the advance and any contemplated changes thereof.

(2) What is known at present about the enemy, and of the position of our Advanced Guard, and of any neighbouring columns of friendly troops.

(3) Any special directions as to rate of march.

As laid down in Section (A), the leader will pass on his instructions to his subordinate before extending and supplementing them by anything he thinks necessary.

He will then tell off an advanced patrol (or patrols), a reserve under his own immediate control, and at least one rear patrol. He may also require connecting links between himself and his support or the Mainguard.

2. - Extension.

Extension must be by units - “twos" or "fours" (four men). In Africa - it was not unusual to see the Flank Screen composed of an apparently endless string of single files, riding behind each other with painful exactitude at about a distance of fifty yards or so. Up hill and down dale, across spruit and donga, they rode, looking neither to right nor left, but watching only the men in front of them. What wonder that every day told its tale of Scouts (?) shot down at close quarters, of troopers missing, of main bodies surprised.

By breaking your Screen into units you secure a delegation of command and fix responsibility upon your N.C.O.'s and four leaders, i.e., upon individuals who should he accustomed to accept responsibility and exercise command.

You say: "Corporal Jones, take your 'four' and Scout on my right. I look to you, I depend on you, to protect that flank and give me warning of any danger." Does it not stand to reason that Corporal Jones will do his best to rise to the occasion?

It is very important that at the outset the leader retains with him a fair proportion of his command to meet subsequent emergencies, but he must detach at least one patrol straight to the front, and another to follow in rear. I do not attempt to lay down distances, because those depend entirely on the nature of the country. Suffice it to say that in clear country distances will be greater and detachments less in number than in enclosed or timbered country.

In any case the patrols must keep "touch" with the body from which they are detached.

3. - Movements.

The Main Plank Guard best carries out its duty by the successive occupation of defensive positions. Similarly the Flank Screen takes up points of observation. The leader should so arrange that there shall be a full utilisation of all vantage points. A study of the sketch and notes will give an idea of what is meant. The instance is founded on an actual occurrence. I may say that the Main Body was moving at a walk on good ground, but the country traversed by the Flank Guard was boulder-strewn ridges. There was neither timber nor scrub.
 

The dotted line with arrow points shows the route of the main body, which was a small column.

The Flank Guard leader is at A, studying the situation.

He has with him the greater portion of a troop -his advanced patrol is halted at R; his support is shown moving in fours towards D.

He decides that he must secure the point C quickly. He there-fore sends a four at a canter to hold B, and with a message to the four already there to push on rapidly to C. This done, lie mounts his party and moves up to B, leaving a patrol to stay at A until he is seen to get to B. On arrival there the disposition is: Advanced patrol at C; Main party at B; patrol leaving A. From B, he can see down and across the valley Y, Y, to where the view is closed by low ridges. He would like to know what is beyond. Suddenly the sharp-pointed hill at F arrests his gaze-if only we had that, he thinks, we could see far and wide. Without any loss of time lie canters up to C himself, with four men leaving the remainder at B to follow leisurely. Arrived at C, he has another look, makes tip his mind, and at once sends a corporal and two men to Scout and occupy F, signal the result of their observations, and remain there till the rear patrol arrives at E.

Next an advanced patrol is sent to E; the main party is then at C, and another patrol is leaving B. Thus by successive steps the Screen moved from one observation point to another. There was always some, portion halted in observation, and no important point was given up to possible seizure by the enemy until the next point was secured. Surprise was impossible.
 
4. Halts.

All the units of the Screen will frequently halt at suitable points to make observations. When a, general halt is called, the Screen becomes a succession of Cossack posts and groups keeping a sharp look out--in fact, a temporary out post line, fronting outwards from the Main Body.
 
5. - Contact with the Enemy.

Whenever the enemy is discovered, the chief thing to be remembered is to at once warn the supporting portions of the Flank Guard and then the Officer commanding the Main Body. If the enemy is unaware of your presence, lie very low and avoid alarming him. Should he be advancing to the attack, fire on his Scouts or skirmishers and hold them back as much as possible. When compelled, and not before, retire, still fighting wherever a position offers.
 
6. - Signals and Signalling.

Constant touch must be maintained between all units by signals and by signallers.

Endeavour should be made to get touch with the Advanced Guard and Rear Guard.


Previous: Part 6, Lecturettes

Next: Part 8, Screen To Rear Guard 


Further Reading:

Obituary, Frederick Allan Dove

Brigade Scouts

The Light Horse

Australian Light Horse Militia

Militia 1899 - 1920

Battles where Australians fought, 1899-1920


Citation: Brigade Scouts, Scouting or Protective and Tactical Reconnaissance Part 7 The Flank Screen

Posted by Project Leader at 12:01 AM EADT
Updated: Saturday, 26 December 2009 4:29 PM EAST
2nd Light Horse Field Ambulance, Contents
Topic: AIF - 2B - 2 LHFA

2nd LHFA, AIF

2ndLight Horse Field Ambulance

Contents


2nd LHFA Colour Patch


2nd Light Horse Field Ambulance

The core 2nd Light Horse Field Ambulance was formed in Brisbane with a contingent from from Gympie.


Structure

The Australian Light Horse – Structural outline

Australian Light Horse Order of Battle


Corps

Desert Mounted Corps (DMC)


Division

Anzac Mounted Division


Brigade

2nd Australian Light Horse Brigade


Field Ambulance

2nd Light Horse Field Ambulance


History

Romani

Battle of Romani, Sinai, August 4 to 5, 1916, 2nd LHFA, AIF, War Diary Account 

Bir el Abd

Bir el Abd, Sinai, 9 August 1916, 2nd LHFA, AIF, War Diary Account 

Bir el Mazar

Bir el Mazar, Sinai, 17 September 1916, 2nd LHFA, AIF, War Diary Account


Embarkations

Full Roll
2nd Light Horse Field Ambulance, AIF, Embarkation Roll, Roll: A - Z
Individual Rolls

"A" Squadron

1st Reinforcement

2nd Reinforcement

3rd Reinforcement

4th Reinforcement

5th Reinforcement

6th Reinforcement

7th Reinforcement

8th Reinforcement

9th Reinforcement

10th Reinforcement

11th Reinforcement

12th Reinforcement

13th Reinforcement

14th Reinforcement

15th Reinforcement

16th Reinforcement

19th Reinforcement

20th Reinforcement

21st Reinforcement

22nd Reinforcement

23rd Reinforcement

24th Reinforcement

25th Reinforcement

26th Reinforcement

27th Reinforcement

28th Reinforcement

29th Reinforcement Port Lincoln Group

29th Reinforcement Commonwealth Group

30th Reinforcement

31st Reinforcement


Roll of Honour 

2nd Australian Light Horse Field Ambulance, Roll of Honour  

Lest We Forget


Further Reading:

2nd Australian Light Horse Field Ambulance, AIF

2nd Australian Light Horse Field Ambulance, Roll of Honour 

Battles where Australians fought, 1899-1920


Citation: 2nd Light Horse Field Ambulance, Contents

Posted by Project Leader at 12:01 AM EADT
Updated: Monday, 29 March 2010 9:09 PM EADT
Friday, 16 October 2009
4th Light Horse Field Ambulance, Contents
Topic: AIF - 4B - 4 LHFA

4th LHFA, AIF

4th Light Horse Field Ambulance

Contents


4th Light Horse Field Ambulance Shoulder Patch.


4th Light Horse Field Ambulance

The 4th Light Horse Field Ambulance was formed in February 1917 from some 60 men drawn out of all the other Light Horse formations in Egypt.


Structure

The Australian Light Horse – Structural outline

Australian Light Horse Order of Battle


Corps

Desert Mounted Corps (DMC)


Division

Australian Mounted Division 


Brigade

4th Australian Light Horse Brigade, 1917-19


Field Ambulance

4th Light Horse Field Ambulance


History

Formation

4th Light Horse Field Ambulance Formation
 
Battle of Beersheba, 31 October 1917
4th LHFA, AIF Unit History account about the fall of Beersheba 


Embarkations

Full Roll
4th Light Horse Field Ambulance, AIF, Embarkation Roll, Roll: A - Z
Individual Rolls

"A" Section

"B" Section

1st Reinforcement

2nd Reinforcement

3rd Reinforcement

4th Reinforcement

5th Reinforcement

6th Reinforcement

7th Reinforcement


Roll of Honour 

4th Light Horse Field Ambulance, Roll of Honour  

Lest We Forget


Further Reading:

4th Light Horse Field Ambulance, AIF 

4th Light Horse Field Ambulance, Roll of Honour

Battles where Australians fought, 1899-1920


Citation: 4th Light Horse Field Ambulance, Contents

Posted by Project Leader at 12:01 AM EADT
Updated: Wednesday, 31 March 2010 6:43 AM EADT

Newer | Latest | Older

Full Site Index


powered by FreeFind
Let us hear your story: You can tell your story, make a comment or ask for help on our forum.

Desert Column Forum

A note on copyright

The Australian Light Horse Studies Centre is a not for profit and non profit group whose sole aim is to write the early history of the Australian Light Horse from 1900 - 1920. It is privately funded and the information is provided by the individuals within the group and while permission for the use of the material has been given for this site for these items by various donors, the residual and actual copyright for these items, should there be any, resides exclusively with the donors. The information on this site is freely available for private research use only and if used as such, should be appropriately acknowledged. To assist in this process, each item has a citation attached at the bottom for referencing purposes.

Please Note: No express or implied permission is given for commercial use of the information contained within this site.

A note to copyright holders

The Australian Light Horse Studies Centre has made every endeavour to contact copyright holders of material digitised for this blog and website and where appropriate, permission is still being sought for these items. Where replies were not received, or where the copyright owner has not been able to be traced, or where the permission is still being sought, the Australian Light Horse Studies Centre has decided, in good faith, to proceed with digitisation and publication. Australian Light Horse Studies Centre would be happy to hear from copyright owners at any time to discuss usage of this item.

Contact

Australian Light Horse Studies Centre

eXTReMe Tracker