"At a mile distant their thousand hooves were stuttering thunder, coming at a rate that frightened a man - they were an awe inspiring sight, galloping through the red haze - knee to knee and horse to horse - the dying sun glinting on bayonet points..." Trooper Ion Idriess
The Australian Light Horse Studies Centre aims to present an accurate history as chroniclers of early Australian military developments from 1899 to 1920.
The Australian Light Horse Studies Centre site holds over 12,000 entries and is growing daily.
Contact:Australian Light Horse Studies CentreLet us hear your story:
You can tell your story, make a comment or ask for help on our Australian Light Horse Studies Centre Forum called:
WARNING: This site contains: names, information and images of deceased people; and, language which may be considered inappropriate today.
Sunday, 15 November 2009
The Jifjafa Raid, Sinai, April 10 to 14, 1916, Times Account, 17 April 1916 Topic: BatzS - Jifjafa
The Jifjafa Raid
Sinai, 10 - 14 April 1916
Times Account
Times, 17 April 1916, p. 8.
The Transcription:
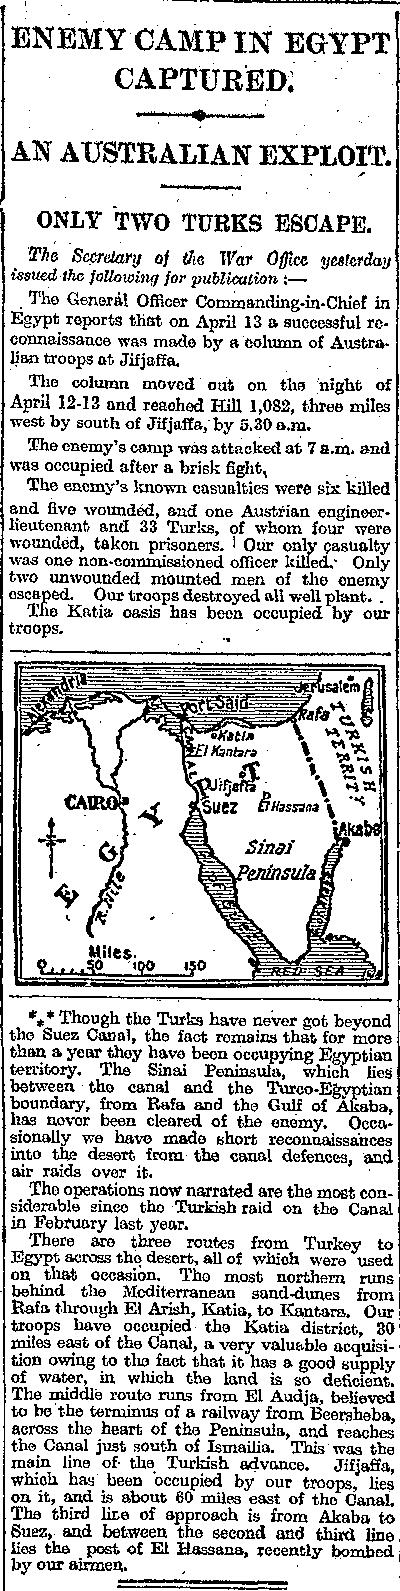
ENEMY CAMP IN EGYPT CAPTURED
AN AUSTRALIAN EXPLOIT.
ONLY TWO TURKS ESCAPE.
The Secretary of the War Office yesterday issued the, following for publication:
The General Officer Commanding-in-Chief in Egypt reports that on April 13 a successful reconnaissance was made by a 'column of Australian troops at Jifjaffa.
The column moved out on the night of April 12 - 13 and reached Hill 1,082, three miles west by south of Jifjaffa, by 5.30 a.m.
The enemy's camp was attacked at 7 a.m. and was occupied after a brisk fight,
The enemy's known casualties were six killed and five wounded, and one Austrian engineer Lieutenant and 33 Turks, of whom four were wounded, taken prisoners. Our only casualty was one non-commissioned officer killed. Only two unwounded mounted men of the enemy escaped. Our troops destroyed all well plant.
The Katia oasis has been occupied by our troops.
Though the Turks have never got beyond the Suez Canal, the fact remains that for more than a year they have been occupying Egyptian territory. The Sinai Peninsula, which lies between the canal and the Turco-Egyptian boundary, from Rafa and the Gulf of Akaba, has never been cleared of the enemy. Occasionally we have made short reconnaissances into the desert from the canal defences, and air raids over it.
The operations now narrated are the most considerable since the Turkish raid on the Canal in February last year.
There are three routes from Turkey to Egypt across the desert, all of which were used on that occasion. The most northern runs behind the Mediterranean sand-dunes from Rafa through El Arish, Katia, to Kantara. Our troops have occupied the Katia district, 30 miles east of the Canal, a very valuable acquisition owing to the fact that it has a good supply of water, in which the land is so deficient. The middle route runs from El Audja, believed to be the terminus of a railway from Beersheba, across the heart of the Peninsula, and reaches the Canal just south of Ismailia. This was the main line of the Turkish advance. Jifjaffa, which has been occupied by our troops, lies on it, and is about 60 miles east of the Canal. The third line of approach is from Akaba to Suez, and between the second and third line lies the post of El Hassana, recently bombed by our airmen.
The Battle of Ayun Kara, Palestine, 14 November 1917, Outline Topic: BatzP - Ayun Kara
The Battle of Ayun Kara
Palestine, 14 November 1918
Outline
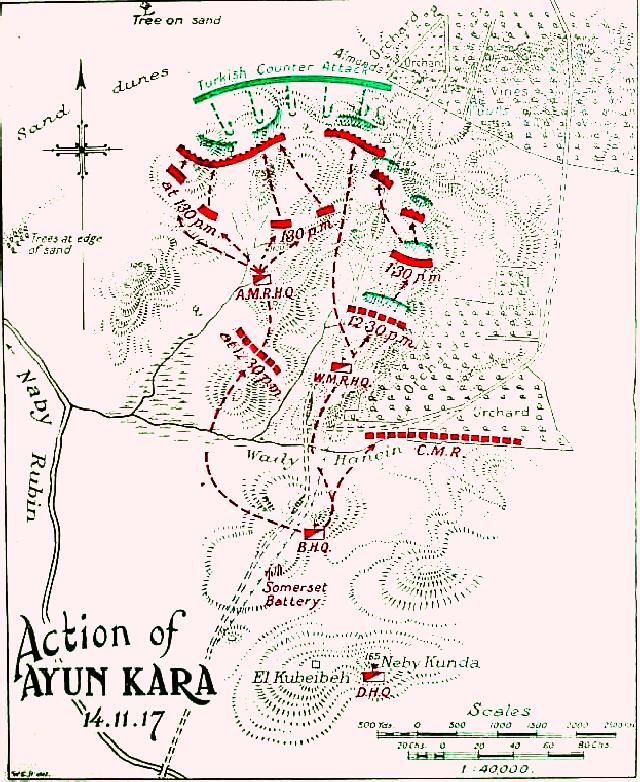
Map outlining the action during the Battle of Ayun Kara.
The following account is extracted from H.S. Gullett (1944) The Australian Imperial Force in Sinai and Palestine, Sydney: Angus & Robertson, pp. 474 - 476.
As Cox's brigade entered Deiran, the New Zealanders on the left closed on Wadi Hanein, and further to the west advanced towards Richon. No opposition was met until Wadi Hanein was reached, but the 1st Light Horse Brigade reported columns of troops crossing their front towards the New Zealand sector. Soon after midday Meldrum's brigade advanced strongly, with the Canterbury Regiment on the right, the Wellingtons in the centre, and the Aucklands on the left, and soon located a stoutly-held enemy line running across the sand-hills. Machine-gun and rifle fire for a time obstructed the advance in the centre, but the Wellingtons, with a dashing bayonet attack, in which twenty Turks were killed and two machine-guns captured, drove through the resistance. The Aucklands on the left were then held up by a strong body of infantry, which was being rapidly reinforced, and the regiment came under fire from a battery towards Richon. At 2.30 the Turks opened heavy fire from all arms upon the Aucklands, and a quarter of an hour later a force of 1,500 advanced to the attack.
The New Zealanders, lying down in the open, shot rapidly and accurately; but they were few and scattered, and the Turks, favoured in their approach by cover from the little sand-hills, closed quickly and in overwhelming numbers on the Auckland position. Lieutenant-Colonel J. N. McCarroll,' the commanding officer, reported the situation serious and asked for reinforcements; but only one squadron of Wellingtons was available. For some time a hot duel was waged at close quarters by the rival machine-gunners, but at 4 o'clock the Turks, who were now very close to the New Zealanders, dashed forward with the bayonet and hand-grenades. McCarroll had all his men, including batmen and gallopers, in the firing line. The shouting enemy got within fifty yards of the riflemen; then the Aucklands, who had taken severe punishment with absolute steadiness, rose and met the Turks with the bayonet. The Turks had the numbers, but they were no match with the steel for the powerful young New Zealand farmers. As the two lines closed, the fighting was bloody, but brief; then the Turks broke and fled, leaving 162 dead and a large number of wounded on the ground. The New Zealanders had one officer and twenty other ranks killed, and nine officers and seventy-eight other ranks wounded.
This counter-attack was the last effort made by the enemy to save his Jaffa-Ramleh-Jerusalem communications. With the loss of Junction Station, in the east, the advance of the yeomanry in the centre, and the failure of his spasmodic assault near Richon, his whole line was in retreat by the evening of the 14th (November).
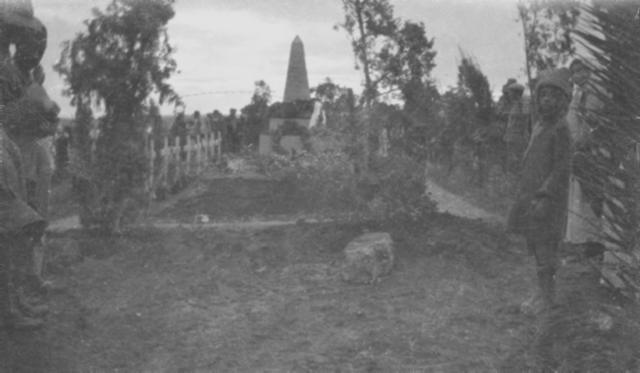
NZMR troopers and members of the local Jewish community attend the memorial service of the first anniversary of the Battle of Ayun Kara.
[Photograph taken by Trooper Charles Broomfield - permission given by the Cato family, Ohaupo and the New Zealand Mounted Rifles Association.]
The Battle of Anzac Cove, Gallipoli, 25 April 1915, Wellington Infantry Battalion War Diary Topic: BatzG - Anzac
The Battle of Anzac Cove
Gallipoli, 25 April 1915
Wellington Infantry Battalion War Diary
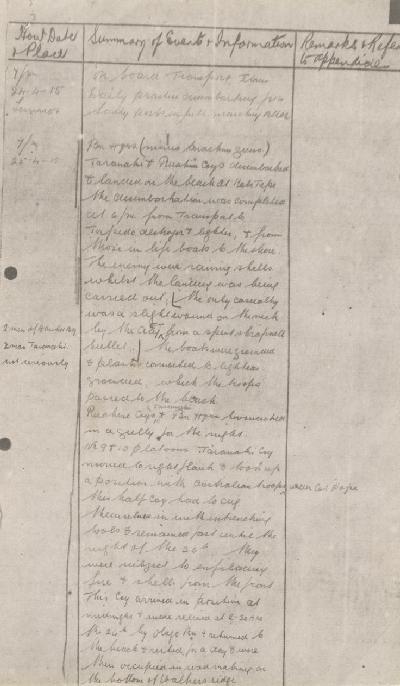
War Diary account of the Wellington Infantry Battalion.
The following is a transcription of the War Diary of the Wellington Infantry Battalion, of their role in the landings at Anzac on 25 April 1915.
25 April 1915
Battalion Headquarters (minus Machine Guns) Taranaki and Ruahini Companies disembarked and landed on the beach at Kabe Tepe. The disembarkation was complete at 6 pm from transport to torpedo destroyer and lighter and from those in life boats to the shore. The enemy were raining shells whilst the landing was being carried out. The only casualty was a slight wound on the neck by the Dai from a spent shrapnel bullet. Two men of Hawkes Bay and 2 men Taranaki not seriously. The boats were grounded and pinnaces connected to lighters grounded which the troops passed to the beach. Ruahini and Taranaki Companies, and Battalion Headquarters bivouacked in a gully for the night.
No.'s 9 and 10 Platoons Taranaki Company moved to right flank and took up a position with Australian troops under Colonel Pope. This half company had to dig themselves in with entrenching tools and remained fast until the night of the 26th. They were subject to enfilading fire and shells from the front. This Company arrived in position at midnight and were relieved at 2.30 am the 26th by Otago Battalion and returned to the beach and rested for a day and were then occupied in road making at the bottom of Walker's Ridge.
26 April
During the action of No.'s 9 and 10 Platoons Taranaki Company the following casualties occurred - killed 7, including Major McGlade; wounded 26. All ranks worked with determination and coolness. No. 10/273 Pte HE Hayson went out under enemy fire and retrieved boxes of ammunition that had become ignited by enemy fire and carried them up with ???? in this action he was killed.
No 10/747 Lance Corporal Looney left his position under heavy fire to attend and bandage a comrade. He was killed while doing so.
No 10/1116 Sergeant Major JH Boner showed great bravery all throughout by going out and bringing wounded to a place of cover. He undoubtedly saved the lives of a number of men.
One and a half companies entrenched themselves on Maclagan’s Ridge on the night of the 26th returning to Howitzer Gully at 9 am the 27th.
Battalion Headquarters remained in the gully north east of Corps Headquarters for the day.
Remainder of Taranaki company returned to beach during the night.
WWC Hawkes Bay and Machine Guns disembarked and joined the Battalion in the gully at about 6.30 pm.
War Diaries
All War Diaries cited on this site should be read in conjunction with the Australian Light Horse Studies Centre, AIF War Diaries of the Great War, Site Transcription Policy which may be accessed at:
The Battle of Ayun Kara, Palestine, 14 November 1917, Auckland Mounted Rifles Unit History Account Topic: BatzP - Ayun Kara
The Battle of Ayun Kara
Palestine, 14 November 1918
Auckland Mounted Rifles Unit History Account
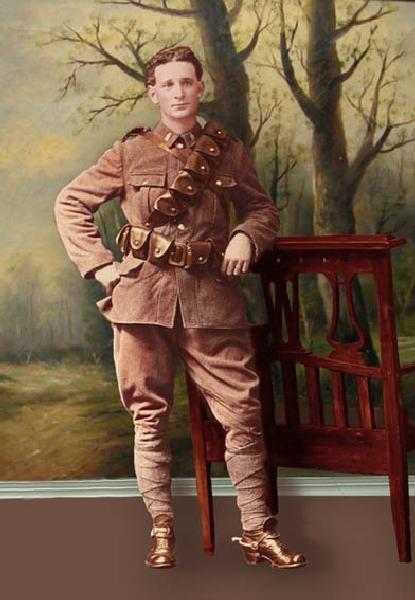
13/3161 Trooper Hugh Gordon Haswell, killed in action.
The following account is extracted from Nicol, CG, The Story of Two Campains - Official war history of the Auckland Mounted Rifles Regiment, 1914 - 1919 in the Battlefields of Gallipoli, Sinai and Palestine during WWI., Wilson and Horton, Auckland, 1921.
CHAPTER XXVI. North to Ayun Kara.
The Canterbury Mounted Rifles who were the advanced guard, got into touch with Turkish outposts at 11 a.m. They pushed on, but by midday were definitely checked. Orders were immediately issued to attack the enemy, whose main positions were on a series of hills, with long slopes between them and the sand hills of the coast. The Canterbury Mounted Rifles was on the right of the line, the Wellington Mounted Rifles in the centre, and the Auckland Mounted Rifles on the left. The regiments advanced in line of troop column, and soon were under long range machine-gun fire. There being some high ground on the right front of the Auckland Mounteds, the 3rd squadron, under Major Twistleton, was sent forward to secure it, the other two squadrons taking cover from direct fire in depressions. As the Wellington Mounteds pressed on towards the main position, some cavalry appeared on the left front of the Aucklanders, and Colonel McCarroll, who had been viewing the position from the 3rd squadron’s hill, ordered the 11th squadron [North Auckland Mounted Rifles] to advance as rapidly as possible to ascertain the strength and position of the threatening force. Heavy rifle and machine-gun fire prevented the ˇsquadron getting to the required position, so two troops of the 4th squadron [Waikato Mounted Rifles] under Lieutenants M. E. Johnson and Ryan were detailed to gallop straight at it. This sudden and vigorous move evidently upset the enemy, for they reached the spot with very few casualtiescasualties, the enemy retiring quickly. Under cover of the fire from the 3rd squadron the other two troops of the 4th squadron pushed on to secure some high ground to the left of the W.M.R., who continued to advance steadily. As soon as the 4th squadron had gained a their objective, the 3rd squadron was drawn into support, and the 11th was sent forward on the left of the 4th. Covered by the 4th, the 11th advanced steadily, but for some time they did not reach any point where they could get a view of the enemy, although heavy rifle fire was coming down all the valleys from the higher positions of the Turks. At 2.15 the patrols of the 11th located some of the enemy concentrating in the orange groves nearby, and Lieutenant Jackson’s troop pushed well forward and found that the enemy was advancing rapidly.
Colonel McCarroll galloped forward, and, seeing that the troop was being attacked, sent in every available man, including signallers, gallopers, and batmen to reinforce, and signalled to the 3rd squadron to come up.
Major Twistleton brought his men up at the gallop in fine style, losing only two horses, although two or three bullet-swept zones were traversed, and dismounted his men within a few yards of the line. Lieutenant S. Reid’s troop was sent in on the right, but heavy enfilade fire gave them a severe time, and the few men who were not killed or wounded had to be called back. At 2.45 the enemy, under cover of heavy artillery fire, started a strong attack. Several of the Turkish machine-guns now began to make their presence felt, and the commander brought up his machine-gun section, which opened a counter fire. The action in this part of the battle now became a machine-gun duel, it being impossible for Colonel McCarroll to move his men until the opposite machine-guns were silenced.
After a furious fusillade the Auckland machine-gun sergeant, in worried tones, reported his gun out of action. “That’s all right,” replied the Colonel, “so is the Turk’s,” for at the moment the enemy guns were abandoned.
Meanwhile, the W.M.R. had pushed up the hill on the right, and there came under a very heavy fire. Two troops of the 3rd squadron were sent further to the right, to a spot where they could bring enfilade fire against the Turks assembled in a valley. The Hotchkiss guns and machine-guns, under Lieutenant Kelly, were also sent in, and did great execution.
Afterwards they described this chance as “the machine-gunner’s dream.” While this drama was being enacted, the counterattack was rapidly developing. It was estimated that fully 600 fresh infantry were flung against the Regiment, which by now had suffered very severe casualties. In many places the attackers got within bombing distance of the thin line. The A.M.R. men on one small hill having been all killed or wounded, theTurks established themselves on it and brought an oblique fire against the main position. The situation was now veryserious, and two orderlies were sent with orders for the fourth squadron to come up, but both were wounded. Eventually a message was got through, and the Waikato stalwarts, led by Major Munro and Lieutenant Johnson, raced across the fire-swept area—a sight worth living to see.
They regained the hill, and in spite of heavy opposition worked round the enemy’s left, and were able to enfilade the main line. This move nonplussed the Turks, who then fled in disorder towardsthe orange grove, under the heaviest fire that could be put across.
Colonel McCarroll had just collected his squadronleaders to organise pursuit when he was wounded in the neck and then in the shoulder. Major Whitehorn then took command, but the colonel before receiving medical aid, rode to brigade headquarters and arranged for support in the event of a night attack. The Turks kept up a heavy artillery fire until dark, after which the victorious troopers consolidated their position and removed the wounded.
The A.M.R. lost heavily, 15 being killed, including the gallant Lieutenant J. D. Stewart, of the 3rd squadron; 74 wounded, including Lieutenant-Colonel McCarroll, Captain Twistleton, M.C., and Lieutenants K. J. Tait, M.C., S. C. Reid, G. L. King, C. G. R. Jackson, and E. A.H. Bisley.
Captain Twistleton and Lieutenant King died of wounds. The W.M.R. lost 8 killed and 44 wounded; the C.M.R., one killed and six wounded; and the machine-gun squadron, eight killed and 18 wounded. The Turks, who retired during the night, lost 160 killed and 250 (estimated) wounded. The Turks who made the counter attack were part of a fresh force that had just arrived from its victories in Romania, and they apparently were unprepared to meet troops of the quality of the desert horsemen. One wounded prisoner remarked to an Aucklander, “Inglizee no run,” and he seemed to be rather perplexed over the fact that a thin and out numbered line had refused to budge in the face of what seemed inevitable disaster. The secret of the victory was the simple fact that the mounted riflemen were actuated by a spirit which did not permit of retreat being considered when committed to a definite action. It was the same attitude of mind which defied set principles of war on Gallipoli. It had its foundations in an extraordinary confidence, resolute and highly capable leadership, and the sense of personal responsibility which possessed the men of the Regiment.
13/1087 Trooper Arthur Robins, wounded in action.
The following morning the village of Ayun Kara was reported clear of the enemy, and, with a company of “Camels” on the left and the 1st Light Horse on the right, the brigade moved forward towards Jaffa, meeting with no resistance.
On the way they passed through the village of Richon le Zion, where for the first time they met Jews. One member of the community was a brother of Rabbi Goldstein, of Auckland. The joy of these people at being freed from the tyranny of the Turks was unbounded. They treated the New Zealanders most hospitably—an exceedingly pleasant experience after the tremendous effort they had just made, and the harsh hungry times spent in the south with its hostile Bedouins.
Acknowledgement: The photographs on this page were colourised by Steve Butler and are used with his permission along with that of the New Zealand Mounted Rifles Association. See: http://www.nzmr.org/phpBB3/
The Australian Light Horse Studies Centre is a not for profit and non profit group whose sole aim is to write the early history of the Australian Light Horse from 1900
- 1920. It is privately funded and the information is provided by the individuals within the group and while permission for the use of the material has been given for this
site for these items by various donors, the residual and actual copyright for these items, should there be any, resides exclusively with the donors. The information on
this site is freely available for private research use only and if used as such, should be appropriately acknowledged. To assist in this process, each item has a citation
attached at the bottom for referencing purposes.
Please Note: No express or implied permission is given for commercial use of the information contained within this site.
A note to copyright holders
The Australian Light Horse Studies Centre has made every endeavour to contact copyright holders of material digitised for this blog and website and where
appropriate, permission is still being sought for these items. Where replies were not received, or where the copyright owner has not been able to be traced, or where
the permission is still being sought, the Australian Light Horse Studies Centre has decided, in good faith, to proceed with digitisation and publication. Australian Light
Horse Studies Centre would be happy to hear from copyright owners at any time to discuss usage of this item.