« June 2010 »
S M T W T F S
1 2 3 4 5
6 7 8 9 10 11 12
13 14 15 16 17 18 19
20 21 22 23 24 25 26
27 28 29 30
You are not logged in. Log in


Search the site:


powered by FreeFind
Volunteer with us.

Entries by Topic All topics  
A Latest Site News
A - Using the Site
AAA Volunteers
AAB-Education Centre
AAC-Film Clips
AAC-Photo Albums
AIF & MEF & EEF
AIF - Lighthorse
AIF - ALH - A to Z
AIF - DMC
AIF - DMC - Or Bat
AIF - DMC - Anzac MD
AIF - DMC - Aus MD
AIF - DMC - British
AIF - DMC - BWI
AIF - DMC - French
AIF - DMC - Indian
AIF - DMC - Italian
AIF - DMC - Medical
AIF - DMC - Remounts
AIF - DMC - Scouts
AIF - DMC - Sigs
AIF - DMC - Sigs AirlnS
AIF - DMC - 1 Sig Sqn
AIF - DMC - 2 Sig Sqn
AIF - DMC - Eng
AIF - DMC - Eng 1FSE
AIF - DMC - Eng 2FSE
AIF - DMC - GSR
AIF - 1B - 1 LHB
AIF - 1B - 6 MVS
AIF - 1B - 1 LHMGS
AIF - 1B - 1 Sig Trp
AIF - 1B - 1 LHFA
AIF - 1B - 1 LHR
AIF - 1B - 2 LHR
AIF - 1B - 3 LHR
AIF - 2B - 2 LHB
AIF - 2B - 7 MVS
AIF - 2B - 2 LHFA
AIF - 2B - 2 LHMGS
AIF - 2B - 2 Sig Trp
AIF - 2B - 5 LHR
AIF - 2B - 6 LHR
AIF - 2B - 7 LHR
AIF - 3B - 3 LHB
AIF - 3B - 8 MVS
AIF - 3B - 3 LHB Sigs
AIF - 3B - 3 LHFA
AIF - 3B - 3 LHMGS
AIF - 3B - 3 Sig Trp
AIF - 3B - 8 LHR
AIF - 3B - 9 LHR
AIF - 3B - 10 LHR
AIF - 4B - 4 LHB
AIF - 4B - 4 Sig Trp
AIF - 4B - 9 MVS
AIF - 4B - 4 LHFA
AIF - 4B - 4 LHMGS
AIF - 4B - 4 LHR
AIF - 4B - 11 LHR
AIF - 4B - 12 LHR
AIF - 5B - 5 LHB
AIF - 5B - 10 MVS
AIF - 5B - 5 LHFA
AIF - 5B - 5 Sig Trp
AIF - 5B - ICC
AIF - 5B - 14 LHR
AIF - 5B - 15 LHR
AIF - 5B - 1er Regt
AIF - 5B - 2 NZMGS
AIF - AASC
AIF - Aboriginal LH
AIF - Badges
AIF - Cars
AIF - Chinese LH
AIF - Double Sqns
AIF - Engineers
AIF - Fr - 22 Corps
AIF - Fr - 13 LHR
AIF - Honour Roll
AIF - HQ - 3rd Echelon
AIF - Marching Songs
AIF - Misc Topics
AIF - NZMRB
AIF - NZMRB - AMR
AIF - NZMRB - CMR
AIF - NZMRB - EFT
AIF - NZMRB - NZMFA
AIF - NZMRB - NZMGS
AIF - NZMRB - OMR
AIF - NZMRB - Sig-Trp
AIF - NZMRB - WMR
AIF - Ships
AIF - Ships - Encountr
AIF - Ships - Una
AIF - WFF
AIF - Wireless Sqn
Battles
BatzA - Australia
BatzA - Broken Hill
BatzA - Liverpool
BatzA - Merivale
BatzB - Boer War
BatzB - Bakenlaagte
BatzB - Belmont
BatzB - Bothaville
BatzB - Buffels Hoek
BatzB - Coetzees Drift
BatzB - Diamond Hill
BatzB - Driefontein
BatzB - Elands
BatzB - Graspan
BatzB - Grobelaar
BatzB - Grootvallier
BatzB - Hartebestfontn
BatzB - Houtnek
BatzB - Karee Siding
BatzB - Kimberley
BatzB - Koster River
BatzB - Leeuw Kop
BatzB - Mafeking
BatzB - Magersfontein
BatzB - Modder River
BatzB - Onverwacht
BatzB - Paardeberg
BatzB - Palmietfontein
BatzB - Pink Hill
BatzB - Poplar Grove
BatzB - Rhenoster
BatzB - Sannahs Post
BatzB - Slingersfontn
BatzB - Stinkhoutbm
BatzB - Sunnyside
BatzB - Wilmansrust
BatzB - Wolvekuil
BatzB - Zand River
BatzG - Gallipoli
BatzG - Anzac
BatzG - Aug 1915
BatzG - Baby 700
BatzG - Evacuation
BatzG - Hill 60
BatzG - Hill 971
BatzG - Krithia
BatzG - Lone Pine
BatzG - Nek
BatzJ - Jordan Valley
BatzJ - 1st Amman
BatzJ - 2nd Amman
BatzJ - Abu Tellul
BatzJ - Es Salt
BatzJ - JV Maps
BatzJ - Ziza
BatzM - Mespot
BatzM - Baghdad
BatzM - Ctesiphon
BatzM - Daur
BatzM - Kurna
BatzM - Kut el Amara
BatzM - Ramadi
BatzN - Naval
BatzN - AE1
BatzN - Cocos Is
BatzN - Heligoland
BatzN - Marmara
BatzN - Zeebrugge
BatzN - Zeppelin L43
BatzNG - Bitapaka
BatzO - Other
BatzO - Baku
BatzO - Egypt 1919
BatzO - Emptsa
BatzO - Karawaran
BatzO - Peitang
BatzO - Wassa
BatzP - Palestine
BatzP - 1st Gaza
BatzP - 2nd Gaza
BatzP - 3rd Gaza
BatzP - Aleppo
BatzP - Amwas
BatzP - Ayun Kara
BatzP - Bald Hill
BatzP - Balin
BatzP - Beersheba
BatzP - Berkusieh
BatzP - Damascus
BatzP - El Auja
BatzP - El Buggar
BatzP - El Burj
BatzP - Haifa
BatzP - Huj
BatzP - JB Yakub
BatzP - Kaukab
BatzP - Khan Kusseir
BatzP - Khuweilfe
BatzP - Kuneitra
BatzP - Megiddo
BatzP - Nablus
BatzP - Rafa
BatzP - Sasa
BatzP - Semakh
BatzP - Sheria
BatzP - Surafend
BatzP - Wadi Fara
BatzS - Sinai
BatzS - Bir el Abd
BatzS - El Arish
BatzS - El Mazar
BatzS - El Qatiya
BatzS - Jifjafa
BatzS - Magdhaba
BatzS - Maghara
BatzS - Romani
BatzS - Suez 1915
BatzSe - Senussi
BatzWF - Westn Front
BW - Boer War
BW - NSW
BW - NSW - 1ACH
BW - NSW - 1NSWMR
BW - NSW - 2NSWMR
BW - NSW - 3ACH
BW - NSW - 3NSWIB
BW - NSW - 3NSWMR
BW - NSW - 5ACH
BW - NSW - A Bty RAA
BW - NSW - AAMC
BW - NSW - Aust H
BW - NSW - Lancers
BW - NSW - NSW Inf
BW - NSW - NSWCBC
BW - NSW - NSWIB
BW - NSW - NSWMR_A
BW - NZ
BW - Qld
BW - Qld - 1ACH
BW - Qld - 1QMI
BW - Qld - 2QMI
BW - Qld - 3ACH
BW - Qld - 3QMI
BW - Qld - 4QIB
BW - Qld - 5QIB
BW - Qld - 6QIB
BW - Qld - 7ACH
BW - QLD - AAMC
BW - SA
BW - SA - 1SAMR
BW - SA - 2ACH
BW - SA - 2SAMR
BW - SA - 3SACB
BW - SA - 4ACH
BW - SA - 4SAIB
BW - SA - 5SAIB
BW - SA - 6SAIB
BW - SA - 8ACH
BW - SA - AAMC
BW - Tas
BW - Tas - 1ACH
BW - Tas - 1TIB
BW - Tas - 1TMI
BW - Tas - 2TB
BW - Tas - 2TIB
BW - Tas - 3ACH
BW - Tas - 8ACH
BW - Vic
BW - Vic - 1VMI
BW - Vic - 2ACH
BW - Vic - 2VMR
BW - Vic - 3VB
BW - Vic - 4ACH
BW - Vic - 4VIB
BW - Vic - 5VMR
BW - Vic - 6ACH
BW - Vic - AAMC
BW - Vic - Scot H
BW - WA
BW - WA - 1WAMI
BW - WA - 2ACH
BW - WA - 2WAMI
BW - WA - 3WAB
BW - WA - 4ACH
BW - WA - 4WAMI
BW - WA - 5WAMI
BW - WA - 6WAMI
BW - WA - 8ACH
BW Gen - Campaign
BW Gen - Soldiers
BW General
Cavalry - General
Diary - Schramm
Egypt - Heliopolis
Egypt - Mena
Gen - Ataturk Pk, CNB
Gen - Australia
Gen - Legends
Gen - Query Club
Gen - St - NSW
Gen - St - Qld
Gen - St - SA
Gen - St - Tas
Gen - St - Vic
Gen - St - WA
Gm - German Items
Gm - Bk - 605 MGC
GW - 11 Nov 1918
GW - Atrocities
GW - August 1914
GW - Biographies
GW - Propaganda
GW - Spies
GW - We forgot
Militia 1899-1920
Militia - Area Officers
Militia - Inf - Infantry
Militia - Inf - 1IB
Militia - Inf - 2IB
Militia - Inf - 3IB
Militia - Inf - NSW
Militia - Inf - Qld
Militia - Inf - SA
Militia - Inf - Tas
Militia - Inf - Vic
Militia - Inf - WA
Militia - K.E.Horse
Militia - LH
Militia - LH - Regts
Militia - LH - 1LHB
Militia - LH - 2LHB
Militia - LH - 3LHB
Militia - LH - 4LHB
Militia - LH - 5LHB
Militia - LH - 6LHB
Militia - LHN - NSW
Militia - LHN - 1/7/1
Militia - LHN - 2/9/6
Militia - LHN - 3/11/7
Militia - LHN - 4/6/16
Militia - LHN - 5/4/15
Militia - LHN - 6/5/12
Militia - LHN - 28
Militia - LHQ - Qld
Militia - LHQ - 13/2
Militia - LHQ - 14/3/11
Militia - LHQ - 15/1/5
Militia - LHQ - 27/14
Militia - LHS - SA
Militia - LHS - 16/22/3
Militia - LHS - 17/23/18
Militia - LHS - 24/9
Militia - LHT - Tas
Militia - LHT - 12/26
Militia - LHV - Vic
Militia - LHV - 7/15/20
Militia - LHV - 8/16/8
Militia - LHV - 9/19
Militia - LHV - 10/13
Militia - LHV - 11/20/4
Militia - LHV - 19/17
Militia - LHV - 29
Militia - LHW - WA
Militia - LHW-18/25/10
Militia - Military Orders
Militia - Misc
MilitiaRC - Rifle Clubs
MilitiaRC - NSW
MilitiaRC - NT
MilitiaRC - Qld
MilitiaRC - SA
MilitiaRC - Tas
MilitiaRC - Vic
MilitiaRC - WA
Militiaz - New Zealand
Tk - Turkish Items
Tk - Army
Tk - Bks - Books
Tk - Bks - 1/33IR
Tk - Bks - 27th IR
Tk - Bks - Air Force
Tk - Bks - Yildirim
Tk - POWs
Wp - Weapons
Wp - Hotchkiss Cav
Wp - Hotchkiss PMG
Blog Tools
Edit your Blog
Build a Blog
RSS Feed
View Profile
Open Community
Post to this Blog
Site Index
Education Centre
LH Militia
Boer War
Transport Ships
LH Battles
ALH - Units
ALH - General
Aboriginal Light H
Weapons
Ottoman Sources

"At a mile distant their thousand hooves were stuttering thunder, coming at a rate that frightened a man - they were an awe inspiring sight, galloping through the red haze - knee to knee and horse to horse - the dying sun glinting on bayonet points..." Trooper Ion Idriess

The Australian Light Horse Studies Centre aims to present an accurate history as chroniclers of early Australian military developments from 1899 to 1920.

The Australian Light Horse Studies Centre site holds over 12,000 entries and is growing daily.

Contact: Australian Light Horse Studies Centre

Let us hear your story: You can tell your story, make a comment or ask for help on our Australian Light Horse Studies Centre Forum called:

Desert Column Forum

WARNING: This site contains: names, information and images of deceased people; and, language which may be considered inappropriate today.

Friday, 11 June 2010
The Battle of Diamond Hill, South Africa, 11 - 12 June 1900, Contents
Topic: BatzB - Diamond Hill

The Battle of Diamond Hill

South Africa, 11 - 12 June 1900

Outline


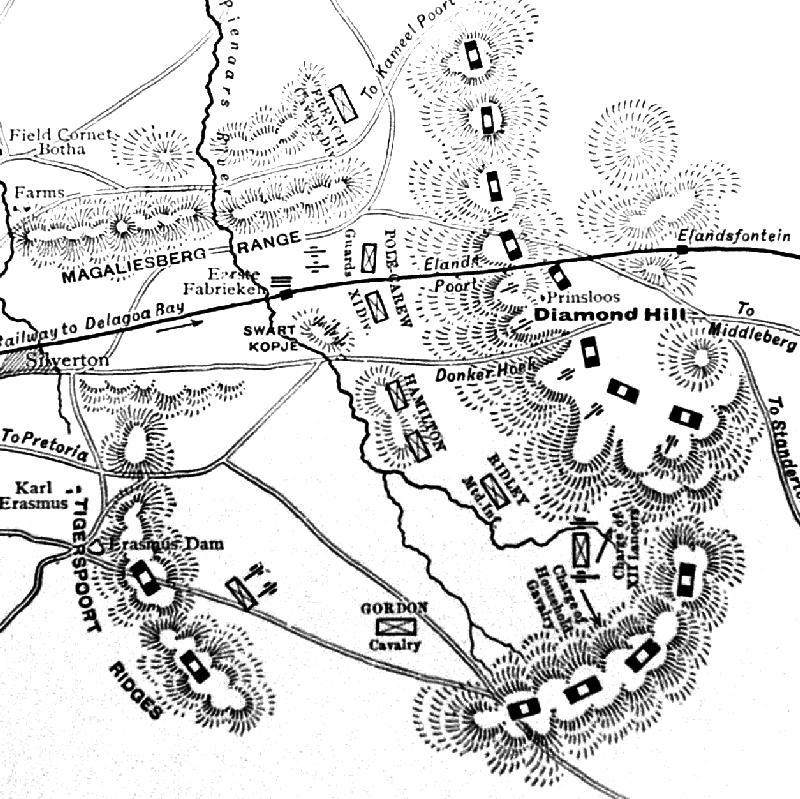
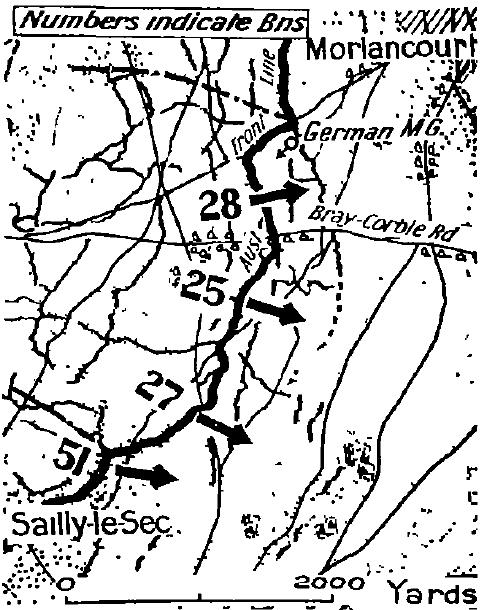
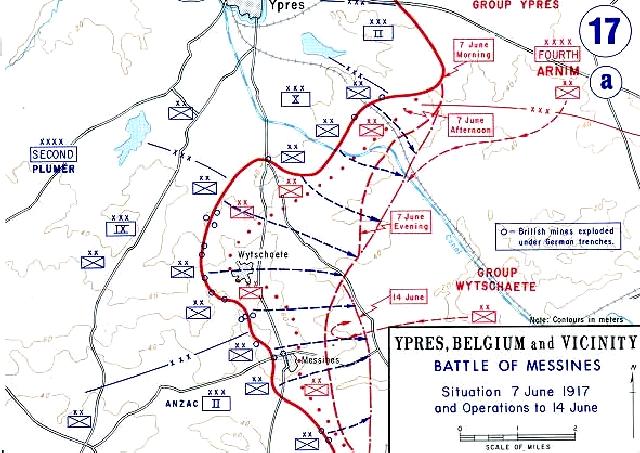
Map detailing the Battle of Diamond Hill


Diamond Hill, an action fought on 11 - 12 June 1900, during the Second South African War, between British forces under the direct command of Field Marshal Lord Roberts and the main Boer army of the Transvaal republic under General Louis Botha. The latter, comprising 6.000 men and 23 guns was menacing the Transvaal capital, Pretoria, which the British had entered with 25,000 men on 5 June, by occupying a 50-kilometre front east of the town. To deal with this threat Roberts moved out on 11 June with 14,000 men and 70 guns - all he could spare from the protection of his lines of communication. His plan called for attacks by Lieut.-General John French's cavalry and mounted infantry in the north and Lieut.-General Sir Ian Hamilton's infantry and mounted infantry in the south, which were intended to tie up both enemy flanks before a main attack was attempted against the centre.

Botha had accurately anticipated Roberts' tactics, and was ready to deal with both flanking movements. French's force comprised only 1,400 horsemen (including ten members of the 1st Australian Horse and 35 of the New South Wales Lancers) and, although supported by a dozen field guns, was easily stopped by General J.H. De la Rey and forced to remain in defensive positions for the night. In the opening moments on this flank, a troop of the New South Wales Lancers which was sent forward on scouting duty was mistaken for Boers and shelled by the British guns, fortunately without any of the Australians being hit. Not so lucky was the New South Wales Ambulance, which was later struck by an enemy shell and damaged while moving about in the front-line.


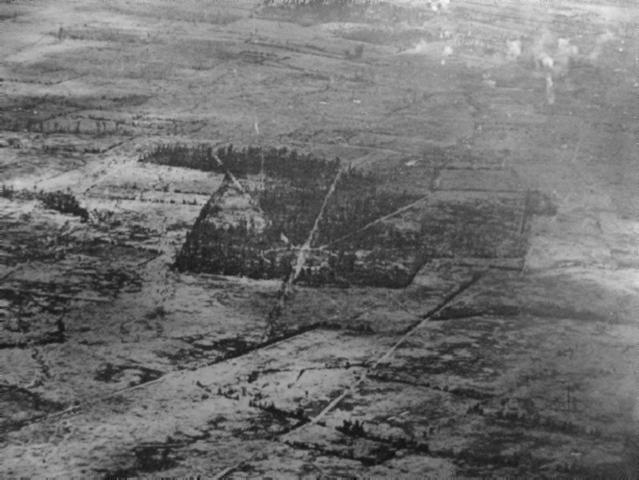
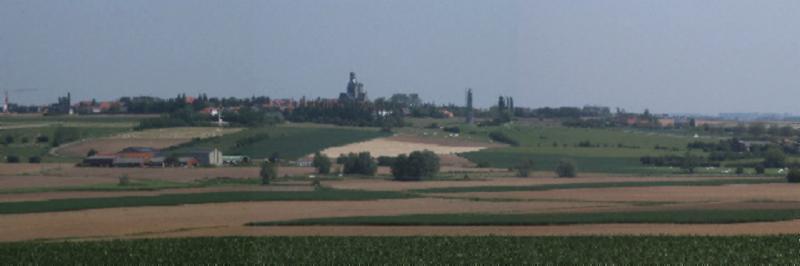
Diamond Hill overlooking the War Cemetery


On the right flank, meanwhile, Hamilton found himself strongly opposed by Boers under General Piet Fourie who occupied a long rocky ridge line dominated by Diamond Hill. In attempting to press ahead in the face of fierce resistance, part of the British force was almost surrounded when night ended the first day's operations. In the face of the situation which now confronted him, Roberts was reluctantly forced to contemplate a costly frontal attack in the centre against enemy positions which had been barely touched. Reports during the night, however, persuaded him to lend his support for a main thrust to be mounted by Hamilton against the Boer strong point at Diamond Hill.

The assault which was finally launched shortly after noon the next day entailed five battalions moving against the western slopes leading onto the Diamond Hill plateau. Although successful, the effort soon became bogged down when the Boers retreated to covering positions and the attackers were exposed to murderous fire from high ground on both flanks. This pressure was only relieved when the brigade under Colonel H. De Lisle, which contained a battalion of British mounted infantry along with both the New South Wales Mounted Rifles and West Australian Mounted Infantry, made an assault onto the Rhenosterfontein kopje on the British right. This position was effectively the eastern extension of the Diamond Hill ridge line, and the source of much of the fire which pinned down the main assault force.

De Lisle, sent to concentrate his efforts against the Rhenosterfontein position during the morning, had used the two pom-pom guns with his force to cover the men of the 6th Mounted Infantry Battalion as they began steadily working their way forward on foot until they were close under the hill. By 2 p.m. De Lisle ordered the Mounted Infantry to advance. As soon as he saw that the leading troops had gained a foothold, he moved his pom-pours up to within 1,300 metres and in the words of The Times history of the war - 'let go the New South Wales Mounted Rifles'.


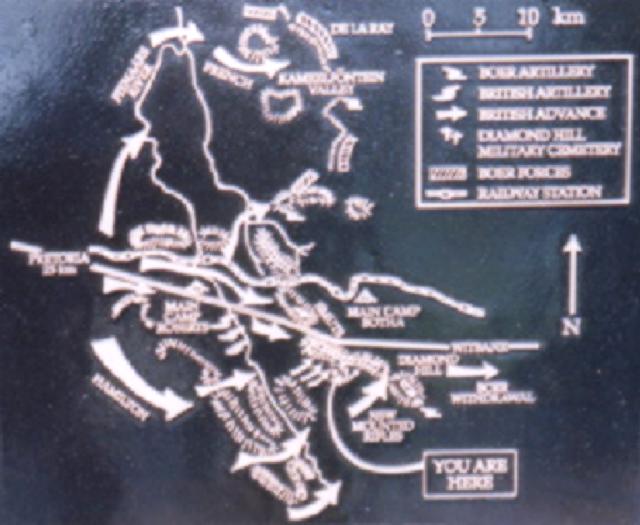
The Australian plaque commemorating the Battle of Diamond Hill.


The four squadrons of the New South Wales regiment, commanded by Lieut.-Colonel G. Knight, came under fire as they galloped in long well-spaced lines across the broad grass-covered valley to where the local farmhouse stood among a grove of gum trees. Leaving their horses in dead ground here, they rushed forward still widely spaced-27 metres between men and 45 metres separating the ranks formed by squadrons. According to The Times account:

Extended in this way the 350 men of the corps created the appearance of a much larger force, and as they swarmed over the crest of the hill with fixed bayonets, the Boers without waiting for the attack retired to a second position some 1,200 yards away.


With darkness now beginning to fall across the hill, the Boers opened up a 'furious fusillade' along the whole line of the position. Botha, however, upon hearing of De Lisle's success, realised that that part of the ridge line which his men still held would be untenable as soon as Hamilton brought up heavy artillery onto the plateau. He accordingly gave orders for his commandos to disperse during the night, the retirement commencing at 11 p.m, and being carried out so quietly that it went undetected until the next morning. Roberts was therefore initially unaware of the victory which his force had obtained, at a cost amounting to less than 200 casualties (including two officers killed and six men wounded among the New South Wales men engaged), Boer losses were probably heavier than the 24 killed and wounded that were admitted but were still minor nonetheless.

The only pursuit of the retreating enemy was carried out on 13 June by a detachment of 150 Australians, mainly men of the West Australian Mounted Rifles under Major Hatherly Moor with come members of "C" Squadron of the New South Wales Mounted Rifles. This force followed the Boers for nearly seventeen kilometres, to near Bronkhorst Spruit station, and fought a brief action with an enemy rearguard in a laager (camp). The role of the Australians during the action at Diamond Hill - the last great defensive battle fought by the Boers - was much praised, and during a review at Elands River on 14 June Knight's men were cheered by British troops for the gallantry they had displayed there.


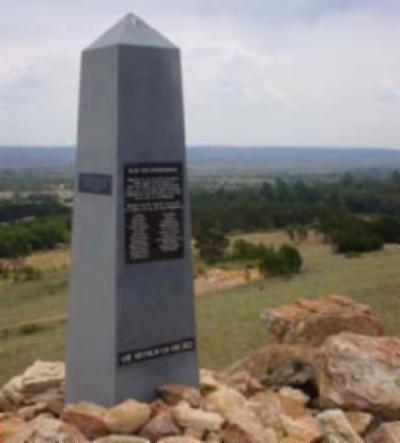
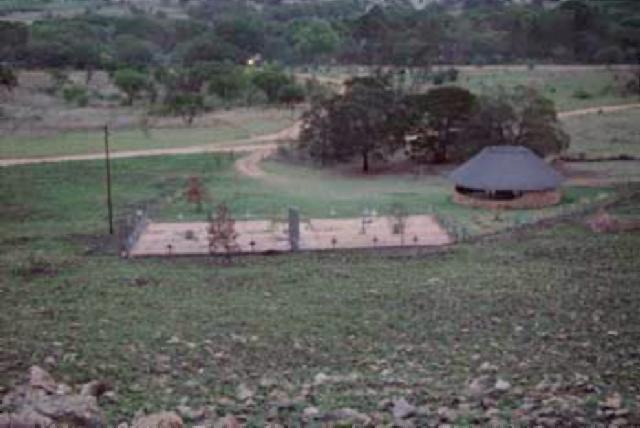
Battle of Diamond Hill War Memorial.


Extracted from the book produced by Chris Coulthard-Clark, Where Australians Fought - The Encyclopaedia of Australia's Battles, Allen and Unwin, Sydney, 1998, p. 78-81.


Additional References cited by Chris Coulthard-Clark:

L.S. Amery, (ed.) The Times History of the War in South Africa 1899-1902, Vol. 4 (1906), London: Sampson Low, Marston & Co.

R.L. Wallace (1976) The Australians at the Boer War, Canberra: Australian War Memorial & Australian Government Publishing Service.


Further Reading:

The Battle of Diamond Hill, South Africa, 11 - 12 June 1900

The Battle of Diamond Hill, South Africa, 11 - 12 June 1900, Roll of Honour

Boer War, 1899 - 1902  

Battles where Australians fought, 1899-1920


Citation: The Battle of Diamond Hill, South Africa, 11 - 12 June 1900, Contents

Posted by Project Leader at 12:01 AM EADT
Updated: Sunday, 10 April 2011 6:43 PM EADT
Thursday, 10 June 2010
The Third Battle of Morlancourt, France, 10 June 1918, Contents
Topic: BatzWF - Westn Front

The Third Battle of Morlancourt

France, 10 June 1918

Contents


Items

Outline

Bean's Account of The Third Battle of Morlancourt, France, 10 June 1918


Roll of Honour

The Third Battle of Morlancourt, France, 10 June 1918, Roll of Honour 

Lest We Forget


Further Reading:

The Third Battle of Morlancourt, France, 10 June 1918, Roll of Honour

Western Front Battles

Battles where Australians fought, 1899-1920


Citation: The Third Battle of Morlancourt, France, 10 June 1918, Contents

Posted by Project Leader at 12:01 AM EADT
Updated: Wednesday, 9 June 2010 11:46 PM EADT
The Third Battle of Morlancourt, France, 10 June 1918, Outline
Topic: BatzWF - Westn Front

The Third Battle of Morlancourt

France, 10 June 1918

Outline


Map outlining the attack at Morlancourt.

[Extracted from Bean, Vol. VI, p. 234.]


Third Morlancourt, an attack carried out on 10 June 1918 by 7th Brigade of the 2nd Australian Division against the southern portion of the Morlancourt spur which overlooked the village of Sailly-Laurette on the Somme. Launched at dusk under cover of an accurate barrage, the operation was a complete success and resulted in the taking of 325 German prisoners at a cost of 400 Australian casualties.


Extracted from the book produced by Chris Coulthard-Clark, Where Australians Fought - The Encyclopaedia of Australia's Battles, Allen and Unwin, Sydney, 1998, p. 148.


Additional References cited by Chris Coulthard-Clark:

C.E.W. Bean (1937) The Australian Imperial Force in France during the Main German Offensive, 1918, Sydney: Angus & Robertson.


Further Reading:

The Third Battle of Morlancourt, France, 10 June 1918

The Third Battle of Morlancourt, France, 10 June 1918, Roll of Honour

Western Front Battles

Battles where Australians fought, 1899-1920


Citation: The Third Battle of Morlancourt, France, 10 June 1918, Outline

Posted by Project Leader at 12:01 AM EADT
Updated: Thursday, 9 June 2011 6:52 PM EADT
Monday, 7 June 2010
The Battle of Messines, Belgium, 7 - 14 June 1917, Outline
Topic: BatzWF - Westn Front

The Battle of Messines

Belgium, 7 - 14 June 1917

Outline


Aerial photograph of operations on 7 June 1917. Note the smoke haze right of Oosteverne Wood.


Messines, a major action in the Flanders region of southern Belgium, undertaken on 7 Jun 1917 for the purpose of' capturing the Wytschaete - Messines ridge south of the British salient at Ypres. Since these low heights-part of the crescent of high ground running east of the battered town-were occupied by the Germans and overlooked British positions, the ridge's capture was essential to plans for an offensive to occupy the Belgian coast. Three army corps were allocated to the task, one of these being II Anzac commanded by Lieut.-General Sir Alexander Godley which comprised three divisions: the 25th British, the New Zealand and the 3rd Australian (Major-General John Monash). In addition, the 4th Australian Division (Major-General William Holmes) was sent to reinforce the corps.


Map detailing the Battle of Messines


A seven-day preliminary bombardment began on 31 May At 3.10 a.m. on 7 June mines containing a million pounds of ammonal, placed in nineteen tunnels which had been dug under and behind the German lines during the preceding two years by Canadian, Australian and British miners, were detonated. The resultant explosions created massive craters, obliterated enemy front-line positions and left survivors stunned and demoralised. The British advance was rapid and largely unopposed, so that by 5.30 a.m. the heights had been easily occupied in one of the most complete local victories yet seen in the war.

Stunning though this success had been, there was drama in the 3rd Division when Monash's men were caught in a German attack using phosgene shells while on approach through Ploegsteert Wood to its start-lines. Some 500 men were gassed and temporarily put out of action, and hundreds more fell to shrapnel rounds, but the division proceeded and was in its correct position for the attack. A further hitch developed that afternoon, when reserve formations moved through to press the advance down the eastern slopes against the German depth positions known as the Oostaverne Line. Delays held back the British corps moving in the centre, forcing the 4th Australian Division to attempt to plug a widening gap so that by the end of the day it was effectively holding half the battlefront.


 Engineering plans and actual placement of an observation tree by the Australians at Hill 63 during the Battle of Messines.


During this battle the Australians also encountered for the first time the German innovation of concrete blockhouses, which were dubbed 'pillboxes'. Despite strong enemy counter-attacks the next day, and heavy casualties due to artillery fire-from both German and Allied batteries which mistakenly targeted friendly troops-the attacking forces were able to continue expanding their gains to the final objectives laid down for them. For the Australians, success in this operation came at the price of nearly 6,800 casualties, close on two-thirds of these in the 3rd Division. Total losses in II Anzac Corps were about 13,900 - slightly more than the combined total of the two other British corps involved. German losses for the same period were about 23,000, including 7,548 missing.


The beautiful gardens of Messines Ridge today over which the men fought in June 1917.


Extracted from the book produced by Chris Coulthard-Clark, Where Australians Fought - The Encyclopaedia of Australia's Battles, Allen and Unwin, Sydney, 1998, pp. 129-130.


Additional References cited by Chris Coulthard-Clark:

C.E.W. Bean, (1933), The Australian Imperial Force in France 1917,  Sydney: Angus & Robertson.

P.A. Pedersen, (1985), Monash as Military Commander, Carlton, Vic.: Melbourne University Press.


Further Reading:

The Battle of Messines, Belgium, 7 - 14 June 1917

The Battle of Messines, Belgium, 7 - 14 June 1917, Roll of Honour

Western Front Battles

Battles where Australians fought, 1899-1920


Citation: The Battle of Messines, Belgium, 7 - 14 June 1917, Outline

Posted by Project Leader at 12:01 AM EADT
Updated: Thursday, 9 June 2011 5:33 PM EADT
Tuesday, 1 June 2010
The Battle of Heligoland Bight, North Sea, 1 June 1915, Outline
Topic: BatzN - Heligoland

The Battle of Heligoland Bight

North Sea, 1 June 1915

Outline


Heligoland Bight, a minor action on 1 June 1918 involving aircraft launched from the Australian light cruisers Melbourne and Sydney, which represented the first use of air power in combat by the RAN. During a three-month refit carried out at the Royal Navy dockyard at Chatham in the last quarter of 1917, Sydney had acquired a revolving aircraft launching platform fitted behind and partly over the forward 6-inch gun turret. This enabled the ship to take on board a Sopwith Camel scout for operational use, probably in February 1918. After being similarly fitted with a platform the following month, Melbourne also began operating a Camel in May that year.

When Admiral David Beatty, commanderin-chief of the Grand Fleet, sent a large force to raid enemy minesweepers in the Heligoland Bight on 1 June, both Australian ships were with the Second Light Cruiser Squadron which led the operation. Included in the main body were two heavy cruisers (Courageous and Glorious) which had been fitted out to carry aircraft, escorted by nine destroyers, and the First Battle Cruiser Squadron with Beatty in HMS Lion. Late in the afternoon, with the operation well underway, two enemy seaplanes suddenly broke through cloud cover overhead, passing the cruiser force and making directly towards the bottle-cruisers beyond. After dropping five bombs, the enemy machines turned and within five minutes were reprising the light cruisers on their way back to base to report what they had sighted.

Meanwhile, Sydney and Melbourne had each launched their own aircraft, getting these aloft in the creditable time of just two minutes. The pilot of Melbourne's aircraft lost sight of the quarry as he climbed through the clouds, but Sydney's aviator, Flight Lieutenant A.G. Sharwood, RAF, kept the enemy planes in view and steadily overhauled them in the course of a 100-kilometre pursuit. Eventually getting within range, he opened fire on one of the aircraft and observed it drop down through the mist in a spinning dive. Sharwood was about to follow his opponent down when he spotted another enemy machine behind him, presumably the first seaplane's partner, and was obliged to turn to meet this threat. In the short combat which followed, one of the Camel's guns ran out of ammunition and the other jammed soon afterwards, forcing Sharwood to disengage and head back towards the fleet.

With petrol running low, Sharwood Was beginning to despair of finding the ships when he sighted two British light cruisers with several destroyers and turned towards them. One of these vessels fired at him before he was able to identify himself, but he was then able to descend to make a landing on the water ahead of one of the destroyers - the only way cruiser-launched aircraft could be recovered at that time. Forced to cling for twenty minutes to the tail of his ditched machine, which fortunately stayed afloat, he Was eventually picked up and his Camel subsequently salvaged. Although the incident was not generally regarded as significant, it was actually a useful early demonstration within the RAN of the utility of seaborne air power in support of naval operations.


Extracted from the book produced by Chris Coulthard-Clark, Where Australians Fought - The Encyclopaedia of Australia's Battles, Allen and Unwin, Sydney, 1998, pp. 147-148.


Additional References cited by Chris Coulthard-Clark:

Keith Isaacs (1971) Military Aircraft of Australia 1909 - 1918, Canberra; Australian War Memorial.


Further Reading:

The Battle of Heligoland Bight, North Sea, 1 June 1915

The Battle of Heligoland Bight, North Sea, 1 June 1915, Roll of Honour

Battles where Australians fought, 1899-1920


Citation: The Battle of Heligoland Bight, North Sea, 1 June 1915, Outline

Posted by Project Leader at 12:01 AM EADT
Updated: Friday, 3 June 2011 10:06 AM EADT

Newer | Latest | Older

Full Site Index


powered by FreeFind
Let us hear your story: You can tell your story, make a comment or ask for help on our forum.

Desert Column Forum

A note on copyright

The Australian Light Horse Studies Centre is a not for profit and non profit group whose sole aim is to write the early history of the Australian Light Horse from 1900 - 1920. It is privately funded and the information is provided by the individuals within the group and while permission for the use of the material has been given for this site for these items by various donors, the residual and actual copyright for these items, should there be any, resides exclusively with the donors. The information on this site is freely available for private research use only and if used as such, should be appropriately acknowledged. To assist in this process, each item has a citation attached at the bottom for referencing purposes.

Please Note: No express or implied permission is given for commercial use of the information contained within this site.

A note to copyright holders

The Australian Light Horse Studies Centre has made every endeavour to contact copyright holders of material digitised for this blog and website and where appropriate, permission is still being sought for these items. Where replies were not received, or where the copyright owner has not been able to be traced, or where the permission is still being sought, the Australian Light Horse Studies Centre has decided, in good faith, to proceed with digitisation and publication. Australian Light Horse Studies Centre would be happy to hear from copyright owners at any time to discuss usage of this item.

Contact

Australian Light Horse Studies Centre

eXTReMe Tracker