« September 2010 »
S M T W T F S
1 2 3 4
5 6 7 8 9 10 11
12 13 14 15 16 17 18
19 20 21 22 23 24 25
26 27 28 29 30
You are not logged in. Log in


Search the site:


powered by FreeFind
Volunteer with us.

Entries by Topic All topics  
A Latest Site News
A - Using the Site
AAA Volunteers
AAB-Education Centre
AAC-Film Clips
AAC-Photo Albums
AIF & MEF & EEF
AIF - Lighthorse
AIF - ALH - A to Z
AIF - DMC
AIF - DMC - Or Bat
AIF - DMC - Anzac MD
AIF - DMC - Aus MD
AIF - DMC - British
AIF - DMC - BWI
AIF - DMC - French
AIF - DMC - Indian
AIF - DMC - Italian
AIF - DMC - Medical
AIF - DMC - Remounts
AIF - DMC - Scouts
AIF - DMC - Sigs
AIF - DMC - Sigs AirlnS
AIF - DMC - 1 Sig Sqn
AIF - DMC - 2 Sig Sqn
AIF - DMC - Eng
AIF - DMC - Eng 1FSE
AIF - DMC - Eng 2FSE
AIF - DMC - GSR
AIF - 1B - 1 LHB
AIF - 1B - 6 MVS
AIF - 1B - 1 LHMGS
AIF - 1B - 1 Sig Trp
AIF - 1B - 1 LHFA
AIF - 1B - 1 LHR
AIF - 1B - 2 LHR
AIF - 1B - 3 LHR
AIF - 2B - 2 LHB
AIF - 2B - 7 MVS
AIF - 2B - 2 LHFA
AIF - 2B - 2 LHMGS
AIF - 2B - 2 Sig Trp
AIF - 2B - 5 LHR
AIF - 2B - 6 LHR
AIF - 2B - 7 LHR
AIF - 3B - 3 LHB
AIF - 3B - 8 MVS
AIF - 3B - 3 LHB Sigs
AIF - 3B - 3 LHFA
AIF - 3B - 3 LHMGS
AIF - 3B - 3 Sig Trp
AIF - 3B - 8 LHR
AIF - 3B - 9 LHR
AIF - 3B - 10 LHR
AIF - 4B - 4 LHB
AIF - 4B - 4 Sig Trp
AIF - 4B - 9 MVS
AIF - 4B - 4 LHFA
AIF - 4B - 4 LHMGS
AIF - 4B - 4 LHR
AIF - 4B - 11 LHR
AIF - 4B - 12 LHR
AIF - 5B - 5 LHB
AIF - 5B - 10 MVS
AIF - 5B - 5 LHFA
AIF - 5B - 5 Sig Trp
AIF - 5B - ICC
AIF - 5B - 14 LHR
AIF - 5B - 15 LHR
AIF - 5B - 1er Regt
AIF - 5B - 2 NZMGS
AIF - AASC
AIF - Aboriginal LH
AIF - Badges
AIF - Cars
AIF - Chinese LH
AIF - Double Sqns
AIF - Engineers
AIF - Fr - 22 Corps
AIF - Fr - 13 LHR
AIF - Honour Roll
AIF - HQ - 3rd Echelon
AIF - Marching Songs
AIF - Misc Topics
AIF - NZMRB
AIF - NZMRB - AMR
AIF - NZMRB - CMR
AIF - NZMRB - EFT
AIF - NZMRB - NZMFA
AIF - NZMRB - NZMGS
AIF - NZMRB - OMR
AIF - NZMRB - Sig-Trp
AIF - NZMRB - WMR
AIF - Ships
AIF - Ships - Encountr
AIF - Ships - Una
AIF - WFF
AIF - Wireless Sqn
Battles
BatzA - Australia
BatzA - Broken Hill
BatzA - Liverpool
BatzA - Merivale
BatzB - Boer War
BatzB - Bakenlaagte
BatzB - Belmont
BatzB - Bothaville
BatzB - Buffels Hoek
BatzB - Coetzees Drift
BatzB - Diamond Hill
BatzB - Driefontein
BatzB - Elands
BatzB - Graspan
BatzB - Grobelaar
BatzB - Grootvallier
BatzB - Hartebestfontn
BatzB - Houtnek
BatzB - Karee Siding
BatzB - Kimberley
BatzB - Koster River
BatzB - Leeuw Kop
BatzB - Mafeking
BatzB - Magersfontein
BatzB - Modder River
BatzB - Onverwacht
BatzB - Paardeberg
BatzB - Palmietfontein
BatzB - Pink Hill
BatzB - Poplar Grove
BatzB - Rhenoster
BatzB - Sannahs Post
BatzB - Slingersfontn
BatzB - Stinkhoutbm
BatzB - Sunnyside
BatzB - Wilmansrust
BatzB - Wolvekuil
BatzB - Zand River
BatzG - Gallipoli
BatzG - Anzac
BatzG - Aug 1915
BatzG - Baby 700
BatzG - Evacuation
BatzG - Hill 60
BatzG - Hill 971
BatzG - Krithia
BatzG - Lone Pine
BatzG - Nek
BatzJ - Jordan Valley
BatzJ - 1st Amman
BatzJ - 2nd Amman
BatzJ - Abu Tellul
BatzJ - Es Salt
BatzJ - JV Maps
BatzJ - Ziza
BatzM - Mespot
BatzM - Baghdad
BatzM - Ctesiphon
BatzM - Daur
BatzM - Kurna
BatzM - Kut el Amara
BatzM - Ramadi
BatzN - Naval
BatzN - AE1
BatzN - Cocos Is
BatzN - Heligoland
BatzN - Marmara
BatzN - Zeebrugge
BatzN - Zeppelin L43
BatzNG - Bitapaka
BatzO - Other
BatzO - Baku
BatzO - Egypt 1919
BatzO - Emptsa
BatzO - Karawaran
BatzO - Peitang
BatzO - Wassa
BatzP - Palestine
BatzP - 1st Gaza
BatzP - 2nd Gaza
BatzP - 3rd Gaza
BatzP - Aleppo
BatzP - Amwas
BatzP - Ayun Kara
BatzP - Bald Hill
BatzP - Balin
BatzP - Beersheba
BatzP - Berkusieh
BatzP - Damascus
BatzP - El Auja
BatzP - El Buggar
BatzP - El Burj
BatzP - Haifa
BatzP - Huj
BatzP - JB Yakub
BatzP - Kaukab
BatzP - Khan Kusseir
BatzP - Khuweilfe
BatzP - Kuneitra
BatzP - Megiddo
BatzP - Nablus
BatzP - Rafa
BatzP - Sasa
BatzP - Semakh
BatzP - Sheria
BatzP - Surafend
BatzP - Wadi Fara
BatzS - Sinai
BatzS - Bir el Abd
BatzS - El Arish
BatzS - El Mazar
BatzS - El Qatiya
BatzS - Jifjafa
BatzS - Magdhaba
BatzS - Maghara
BatzS - Romani
BatzS - Suez 1915
BatzSe - Senussi
BatzWF - Westn Front
BW - Boer War
BW - NSW
BW - NSW - 1ACH
BW - NSW - 1NSWMR
BW - NSW - 2NSWMR
BW - NSW - 3ACH
BW - NSW - 3NSWIB
BW - NSW - 3NSWMR
BW - NSW - 5ACH
BW - NSW - A Bty RAA
BW - NSW - AAMC
BW - NSW - Aust H
BW - NSW - Lancers
BW - NSW - NSW Inf
BW - NSW - NSWCBC
BW - NSW - NSWIB
BW - NSW - NSWMR_A
BW - NZ
BW - Qld
BW - Qld - 1ACH
BW - Qld - 1QMI
BW - Qld - 2QMI
BW - Qld - 3ACH
BW - Qld - 3QMI
BW - Qld - 4QIB
BW - Qld - 5QIB
BW - Qld - 6QIB
BW - Qld - 7ACH
BW - QLD - AAMC
BW - SA
BW - SA - 1SAMR
BW - SA - 2ACH
BW - SA - 2SAMR
BW - SA - 3SACB
BW - SA - 4ACH
BW - SA - 4SAIB
BW - SA - 5SAIB
BW - SA - 6SAIB
BW - SA - 8ACH
BW - SA - AAMC
BW - Tas
BW - Tas - 1ACH
BW - Tas - 1TIB
BW - Tas - 1TMI
BW - Tas - 2TB
BW - Tas - 2TIB
BW - Tas - 3ACH
BW - Tas - 8ACH
BW - Vic
BW - Vic - 1VMI
BW - Vic - 2ACH
BW - Vic - 2VMR
BW - Vic - 3VB
BW - Vic - 4ACH
BW - Vic - 4VIB
BW - Vic - 5VMR
BW - Vic - 6ACH
BW - Vic - AAMC
BW - Vic - Scot H
BW - WA
BW - WA - 1WAMI
BW - WA - 2ACH
BW - WA - 2WAMI
BW - WA - 3WAB
BW - WA - 4ACH
BW - WA - 4WAMI
BW - WA - 5WAMI
BW - WA - 6WAMI
BW - WA - 8ACH
BW Gen - Campaign
BW Gen - Soldiers
BW General
Cavalry - General
Diary - Schramm
Egypt - Heliopolis
Egypt - Mena
Gen - Ataturk Pk, CNB
Gen - Australia
Gen - Legends
Gen - Query Club
Gen - St - NSW
Gen - St - Qld
Gen - St - SA
Gen - St - Tas
Gen - St - Vic
Gen - St - WA
Gm - German Items
Gm - Bk - 605 MGC
GW - 11 Nov 1918
GW - Atrocities
GW - August 1914
GW - Biographies
GW - Propaganda
GW - Spies
GW - We forgot
Militia 1899-1920
Militia - Area Officers
Militia - Inf - Infantry
Militia - Inf - 1IB
Militia - Inf - 2IB
Militia - Inf - 3IB
Militia - Inf - NSW
Militia - Inf - Qld
Militia - Inf - SA
Militia - Inf - Tas
Militia - Inf - Vic
Militia - Inf - WA
Militia - K.E.Horse
Militia - LH
Militia - LH - Regts
Militia - LH - 1LHB
Militia - LH - 2LHB
Militia - LH - 3LHB
Militia - LH - 4LHB
Militia - LH - 5LHB
Militia - LH - 6LHB
Militia - LHN - NSW
Militia - LHN - 1/7/1
Militia - LHN - 2/9/6
Militia - LHN - 3/11/7
Militia - LHN - 4/6/16
Militia - LHN - 5/4/15
Militia - LHN - 6/5/12
Militia - LHN - 28
Militia - LHQ - Qld
Militia - LHQ - 13/2
Militia - LHQ - 14/3/11
Militia - LHQ - 15/1/5
Militia - LHQ - 27/14
Militia - LHS - SA
Militia - LHS - 16/22/3
Militia - LHS - 17/23/18
Militia - LHS - 24/9
Militia - LHT - Tas
Militia - LHT - 12/26
Militia - LHV - Vic
Militia - LHV - 7/15/20
Militia - LHV - 8/16/8
Militia - LHV - 9/19
Militia - LHV - 10/13
Militia - LHV - 11/20/4
Militia - LHV - 19/17
Militia - LHV - 29
Militia - LHW - WA
Militia - LHW-18/25/10
Militia - Military Orders
Militia - Misc
MilitiaRC - Rifle Clubs
MilitiaRC - NSW
MilitiaRC - NT
MilitiaRC - Qld
MilitiaRC - SA
MilitiaRC - Tas
MilitiaRC - Vic
MilitiaRC - WA
Militiaz - New Zealand
Tk - Turkish Items
Tk - Army
Tk - Bks - Books
Tk - Bks - 1/33IR
Tk - Bks - 27th IR
Tk - Bks - Air Force
Tk - Bks - Yildirim
Tk - POWs
Wp - Weapons
Wp - Hotchkiss Cav
Wp - Hotchkiss PMG
Blog Tools
Edit your Blog
Build a Blog
RSS Feed
View Profile
Open Community
Post to this Blog
Site Index
Education Centre
LH Militia
Boer War
Transport Ships
LH Battles
ALH - Units
ALH - General
Aboriginal Light H
Weapons
Ottoman Sources

"At a mile distant their thousand hooves were stuttering thunder, coming at a rate that frightened a man - they were an awe inspiring sight, galloping through the red haze - knee to knee and horse to horse - the dying sun glinting on bayonet points..." Trooper Ion Idriess

The Australian Light Horse Studies Centre aims to present an accurate history as chroniclers of early Australian military developments from 1899 to 1920.

The Australian Light Horse Studies Centre site holds over 12,000 entries and is growing daily.

Contact: Australian Light Horse Studies Centre

Let us hear your story: You can tell your story, make a comment or ask for help on our Australian Light Horse Studies Centre Forum called:

Desert Column Forum

WARNING: This site contains: names, information and images of deceased people; and, language which may be considered inappropriate today.

Sunday, 19 September 2010
The Battle of Menin Road, Belgium, 20 September 1917, Outline
Topic: BatzWF - Westn Front

The Battle of Menin Road

Belgium, 20 September 1917

Outline


'Clapham Junction', Menin Road between Hooge and Geluveld.


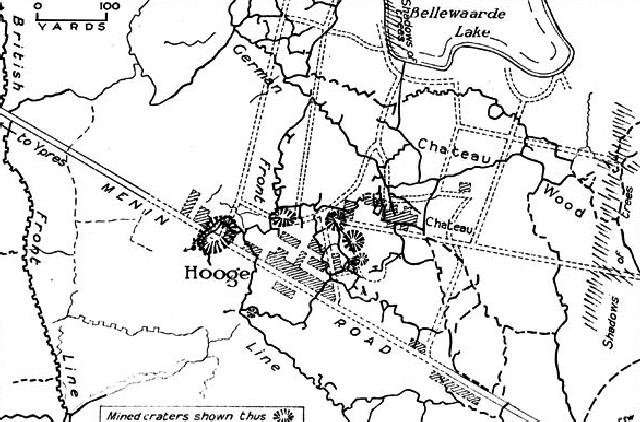
Menin Road, the first operation of the Third Battle of Ypres in which Australians took part, was fought on 20 September 1917. In preparation for this attack, the 1st and 2nd Australian divisions took over a portion of the front-line east of the town, on the main ridge at Glencorse Wood and a spur just north of there called Westhoek Ridge. I Anzac Corps formed the left flank of the Second Army for this attack, while north of the Australians would be three divisions of the Fifth Army-thus making for an attack frontage of thirteen kilometres.


Map detailing the area of action.


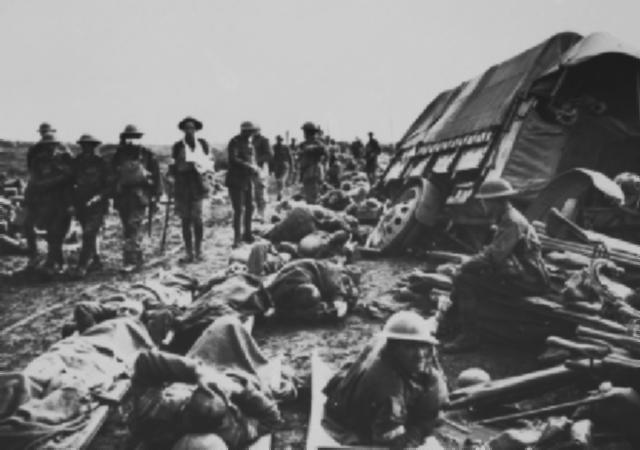
Following an intense artillery barrage, the two Australian divisions advanced at 5.40 a.m., the first time two AIF formations had attacked side by side. Moving in two bounds with a one-hour and a two-hour pause in between, they covered the 1,500 metres to their final objective and were able to secure this with minimal interference from the enemy, who were unable to deliver counter-attacks because of the British standing barrage. Despite the effective cover thus provided the infantry, the troops still had much hard fighting against pillboxes and other strong points. Enemy artillery fire was also brought to bear, and at one stage the Australians were accidentally hit by their own guns. While this battle proved the worth of step-by-step tactics, the two AIF divisions still sustained 5,013 casualties and the total British loss was between 20,000 - 27,000 men. The Germans had suffered to about an equal extent, but whereas the attackers were elated the effect on the enemy was practically crushing.


Frank Hurley's photograph of the wounded on 20 September 1917 at Menin Road, Belgium.


Extracted from the book produced by Chris Coulthard-Clark, Where Australians Fought - The Encyclopaedia of Australia's Battles, Allen and Unwin, Sydney, 1998, p. 130.


Additional References cited by Chris Coulthard-Clark:

C.E.W. Bean, (1933), The Australian Imperial Force in France 1917,  Sydney: Angus & Robertson.

P.A. Pedersen, (1985), Monash as Military Commander, Carlton, Vic.: Melbourne University Press.


Further Reading:

The Battle of Menin Road, Belgium, 20 September 1917

The Battle of Menin Road, Belgium, 20 September 1917, Roll of Honour

Battles of the Western Front

Battles where Australians fought, 1899-1920


Citation: The Battle of Menin Road, Belgium, 20 September 1917, Outline

Posted by Project Leader at 12:01 AM EADT
Updated: Monday, 20 September 2010 10:18 AM EADT
The Battle of Nablus, Palestine, 20 September 1918, Outline
Topic: BatzP - Nablus

The Battle of Nablus

Palestine, 20 September 1918

Outline


Nablus, the action following the British breakthrough at Sharon (see Megiddo) on 19 September 1918 which saw the Turkish Seventh Army under Mustafa Kemal (later known as Kemal Attatürk) put to flight and forced to male a hasty and costly retreat north-east across the Jordan. After creating the gap in the Turkish defences on the coastal plain for the cavalry to pass through, the British 21st Corps wheeled north-east towards the hills to attack Tul Keram which contained the headquarters of the already overwhelmed Turkish Eighth Army. The left flank of this advance was protected and pressed ahead by the 5th Light Horse Brigade under Brig.-General George Macarthur-Onslow. Passing north of the town, the task of cleaning out the pockets of resistance was left to the infantry and the light horsemen concentrated on the column of Turks fleeing east along the road to Anebta and Nablus. By 6 p.m. the Australians had captured 2,000 prisoners and fifteen guns.

Moving during the early hours of 20 September, Macarthur-Onslow's brigade pressed on across the trackless hills northeast of Tul Keram. The purpose was to reach Ajjeh, a point on the railway line running north to Jenin, and to destroy the track to cut off this avenue of escape for Turks in the area around Samaria and Nablus. By 7 a.m. the leading Australian elements had achieved this objective. After re-assembling at Tul Keram, the 5th Brigade was ordered to resume an easterly advance the next morning down the road from Anebta towards Nablus. Troops from several British infantry divisions were already moving up against these places from the south, so that the route of the Australian horsemen effectively brought them in upon the enemy rear. Enemy resistance - already weakened by masses of troops in disorganised flight - quickly began to collapse in the face of this vice-like movement, so that by nightfall the Seventh Army was in full retreat.


Extracted from the book produced by Chris Coulthard-Clark, Where Australians Fought - The Encyclopaedia of Australia's Battles, Allen and Unwin, Sydney, 1998, pp. 159-160.


Additional References cited by Chris Coulthard-Clark:

H.S. Gullett (1944) The Australian Imperial Force in Sinai and Palestine, Sydney: Angus & Robertson.


Further Reading:

The Battle of Nablus, Palestine, 20 September 1918

The Battle of Nablus, Palestine, 20 September 1918, Roll of Honour

Battles where Australians fought, 1899-1920


Citation: The Battle of Nablus, Palestine, 20 September 1918, Outline

Posted by Project Leader at 12:01 AM EADT
Updated: Monday, 20 September 2010 10:28 AM EADT
The Battle of Megiddo, Palestine, 19-21 September 1918, Contents
Topic: BatzP - Megiddo

The Battle of Megiddo

Palestine, 19 - 21 September 1918

Contents


Items

Outline

The Battle of Megiddo, Palestine, 19-21 September 1918, Outline


Roll of Honour

The Battle of Megiddo, Palestine, 19-21 September 1918, Roll of Honour 

Lest We Forget


Further Reading:

The Battle of Megiddo, Palestine, 19-21 September 1918

The Battle of Megiddo, Palestine, 19-21 September 1918, Roll of Honour

Battles where Australians fought, 1899-1920


Citation: The Battle of Megiddo, Palestine, 19-21 September 1918, Contents

Posted by Project Leader at 12:01 AM EADT
Updated: Monday, 20 September 2010 10:44 AM EADT
Saturday, 18 September 2010
The Battle of Megiddo, Palestine, 19-21 September 1918, Outline
Topic: BatzP - Megiddo

The Battle of Megiddo

Palestine, 19 - 21 September 1918

Outline


Megiddo, the name given to the great northern cavalry drive which split apart the Turkish defence of Palestine on 19-21 September 1918 and brought the war in the Near East to an end five weeks later. After encouraging the Turks to believe that his next offensive would take place inland, along the section of battlefront facing the Jordan River, the British commander-in-chief, General Sir Edmund Allenby, took the enemy by surprise by launching his main assault on the coastal Plain of Sharon. To this end he had secretly moved the Desert Mounted Corps (4th and 5th divisions of Indian cavalry plus Australian Mounted Division), under the command of Lieut.-General Sir Harry Chauvel, from the Jordan Valley into olive and orange groves near modern Tel Aviv in readiness to exploit the anticipated breakthrough. To conceal their departure from their former base areas, elaborate deception measures were taken.

Before the 383 gun cannonade and infantry assault at dawn on 19 September, British and Australian aircraft had also bombed out key Turkish communications centres. This ensured that large sections of the enemy line remained unaware when Chauvel's corps passed through the gap created on the Mediterranean flank at 9 a.m. on the 19th and immediately began sweeping north and north-east, aiming to get astride the enemy's vital routes for supply and reinforcement (and withdrawal). Many units were taken completely by surprise when Chauvel's horsemen appeared in rear of their positions, and within 24 hours the cavalry's advance had carried it 50 - 65 kilometres into the Turks' rear. The Turkish Eighth Army had effectively ceased to exist, and the Seventh Army next in line on its left flank was reeling back and attempting to escape impending catastrophe by getting away across the Jordan to join the demoralised but still largely intact Fourth Army.

After crossing the Carmel Range, by dawn on the 20th Chauvel's troops had reached Lejjun near the ancient fortress of Megiddo, on the edge of the plain of Esdraelon (the Armageddon of the Old Testament). While part of the 5th Division made for Haifa, the rest swung east and that evening had reached Nazareth. Here they almost captured Field Marshal Liman von Sanders, the German who had taken over supreme command in Palestine in February, but a spirited resistance by his headquarters staff enabled him to escape along the road to Tiberias. Meanwhile the 4th Division, which had also swung east, made for Beisan - the seizure of which cut the main Turkish line of communications across the Jordan. The Australian Mounted Division, moving as corps reserve during the drive up the coast, was now swung south-east towards Jenin with the aim of blocking the main escape route as the enemy's centre attempted to fall back from the disaster inflicted at Sharon. The 3rd Light Horse Brigade (under Brig. General Lachlan Wilson) was in Jenin by the evening of the 20th and by next morning had taken 8,000 prisoners. Other actions which also flowed from Sharon are Nablus, Wady Fara and (Second) Amman (q.v).


Extracted from the book produced by Chris Coulthard-Clark, Where Australians Fought - The Encyclopaedia of Australia's Battles, Allen and Unwin, Sydney, 1998, pp. 158-159.


Additional References cited by Chris Coulthard-Clark:

H.S. Gullett (1944) The Australian Imperial Force in Sinai and Palestine, Sydney: Angus & Robertson.


Further Reading:

The Battle of Megiddo, Palestine, 19-21 September 1918

The Battle of Megiddo, Palestine, 19-21 September 1918, Roll of Honour

Battles where Australians fought, 1899-1920


Citation: The Battle of Megiddo, Palestine, 19-21 September 1918, Outline

Posted by Project Leader at 12:01 AM EADT
Updated: Monday, 20 September 2010 10:51 AM EADT
Sunday, 12 September 2010
The Battle of Bitapaka, New Guinea, 11 September 1914, Contents
Topic: BatzNG - Bitapaka

The Battle of Bitapaka

New Guinea, 11 September 1914

Contents


Items

Outline

The Battle of Bitapaka, New Guinea, 11 September 1914, Outline


History

Official Australian War History, Volume 10

Mackenzie Account


Military Journal, January 1915

Military Journal January 1915 Account


Burnell's Photographic Essay, 1914

Burnell's Photographic Essay, 1914, Part 1

Burnell's Photographic Essay, 1914, Part 2

Burnell's Photographic Essay, 1914, Part 3

Burnell's Photographic Essay, 1914, Part 4


War Crimes

Flogging Germans, New Guinea, 30 November 1914 


Roll of Honour

The Battle of Bitapaka, New Guinea, 11 September 1914, Allied Forces, Roll of Honour 

Lest we forget


Further Reading:

The Battle of Bitapaka, New Guinea, 11 September 1914

The Battle of Bitapaka, New Guinea, 11 September 1914, Allied Forces, Roll of Honour 

Battles where Australians fought, 1899-1920


Citation: The Battle of Bitapaka, New Guinea, 11 September 1914, Contents


Posted by Project Leader at 12:01 AM EADT
Updated: Friday, 4 February 2011 6:11 AM EAST

Newer | Latest | Older

Full Site Index


powered by FreeFind
Let us hear your story: You can tell your story, make a comment or ask for help on our forum.

Desert Column Forum

A note on copyright

The Australian Light Horse Studies Centre is a not for profit and non profit group whose sole aim is to write the early history of the Australian Light Horse from 1900 - 1920. It is privately funded and the information is provided by the individuals within the group and while permission for the use of the material has been given for this site for these items by various donors, the residual and actual copyright for these items, should there be any, resides exclusively with the donors. The information on this site is freely available for private research use only and if used as such, should be appropriately acknowledged. To assist in this process, each item has a citation attached at the bottom for referencing purposes.

Please Note: No express or implied permission is given for commercial use of the information contained within this site.

A note to copyright holders

The Australian Light Horse Studies Centre has made every endeavour to contact copyright holders of material digitised for this blog and website and where appropriate, permission is still being sought for these items. Where replies were not received, or where the copyright owner has not been able to be traced, or where the permission is still being sought, the Australian Light Horse Studies Centre has decided, in good faith, to proceed with digitisation and publication. Australian Light Horse Studies Centre would be happy to hear from copyright owners at any time to discuss usage of this item.

Contact

Australian Light Horse Studies Centre

eXTReMe Tracker