Topic: BatzP - JB Yakub
The Battle of Jisr Benat Yakub
Palestine, 27 September 1918
Outline

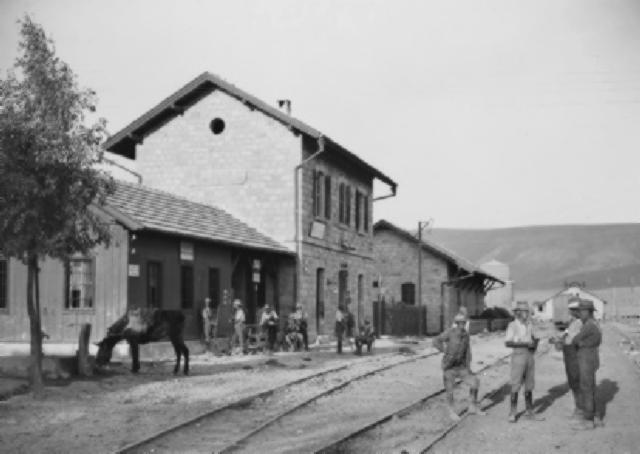
Jisr Benat Yakub (The Bridge of Jacob's Daughters)
The Battle of Jisr Benat Yakub (The Bridge of Jacob's Daughters)
Shortly after midnight orders were received that Division would move at 0600 with the object of relieving Damascus on the 29th September 1918. At 0730, 3rd Light Horse Brigade moved off, following 5th Light Horse Brigade as far as Rosh Pina, after which the 3rd Light Horse Brigade, with 9th Light Horse Regiment - Regiment and six machine guns as advance guard, took the lead. It had been reported that the Jordan River bridge at Jisr Benat Yakub had been blown up. Orders had therefore been given for the squadron 9th Light Horse Regiment at Rosa Pina to push forward at dawn and reconnoitre the fords as far as Lake Huleh. The 3rd Field Troop were pushed on ahead to collect material and repair the bridges.
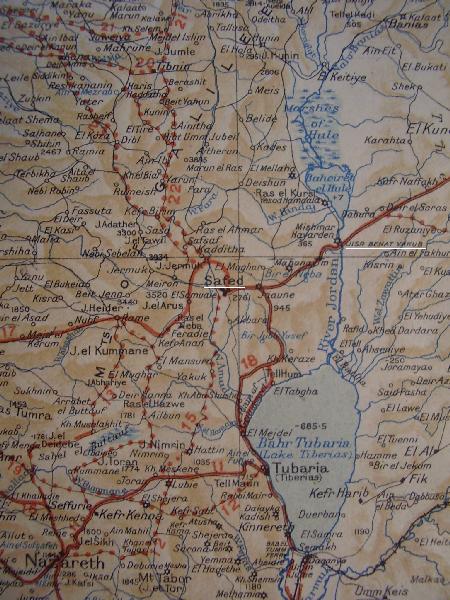
Map illustrating the region around Jisr Benat Yakub
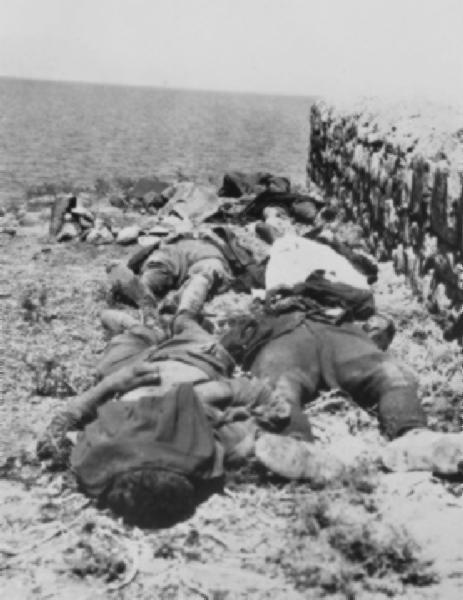
Our orders were to reach the high ground overlooking Kuneitra before dark. At 0030 while on the march a message was received from advanced squadron, 9th Light Horse Regiment that the enemy were holding Jisr Benat Yakub and the Jordan River crossings with machine guns and at least one field gun and were entrenching. Aeroplane reconnaissance confirmed this - the total enemy force facing was estimated at 600 - 800. The Division halted at Rosh Pina, the balance of the 9th Light Horse Regiment with Notts Battery, Royal Horse Artillery being sent on to clear up the situation. It soon became apparent that the enemy were determined to vigorously dispute the crossing of the river. Hannaford, Lieutenant E, reported a crossing not held by the enemy about two miles south of the bridge, at El Min. The enemy no doubt recognised that every hour he could hold the Division it was of vital importance. His 4th Army was now in full retreat from Deraa towards Damascus. He no doubt hoped that if those 20,000 fugitive's could get a little rest at Damascus, he could organise a defence of that place against our purely cavalry force. It was imperative that they should not get that rest and chance to reorganise. The Divisional Commander therefore decided on an immediate general attack. The 5th Light Horse Brigade were to cross the river to the south of Jisr Benat Yakub bridge at El Min and work round the enemy's flank while the 3rd Light Horse Brigade were to engage the enemy in front, and if possible gain round his right flank by crossing immediately south of Lake Huleh. The 9th Light Horse Regiment moved and engaged the enemy between the lake and the bridge, pinning him to his ground and forcing him to disclose his dispositions and strength. The Notts Battery early in the fight silenced the enemy guns, obtaining a direct hit upon one of them, and effectively kept down the fire of enemy machine guns which had been located by the 9th Light Horse Regiment. The 3rd Machine Gun Squadron took up positions along the western bank from which effective covering fire could be given to troops crossing the river. Vigorous reconnaissances under heavy rifle and machine gun fire for a crossing of the river was carried out by the 10th Light Horse Regiment, and a ford was located half a mile south of the southern end of the lake. 8th Light Horse Regiment were sent to join the 9th Light Horse Regiment, the plan being for the 8th and 9th Light Horse Regiments 3rd Machine Gun Squadron and Notts Battery, Royal Horse Artillery to give covering fire while 10th Light Horse Regiment crossed. After this Regiment had established itself on the eastern bank, the remainder of the Brigade would cross. It was expected that the operation would be facilitated by the fact that the 5th Light Horse Brigade at 1630 were reported to be crossing the river at El Min without opposition and would therefore soon make themselves felt on the enemy's flank. It turned out, however, that the country to the east of the 5th Light Horse Brigade crossing place was so rough that they were unable to get on to the main road until after daylight next morning. Up to 1700 the enemy hung on to his positions with determination, at times developing considerable rifle and machine gun fire, causing us a few casualties. By 1730 all covering troops were in position and the 10th Light Horse Regiment moved forward to cross at the ford previously located under heavy covering fire from the remainder of the Brigade. The water was about 2'6" in depth. The 10th Light Horse Regiment were all across by 1915 and were followed at once by the 8th Light Horse Regiment. These two Regiments were directed to make for Deir es Sarass, the 10th Light Horse Regiment detaching “B” Squadron to move south along the river to clear up any enemy still in position. This squadron encountered a party of enemy in the dark who opened fire at a few yards range causing casualties. Without hesitation the leading troop under Macnee, Lieutenant MH, flung themselves off their horses - it was too rough to charge mounted - and with fixed bayonets rushed the flashes. A sharp fight took place and for a time the enemy fought with great determination inflicting several casualties on us. The balance of the squadron soon supported the leading troop and the enemy surrendered. The post included twelve Germans, 41 Turks, one field gun and one machine gun, and one motor lorry.
During these operations it was apparent that the enemy were extensively using motor lorries as a means of withdrawing the troops, comprising their rear guard on this sector. In the morning a large, number of these had been seen moving down to the river positions. Similar tactics were two days later adopted by them at Sasa.
Extracted from the 3rd Light Horse Brigade War Diary.
Further Reading:
The Battle of Jisr Benat Yakub, Palestine, 27 September 1918
The Battle of Jisr Benat Yakub, Palestine, 27 September 1918, Roll of Honour
Battles where Australians fought, 1899-1920
Citation: The Battle of Jisr Benat Yakub, Palestine, 27 September 1918, Outline