« September 2010 »
S M T W T F S
1 2 3 4
5 6 7 8 9 10 11
12 13 14 15 16 17 18
19 20 21 22 23 24 25
26 27 28 29 30
You are not logged in. Log in


Search the site:


powered by FreeFind
Volunteer with us.

Entries by Topic All topics  
A Latest Site News
A - Using the Site
AAA Volunteers
AAB-Education Centre
AAC-Film Clips
AAC-Photo Albums
AIF & MEF & EEF
AIF - Lighthorse
AIF - ALH - A to Z
AIF - DMC
AIF - DMC - Or Bat
AIF - DMC - Anzac MD
AIF - DMC - Aus MD
AIF - DMC - British
AIF - DMC - BWI
AIF - DMC - French
AIF - DMC - Indian
AIF - DMC - Italian
AIF - DMC - Medical
AIF - DMC - Remounts
AIF - DMC - Scouts
AIF - DMC - Sigs
AIF - DMC - Sigs AirlnS
AIF - DMC - 1 Sig Sqn
AIF - DMC - 2 Sig Sqn
AIF - DMC - Eng
AIF - DMC - Eng 1FSE
AIF - DMC - Eng 2FSE
AIF - DMC - GSR
AIF - 1B - 1 LHB
AIF - 1B - 6 MVS
AIF - 1B - 1 LHMGS
AIF - 1B - 1 Sig Trp
AIF - 1B - 1 LHFA
AIF - 1B - 1 LHR
AIF - 1B - 2 LHR
AIF - 1B - 3 LHR
AIF - 2B - 2 LHB
AIF - 2B - 7 MVS
AIF - 2B - 2 LHFA
AIF - 2B - 2 LHMGS
AIF - 2B - 2 Sig Trp
AIF - 2B - 5 LHR
AIF - 2B - 6 LHR
AIF - 2B - 7 LHR
AIF - 3B - 3 LHB
AIF - 3B - 8 MVS
AIF - 3B - 3 LHB Sigs
AIF - 3B - 3 LHFA
AIF - 3B - 3 LHMGS
AIF - 3B - 3 Sig Trp
AIF - 3B - 8 LHR
AIF - 3B - 9 LHR
AIF - 3B - 10 LHR
AIF - 4B - 4 LHB
AIF - 4B - 4 Sig Trp
AIF - 4B - 9 MVS
AIF - 4B - 4 LHFA
AIF - 4B - 4 LHMGS
AIF - 4B - 4 LHR
AIF - 4B - 11 LHR
AIF - 4B - 12 LHR
AIF - 5B - 5 LHB
AIF - 5B - 10 MVS
AIF - 5B - 5 LHFA
AIF - 5B - 5 Sig Trp
AIF - 5B - ICC
AIF - 5B - 14 LHR
AIF - 5B - 15 LHR
AIF - 5B - 1er Regt
AIF - 5B - 2 NZMGS
AIF - AASC
AIF - Aboriginal LH
AIF - Badges
AIF - Cars
AIF - Chinese LH
AIF - Double Sqns
AIF - Engineers
AIF - Fr - 22 Corps
AIF - Fr - 13 LHR
AIF - Honour Roll
AIF - HQ - 3rd Echelon
AIF - Marching Songs
AIF - Misc Topics
AIF - NZMRB
AIF - NZMRB - AMR
AIF - NZMRB - CMR
AIF - NZMRB - EFT
AIF - NZMRB - NZMFA
AIF - NZMRB - NZMGS
AIF - NZMRB - OMR
AIF - NZMRB - Sig-Trp
AIF - NZMRB - WMR
AIF - Ships
AIF - Ships - Encountr
AIF - Ships - Una
AIF - WFF
AIF - Wireless Sqn
Battles
BatzA - Australia
BatzA - Broken Hill
BatzA - Liverpool
BatzA - Merivale
BatzB - Boer War
BatzB - Bakenlaagte
BatzB - Belmont
BatzB - Bothaville
BatzB - Buffels Hoek
BatzB - Coetzees Drift
BatzB - Diamond Hill
BatzB - Driefontein
BatzB - Elands
BatzB - Graspan
BatzB - Grobelaar
BatzB - Grootvallier
BatzB - Hartebestfontn
BatzB - Houtnek
BatzB - Karee Siding
BatzB - Kimberley
BatzB - Koster River
BatzB - Leeuw Kop
BatzB - Mafeking
BatzB - Magersfontein
BatzB - Modder River
BatzB - Onverwacht
BatzB - Paardeberg
BatzB - Palmietfontein
BatzB - Pink Hill
BatzB - Poplar Grove
BatzB - Rhenoster
BatzB - Sannahs Post
BatzB - Slingersfontn
BatzB - Stinkhoutbm
BatzB - Sunnyside
BatzB - Wilmansrust
BatzB - Wolvekuil
BatzB - Zand River
BatzG - Gallipoli
BatzG - Anzac
BatzG - Aug 1915
BatzG - Baby 700
BatzG - Evacuation
BatzG - Hill 60
BatzG - Hill 971
BatzG - Krithia
BatzG - Lone Pine
BatzG - Nek
BatzJ - Jordan Valley
BatzJ - 1st Amman
BatzJ - 2nd Amman
BatzJ - Abu Tellul
BatzJ - Es Salt
BatzJ - JV Maps
BatzJ - Ziza
BatzM - Mespot
BatzM - Baghdad
BatzM - Ctesiphon
BatzM - Daur
BatzM - Kurna
BatzM - Kut el Amara
BatzM - Ramadi
BatzN - Naval
BatzN - AE1
BatzN - Cocos Is
BatzN - Heligoland
BatzN - Marmara
BatzN - Zeebrugge
BatzN - Zeppelin L43
BatzNG - Bitapaka
BatzO - Other
BatzO - Baku
BatzO - Egypt 1919
BatzO - Emptsa
BatzO - Karawaran
BatzO - Peitang
BatzO - Wassa
BatzP - Palestine
BatzP - 1st Gaza
BatzP - 2nd Gaza
BatzP - 3rd Gaza
BatzP - Aleppo
BatzP - Amwas
BatzP - Ayun Kara
BatzP - Bald Hill
BatzP - Balin
BatzP - Beersheba
BatzP - Berkusieh
BatzP - Damascus
BatzP - El Auja
BatzP - El Buggar
BatzP - El Burj
BatzP - Haifa
BatzP - Huj
BatzP - JB Yakub
BatzP - Kaukab
BatzP - Khan Kusseir
BatzP - Khuweilfe
BatzP - Kuneitra
BatzP - Megiddo
BatzP - Nablus
BatzP - Rafa
BatzP - Sasa
BatzP - Semakh
BatzP - Sheria
BatzP - Surafend
BatzP - Wadi Fara
BatzS - Sinai
BatzS - Bir el Abd
BatzS - El Arish
BatzS - El Mazar
BatzS - El Qatiya
BatzS - Jifjafa
BatzS - Magdhaba
BatzS - Maghara
BatzS - Romani
BatzS - Suez 1915
BatzSe - Senussi
BatzWF - Westn Front
BW - Boer War
BW - NSW
BW - NSW - 1ACH
BW - NSW - 1NSWMR
BW - NSW - 2NSWMR
BW - NSW - 3ACH
BW - NSW - 3NSWIB
BW - NSW - 3NSWMR
BW - NSW - 5ACH
BW - NSW - A Bty RAA
BW - NSW - AAMC
BW - NSW - Aust H
BW - NSW - Lancers
BW - NSW - NSW Inf
BW - NSW - NSWCBC
BW - NSW - NSWIB
BW - NSW - NSWMR_A
BW - NZ
BW - Qld
BW - Qld - 1ACH
BW - Qld - 1QMI
BW - Qld - 2QMI
BW - Qld - 3ACH
BW - Qld - 3QMI
BW - Qld - 4QIB
BW - Qld - 5QIB
BW - Qld - 6QIB
BW - Qld - 7ACH
BW - QLD - AAMC
BW - SA
BW - SA - 1SAMR
BW - SA - 2ACH
BW - SA - 2SAMR
BW - SA - 3SACB
BW - SA - 4ACH
BW - SA - 4SAIB
BW - SA - 5SAIB
BW - SA - 6SAIB
BW - SA - 8ACH
BW - SA - AAMC
BW - Tas
BW - Tas - 1ACH
BW - Tas - 1TIB
BW - Tas - 1TMI
BW - Tas - 2TB
BW - Tas - 2TIB
BW - Tas - 3ACH
BW - Tas - 8ACH
BW - Vic
BW - Vic - 1VMI
BW - Vic - 2ACH
BW - Vic - 2VMR
BW - Vic - 3VB
BW - Vic - 4ACH
BW - Vic - 4VIB
BW - Vic - 5VMR
BW - Vic - 6ACH
BW - Vic - AAMC
BW - Vic - Scot H
BW - WA
BW - WA - 1WAMI
BW - WA - 2ACH
BW - WA - 2WAMI
BW - WA - 3WAB
BW - WA - 4ACH
BW - WA - 4WAMI
BW - WA - 5WAMI
BW - WA - 6WAMI
BW - WA - 8ACH
BW Gen - Campaign
BW Gen - Soldiers
BW General
Cavalry - General
Diary - Schramm
Egypt - Heliopolis
Egypt - Mena
Gen - Ataturk Pk, CNB
Gen - Australia
Gen - Legends
Gen - Query Club
Gen - St - NSW
Gen - St - Qld
Gen - St - SA
Gen - St - Tas
Gen - St - Vic
Gen - St - WA
Gm - German Items
Gm - Bk - 605 MGC
GW - 11 Nov 1918
GW - Atrocities
GW - August 1914
GW - Biographies
GW - Propaganda
GW - Spies
GW - We forgot
Militia 1899-1920
Militia - Area Officers
Militia - Inf - Infantry
Militia - Inf - 1IB
Militia - Inf - 2IB
Militia - Inf - 3IB
Militia - Inf - NSW
Militia - Inf - Qld
Militia - Inf - SA
Militia - Inf - Tas
Militia - Inf - Vic
Militia - Inf - WA
Militia - K.E.Horse
Militia - LH
Militia - LH - Regts
Militia - LH - 1LHB
Militia - LH - 2LHB
Militia - LH - 3LHB
Militia - LH - 4LHB
Militia - LH - 5LHB
Militia - LH - 6LHB
Militia - LHN - NSW
Militia - LHN - 1/7/1
Militia - LHN - 2/9/6
Militia - LHN - 3/11/7
Militia - LHN - 4/6/16
Militia - LHN - 5/4/15
Militia - LHN - 6/5/12
Militia - LHN - 28
Militia - LHQ - Qld
Militia - LHQ - 13/2
Militia - LHQ - 14/3/11
Militia - LHQ - 15/1/5
Militia - LHQ - 27/14
Militia - LHS - SA
Militia - LHS - 16/22/3
Militia - LHS - 17/23/18
Militia - LHS - 24/9
Militia - LHT - Tas
Militia - LHT - 12/26
Militia - LHV - Vic
Militia - LHV - 7/15/20
Militia - LHV - 8/16/8
Militia - LHV - 9/19
Militia - LHV - 10/13
Militia - LHV - 11/20/4
Militia - LHV - 19/17
Militia - LHV - 29
Militia - LHW - WA
Militia - LHW-18/25/10
Militia - Military Orders
Militia - Misc
MilitiaRC - Rifle Clubs
MilitiaRC - NSW
MilitiaRC - NT
MilitiaRC - Qld
MilitiaRC - SA
MilitiaRC - Tas
MilitiaRC - Vic
MilitiaRC - WA
Militiaz - New Zealand
Tk - Turkish Items
Tk - Army
Tk - Bks - Books
Tk - Bks - 1/33IR
Tk - Bks - 27th IR
Tk - Bks - Air Force
Tk - Bks - Yildirim
Tk - POWs
Wp - Weapons
Wp - Hotchkiss Cav
Wp - Hotchkiss PMG
Blog Tools
Edit your Blog
Build a Blog
RSS Feed
View Profile
Open Community
Post to this Blog
Site Index
Education Centre
LH Militia
Boer War
Transport Ships
LH Battles
ALH - Units
ALH - General
Aboriginal Light H
Weapons
Ottoman Sources

"At a mile distant their thousand hooves were stuttering thunder, coming at a rate that frightened a man - they were an awe inspiring sight, galloping through the red haze - knee to knee and horse to horse - the dying sun glinting on bayonet points..." Trooper Ion Idriess

The Australian Light Horse Studies Centre aims to present an accurate history as chroniclers of early Australian military developments from 1899 to 1920.

The Australian Light Horse Studies Centre site holds over 12,000 entries and is growing daily.

Contact: Australian Light Horse Studies Centre

Let us hear your story: You can tell your story, make a comment or ask for help on our Australian Light Horse Studies Centre Forum called:

Desert Column Forum

WARNING: This site contains: names, information and images of deceased people; and, language which may be considered inappropriate today.

Wednesday, 29 September 2010
The Battle of St Quentin Canal, France, 29 September - 1 October 1918, Contents
Topic: BatzWF - Westn Front

The Battle of St Quentin Canal

France, 29 September - 1 October 1918

Contents


Items

Outline

The Battle of St Quentin Canal, France, 29 September - 1 October 1918, Outline


Roll of Honour 

The Battle of St Quentin Canal, France, 29 September - 1 October 1918, Roll of Honour

Lest We Forget


Further Reading:

The Battle of St Quentin Canal, France, 29 September - 1 October 1918

The Battle of St Quentin Canal, France, 29 September - 1 October 1918, Roll of Honour

Western Front Battles

Battles where Australians fought, 1899-1920


Citation: The Battle of St Quentin Canal, France, 29 September - 1 October 1918, Contents

Posted by Project Leader at 3:02 PM EADT
Updated: Wednesday, 29 September 2010 3:22 PM EADT
The Battle of Kaukab, Palestine, 30 September 1918, Outline
Topic: BatzP - Kaukab

The Battle of Kaukab

Palestine, 30 September 1918

Outline


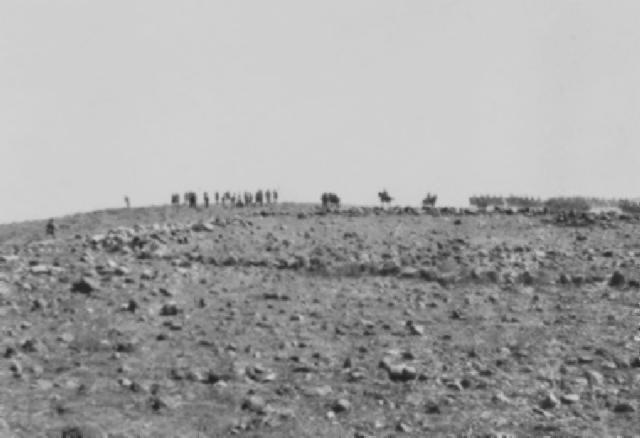
The 4th Australian Light Horse Regiment in cavalry formation moving up to the attack on the enemy's position at Kaukab.


Kaukab, an action fought on 30 September 1918 about sixteen kilometres south-west of Damascus, brought about when a Turkish column attempted to block the advance by leading elements of the Australian Mounted Division (Major-General Henry Hodgson) towards the city. The Turks, numbering several thousand, were themselves falling back north-east on Damascus, but when they sighted the 4th Australian Light Horse Brigade (Colonel Murray Bourchier) they moved across its path and took up position along a ridge with the clear intention of making a stand. Hodgson ordered Bourchier's 4th and 12th regiments to prepare to charge with the sword across the two kilometre wide stony valley separating the two forces, while the 5th Light Horse Brigade (Brig. General George Macarthur-Onslow) - ignoring the enemy's line-pushed past the western flank and kept going.


Map of the Damascus region with Kaukab located at the bottom left (south west) side of Damascus.


Although their position was well covered by many machine-guns, the Turks had no guns with which to reply to the fire opened up on them by the British horse artillery in Hodgson's force. As the latter began bombarding the Turkish machine-gun posts over open sights, and with Macarthur-Onslow's brigade (French cavalry on distinctive grey horses being prominent) moving ominously in their rear, the Turks lost all heart for a fight. The Australians were expecting a hot reception by the time Bourchier finally gave the order to advance soon after 11 a.m., but in the event the action was bloodless. The German machine gunners abandoned their weapons without firing a shot at the charging lines of horsemen and joined in the general flight. Twelve machine-guns were thus captured, and 22 prisoners, for no loss to the attackers.


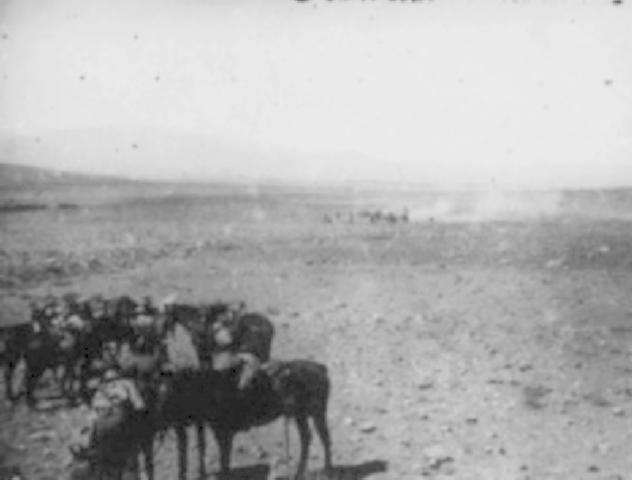
A battery of the Nottinghamshire Brigade (The Notts) in action at Kaukab.


Extracted from the book produced by Chris Coulthard-Clark, Where Australians Fought - The Encyclopaedia of Australia's Battles, Allen and Unwin, Sydney, 1998, pp. 164.


Additional References cited by Chris Coulthard-Clark:

H.S. Gullett (1944) The Australian Imperial Force in Sinai and Palestine, Sydney: Angus & Robertson.


Further Reading:

The Battle of Kaukab, Palestine, 30 September 1918

Battles where Australians fought, 1899-1920


Citation: The Battle of Kaukab, Palestine, 30 September 1918, Outline

Posted by Project Leader at 12:01 AM EADT
Updated: Thursday, 30 September 2010 4:32 PM EADT
Tuesday, 28 September 2010
The Battle of St Quentin Canal, France, 29 September - 1 October 1918, Outline
Topic: BatzWF - Westn Front

The Battle of St Quentin Canal

France, 29 September - 1 October 1918

Outline


The St. Quentin Canal from the air


St Quentin Canal, scene of an attack on 29 September-1 October 1918 by the Australian Corps commanded by Lieut.-General Sir John Monash, aimed at breaking through the main defence system of the Hindenburg Line. The German complex of trenches had been constructed mainly east of the St Quentin Canal (connecting the sources of the Somme and Scheldt rivers) to utilise that waterway as an additional obstacle to an attacker, except where the canal passed into a tunnel for nearly six kilometres through hills between Bellicourt and Venhuille; here it actually bulged west beyond the line followed by the canal underground. Monash was ordered to make his assault along this section of front, since the canal posed no obstacle at this point except that the tunnel possibly provided deep shelter for enemy reserves. The importance of this bridged approach was, however, obvious to the Germans and the defences of the area had been thickened accordingly.


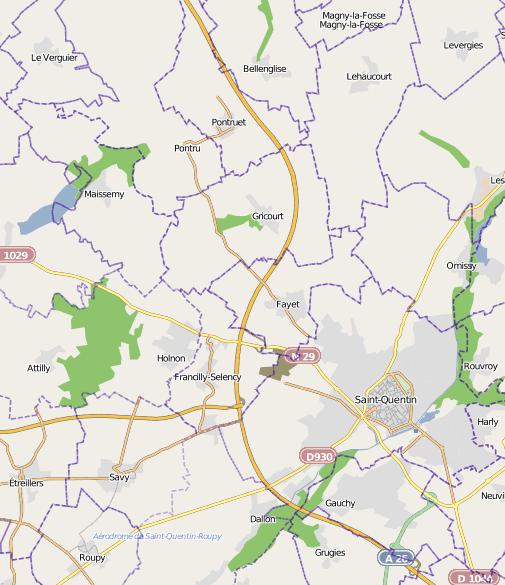
Map of the St. Quentin region.


With the divisions which had taken the Hindenburg Outpost Line (q.v.) now in need of rest, Monash found himself with only two divisions-the 3rd and 5th-in reasonable condition for combat. For the operation contemplated, therefore, the Australian Corps was reinforced by two American divisions-the 27th (New York) and 30th (Tennessee)-which took over the left and right sectors of the corps area. These formations contained as many as three times the number of infantry available in any of the Australian divisions at this time, but the troops were newly trained and lacked battle experience. To overcome this deficiency, the 1st and 4th divisions were each required to provide about 200 experienced officers and men for an advisory 'mission' to assist in preparing the Americans for the coming operation.


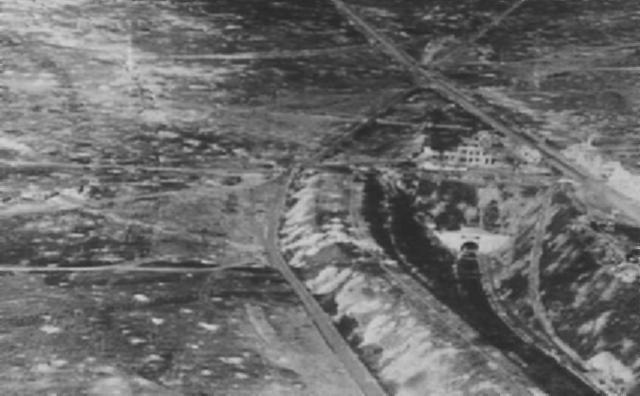
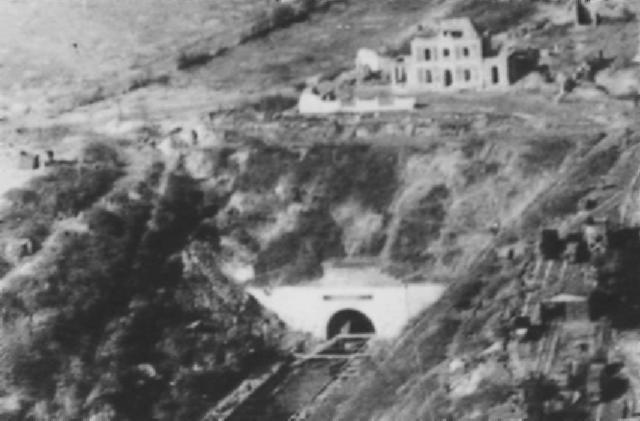
Close-up aerial view of the high ground above the St. Quentin Canal.


In the plan which Monash devised-as usual, elaborate but carefully constructed - he decided to utilise the Americans to attack the first objective, the main Hindenburg Line above the tunnel, and also the second line a kilometre or more behind that. lie would then pass through the two Australian divisions to carry on the assault for another four kilometres through the third and final objective, the Beaurevoir Line.

Since concealment of the point of attack was an impossibility, a two-day preliminary bombardment was settled upon. Apart from' smashing up the defences, this would use a consignment of 30,000 mustard-gas shells just arrived from English factories. Tanks would also he used in the attack; 60 supporting the Americans in the first phase, 30 with the Australians in the second.


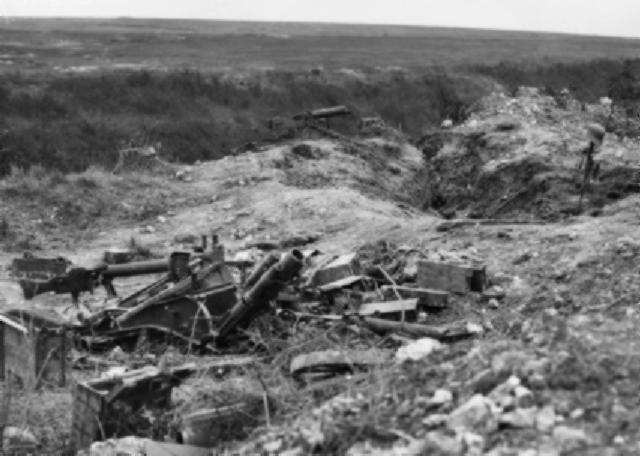
Captured German machine gun positions on the bank of the St Quentin Canal.


Monash's plan did not envisage flanking corps trying to cross the sections of canal on either flank, since he considered this likely to be too costly, but in the event Rawlinson directed that the British 9th Corps would make such an attempt at the Bellicourt end of the tunnel in the south. A major problem which quickly emerged was, however, the fact that the chosen start-line for the attack had not yet been secured, and would entail a separate preliminary operation to wrest control of the required ground from the enemy. This attack, launched at 5.30 a.m. on 27 September by a regiment of the 27th Division, failed-largely due to the Americans not heeding advice about clearing trenches and dugouts properly, and thus leaving significant pockets of Germans who emerged behind the attackers with machine guns.

The consequence of this botched attempt was that capture of the start-line became the first requirement of the main attack launched at 5.55 a.m. two days later. In the confusion of this advance, carried out amid thick mist made worse by smoke, the Americans were reported to be on their objective when they were not. The men of the 3rd Australian Division, going forward at 9 a.m. to begin the second phase, thus found themselves engaged in securing even the first phase objective. With all the tanks knocked out by mines and enemy fire, and use of artillery disallowed because of uncertainty concerning the positions actually reached and held by the Americans, the situation in the centre and left degenerated into a desperate struggle by small parties to overcome enemy strong points with Lewis guns and hand grenades. This fighting raged for the next three days on this part of the battlefront.

To the south matters had gone somewhat better. The 30th Division made good progress, thanks to the accuracy of the bombardment, and enabled the 5th Australian Division to pass through and capture Bellicourt village at the mouth of the canal. The situation to the north now placed this gain in peril, since German fire from this flank stopped any further movement forward. The battle might have lapsed into stalemate at this point, but for the astonishing achievement of the flanking British 9th Corps in getting across the canal and striking out halfway towards the Beaurevoir Line. This success threatened the Germans with being outflanked and forced their gradual withdrawal. The whole operation up to 2 October had cost the two Australian divisions involved 2,577 casualties, but the main Hindenburg Line had been breached.


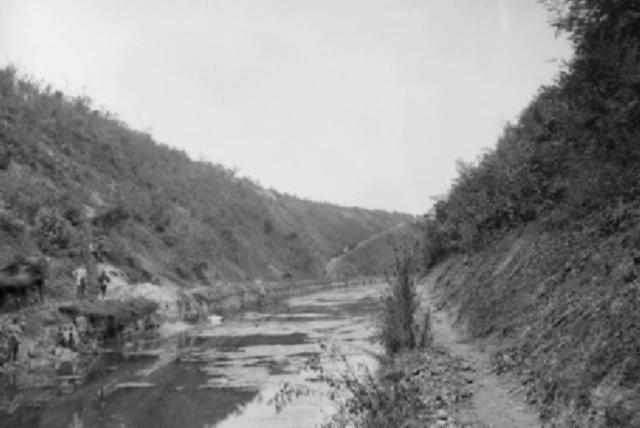
The steep, wooded banks of the St Quentin Canal, in the Hindenburg Main Line, looking towards Bellenglise from near Riqueval.


Extracted from the book produced by Chris Coulthard-Clark, Where Australians Fought - The Encyclopaedia of Australia's Battles, Allen and Unwin, Sydney, 1998, pp. 162-164.


Additional References cited by Chris Coulthard-Clark:

C.E.W. Bean (1937) The Australian Imperial Force in France during the Main German Offensive, 1918, Sydney: Angus & Robertson.


Further Reading:

The Battle of St Quentin Canal, France, 29 September - 1 October 1918

The Battle of St Quentin Canal, France, 29 September - 1 October 1918, Roll of Honour

Western Front Battles

Battles where Australians fought, 1899-1920


Citation: The Battle of St Quentin Canal, France, 29 September - 1 October 1918, Outline

Posted by Project Leader at 12:01 AM EADT
Updated: Wednesday, 29 September 2010 3:22 PM EADT
The Battle of Ramadi, Mesopotamia, 28 September 1918, Contents
Topic: BatzM - Ramadi

The Battle of Ramadi

Mesopotamia, 28 September 1917

Outline


Items

Outline

The Battle of Ramadi, Mesopotamia, 28 September 1918, Outline


Further Reading:

The Battle of Ramadi, Mesopotamia, 28 September 1918

Battles where Australians fought, 1899-1920


Citation: The Battle of Ramadi, Mesopotamia, 28 September 1918, Contents

Posted by Project Leader at 12:01 AM EADT
Updated: Wednesday, 29 September 2010 3:38 PM EADT
Monday, 27 September 2010
The Battle of Jisr Benat Yakub, Palestine, 27 September 1918, Contents
Topic: BatzP - JB Yakub

The Battle of Jisr Benat Yakub

Palestine, 27 September 1918

Contents


Items

Outline

The Battle of Jisr Benat Yakub, Palestine, 27 September 1918, Outline


Roll of Honour 

The Battle of Jisr Benat Yakub, Palestine, 27 September 1918, Roll of Honour

Lest We Forget


Further Reading:

The Battle of Jisr Benat Yakub, Palestine, 27 September 1918

The Battle of Jisr Benat Yakub, Palestine, 27 September 1918, Roll of Honour

Battles where Australians fought, 1899-1920


Citation: The Battle of Jisr Benat Yakub, Palestine, 27 September 1918, Contents

Posted by Project Leader at 12:01 AM EADT
Updated: Tuesday, 28 September 2010 11:23 AM EADT

Newer | Latest | Older

Full Site Index


powered by FreeFind
Let us hear your story: You can tell your story, make a comment or ask for help on our forum.

Desert Column Forum

A note on copyright

The Australian Light Horse Studies Centre is a not for profit and non profit group whose sole aim is to write the early history of the Australian Light Horse from 1900 - 1920. It is privately funded and the information is provided by the individuals within the group and while permission for the use of the material has been given for this site for these items by various donors, the residual and actual copyright for these items, should there be any, resides exclusively with the donors. The information on this site is freely available for private research use only and if used as such, should be appropriately acknowledged. To assist in this process, each item has a citation attached at the bottom for referencing purposes.

Please Note: No express or implied permission is given for commercial use of the information contained within this site.

A note to copyright holders

The Australian Light Horse Studies Centre has made every endeavour to contact copyright holders of material digitised for this blog and website and where appropriate, permission is still being sought for these items. Where replies were not received, or where the copyright owner has not been able to be traced, or where the permission is still being sought, the Australian Light Horse Studies Centre has decided, in good faith, to proceed with digitisation and publication. Australian Light Horse Studies Centre would be happy to hear from copyright owners at any time to discuss usage of this item.

Contact

Australian Light Horse Studies Centre

eXTReMe Tracker