"At a mile distant their thousand hooves were stuttering thunder, coming at a rate that frightened a man - they were an awe inspiring sight, galloping through the red haze - knee to knee and horse to horse - the dying sun glinting on bayonet points..." Trooper Ion Idriess
The Australian Light Horse Studies Centre aims to present an accurate history as chroniclers of early Australian military developments from 1899 to 1920.
The Australian Light Horse Studies Centre site holds over 12,000 entries and is growing daily.
Contact:Australian Light Horse Studies CentreLet us hear your story:
You can tell your story, make a comment or ask for help on our Australian Light Horse Studies Centre Forum called:
WARNING: This site contains: names, information and images of deceased people; and, language which may be considered inappropriate today.
Friday, 27 June 2008
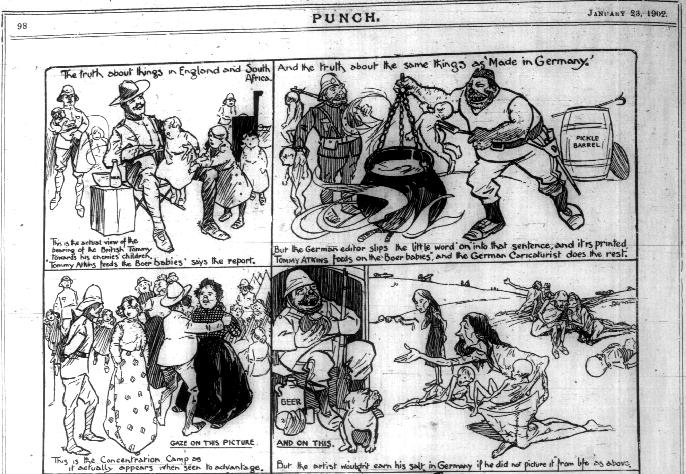
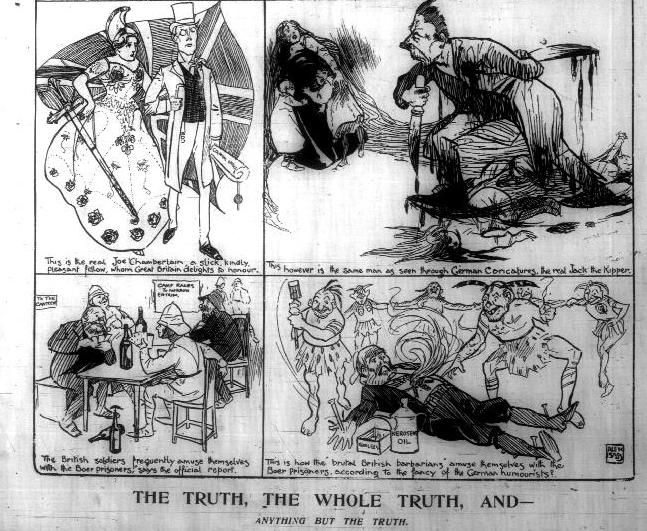
Australian Boer War Propaganda, Punch, 9 January 1902 Topic: GW - Propaganda
In an effort to disparage those who felt that the Boer War was somehow conducted criminally in terms of the concentration camps, the British tried to counter the stories with their varnished version of the truth. In a cartoon series, ironically titled "The Truth, The Whole Truth and anything but the truth" it aimed to present the German view next to the actual British view in an effort to demonstrate that the German propaganda was designed to denigrate the best efforts of the British in South Africa. Looking back on this cartoon series with the ability of hindsight, it is obvious that the presentation is risible at many levels. That it was required says a great deal about how the war was proceeding in South Africa. The distaste is evident thus requiring this type of response.
It would appear that the Melbourne Punch did not see any irony in their presentation of the "truth", something which lies somewhere in between the two extremes presented in this cartoon presentation.
The Great War, Propaganda, The use of women in Australian enlistment propaganda Topic: GW - Propaganda
The Great War
Propaganda
The use of women for enlistment propaganda
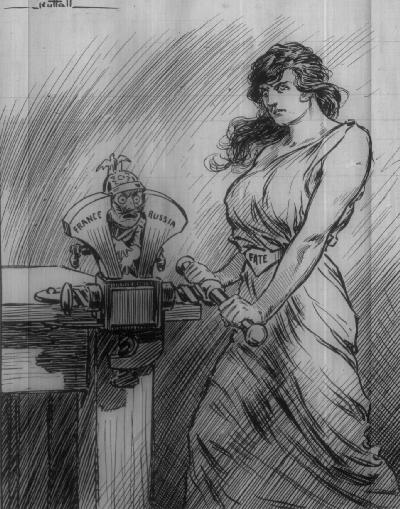
Women portrayed as "Fate"
[Melbourne Punch, 1 October 1914, p. 585.]
Boer War and Great War use of women in Australian enlistment propaganda
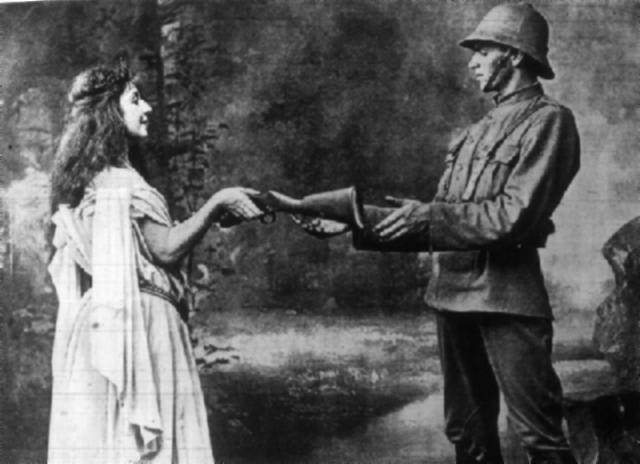
Each nation promoted the Boer War in their own way. Australia was no different. To entice young and single men to enlist into the mounted infantry for the near utopian emolument of half a crown per diem all found - 2/6d per day - or 17/6d per week, as a private. The re was an overseas allowance of 1/- per day making it a total of £1/4/6d per week in total, about 6/- below the ordinary labourer's pay. Quite unattractive for a single man in good steady employment. The first groups of men coming forward for service in South Africa were mainly poor and unemployed looking to get their first regular paid job. So to increase the pool of eligible candidates and get quality recruits, the best way was to tie an understated sexuality to the message. Below is a good example of an active piece of Boer War propaganda employing a woman to sell the war.
A nymph passing the rifle
[Sydney Mail, 3 March 1900, p. 503.]
This picture immediately jumps out as it oozes sexuality in every sense of the term. No skinny, anorexic, waif like, androgynous creature as seen today regaling the contemporary magazines. This is the 1900 version of a beauty - covered in the robes of a vestal virgin accentuating all her intimate curves, replete with aquiline nose - this young lass appears to be promising steamy romance to anyone in uniform who takes a rifle from her.
Of course, the mythology is redolant. We see a sylvanian nymph or a lady of the lake passing the new sword, Henry Martini, rather than Exculiver. Whatever the call, it is up to the individual to read the story.
Who could resist the call of this siren?
The war was initially popular and seen as a romp in the park. A few brave souls might be killed but many will return as heroes. The popularity of the war waned after the first year as it became bogged down in relentless police and counter insurgency work which was never glamorous. No gallant charges, just burning houses and rounding up women and children for transport to concentration camps. The war was then unpopular and disappeared from the newspapers. So cartoons were employed.
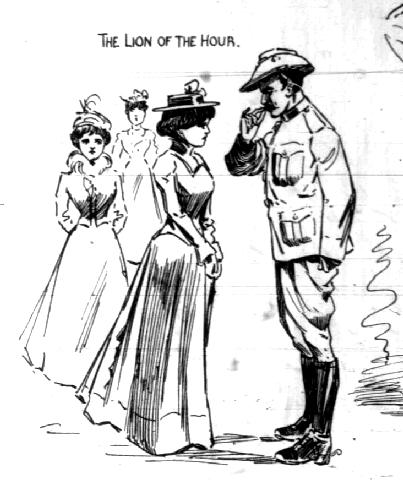
The Lion of the Hour
[Sydney Mail, 27 July 1901, p. 207.]
The Sydney Mail cartoon aimed to welcome home the returning men from the Imperial Bushman's Contingent. In so doing, it employed the alure of the uniform to young women. There was an impelling reason for this - a failed recruiting campaign. The Imperial Army had offered to pay 400 passages from Sydney in July. When the day arrived for the men to arrive, only 128 men actually turned up to accept a passage to South Africa.
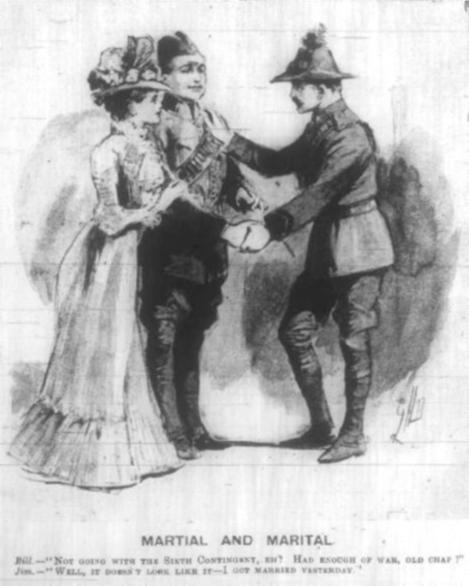
In Victoria, it more entertaining to lampoon the institution of marriage as a method of recruiting. Nice to have a woman but even nicer to be done with them.
Martial and Marital
[Melbourne Punch, 24 January 1901, p. 86.]
The overall impression was that the Boer War was a game for young men to enjoy. Women were a part of the winnings.
This popular perception can be seen at the beginning of the Great War. This theme of sirens to support the war effort came to the forefront. Two common two images promoted at the beginning of the Great War.
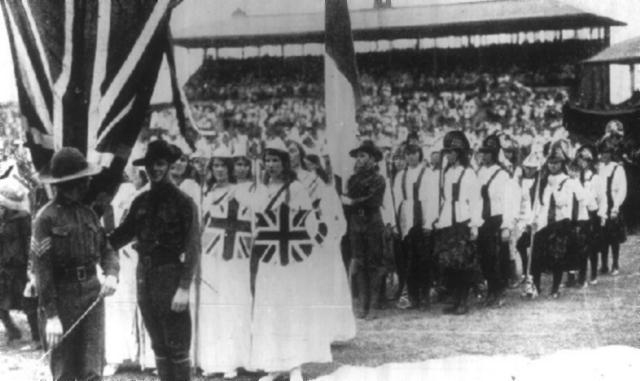
The first image was taken in October 1914 and demonstrates a craze at the beginning of the war. There were an incredible number of pix showing women dressed as Britannia. This started almost from day one. The pic below shows a whole bevy of nubile Britannias, all trying to rule the waves from the cheering crowds.
The line up of Britannias
[Sydney Mail, 21 October 1914, p. 7.]
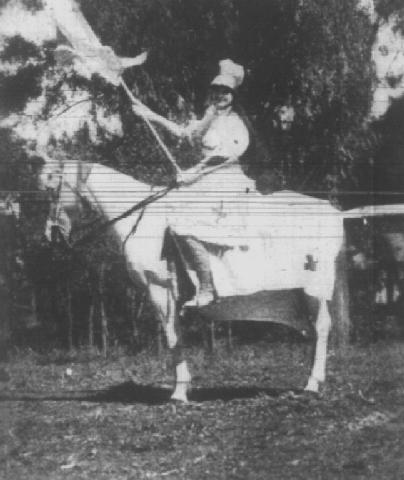
Then other young women went to ridiculous lengths to demonstrate that they are happy to lead their menfolk into war. This pic taken in March 1915 shows a young woman dressed as Joan of Arc looking all inviting, ready to lead her admirers to Orleans and defeat the English??? Not quite sure why Joan of Arc was seen as an appropriate costume unless it was a metaphor rather than a real call to arms against the English.
Joan of Arc - the friend of Britain
[Sydney Mail, 21 April 1915, p. 22.]
These are the young things over whom the young men were supposed to swoon.
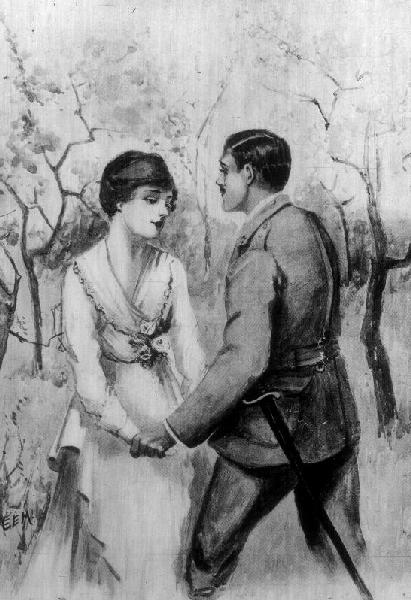
The swooning took a more sophisticated propaganda turn later on in the war. The next picture is from 1916 and could have come from Women's Weekly, although it didn't, but the message is very clear. Only women whose men went to war would remain loyal and faithful to them.
Here is the swooning swain captivated by a voluptuous siren, heeding the call to go to war with a promise to remain faithful and pure while keeping the home fires burning until the soldier returns, obviously in one piece. No cripples need apply.
Lover's swoon
[Sydney Mail, 13 December 1916, p. 15.]
These pictures demonstrate the gradual change in methods of portraying gender attraction as a military tool to enhance recruitment. This set of pictures illustrate the use of the siren leading men to war.
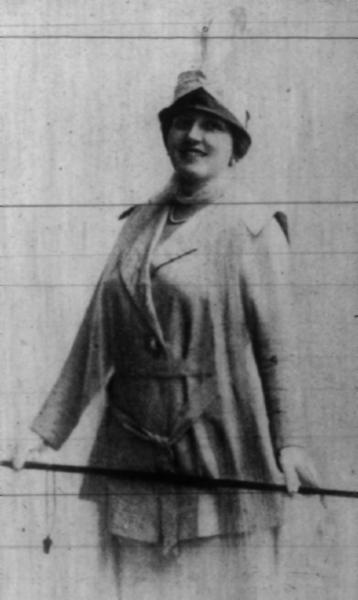
Here is a glamour shot of the actress and impresario, Mrs HT Kelly.
Mrs HT Kelly
[Sydney Mail, 26 June 1918, p. 10.]
Here she is in a raunchy shot as an "It" girl, wearing an Italian uniform - or should I say her interpretation of an Italian Uniform - which was part of a show she starred in and funded in Sydney. It was a special benefit concert to raise funds for the Italian soldiers.
The shot shows everything that was considered to be steamy - a well built, buxom young lady striding upon the scene. No waif like figure here - this is someone who likes her food. All the embrace of motherhood, something a nation traumatised by hideous slaughter needed. The men needed mothering and here was the imagery to provide that need.
The Great War, Propaganda, Using Turkish Troops for Propaganda Purposes 2 Topic: GW - Propaganda
The Great War
Propaganda
Using Turkish Troops for Propaganda Purposes 2
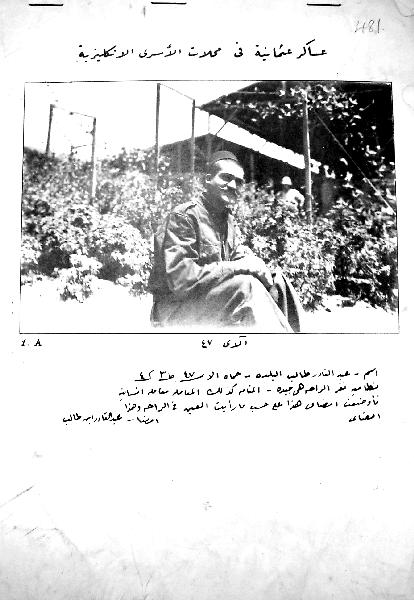
Propaganda leaflet dropped by air, late 1917.
To further illustrate the use of Turkish prisoners for British Propaganda purposes, here is another example.
The note basically says: Come on over fellows, I am having a great time being a POW.
This picture also demonstrates another issue. The lack of care in presentation of the subject. In this picture, the photographer made a classic error. I am not sure if it was intentional but it stands out like a wart and was sure to be picked up by the viewer.
Bear in mind that the written portion of this propaganda sheet was meant for a confined audience. The bulk of the readers were illiterate and thus the picture was the key source of the information. If the Allies got the picture wrong then the whole effect was destroyed.
This pic is taken in a wonderful bucolic setting to illustrate the luxurious life in an Egyptian POW camp. Flowing vines, comfort, clean clothes and a happy smile. These are all calculated to appeal to the heart strings of the average Mehmet who came from the peasantry. This was wealth beyond his personal belief and it was here for the taking and enjoyment, so long as he surrendered as a POW.
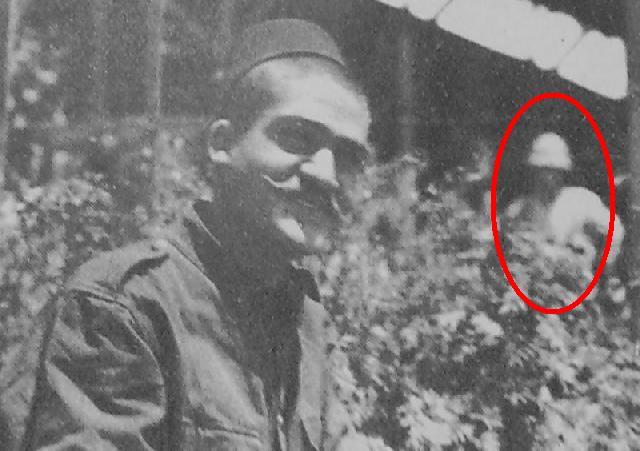
Now for the wart.
Enlargement of the first photograph.
Unfortunately standing close at hand was a British guard. Nothing like a dose of reality to spoil the image. This counters the previous message by saying - regardless of where you are in this camp, we will be watching you very carefully. For the poor Mehmet in the field, this was trading down from the Germans overlords to the British. Not much of a choice then.
There is little doubt that this sheet would have had any effect whatsoever except to raise the cynical smirk and then be used as toilet paper.
The Great War, Propaganda, Using Turkish Troops for Propaganda Purposes Topic: GW - Propaganda
The Great War
Propaganda
Using Turkish Troops for Propaganda Purposes
Propaganda leaflet dropped by air, late 1917.
There is no doubt that some of the more unseemly practices undertaken during the Great War led to the various conventions regarding the treatment of Prisoners of War, which we as a nation, adhere to through various treaties.
It is instructive to see the origins of these conventions.
One area of Allied propaganda was to exploit Turkish Prisoners of War for propaganda purposes. This was done ruthlessly by the Allied authorities.
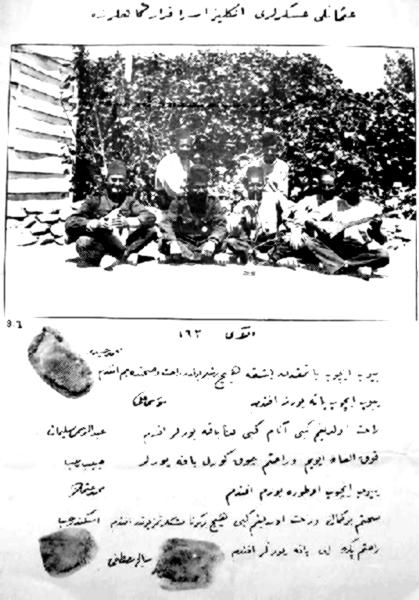
After prisoners were captured, a select few would be given clean Egyptian Labour Corps uniforms complete with fez. Those who received the Turkish Gallipoli medal were still allowed to wear it on their uniform. These people were then given all the various paraphernalia attached to the good life as seen by the average Mehmet in the front line. Each person in the pic would "write" a note suggesting that thing were just dandy and their comrades should join them. The statement was then signed by the prisoner or if they were illiterate, a thumb print would be used.
After the photo shoot, thousands of the propaganda leaflets would be printed in their thousands on good quality highly bleached bonded paper of about 82gsm, a rarity in the war indicating to the Turks below that the Allies had money to burn. The air crews would then be assigned a trench sector and they would litter the area with paper. There was no quantitave study regarding the effectiveness of these exercises so no evidence exists as to the consequences of the constant barrage of this style of propaganda sapping morale or other reasons.
To illustrate the style of propaganda used, here is the first sample picture.
The comments signed by the men state the following:
We don't do anything but eat, drink and lie about, I am comfortable and in good health sir.
- Mehmed Haydar
We eat, drink, and lie about.
- Musa Ali
Not only am I comfortable, but they also look qfter me as my mother would.
- Abdurrahman Suleyman
I am in extraordinarily good health and comfortable, they look after me very well.
- Habib Receb
I eat, drink, and sit around sir.
- Mehmed Osman
My health is excellent and I not only am I comfortable, but we do not have any kind of difficulty whatsoever sir.
- Iskender Habib
I am quite comfortable, they look after me sir.
- Salih Mustafa
The things that jump out are:
1. There are seven men in this group photograph. You will notice that each person has written his own little piece and signed it.
2. For those struggling to see this, Ottoman Script is, like all Semitic Scripts, read from right to left. You will see a sentence, then a space and then some further words. These final words are in actuality the name of the POW. Those who were illiterate used a finger print to sign their name. Of course, next to their mark is their name.
3. On the left, you will see the man sitting down with Doumbek, a very common goblet like Turkish drum.
4. The next three fellows all are wearing what appears to be their Gallipoli medal indicating that they are seasoned veterans and definitely not cowards.
5. The fellow smoking the hookah pipe is illustrating that the life for the average Mehmet is far in excess of anything he could hope to endure in the army or even at their village. The use of the hookah is a symbol of wealth and leisure. The ordinary fellow in the field could only dream of sitting around smoking a hookah and shooting the breeze. And here, in a POW camp, everyone is able to smoke the hookah.
6. The fellow sitting to the extreme right is playing a Baglama Saz, again indicating wealth and leisure that is in the grasp of the average Mehmet who surrenders to the Allies. You will notice that the fellow is smoking a tailor made cigarette, another sign of affluence as most people who did smoke used rollies as tailor made ciggies were very pricey.
7. The fellows sitting around in their knitted singlets are indicating that everyone gets issued with underwear. But not only that, there are washing facilities to keep them clean and presentable.
All in all, these 7 men were recruited to assist in undermining their comrades morale to fight. We do not know the circumstances under which these pix and stories were made but I could bet that the good fortune displayed by all these people ended when the photo shoot ended.
It is activities such as this which tended to humiliate the men involved, not only for surrendering for whatever reason but to have their face and names dropped in the Turkish trenches, thereby putting their lives at great risk should they be recaptured by the Turks.
The role of humiliating and putting the life at risk was one of the key reasons why the conventions now prohibit the showing of POWs for triumphalist purposes. As bad as Saddam was, he had a point during the Iraq invasion when the faces of the mass of troops were shown surrendering. Very quickly the faces of the POWs were obscured by the press. It is the unbridled exploitation and humiliation of these prisoners that led to the conventions. Pictures like this were at the forefront in bringing these conventions to fruition.
The Great War, Propaganda, British Propaganda Topic: GW - Propaganda
The Great War
Propaganda
British Propaganda
Every nation participates in a propaganda war as an ancillary to the conflict. It aim to reach the hearts and minds of the antagonists with the hope that it will remove a combatant as surely as a bullet.
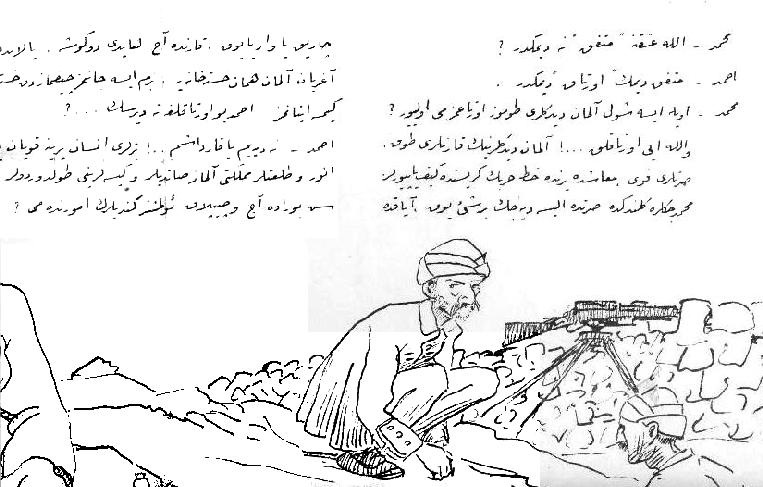
During the phase of the Allied campaign against the Ottoman forces in Palestine, the Allied air force was employed often in the process of dropping propaganda leaflets onto the troop encampments. The leaflets had to be highly visual due to low levels of literacy while also tell a story. Below is one example produced by the British at the end of 1917 and tossed over the Turkish lines.
The story in the propaganda sheet calls upon the average Mehmet to reflect upon their appalling conditions experienced in the Judaean Hills while on their campaign. The two characters are Mehmet and Ahmet, two of the most common Turkish names, like Bill and Jim.
The conversation goes like this:
Mehmet: In the name of Allah, what is the meaning of ally?
Ahmet: Ally means partner.
Mehmet: If this is so then this German pig is our so-called partner. What a partnership! These so called Germans allies are well fed, their clothes are dry, they are well paid and they are enjoying the war. But if you think of Mehmets, they don't have clothes, shoes, and are always hungry when going into the combat. The Germans go immediately to hospital after inventing an illness. On the other hand, unless we lose our lives, no body will believe that we are sick. So Ahmet what can you say about this partnership?
Ahmet: What can I say? Enver and Talat treated them like men and sold our country to them so they could line their pockets. In contrast, they really couldn't care if we died naked and hungry. My God! How much longer do we need to endure everything? For God's sake my dear Mehmet, tell me.
Mehmet: How long will we have to suffer? The way I see it we should stop fighting for German profits and join the English. Even though we are told the English are our enemies, they care for us a thousand times better than our lot. Please come!
The left hand side of this pic is missing which should contain an image of a German officer stuffing himself with some wonderful food while two rather gaunt Mehmets look on at the feast while manning a Bergman Light Machinegun behind a sangar. This piece of propaganda appears to come from Palestine and more specifically in the Judaean Hills, the only place where sangars were employed along with the Bergman in this manner.
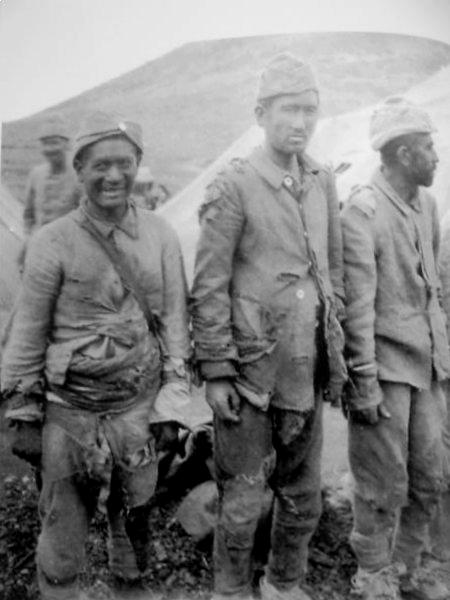
For propaganda to be effective, it must be based upon something of substance. The photograph below is illustrative of the destitute circumstances in which some Ottoman formations found themselves during this part of the campaign.
Destitute Turkish Soldiers
[Picture from: Orses, T., & Ozcelik, N., 1. Dunya Savasi'nda, Turk Askeri Kiyafetleri (1914-1918), Istanbul, p. 156.]
While there are no statistics maintained on the numbers of Turkish soldiers who deserted as a consequence of this piece of propaganda, it was a clever piece of writing going to the heart of the disgruntled Turkish minds.
In contrast to these desperate circumstances, the moral of the Anatolian troops was remarkably good. Despite all of these privations, they fought on doggedly without any signs of mass desertions. Other men from the non-Turkish regions were ambivalent. Some formations fought well while others were indifferent and surrendered at the first opportunity.
Desertions to the Allies was not as big a problem as desertions within the Ottoman Empire itself. Transferring formations within the Empire was a fraught affair with sometimes up to 50% of the strength disappearing in transit. The men just packed up and went home. The numbers of these men influenced by propaganda such as illustrated above is unknown. It is possibly more attributed to being tired of the war and wanting to go home rather than anything the Allies might have said. But this will always remain an avenue for debate.
The Australian Light Horse Studies Centre is a not for profit and non profit group whose sole aim is to write the early history of the Australian Light Horse from 1900
- 1920. It is privately funded and the information is provided by the individuals within the group and while permission for the use of the material has been given for this
site for these items by various donors, the residual and actual copyright for these items, should there be any, resides exclusively with the donors. The information on
this site is freely available for private research use only and if used as such, should be appropriately acknowledged. To assist in this process, each item has a citation
attached at the bottom for referencing purposes.
Please Note: No express or implied permission is given for commercial use of the information contained within this site.
A note to copyright holders
The Australian Light Horse Studies Centre has made every endeavour to contact copyright holders of material digitised for this blog and website and where
appropriate, permission is still being sought for these items. Where replies were not received, or where the copyright owner has not been able to be traced, or where
the permission is still being sought, the Australian Light Horse Studies Centre has decided, in good faith, to proceed with digitisation and publication. Australian Light
Horse Studies Centre would be happy to hear from copyright owners at any time to discuss usage of this item.