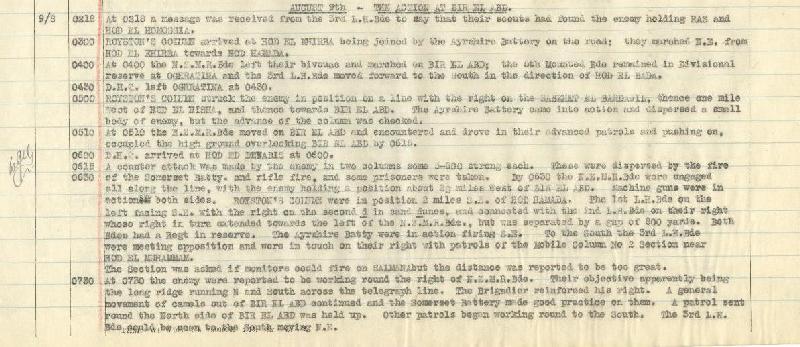
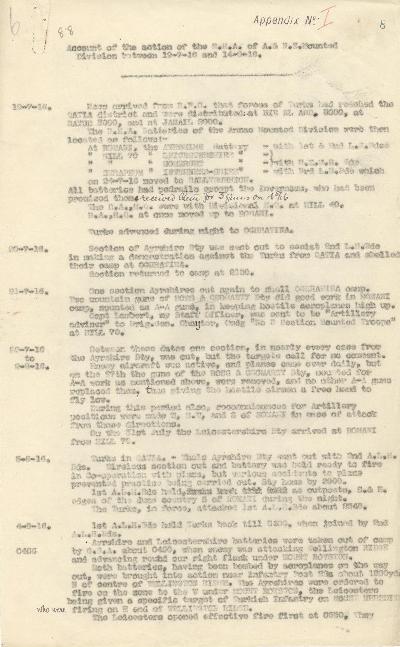
« January 2011 »
S M T W T F S
1
2 3 4 5 6 7 8
9 10 11 12 13 14 15
16 17 18 19 20 21 22
23 24 25 26 27 28 29
30 31
You are not logged in. Log in


Search the site:


powered by FreeFind
Volunteer with us.

Entries by Topic All topics
A Latest Site News
A - Using the Site
AAA Volunteers
AAB-Education Centre
AAC-Film Clips
AAC-Photo Albums
AIF & MEF & EEF
AIF - Lighthorse
AIF - ALH - A to Z
AIF - DMC
AIF - DMC - Or Bat
AIF - DMC - Anzac MD  
AIF - DMC - Aus MD
AIF - DMC - British
AIF - DMC - BWI
AIF - DMC - French
AIF - DMC - Indian
AIF - DMC - Italian
AIF - DMC - Medical
AIF - DMC - Remounts
AIF - DMC - Scouts
AIF - DMC - Sigs
AIF - DMC - Sigs AirlnS
AIF - DMC - 1 Sig Sqn
AIF - DMC - 2 Sig Sqn
AIF - DMC - Eng
AIF - DMC - Eng 1FSE
AIF - DMC - Eng 2FSE
AIF - DMC - GSR
AIF - 1B - 1 LHB
AIF - 1B - 6 MVS
AIF - 1B - 1 LHMGS
AIF - 1B - 1 Sig Trp
AIF - 1B - 1 LHFA
AIF - 1B - 1 LHR
AIF - 1B - 2 LHR
AIF - 1B - 3 LHR
AIF - 2B - 2 LHB
AIF - 2B - 7 MVS
AIF - 2B - 2 LHFA
AIF - 2B - 2 LHMGS
AIF - 2B - 2 Sig Trp
AIF - 2B - 5 LHR
AIF - 2B - 6 LHR
AIF - 2B - 7 LHR
AIF - 3B - 3 LHB
AIF - 3B - 8 MVS
AIF - 3B - 3 LHB Sigs
AIF - 3B - 3 LHFA
AIF - 3B - 3 LHMGS
AIF - 3B - 3 Sig Trp
AIF - 3B - 8 LHR
AIF - 3B - 9 LHR
AIF - 3B - 10 LHR
AIF - 4B - 4 LHB
AIF - 4B - 4 Sig Trp
AIF - 4B - 9 MVS
AIF - 4B - 4 LHFA
AIF - 4B - 4 LHMGS
AIF - 4B - 4 LHR
AIF - 4B - 11 LHR
AIF - 4B - 12 LHR
AIF - 5B - 5 LHB
AIF - 5B - 10 MVS
AIF - 5B - 5 LHFA
AIF - 5B - 5 Sig Trp
AIF - 5B - ICC
AIF - 5B - 14 LHR
AIF - 5B - 15 LHR
AIF - 5B - 1er Regt
AIF - 5B - 2 NZMGS
AIF - AASC
AIF - Aboriginal LH
AIF - Badges
AIF - Cars
AIF - Chinese LH
AIF - Double Sqns
AIF - Engineers
AIF - Fr - 22 Corps
AIF - Fr - 13 LHR
AIF - Honour Roll
AIF - HQ - 3rd Echelon
AIF - Marching Songs
AIF - Misc Topics
AIF - NZMRB
AIF - NZMRB - AMR
AIF - NZMRB - CMR
AIF - NZMRB - EFT
AIF - NZMRB - NZMFA
AIF - NZMRB - NZMGS
AIF - NZMRB - OMR
AIF - NZMRB - Sig-Trp
AIF - NZMRB - WMR
AIF - Ships
AIF - Ships - Encountr
AIF - Ships - Una
AIF - WFF
AIF - Wireless Sqn
Battles
BatzA - Australia
BatzA - Broken Hill
BatzA - Liverpool
BatzA - Merivale
BatzB - Boer War
BatzB - Bakenlaagte
BatzB - Belmont
BatzB - Bothaville
BatzB - Buffels Hoek
BatzB - Coetzees Drift
BatzB - Diamond Hill
BatzB - Driefontein
BatzB - Elands
BatzB - Graspan
BatzB - Grobelaar
BatzB - Grootvallier
BatzB - Hartebestfontn
BatzB - Houtnek
BatzB - Karee Siding
BatzB - Kimberley
BatzB - Koster River
BatzB - Leeuw Kop
BatzB - Mafeking
BatzB - Magersfontein
BatzB - Modder River
BatzB - Onverwacht
BatzB - Paardeberg
BatzB - Palmietfontein
BatzB - Pink Hill
BatzB - Poplar Grove
BatzB - Rhenoster
BatzB - Sannahs Post
BatzB - Slingersfontn
BatzB - Stinkhoutbm
BatzB - Sunnyside
BatzB - Wilmansrust
BatzB - Wolvekuil
BatzB - Zand River
BatzG - Gallipoli
BatzG - Anzac
BatzG - Aug 1915
BatzG - Baby 700
BatzG - Evacuation
BatzG - Hill 60
BatzG - Hill 971
BatzG - Krithia
BatzG - Lone Pine
BatzG - Nek
BatzJ - Jordan Valley
BatzJ - 1st Amman
BatzJ - 2nd Amman
BatzJ - Abu Tellul
BatzJ - Es Salt
BatzJ - JV Maps
BatzJ - Ziza
BatzM - Mespot
BatzM - Baghdad
BatzM - Ctesiphon
BatzM - Daur
BatzM - Kurna
BatzM - Kut el Amara
BatzM - Ramadi
BatzN - Naval
BatzN - AE1
BatzN - Cocos Is
BatzN - Heligoland
BatzN - Marmara
BatzN - Zeebrugge
BatzN - Zeppelin L43
BatzNG - Bitapaka
BatzO - Other
BatzO - Baku
BatzO - Egypt 1919
BatzO - Emptsa
BatzO - Karawaran
BatzO - Peitang
BatzO - Wassa
BatzP - Palestine
BatzP - 1st Gaza
BatzP - 2nd Gaza
BatzP - 3rd Gaza
BatzP - Aleppo
BatzP - Amwas
BatzP - Ayun Kara
BatzP - Bald Hill
BatzP - Balin
BatzP - Beersheba
BatzP - Berkusieh
BatzP - Damascus
BatzP - El Auja
BatzP - El Buggar
BatzP - El Burj
BatzP - Haifa
BatzP - Huj
BatzP - JB Yakub
BatzP - Kaukab
BatzP - Khan Kusseir
BatzP - Khuweilfe
BatzP - Kuneitra
BatzP - Megiddo
BatzP - Nablus
BatzP - Rafa
BatzP - Sasa
BatzP - Semakh
BatzP - Sheria
BatzP - Surafend
BatzP - Wadi Fara
BatzS - Sinai
BatzS - Bir el Abd
BatzS - El Arish
BatzS - El Mazar
BatzS - El Qatiya
BatzS - Jifjafa
BatzS - Magdhaba
BatzS - Maghara
BatzS - Romani
BatzS - Suez 1915
BatzSe - Senussi
BatzWF - Westn Front
BW - Boer War
BW - NSW
BW - NSW - 1ACH
BW - NSW - 1NSWMR
BW - NSW - 2NSWMR
BW - NSW - 3ACH
BW - NSW - 3NSWIB
BW - NSW - 3NSWMR
BW - NSW - 5ACH
BW - NSW - A Bty RAA
BW - NSW - AAMC
BW - NSW - Aust H
BW - NSW - Lancers
BW - NSW - NSW Inf
BW - NSW - NSWCBC
BW - NSW - NSWIB
BW - NSW - NSWMR_A
BW - NZ
BW - Qld
BW - Qld - 1ACH
BW - Qld - 1QMI
BW - Qld - 2QMI
BW - Qld - 3ACH
BW - Qld - 3QMI
BW - Qld - 4QIB
BW - Qld - 5QIB
BW - Qld - 6QIB
BW - Qld - 7ACH
BW - QLD - AAMC
BW - SA
BW - SA - 1SAMR
BW - SA - 2ACH
BW - SA - 2SAMR
BW - SA - 3SACB
BW - SA - 4ACH
BW - SA - 4SAIB
BW - SA - 5SAIB
BW - SA - 6SAIB
BW - SA - 8ACH
BW - SA - AAMC
BW - Tas
BW - Tas - 1ACH
BW - Tas - 1TIB
BW - Tas - 1TMI
BW - Tas - 2TB
BW - Tas - 2TIB
BW - Tas - 3ACH
BW - Tas - 8ACH
BW - Vic
BW - Vic - 1VMI
BW - Vic - 2ACH
BW - Vic - 2VMR
BW - Vic - 3VB
BW - Vic - 4ACH
BW - Vic - 4VIB
BW - Vic - 5VMR
BW - Vic - 6ACH
BW - Vic - AAMC
BW - Vic - Scot H
BW - WA
BW - WA - 1WAMI
BW - WA - 2ACH
BW - WA - 2WAMI
BW - WA - 3WAB
BW - WA - 4ACH
BW - WA - 4WAMI
BW - WA - 5WAMI
BW - WA - 6WAMI
BW - WA - 8ACH
BW Gen - Campaign
BW Gen - Soldiers
BW General
Cavalry - General
Diary - Schramm
Egypt - Heliopolis
Egypt - Mena
Gen - Ataturk Pk, CNB
Gen - Australia
Gen - Legends
Gen - Query Club
Gen - St - NSW
Gen - St - Qld
Gen - St - SA
Gen - St - Tas
Gen - St - Vic
Gen - St - WA
Gm - German Items
Gm - Bk - 605 MGC
GW - 11 Nov 1918
GW - Atrocities
GW - August 1914
GW - Biographies
GW - Propaganda
GW - Spies
GW - We forgot
Militia 1899-1920
Militia - Area Officers
Militia - Inf - Infantry
Militia - Inf - 1IB
Militia - Inf - 2IB
Militia - Inf - 3IB
Militia - Inf - NSW
Militia - Inf - Qld
Militia - Inf - SA
Militia - Inf - Tas
Militia - Inf - Vic
Militia - Inf - WA
Militia - K.E.Horse
Militia - LH
Militia - LH - Regts
Militia - LH - 1LHB
Militia - LH - 2LHB
Militia - LH - 3LHB
Militia - LH - 4LHB
Militia - LH - 5LHB
Militia - LH - 6LHB
Militia - LHN - NSW
Militia - LHN - 1/7/1
Militia - LHN - 2/9/6
Militia - LHN - 3/11/7
Militia - LHN - 4/6/16
Militia - LHN - 5/4/15
Militia - LHN - 6/5/12
Militia - LHN - 28
Militia - LHQ - Qld
Militia - LHQ - 13/2
Militia - LHQ - 14/3/11
Militia - LHQ - 15/1/5
Militia - LHQ - 27/14
Militia - LHS - SA
Militia - LHS - 16/22/3
Militia - LHS - 17/23/18
Militia - LHS - 24/9
Militia - LHT - Tas
Militia - LHT - 12/26
Militia - LHV - Vic
Militia - LHV - 7/15/20
Militia - LHV - 8/16/8
Militia - LHV - 9/19
Militia - LHV - 10/13
Militia - LHV - 11/20/4
Militia - LHV - 19/17
Militia - LHV - 29
Militia - LHW - WA
Militia - LHW-18/25/10
Militia - Military Orders
Militia - Misc
MilitiaRC - Rifle Clubs
MilitiaRC - NSW
MilitiaRC - NT
MilitiaRC - Qld
MilitiaRC - SA
MilitiaRC - Tas
MilitiaRC - Vic
MilitiaRC - WA
Militiaz - New Zealand
Tk - Turkish Items
Tk - Army
Tk - Bks - Books
Tk - Bks - 1/33IR
Tk - Bks - 27th IR
Tk - Bks - Air Force
Tk - Bks - Yildirim
Tk - POWs
Wp - Weapons
Wp - Hotchkiss Cav
Wp - Hotchkiss PMG
Blog Tools
Edit your Blog
Build a Blog
RSS Feed
View Profile
Open Community
Post to this Blog
Site Index
Education Centre
LH Militia
Boer War
Transport Ships
LH Battles
ALH - Units
ALH - General
Aboriginal Light H
Weapons
Ottoman Sources

"At a mile distant their thousand hooves were stuttering thunder, coming at a rate that frightened a man - they were an awe inspiring sight, galloping through the red haze - knee to knee and horse to horse - the dying sun glinting on bayonet points..." Trooper Ion Idriess

The Australian Light Horse Studies Centre aims to present an accurate history as chroniclers of early Australian military developments from 1899 to 1920.

The Australian Light Horse Studies Centre site holds over 12,000 entries and is growing daily.

Contact: Australian Light Horse Studies Centre

Let us hear your story: You can tell your story, make a comment or ask for help on our Australian Light Horse Studies Centre Forum called:

Desert Column Forum

WARNING: This site contains: names, information and images of deceased people; and, language which may be considered inappropriate today.

Tuesday, 25 January 2011
Australian and New Zealand Mounted Division, Anzac MD, Contents
Topic: AIF - DMC - Anzac MD

Anzac MD, AIF

Australian and New Zealand Mounted Division

Contents


This topic gives details as to the formation and operation of the Australian and New Zealand Mounted Division, initially shortened to the A & NZ MD but later known as the Anzac MD. It was formed in February 1916 specifically to defend the Suez Canal from attack from the Ottoman troops.

To view an outline of its history regarding this formation, its emergence and composition, this is detailed in the section on the Australian Light Horse Order of Battle. The full Order of Battle can be viewed at the following link:

Australian Light Horse Order of Battle


Historical Outline

Australian and New Zealand Mounted Division Outline.


Individual Units

The individual formations that comprised the Anzac MD were many. Put together at any one time and there was about 7,000 mounted men in the Division. Below is a guide to the individual units.

Division

Anzac Mounted Division

Brigades

New Zealand Mounted Rifles Brigade

1st Australian Light Horse Brigade

2nd Australian Light Horse Brigade

3rd Australian Light Horse Brigade

Regiments

Auckland Mounted Rifles, NZMRB, Outline

Wellington Mounted Rifles, NZMRB, Outline

Canterbury Mounted Rifles, NZMRB, Outline

1st Australian Light Horse Regiment, AIF, Outline

2nd Australian Light Horse Regiment, AIF, Outline

3rd Australian Light Horse Regiment, AIF, Outline

5th Australian Light Horse Regiment, AIF, Outline

6th Australian Light Horse Regiment, AIF, Outline

7th Australian Light Horse Regiment, AIF, Outline

8th Australian Light Horse Regiment, AIF, Outline

9th Australian Light Horse Regiment, AIF, Outline

10th Australian Light Horse Regiment, AIF, Outline


Documents

Reports February 1918

Anzac Mounted Division Daily Reports, February 1918

Anzac Mounted Division Daily Reports, February 1918, Album Contents 


War Diary

The War Diary of this Corps isavailable on the Australian War Memorial Website at this address:

General Staff, Headquarters ANZAC Mounted Division.


Jifjafa Raid, 10-14 April 1916

Anzac Mounted Division, AIF, War Diary Account

el Qatiya, 23 April 1916


Romani, 4-5 August 1916

General Staff Headquarters, Anzac Mounted Division, AIF, War Diary Account

Anzac Mounted Division Artillery, AIF, War Diary Account
 

Bir el Abd, 9 August 1916

Bir el Abd, Sinai, 9 August 1916, Headquarters, Anzac Mounted Division, AIF, War Diary Account 

Bir el Abd, Sinai, 9 August 1916, General Staff Headquarters, Anzac Mounted Division, AIF, War Diary Account

Bir el Abd, Sinai, 9 August 1916, Anzac MD Post Battle Unit Deployment Map 


Bir el Mazar, 17 September 1916

Bir el Mazar, Sinai, 17 September 1916, General Staff HQ, Anzac MD, AIF, War Diary Account

RHA HQ, Anzac MD, AIF, War Diary Account  


Magdahba, 23 December 1916

General Staff Headquarters, Anzac Mounted Division, AIF, War Diary Account

Anzac Mounted Division Artillery, AIF, War Diary Account


Rafa, 9 January 1917 

Secret Special Instructions

Anzac Mounted Division, Order No. 69

Anzac Mounted Division Special Instructions

Anzac Mounted Division Battle Chronology, 8 - 11 January 1917

Anzac Mounted Division Signals Chronology 

Signals

Signal 0832

Signal 1054 

Signal 1435

Signal 1645

Signal 2359


Battles

1916

The Jifjafa Raid, Sinai, April 10 to 14, 1916

Romani, Sinai, August 4 to 5, 1916.

Bir el Abd, Sinai, August 9, 1916.

El Mazar, Sinai, September 17, 1916.

El Arish, Sinai, December 20, 1916.

Magdhaba, Sinai, December 23, 1916.

1917

Rafa, Sinai, January 9, 1917.

First Gaza, Palestine, March 26 to 27, 1917.

Second Gaza, Palestine, April 19, 1917.
El Auja, Palestine, May 23, 1917.
Beersheba, Palestine, October 31, 1917.

Khuweilfe, Palestine, November 1 to 8, 1917.
Tel es Sheria, Palestine, November 7, 1917.
Huj, Palestine, November 8, 1917. 

1918

First Amman, Palestine, March 27 to 30, 1918.

Es Salt, Palestine, April 30 to May 3, 1918.

Abu Tellul, Palestine, July 14, 1918.

Megiddo, Palestine, September 19 to 21, 1918.

Second Amman, Palestine, September 25, 1918.

1919

The Egyptian Rebellion, Egypt, 13 March to 10 April 1919


Routine Orders

One of the best sources of information available for understanding the immediate challenges facing a regiment is to be found in the Routine Orders. They are a wealth of detail. The Routine Orders provide an unvarnished history of the Regiment.

Reconnaissance to Muksheib by Captain Wearne, 8th Light Horse Regiment

Memorandum

Memorandum on reconnaissance to Muksheib, Page 1

Memorandum on reconnaissance to Muksheib, Page 2

Memorandum on reconnaissance to Muksheib, 16 March 1916, Page 1

Memorandum on reconnaissance to Muksheib, 16 March 1916, Page 2

Memorandum on reconnaissance to Muksheib, 19 March 1916, Page 1

Memorandum on reconnaissance to Muksheib, 19 March 1916, Page 2

Memorandum on reconnaissance to Muksheib, 19 March 1916


Report

Report on reconnaissance to Muksheib by Capt Wearne, Page 1

Report on reconnaissance to Muksheib by Capt Wearne, Page 2

Report on reconnaissance to Muksheib by Capt Wearne, Page 3

Report on reconnaissance to Muksheib by Capt Wearne, Page 4

Report on reconnaissance to Muksheib by Capt Wearne, Page 5

Report on reconnaissance to Muksheib by Capt Wearne, Page 6


Special Orders to establish a Signals Station

Special Orders to establish a Signals Station, 9 May 1916, Page 1
Special Orders to establish a Signals Station, 9 May 1916, Page 2


Reconnaissance to Bir el Abd

Memorandum 

Memorandum on proposed Reconnaissance to Bir el Abd, 5 May 1916, Page 1

Memorandum on proposed Reconnaissance to Bir el Abd, 5 May 1916, Page 2

Memorandum on proposed Reconnaissance to Bir el Abd, 5 May 1916, Page 1

Memorandum on proposed Reconnaissance to Bir el Abd, 5 May 1916, Page 2


Report 

Report on Reconnaissance to Bir el Abd, 9 May 1916, Page 1

Report on Reconnaissance to Bir el Abd, 9 May 1916, Page 2

Report on Reconnaissance to Bir el Abd, 9 May 1916, Page 3

Report on Reconnaissance to Bir el Abd, 9 May 1916, Page 1

Report on Reconnaissance to Bir el Abd, 9 May 1916, Page 2

Report on Reconnaissance to Bir el Abd, 9 May 1916, Page 3

Report on Reconnaissance to Bir el Abd, 9 May 1916, Page 4

Report on Reconnaissance to Bir el Abd, 9 May 1916, Map 1

Report on Reconnaissance to Bir el Abd, 9 May 1916, Map 2  


Other orders and reports

Movement Order

Movement order from Hill 70 to Bir Et Maler, 9 May 1916, Page 1

Movement Order to Hill 70, 13 May 1916

 Memorandum  

Chauvel Order for a Reconnaissance to Bir el Bayud, 13 May 1916

Chauvel Order for a Reconnaissance to Bir el Bayud, 13 May 1916, page 2.

 Memorandum  

Reconnaissance to Hod el Gedaidia, 14 May 1916, page 1.

Reconnaissance to Hod el Gedaidia, 14 May 1916, page 2.

Movement Order 

Orders for the relief of the 155th Infantry Brigade by the 12th LHR, 14 May 1916, page 1.

Movement Order 

Scottish Horse Movement Order cancelled, 14 May 1916  

Movement Order 

Movement Order for the 12th Light Horse Regiment, 14 May 1916

Report  

Report on the reconnaissance to Hod el Sagia, 17 May 1916, page 1.

Report on the reconnaissance to Hod el Sagia, 17 May 1916, page 2.

Movement Order  

Movement Order for the NZMRB to occupy Oghratina, 17 May 1916
Report  
Report by 1st Light Horse Field Ambulance, 17 May 1916

Memorandum 

Memorandum on 4th Royal Scots Establishment, 14 June 1916, Page 1


Roll of Honour

Australian and New Zealand Mounted Division, Anzac MD, Roll of Honour 

Lest We Forget


Further Reading:

Anzac Mounted Division, AIF

Australian and New Zealand Mounted Division, Anzac MD, Roll of Honour

Battles where Australians fought, 1899-1920


Citation: Australian and New Zealand Mounted Division, Anzac MD, Contents

Posted by Project Leader at 12:01 AM EAST
Updated: Sunday, 29 July 2012 9:48 AM EADT
Tuesday, 2 March 2010
Australian and New Zealand Mounted Division Outline
Topic: AIF - DMC - Anzac MD

Anzac MD

Australian and New Zealand Mounted Division

Outline


The formation of the Anzac MD (Australian and New Zealand Mounted Division) began during February 1916. During this time of formation the 1st Light Horse Brigade was despatched to the Western Desert to fight the Senussi while the balance of the Division moved to the Suez Canal defensive zone to relieve the 1st Infantry Division, which was preparing to transfer to the Western Front.

The division soon became involved in raiding the Turkish positions.

An attempt by the Turks to attack the Suez Canal in August 1916 resulted in their force being intercepted and defeated by the Australian and New Zealand Mounted Division in the Battle of Romani. The division followed up its victory, pursuing the Turks to the Palestine frontier, capturing major Turkish positions at Magdhaba in December 1916 and Rafah in January 1917.
    
In March 1917 the division surrounded Gaza during the First Battle of Gaza but was ordered to withdraw.

It played a minor role in the Second Battle of Gaza before participating in the Third, successful Battle of Gaza in October 1917. Afterward it pursued the enemy as far as Jaffa.

In March and again in April 1918, the division made major raids across the Jordan River.

In August 1918, the Anzac Mounted Division participated in the final breakthrough and captured Amman in September 1918, capturing 10,300 prisoners in just nine days.

Units of this division reoccupied Gallipoli in December 1918.


Commanders

Major General Harry G. Chauvel, from 16 March 1916 to 20 April 1917; and,
Major General E.W.C. Chaytor, from 21 April 1917 to past November 1918.


Casualties

During the period of campaigning, the Anzac MD and Australian Mounted Division suffered the following casualties.

Killed in action - 1,168

Died of wounds - 566

Other causes of death - 598

Prisoners of War - 83

Wounded - 7,590

Total Casualties, 1916-19 -  10,005


Battles

1916

The Jifjafa Raid, Sinai, April 10 to 14, 1916

Romani, Sinai, August 4 to 5, 1916.

Bir el Abd, Sinai, August 9, 1916.

El Mazar, Sinai, September 17, 1916.

El Arish, Sinai, December 20, 1916.

Magdhaba, Sinai, December 23, 1916.

1917

Rafa, Sinai, January 9, 1917.

First Gaza, Palestine, March 26 to 27, 1917.

Second Gaza, Palestine, April 19, 1917.
El Auja, Palestine, May 23, 1917.
Beersheba, Palestine, October 31, 1917.

Khuweilfe, Palestine, November 1 to 8, 1917.
Tel es Sheria, Palestine, November 7, 1917.
Huj, Palestine, November 8, 1917. 

1918

First Amman, Palestine, March 27 to 30, 1918.

Es Salt, Palestine, April 30 to May 3, 1918.

Abu Tellul, Palestine, July 14, 1918.

Megiddo, Palestine, September 19 to 21, 1918.

Second Amman, Palestine, September 25, 1918.

1919

The Egyptian Rebellion, Egypt, 13 March to 10 April 1919


Order of Battle


Australian and New Zealand Mounted Division (Egypt, April 1916)

    * Australian and New Zealand  Mounted Division Artillery
          o British 3rd (Territorial Force) Horse Artillery Brigade [8 x 18 pounders]
                + British Leicester, Somerset Batteries
                + British 3rd Horse Artillery Brigade Ammunition Column
          o British 4th (Territorial Force) Horse Artillery Brigade [8 x 18 pounders]
                + British Inverness, Ayr Batteries
                + British 4th Horse Artillery Brigade Ammunition Column
    * Anzac Mounted Division Engineers
          o Anzac Field Squadron
          o Anzac Signal Squadron
    * Anzac Mounted Division Medical Services
          o 1st, 2nd, 3rd Light Horse Field Ambulances
          o New Zealand Mounted Field Ambulance

1st Australian Light Horse Brigade

1st Australian Light Horse Regiment
2nd Australian Light Horse Regiment
3rd Australian Light Horse Regiment

(New South Wales; Queensland and Northern Territory; South Australia and Tasmania)

          o 1st Signal Troop

2nd Australian Light Horse Brigade
5th Australian Light Horse Regiment
6th Australian Light Horse Regiment
7th Australian Light Horse Regiment, AIF, History
(Queensland; New South Wales; New South Wales)

          o 2nd Signal Troop

3rd Australian Light Horse Brigade
8th Australian Light Horse Regiment
9th Australian Light Horse Regiment
10th Australian Light Horse Regiment

(Victoria; Victoria and South Australia; Western Australia)

          o 3rd Signal Troop

New Zealand Mounted Rifles Brigade
Auckland Mounted Rifles
Wellington Mounted Rifles
Canterbury Mounted Rifles

          o New Zealand Mounted Rifles Signal Troop
    * Anzac Mounted Division Train
          o 1st, 2nd, 3rd Supply Sections
          o New Zealand Mounted Rifles Supply Section
    * Anzac Mounted Division Veterinary Services
          o 6th, 7th, 8th Mobile Veterinary Sections
          o New Zealand 2nd Mobile Veterinary Section

Australian and New Zealand Mounted Division (Egypt, February 1917)

    * Australian and New Zealand Mounted Division Horse Artillery
          o British 3rd (Territorial Force) Horse Artillery Brigade [8 x 18 pounders]
                + British Leicester, Somerset Batteries
                + British 3rd Horse Artillery Brigade Ammunition Column
          o British 4th (Territorial Force) Horse Artillery Brigade [8 x 18 pounders]
                + British Inverness, Ayr Batteries
                + British 4th Horse Artillery Brigade Ammunition Column
    * Anzac Mounted Division Engineers
          o Anzac Field Squadron
          o Anzac Signal Squadron
    * Anzac Mounted Division Medical Services
          o 1st, 2nd Light Horse Field Ambulances
          o New Zealand Mounted Field Ambulance
          o British 22nd Mounted Field Ambulance
          o 7th Sanitary Section

1st Australian Light Horse Brigade

1st Australian Light Horse Regiment
2nd Australian Light Horse Regiment
3rd Australian Light Horse Regiment

(New South Wales; Queensland and Northern Territory; South Australia and Tasmania)

          o 1st Machinegun Squadron [12 x Vickers machine guns]
          o 1st Signal Troop


2nd Australian Light Horse Brigade
5th Australian Light Horse Regiment
6th Australian Light Horse Regiment
7th Australian Light Horse Regiment, AIF, History
(Queensland; New South Wales; New South Wales)

          o 2nd Machinegun Squadron [12 x Vickers machine guns]
          o 2nd Signal Troop

New Zealand Mounted Rifles Brigade

Auckland Mounted Rifles
Wellington Mounted Rifles
Canterbury Mounted Rifles         

          o New Zealand 1st Machinegun Squadron [12 x Vickers machine guns]
          o New Zealand Mounted Rifles Signal Troop
    * British 22nd Mounted Brigade
          o British 1/1 Staffordshire Yeomanry, 1/1 Lincoln Yeomanry, 1/1 East Riding Yeomanry
          o British 18th Machinegun Squadron [12 x Vickers machine guns]
          o British 22nd Mounted Brigade Signal Troop
    * Anzac Mounted Division Train
          o 1st, 2nd Supply Sections
          o New Zealand Mounted Rifles Supply Section
          o 26th Depot Unit of Supply
    * Anzac Mounted Division Veterinary Services
          o 6th, 7th Mobile Veterinary Sections
          o New Zealand 2nd Mobile Veterinary Section

Anzac Mounted Division (Palestine, February 1918)

    * Anzac Mounted Division Artillery
          o British 18th Horse Artillery Brigade [18 x 13 pounders]
                + British Somerset , Inverness, Ayr Batteries
                + British 18th Horse Artillery Brigade Ammunition Column
    * Anzac Mounted Division Engineers
          o 1st Field Squadron
          o 1st Signal Squadron
    * Anzac Mounted Division Medical Services
          o 1st, 2nd Light Horse Field Ambulances
          o New Zealand Mounted Field Ambulance
          o 7th Sanitary Section

1st Australian Light Horse Brigade

1st Australian Light Horse Regiment
2nd Australian Light Horse Regiment
3rd Australian Light Horse Regiment

(New South Wales; Queensland and Northern Territory; South Australia and Tasmania)

          o 1st Machinegun Squadron [12 x Vickers machine guns]
          o 1st Signal Troop

2nd Australian Light Horse Brigade
5th Australian Light Horse Regiment
6th Australian Light Horse Regiment
7th Australian Light Horse Regiment, AIF, History
(Queensland; New South Wales; New South Wales)

          o 2nd Machinegun Squadron [12 x Vickers machine guns]
          o 2nd Signal Troop

New Zealand Mounted Rifles Brigade

Auckland Mounted Rifles
Wellington Mounted Rifles
Canterbury Mounted Rifles       

          o New Zealand 1st Machinegun Squadron [12 x Vickers machine guns]
          o New Zealand Mounted Brigade Signal Troop
    * Anzac Mounted Division Train
          o 32nd, 33rd, 34th Australian Army Service Corps Companies
          o 5th New Zealand Army Service Corps Company
          o 26th Depot Unit of Supply
    * Anzac Mounted Division Veterinary Services
          o 6th, 7th Mobile Veterinary Sections
          o New Zealand 2nd Mobile Veterinary Section


Further Reading:

Australian and New Zealand Mounted Division

Australian and New Zealand Mounted Division, Anzac MD, Roll of Honour

Battles where Australians fought, 1899-1920


Citation: Australian and New Zealand Mounted Division Outline

Posted by Project Leader at 12:01 AM EAST
Updated: Sunday, 13 March 2011 7:23 AM EADT
Sunday, 9 August 2009
Bir el Abd, Sinai, 9 August 1916, General Staff Headquarters, Anzac Mounted Division, AIF, War Diary Account
Topic: AIF - DMC - Anzac MD

Bir el Abd

Sinai, 9 August 1916

General Staff HQ, Anzac MD, AIF, War Diary Account


War Diary account of the General Staff Headquarters, Anzac Mounted Division, AIF.


The transcription:


9 August

0218

At 0218 a message was received from the 3rd Light Horse Brigade to say that their scouts had found the enemy holding Ras and Hod el Homossia.

0300

Royston’s Column arrived at Hod el Khirba being joined by the Ayrshire Battery on the road; they marched north east form Hod el Khirba towards Hod Hamada.

0400

At 0400 the New Zealand Mounted Rifles Brigade left their bivouac and marched on Bir el Abd; the 5th Mounted Brigade remained in Divisional Reserve at Oghratina and the 3rd Light Horse Brigade moved forward to the south in the direction of Ho el Bada.

0430

Divisional Headquarters left Oghratina at 0430.

0500

Royston’s Column struck the enemy in position on a line with the right on the Sabkhet el Bardawil, thence one mile west of Hod el Hisha, and thence towards Bir el Abd. The Ayrshire Battery came into action and dispersed a small body of enemy, but the advance of the column was checked.

0510

At 0510 the New Zealand Mounted Rifles Brigade moved on Bir el Abd and encountered and drove in their advanced patrols and pushing on, occupied the high ground overlooking Bir el Abd by 0615.

0600

Division Headquarters arrived at Hod ed Debabis at 0600.

0615 - 0630

A counter attack was made by the enemy in two columns some 5-600 strong each. These were dispersed by the fire of the Somerset Battery and rifle fire, and some prisoners were taken. By 0630 the New Zealand Mounted Rifles Brigade were engaged all along the line, with the enemy holding a position 2 miles south east of Hod Hamada. The 1st Light Horse Brigade on the left facing south east with the right on the second “d” in “sand dunes” and connected with the 2nd Light Horse Brigade on their right whose right in turn extended towards the left of the New Zealand Mounted Rifles Brigade, but was separated by a gap of 800 yards. Both Brigades had a Regiment in reserve. The Ayrshire Battery were in action firing south east. To the south the 3rd Light Horse Brigade were meeting opposition and were in touch on their right with patrols of the Mobile Column No. 2 Section near Hod el Muhammam.

0730

At 0730 the enemy were reported to be working round the right of the New Zealand Mounted Rifles Brigade. Their objective apparently being the long ridge running north and south across the telegraph line. The Brigadier reinforced his right. A general movement of camels out of Bir el Abd continued and the Somerset Battery made good practice on them. A patrol sent round the north side of Bir el Abd was held up. Other patrols began working round to the south. The 3rd Light Horse Brigade could be seen to the south moving north east.

0825

At 0825 the Leicester Battery and the remaining gun of the Somerset Battery were ordered forward to the New Zealand Mounted Rifles Brigade Headquarters.

0830

At 0830 the 3rd Light Horse Brigade were ordered to get close touch with the New Zealand Mounted Rifles Brigade and make Bir el Abd their objective instead of Salmana.

0850

By 0850 it seemed probable that the New Zealand Mounted Rifles Brigade would get into Bir el Abd as they were able to advance and were immediately west of it and the enemy seemed to be retreating. They were ordered to report directly they occupied the high ground immediately east of the place.

0855

Meantime the 3rd Light Horse Brigade had reached a point slightly west of Likbirdeh, where they were strongly opposed. The 8th and 9th Light Horse Regiments were attacking, supported by the fire of the Inverness Battery. They reported a redoubt in their immediate front. Colonel Royston on the left also reported strong enemy opposition and that several guns were in action against him.

1035

By 1035 the enemy’s guns ere showing great activity. As the artillery were unable to locate them a request was made for an aeroplane to try and locate them by dropping smoke balls. The request was granted.

1130

At 1130 the New Zealand Mounted Rifles Brigade asked for reinforcements and the Warwickshire Yeomanry were sent up. They were put in between, Royston’s Column and New Zealand Mounted Rifles Brigade left.

1140

By 1140 our advance had been completely checked. Our line was in a semicircle facing south east, east and north east, and from 2 to 3 miles distant from Bir el Abd. The enemy had brought a large number of guns into action. Parties could be seen removing stores, and these were shelled by our batteries.

1147

From 1147 onwards the enemy made several counter attacks against the Canterbury Mounted Rifles, which was in advance on the left of the New Zealand Mounted Rifles Brigade. At mid day he opened high explosive shells from one of his heavy pieces on the wagon teams of the Ayrshire Battery. 4 men and 37 horses were killed and 7 men and 7 horses wounded before they could get to other positions.

1257

At 1257 the enemy were made out moving north east in large bodies; the dump of stores were seen on fire and lit up by the enemy.

1255

At 1255 very heavy shell fire both high explosive and shrapnel was opened on Royston’s Column. Casualties took place particularly among the led horses and the enemy began to advance on the centre of his line.

1258

At 1258 the enemy made a determined counter attack on the centre of the New Zealand Mounted Rifles Brigade. Heavy firing was going on all along the line. Our guns were turned on the enemy columns and the counter attack broke, the enemy retreating hurriedly. The enemy’s heavy guns were firing on our line the whole time.

1310

At 1310 Colonel Royston reported that he had joined with the New Zealand Mounted Rifles Brigade and was moving forward south east. He was being heavily shelled. The enemy begun to press his left.

1330

At 1330 the enemy delivered an attack on the New Zealand Mounted Rifles Brigade left with 5 Battalions. The gap which had existed here had been filled by the Warwick Yeomanry which met the attack, the Leicester Battery being also turned on to it and the pressure was relieved. One Squadron Composite Regiment was sent to report to the New Zealand Mounted Rifles Brigade.

1350

At 1350 the 3rd Light Horse Brigade reported that all troops except the reserve were in the firing line. A slight advance had been made on the right; but this had been opposed by rifle and machine gun fire. The enemy were very strong along the whole line, and the pressure obliged the Brigadier to draw back to the right a little. He reported that he did not think he could shift the enemy from where he was.

1400

Royston’s right was now forced back and at 1400 a determined counter attack on his column began, supported by heavy artillery fire. The Ayrshire Battery was ordered back, but owing to casualties in horses could not move.

1405

All reserves were called up and put in the fight so that the guns could be withdrawn. The 3rd Light Horse Brigade received orders from Division Headquarters to hold on where they were unless otherwise ordered.

1427

By 1427 the left flank of Royston’s Column began a gradual retreat. At the same time the enemy pressure forced back the 3rd Light Horse Brigade for nearly a mile, and the enemy concentrated about Umm Dirk making apparently for the ridge which runs from the “H” of Hod umm Zaghliya to Hod ed Darabis.

1448

The attacks on Royston’s left were also pushed on and he reported at 1448 that he was just holding on but would have to probably retire. All men were now in the firing line.

1650

By 1650 his left was forced right back, the enemy to the number of 2-3,000 strong were pressing on the centre, and about 1,000 strong against his left. The shell fire all along the line was very heavy, and the whole line was gradually going back. He succeeded however in getting all the wounded away.

1700

At 1700 a counter attack was made on the 3rd Light Horse Brigade but was repulsed by the 8th Light Horse Regiment. By forcing back of both forces on their flanks the New Zealand Mounted Rifles Brigade became very exposed.

1750

Preparations were made to withdraw, the Leicester Battery being sent to a position 1,000 yards in rear. Orders were then sent to the Regiments in front to begin a gradual withdrawal.

1850

At 1850 as the withdrawal was taking place the enemy delivered an attack on a front of about 2½ miles. The rifle and machine gun fire was intense and continued up till dark; but the enemy was held off and the withdrawal was completed. During the day the Leicester and Somerset Batteries fired 1,000 rounds between them, and the Inverness 455.

Orders for bivouac had already been issued. New Zealand Mounted Rifles Brigade was to bivouac at Hod ed Dababis, one Brigade of Royston’s Column at Bir Abu el Afein, 3rd Light Horse Brigade at Hod Abu Dhahab, and the remaining Brigade of Royston’s Column, 5th Mounted Brigade less 1 Regiment, and Division Headquarters at Oghratina.

In view however of the large number of fresh enemy troops which had appeared, the General Officer Commanding Division after a consultation with Brigadier General Chaytor decided it was inadvisable to bivouac at either Hod ed Debabis or Bir Abu el Afein and after rations had been distributed and horses watered orders were issued for the whole of the Anzac Mounted Division, less 3rd Light Horse Brigade, to be concentrated at Oghratina for the night, having an outpost line covering the north east, east and south east sides of the camp. The 3rd Light Horse Brigade to bivouac at Hod Abu Dhahab, also with an outpost line. Officers patrols kept a watch on the enemy during the night.

Arrangements for next day were:-

New Zealand Mounted Rifles Brigade to move to Hod ed Dababis at 0650, send out reconnoitring parties, water and await orders.

2nd Light Horse Brigade to move to Hod el Khirba at 0650, send out reconnoitring parties, water, and await orders.

The other Brigades to water at Oghratina wells;

wells at Hod Minshla should be left to the Field Ambulances.

Royston’s Column to cease from now on, and the 1st and 2nd Light Horse Brigades to come under their own Brigadiers.

2330

All moves to Oghratina were made and outpost line posted by 2330.


Further Reading:

Anzac Mounted Division, AIF

Bir el Abd, Sinai, 9 August 1916, Roll of Honour

Battle of Romani, Sinai, August 4 to 5, 1916 

Bir el Abd, Sinai, 9 August 1916

Battles where Australians fought, 1899-1920


Citation: Bir el Abd, Sinai, 9 August 1916, General Staff Headquarters, Anzac Mounted Division, AIF, War Diary Account

Posted by Project Leader at 12:01 AM EADT
Updated: Monday, 21 September 2009 11:41 PM EADT
Wednesday, 5 August 2009
Battle of Romani, Sinai, August 4 to 5, 1916, General Staff HQ, Anzac MD, AIF, War Diary Account
Topic: AIF - DMC - Anzac MD

Battle of Romani

Sinai, August 4 to 5, 1916

 General Staff HQ, Anzac MD, AIF, War Diary Account


War Diary account of the General Staff Headquarters, Anzac Mounted Division, AIF.


The transcription:

3 August

0315 - The officers patrols left out reported enemy advance on Qatia at this hour. They consisted chiefly of camel men, and on reaching Qatia split up into small patrols, which prevented our patrols finding out what was in rear. Infantry appeared on ridges south west of Er Ragah and east of Qatia at dawn.

0400 - The 2nd Light Horse Brigade left the gully south of Katib Gannit for Qatia.

0430 - A Column of Infantry also appeared at 0430 marching on high ground south of Bir el Hamisah from the south east. One man sent to meet the Brigade with a message is missing. The patrol retired on Qatia and was heavily fired on and withdrew north west and met the Brigade. The Turks could be seen digging on ridges west of Er Rabah. The Brigade had left the gully south of Katib Gannit at 0400 and met the officer’s patrols on the way to Qatia.

0740 - The Ayrshire Battery left at 0740 to join the Brigade.

0835 - At 0835 the enemy were found holding the ridge north of Bir el Hamisah very strongly.

0847 - At 0847 the Section Mounted Troops reported enemy holding high ground west of Bir Waset, put at 2000, very strongly. They were also moving on Bir Nagid.

0950 - At 0950 patrol from Hill 110 found the Turks entrenching the line on rise two miles distant towards Er Rabah. Orders were issued to try and drive enemy from Er Rabah, and preparations made to do so; but in view of the information received of enemy advance about Bir Nagid, this was countermanded at 1020 and the Brigade ordered to remain in observation.

1020 - In view of the enemy advance on Qatia being probably only a step to an attack on Romani the General Officer Commanding the Anzac Mounted Division gave orders for the 1st Light Horse Brigade to hold the entrance to the sand dune country between Katib Gannit and Hod el Enna with an outpost line to be in position by dusk. The position was fired during the day.

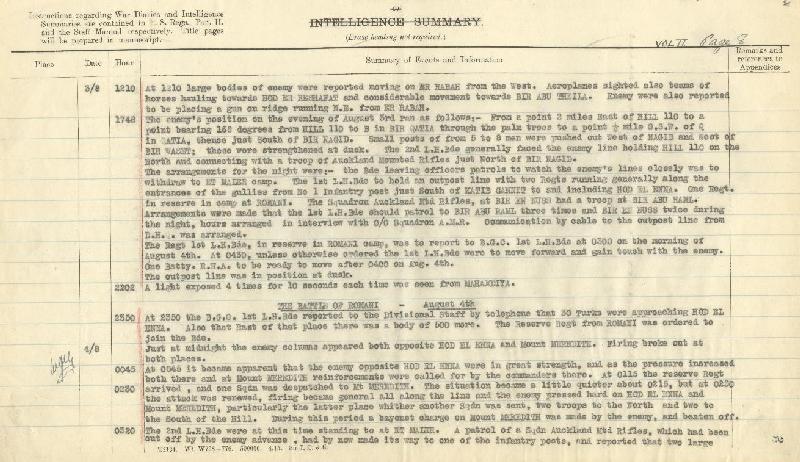
1210 - At 1210 large bodies of enemy were reported moving on Er Rabah from the west. Aeroplanes sighted also teams of horses hauling towards Hod er Reshafat and considerable movement towards Bir abu Thrila. Enemy were also reported to be placing a gun on ridge running north east from Er Rabah.

1748 - The enemy's position on the evening of August 3rd ran as follows:-

From a point two miles east of Hill 110 to a point bearing 158 degrees from Hill 110 to "B" in Bir Qatia through the palm trees to a point ½ mile south south west of "Q" in Qatia, thence just south of Bir Nagid.

Small posts of 5 to 8 men were pushed out west of Nagid and west of Bir Waset; these were strengthened at dusk. The 2nd Light Horse Brigade generally faced the enemy line holding Hill 110 on the north and connection with a troop of Auckland Mounted Rifles Regiment just north of Bir Nagid.

The arrangements for the night were:-

The Brigade leaving officers patrols to watch the enemy's lines closely was to withdraw to Et Maler camp. the 1st Light Horse Brigade to hold an outpost line with two Regiments running generally along the entrances of the gullies from No. 1 Infantry Post just south of Katib Gannit to and including hod el Enna. One Regiment in reserve in camp at Romani. The Squadron Auckland Mounted Rifles Regiment, at Bir en Nuss had a troop at Bir abu Raml. Arrangements were made that the 1st Light Horse Brigade should patrol to Bir abu Raml three times and Bir en Nuss twice during the night, hours arranged in interview with Officer Commanding Squadron Auckland Mounted Rifles Regiment. Communications by cable to the outpost line from Divisional Headquarters was arranged.

The Regiment 1st Light Horse Brigade , in reserve in Romani camp, was to report to Brigade Officer Commanding 1st Light Horse Brigade  at 0300 on the morning of August 4th. At 0430, unless otherwise ordered, the 1st Light Horse Brigade were to move forward and gain touch with the enemy.

One Battery, Royal Horse Artillery to be ready to move out after 0400 on August 4th.

The Outpost Line was in position at dusk.

2202 - A light exposed four times for ten seconds each time was seen from Mohamadiya.

The Battle of Romani - August 4th

2350 - At 2350 the Brigade Officer Commanding 1st Light Horse Brigade reported to the Divisional Staff by telephone that 30 Turks were approaching Hod el Enna. Also that east of that place there was a body of 500 more. The Reserve Regiment from Romani was ordered to join the Brigade.

Just at midnight the enemy columns appeared both opposite Hod el Enna were in great strength, and as the pressure increased both there and at Mount Meredith reinforcements were called for by the commanders there. At 0115 the reserve Regiment arrived, and one Squadron was despatched to Mount Meredith. The situation became a little quieter about 0215, but at 0230 the attack was renewed, firing became general all along the line and the enemy pressed hard on Hod el Enna and Mount Meredith, particularly the latter place whither another Squadron was sent, two Troops to the north and two to the south of the hill. During this period a bayonet charge on Mount Meredith was made by the enemy and beaten off.

0320 - The 2nd Light Horse Brigade were at this time standing to at Et Maler. A patrol of the Squadron Auckland Mounted Rifles Regiment, which had been cut off by the enemy advance, had by now made its way to one of the infantry posts, and reported that two large columns of the enemy had been seen moving north east between Bir ed Dhaba and Bir abu Raml.

The right of the 1st Light Horse Brigade was now hard pressed at hod el Enna, and the Brigadier sent the last Squadron of his reserve Regiment to reinforce that flank. the attacks however continued and the Brigade gradually fell back on Wellington Ridge. The enemy were now reported approaching No. 1 Infantry Post.

0400 - General Officer Commanding the Anzac Mounted Division ordered the 2nd Light Horse Brigade to turn out, and join them with the Divisional Headquarters at Et Maler.

The Ayrshire and Leicestershire Batteries, Royal Horse Artillery moved out to positions to come into action; they were attacked by bombs on the way.

0420 - At 0420 the 1st Light Horse Brigade had been forced back from Mount Meredith, and the Brigade faced generally south. The were contesting the enemy advance among the sand dunes; but, in addition to the force in front of them the enemy were pressing up the valley round the right of the Brigade and continually outflanking them. General Chauvel, General Officer Commanding the Anzac Mounted Division met with Colonel Meredith Brigade Officer Commanding the 1st Light Horse Brigade on the southern slopes of Wellington Ridge. At the same time as he arrived there, the Turks in front of the 1st Light Horse Brigade charged over the intervening ridge, and covered by machine gun fire from Mount Meredith, and got into the valley immediately south of Wellington Ridge.

0425 - General Chauvel ordered Colonel Royston Brigade Officer Commanding the 2nd Light Horse Brigade to extend his Brigade to Colonel Meredith's right and hold Wellington Ridge at all costs. The 6th and 7th Light Horse Regiments therefore took up their positions on the hill, the Wellington Mounted Rifles Regiment being in reserve. This was done by 0430.

0500 - At 0500 the enemy guns opened up with shrapnel on Wellington Ridge and searched the valley behind, causing some casualties there. At the same time the enemy aeroplanes were dropping bombs on the camp, though with very little result. The pressure of the enemy on the front held by the two Brigades continued and strong bodies made their way up the valley between Wellington Ridge and Mount Royston causing further withdrawal of our right.

0515 - As the enemy advance on our right continued to outflank the line, it became evident that Wellington Ridge would be no longer tenable. At 0515 Divisional Headquarters was established on the northern slope of Wellington Ridge connected with the 1st Light Horse Brigade and the Divisional Headquarters Office at Romani. Hostile aeroplanes were still very active with bombs and the enemy's heavy guns opened on the infantry posts and the hills north of Katib Gannit.

0544 - At 0544 the Leicester Battery, Royal Horse Artillery opened on Mount Meredith and stopped the machine gun fire from that direction.

0555 - At 0555 1st Light Horse Brigade telephoned through that they were unable to hold on the southern slopes of Wellington Ridge. General Chauvel gave orders for the Brigade to retire to the ridge in line and to the west of it. Divisional Headquarters were also moved 500 yards back to the ridge immediately north of Wellington Ridge where some infantry outposts were in position. The Section and 52nd Division were informed of this move.

0615 - Meantime the pressure of the enemy on our right continued and outflanked the 2nd Light Horse Brigade. The 6th and 7th Light Horse Regiments and some picquets of the royal Welsh Fusiliers still held the western end of Wellington Ridge but the 1st Light Horse Brigade were forced to retire from the eastern end, and Colonel Meredith was ordered to collect his Brigaded in Et Maler camp behind the lines occupied by the 7th Light Horse Regiment. Heavy shrapnel fire was opened on the retiring Brigade and some casualties were caused. The Divisional Headquarters moved back and established themselves in Et Maler camp in the Orderly Room of the Wellington Mounted Rifles Regiment.

0647 - At 0647 information was received that the 156th infantry Brigade had been ordered to move to a position in readiness behind Work No. 23.

0700 - At 0700, 6th and 7th Light Horse Regiments retired by alternate Squadrons from Wellington Ridge. The enemy did not come at once move forward to the crest. Communication was cut with Kantara from now onwards. At thi8s hour the New Zealand Mounted Rifles Brigade were on the march to Dueidar, but they were now directed to march to Canterbury Hill.

0720 - At 0720 the enemy were still pressing on between Et Maler and Mount Royston, and a Brigade of Infantry and mounted troops were seen. The Wellington Mounted Rifles Regiment were put into the line, with their left on No. 2 Outpost and from this position covered the retirements of the 6th and 7th Light Horse Regiments.

0745 - Colonel Royston, Brigade Commanding Officer, 2nd Light Horse Brigade arrived at Divisional Headquarters and told General Chauvel that the enemy was now pushing along the slopes of Mount Royston and outflanking his right. A Regiment from 1st Light Horse Brigade was sent to prolong his line to the west. Meantime a Squadron of the 5th Mounted Brigade from Pelusium had moved up from that place and engaged the enemy.

0830 At 0830 the 52nd Infantry (Lowland) Division sent to say that the enemy some 2-3,000 strong had appeared close to Work 23A. The Turks also now began to line the crest of Wellington Ridge, and a hot fire was poured into the camp. The Ayrshire Battery, Royal Horse Artillery and a section of the Leicestershire Battery, Royal Horse Artillery was turned on to them, and cleared the crest. They did not again attempt to cross it.

0835 - At 0835 a message was received from 5th Mounted Brigade that they were taking up a position Bir el Kashba, Nod Nigeiret Ali, Bir umm Ziyad. One Regiment to be at Gibah. The armoured train was also to be ready at Kilo 37.

0930 - At 0930 it was also known that the 42nd Infantry Division were moving towards Canterbury Hill. At 0945 Colonel Yorks, commanding the Composite Regiment 5th Mounted Brigade got in touch with the enemy two miles south west of Mount Royston.

1000 - On our left, "B" Squadron, 3rd Light Horse Regiment reported that they were cut off from their Brigade but still holding the crest of the hill above the hod west of Infantry Post No. 1. They were ordered to rejoin their Brigade.

The position of the Anzac Mounted Division at this hour was as follows:-

Wellington Mounted Rifles Regiment, 7th Light Horse Regiment, 2nd Light Horse Regiment, 3rd Light Horse Regiment, 5th Light Horse Regiment. The line running from No.2 Outpost, less about 700 yards, north of Wellington Ridge to the sand hills north of Mount Royston. In reserve Headquarters and one Regiment 1st Light Horse Brigade.

The enemy still continued to work along Mount Royston.

1040 - By 1040 the situation was stationary in all parts of the line except at Mount Royston, where our right was succeeding in working south along the sand hills endeavouring to occupy Mount Royston. Our right was now in communication with the 5th Mounted Brigade at Pelusium at this hour.

1050 - In the left of the line, an arrangement was made with the Brigadier 156th Infantry Brigade to relieve part of the line held by the 7th Light Horse Regiment with two Companies of infantry.

1100 - To support our attack on Mount Royston, one Section of the Ayrshire Battery, Royal Horse Artillery were detached to deal with the enemy in the hods and valleys under the hill. The New Zealand Mounted Rifles Brigade now got into touch with the 5th Mounted Brigade. The 127th Infantry Brigade under Brigadier General Ormsby, were asked to send two battalions in support of this attack. This request was immediately complied with. At 1100 the enemy formed for attack on the Infantry line of works opposite Works 22A, 21, 21A, 4 and 5 but did not press the attack home.

1130 - At 1130 the enemy opened on Et Maler with a mountain battery. This was located by the dust of the discharge, and the Section of Ayrshire Battery, Royal Horse Artillery turned on to it and it ceased fire.

1140 - Two considerable bodies of enemy entered Abu Hamra.

1145 - Enemy reinforcements appeared south of Wellington ridge and were seen entering the hods west of it. The artillery again swept the crest of the ridge and searched the ground behind, and also the hods. The enemy at the same time strengthened his western flank and became hotly engaged on his extreme left with the 5th Mounted Brigade. He still held Mount Royston, the south side of Wellington Ridge and thence bending round east and north facing the Infantry Posts.

1215 - The 126th and 127th Infantry Brigades began concentrating at Pelusium.

1230 - the 6th Light Horse Regiment reported the enemy in Bir abu Diyuk and advancing. Rifle fire was heavy and continuous.

1310 - The New Zealand Mounted Rifles Brigade began to attack on Mount Royston from the west. They were supported by the fire of the Somerset Battery, Royal Horse Artillery. Orders were issued by the Division that as soon as the New Zealand Mounted Rifles Brigade had made mount Royston good the 1st and 2nd Light Horse Brigades would push forward from the north.

1350 - A message was received from 52nd Infantry (Lowland) Division asking that the Companies of the 156th Infantry Brigade holding part of the line with us might be withdrawn in case of an advance towards Abu Hamra. this was however cancelled on the position being explained.

1430 - The New Zealand Mounted Rifles Brigade and 5th Mounted Brigade advance on Mount Royston. The two Battalions of the 127th Infantry Brigade moved forward in support of the New Zealand Mounted Rifles Brigade, the rest of the Brigade following.

1630 - The Turks were reported to be in strong force and moving forward again, while their guns opened from close to Mount Meredith. Artillery fire was directed on Wellington Ridge in anticipation of Infantry attack.


1635 - Divisional Headquarters moved at 1635 with the reserve Regiment from their present position to a pint 800 yards north of the "D" in Abu Diyuk.

1700 - The combined attack on Mount Royston by the 5th Mounted Brigade and New Zealand Mounted Rifles Brigade at the same time the 156th Infantry Brigade were ordered by the General Officer Commanding the 52nd Infantry (Lowland) Division to attack Wellington Ridge. The enemy north of Mount Royston now began to surrender, and the hill itself fell at 1830, some 4-500 surrendered on the hill and one machine gun was taken. The whole line began moving forward but it already was getting dark, and the horses had, in many cases, been without water all day. The positions of the Regiments was as follows:-

Wellington Mounted Rifles Regiment, 7th Light Horse Regiment, 2nd Light Horse Regiment, 3rd Light Horse Regiment, 6th Light Horse Regiment and 1st Light Horse Regiment; then came the New Zealand Mounted Rifles Brigade with the two Battalions of the 127th Infantry Brigade and then the 5th Mounted Brigade. The line running from No. 2 Outpost to the sand ridge south of Bir el Arais and thence on to and including Mount Royston where the two Battalions, 127th Infantry Brigade remained for the night.

1845 - The New Zealand Mounted Rifles Brigade and the 5th Mounted Brigade withdrew to water at Pelusium. The New Zealand Mounted Rifles Brigade casualties were 4 Other Ranks killed and 3 Officers and 32 Other Ranks wounded. The 1st and 2nd Light Horse Brigades put out an outpost line and remained where they were. In order to facilitate command for the night, Colonel Royston was put in command of the left of the line comprising the Wellington Mounted Rifles Regiment, 7th and 2nd Light Horse Regiments; and Colonel Meredith of the right comprising the 3rd, 6th and 1st Light Horse Regiments. Firing still continued all along the line. The enemy also kept up artillery fire and star shells.

2030 - The 3rd Light Horse Brigade and Inverness Battery, Royal Horse Artillery arrived at Dueidar. Divisional Headquarters remained at the point 800 yards north of "D" of Abu Diyuk for the night. During the night parties were sent into Et Maler camp to water the horses.

2050 - During this day's fighting the Ayrshire Battery, Royal Horse Artillery expended 429 rounds, Leicester Battery, Royal Horse Artillery, about 500 and Somerset Battery, Royal Horse Artillery 180 rounds.

Casualties in the Artillery were

Ayrshires: 2 Other Ranks killed and 1 Officer and 6 Other Ranks wounded;

Leicesters: 1 Other Rank killed.

The casualties for the 1st and 2nd Light Horse Brigades during the day were:

Killed: 4 Officers, 57 Other Ranks.

Wounded: 51 Officers, 312 Other Ranks.

Orders for action next day were issued to Brigades. The enemy had withdrawn to a line of entrenched positions from Hod el Enna through Bir Qatia to Abu Hamra, with covering troops in front. The Section commander desired first to crush the enemy southward to the line Katib Gannit, Hod el Enna and vicinity, and then made a general advance on the northern flanks in the direction of Abu Hamsa and Er Rabah, at the same time a strong enveloping move to be made against the flanks. The Anzac Mounted Division were to press forward all long the line, right on Hod el Enna and left in close touch with 52nd Infantry (Lowland) Division, which was advancing on the line Katib Gannit - Mount Meredith. The 3rd Light Horse Brigade pushed towards Bir en Nuss and attack Hod el Enna from the south, keeping in touch with the 5th Mounted Brigade on its left. The 5th Mounted Brigade, at present under orders of General Officer Commanding the 42nd Infantry Division, to assist in linking up the 3rd Light Horse Brigade and the Anzac Mounted Division. The 42nd Infantry Division were moving forward in full strength on line Canterbury Hill, Mount Royston, Hod el Enna, in close support of Anzac Mounted Division right flank and were to drive back anything which delayed the cavalry.

August 5th - The Actions at Qatia and Bir el Hamisah

0400 - The enemy's artillery continued to fire at intervals during the night, the last shots from their heavy pieces being at 0500. At 0400 in accordance with orders, the 1st Light Horse Brigade drove south east toward hod el Enna, taking prisoners, arms and ammunition on the way; some 50 unwounded and 30 wounded prisoners were taken near mount Royston. A battery of four Mountain guns and three Machine Guns were found in the valley and sent in. The 2nd Light Horse Brigade moved on their left. The Wellington Mounted Rifles Regiment and the 7th Light Horse Regiment encountered the enemy, who opened fire from Wellington Ridge. They dismounted and attacked with the bayonet, while the 156th Infantry Brigade advanced on their left and the Ayrshire and Leicestershire Batteries, Royal Horse Artillery, prepared to come into action. The enemy, however, stood up on all sides and surrendered with six Machine Guns. In the action, Lieutenant Colonel Onslow, Commanding 7th Light Horse Regiment was wounded. The New Zealand Mounted Rifles Brigade had marched on Bur en Nuss, and the 3rd Light Horse Brigade left Dueidar at 0500 and marched from there.

Colonel Royston, who had been wounded the previous day was obliged to hand over the 2nd Light Horse Brigade to Lieutenant Colonel Meredith commanding the Wellington Mounted Rifles Regiment.

0600 - The 5th Mounted Brigade reached Hod en Enna at 0600 and moved towards Abu Hamra in touch with the New Zealand Mounted Rifles Brigade, taking 9 prisoners.

0635 - Orders were received from No. 3 Section putting all mounted troops under the command of General Chauvel. A vigorous pursuit was ordered, by the mounted troops, the Infantry to follow as soon as the front was clear. Accordingly the general forward move of the mounted troops continued, the only resistance encountered in the centre of the line.

0730 - Divisional Headquarters moved to the sand hill in the gully 1,000 yards south of Katib Gannit. The 1st Light Horse Brigade reached Bir abu Gulud and watered there.

0800 - The Ayrshire and Leicester Batteries, Royal Horse Artillery, moved out with the Brigades towards Qatia. The 3rd Light Horse Brigade and New Zealand Mounted Rifles Brigade met at Bir en Nuss, the latter picking up the 8th Light Horse Regiment and Squadron Auckland Mounted Rifles Regiment here. Both continued to move on the line Qatia - Bir Hamisah, the 3rd Light Horse Brigade directed on the latter place.

0900 - Rifle fire broke out from Abu Hamra, some shots falling into the batteries.

1000 - A Mountain Battery opened on the Ayrshire Battery, Royal Horse Artillery which came in action and returned the fire, when the battery apparently made off, the ground being favourable for concealment.

1002 - The enemy were found holding the ridges west of Qatia, and our guns opened on them. The 3rd Light Horse Brigade continued their advance on Bir Hamisah and gained touch with the enemy 1½ miles from that place. The 9th Light Horse Regiment were in advance and engaged the enemy in front while the 10th Light Horse Regiment swept round their left flank. 439 prisoners, 3 Machine Guns and many camels and much material were taken. The Brigade, however, came under heavy howitzer fire and the engagement continued until dark with no further advance.

1120 - No. 3 Section reported that the enemy's heavy guns were supposed to be in Qatia. The enemy were also reported to be digging about Abu Hamra. The General Officer Commanding the Anzac Mounted Division directed that all horses should be watered and then a general move on Qatia.

1200 - At noon, the position of the Division was as follows:-

3rd Light Horse Brigade engaged at Bir Hamisah, New Zealand Mounted Rifles Brigade on their left, the 1st Light Horse Brigade north and south of Abu Gulud with one Regiment extended across the Qatia - Dueidar line, 2nd Light Horse Brigade on the left of the 1st Light Horse Brigade, 5th Mounted Brigade waiting in the gully 1,000 yards south of Katib Gannit, Divisional Headquarters still on the sand hill 1,000 yards south of Katib Gannit.

The advance against Qatia was ordered to begin at 1430.

1430 - The enemy were still in Abu Hamra and the 52nd Infantry (Lowland) Division moved against them at 1430. The Anzac Mounted Division moved as follows:-

5th Mounted Brigade on Er Rabah; 2nd Light Horse Brigade, 1st Light Horse Brigade; New Zealand Mounted Rifles Brigade all on Qatia; the 3rd Light Horse Brigade still engaged at Bir el Hamisah.

The 42nd Infantry Division were following the mounted troops and the 127th Infantry Brigade were already at Bir en Nuss, the 125th Infantry Brigade and Headquarters being about Mount Royston. The 52nd Infantry (Lowland) Division Heavy Artillery cooperated in the attack on Qatia from Romani. Divisional Headquarters moved forward and was established on the telegraph line three miles west of Qatia.

The 5th Mounted Brigade found enemy strongly entrenched about Er Ragah, and could not push on. They had heavy gun fire opened on them. The 2nd Light Horse Brigade got within 500 yards of Qatia; the 1st Light Horse Brigade and New Zealand Mounted Rifles Brigade reached the fringe of the palms west of it.

1600 - Here the enemy were found in strength holding the ground and line of palm trees across the salt pan at Qatia. They were entrenched and had machine guns among the trees. The attack was held up and the enemy's guns opened from positions in rear.

The Ayrshire Battery, Royal Horse Artillery, and later the Leicestershire Battery, Royal Horse Artillery, came into action, but were unable to locate machine guns which stopped the advance.

1730 - It was plain that no advance could be made direct on Qatia, and that the holding up of the 3rd Light Horse Brigade at Bir el Hamisah prevented any chance of turning the enemy's flank from the south.

The position on this hour was the 5th Mounted Brigade outside Er Rabah, 2nd Light Horse Brigade 500 yards from Qatia in low ground, 1st Light Horse Brigade in palm west of Bir Qatia from the telegraph line to the "L" of Bir el Maraieh with Brigade Headquarters west of Abu Gulud, New Zealand Mounted Rifles Brigade on their right also in the palms with Headquarters ½ mile south of last "U" in Abu Gulud. 3rd Light Horse Brigade at Bir Nagid. Ayrshire Battery, Royal Horse Artillery in action just west of palms at Bir el Maraieh. Leicester Battery, Royal Horse Artillery on high ground due west of Tomb of Sheikh el Mussal'in.

1815 - Orders were issued to hold on until dark and if Qatia not made good, to withdraw and water horses as follows:-

1st Light Horse Brigade at Romani, 2nd Light Horse Brigade to Et Maler, 3rd Light Horse Brigade to Hod el Enna, New Zealand Mounted Rifles Brigade to new wells in Hod 700 yards south of Katib Gannit, 5th Mounted Brigade to new wells in gully 1,000 yards south of Katib Gannit.

Officers patrols kept contact with the enemy.

2230 - The 1st Light Horse Brigade arrived at Romani. The casualties of this Brigade in the battle of Romani and in today's fighting were:-

Killed: 3 Officers; 32 Other Ranks.

Wounded: 10 Officers; 99 Other Ranks.

Missing: 24 Other Ranks.

Orders issued for next day. 1st and 2nd Light Horse Brigades to remain at Romani and Et Maler in reserve. The 5th Mounted Brigade, New Zealand Mounted Rifles Brigade, and 3rd Light Horse Brigade to move forward next morning leaving bivouac at 0500.

The 52nd Infantry (Lowland) Division and 42nd Infantry Division were to continue their advance on Er Ragah and Qatia respectively.


August 6th

0600 - The 5th Mounted Brigade and the New Zealand Mounted Rifles Brigade moved to Qatia. Divisional Headquarters being established on the telegraph line three miles west of Qatia. Both Er Rabah and Qatia were found deserted, a few prisoners being taken in the latter place.

0800 - The 5th Mounted Brigade pushed on through Er Rabah and found high ground to the north also clear of enemy. At 0835 the New Zealand Mounted Rifles Brigade got touch with the 3rd Light Horse Brigade. The Divisional Squadron of the 52nd Infantry (Lowland) Division were moving on Er Rabah and the New Zealand Mounted Rifles Brigade were asked to gain touch with them.

1030 - The 5th Mounted Brigade and the New Zealand Mounted Rifles Brigade pushed on towards Oghratina and found the enemy entrenched east of Umm Ugba, holding a position across the telegraph line. Divisional Headquarters moved to the ruins in Qatia and established themselves there. Artillery and rifle fire continued throughout the day. Both Brigades pushed their way as near as possible and the enemy were located holding the following line:-

From "H" in Hod er Reshafat to "H" in Hod ed Dhaba. The high ground south east of Dhaba strongly held. Orders were sent to the 3rd Light Horse Brigade to make Hod es Sagia good. There was desultory firing all day. The enemy's artillery got into the lead horses of the 3rd Light Horse Brigade and there were some casualties.

1412 - News was received at 1412 that the Mobile Column No. 2 Section had taken Mageibra unopposed.

1435 - The 5th Mounted Brigade were ordered to move via Umm Ugba to the "S" in Sabkhet el Amya and round the enemy's right. They were to keep touch with the left flank of the New Zealand Mounted Rifles Brigade.

1510 - The enemy's flank was located by the 5th Mounted Brigade 1½ miles north west of Oghratina. It consisted of a post of about 50 men. They were shelled and the Ayrshire Battery, Royal Horse Artillery, which was with them, came into action and fired 15 shells at the enemy's redoubt. By 1750 the Brigade got a position 1½ miles north north west of Hod en Negiliat. Meanwhile the 3rd Light Horse Brigade had moved and got possession of Hod es Sagia. One Turk and a Machine Gun and ammunition were taken. The Brigade, however, could not stay in Hod es Sagia on account of shell fire and so withdrew for the night to Abu Darem.

1900 - Brigades withdrew to bivouac; New Zealand Mounted Rifles Brigade west of Er Rah, 5th Mounted Brigade to Qatia, Divisional Headquarters to Qatia and 3rd Light Horse Brigade to Abu Darem. Officer's patrols were kept out keeping touch with the enemy. During this day, the 1st and 2nd Light Horse Brigades remained in reserve at Romani and Et Maler.


Further Reading:

Battle of Romani, Sinai, August 4 to 5, 1916 

Bir el Abd, Sinai, 9 August 1916

Battles where Australians fought, 1899-1920


Citation: Battle of Romani, Sinai, August 4 to 5, 1916, General Staff HQ, Anzac MD, AIF, War Diary Account

Posted by Project Leader at 12:01 AM EADT
Updated: Wednesday, 21 October 2009 7:49 PM EADT
Battle of Romani, Sinai, August 4 to 5, 1916, Anzac Mounted Division Artillery, AIF, War Diary Account
Topic: AIF - DMC - Anzac MD

 Battle of Romani

Sinai, August 4 to 5, 1916

Anzac Mounted Division Artillery, AIF, War Diary Account


War Diary account of the Anzac Mounted Division Artillery, AIF.


The transcription:

3 August

Turks in Qatia. While Ayrshire Battery went out with 2nd Light Horse Brigade, wireless section out and battery was held ready to fire in co-operation with plane, but various accidents to plane prevented practice being carried out. Battery home by 2000.

1st Light Horse Brigade held as outposts south and east edges of the dune country south of Romani during the night.

The Turks, in force, attacked 1st Light Horse Brigade about 2348.


4 August

1st Light Horse Brigade held Turks back till 0100, when joined by the 2nd Light Horse Brigade.

0400 - Ayrshire and Leicestershire Batteries were taken out of camp by Commander of Royal Artillery about 0400, when enemy was attacking Wellington Ridge and advancing round our right flank under Mount Royston.

Both Batteries, having been bombed by aeroplanes on the way out, were brought into action near Infantry Post 23a about 1,200 yards north of centre of Wellington Ridge. The Ayrshires were ordered to fire on the zone to the west under Mount Royston, the Leicesters being given a specific target of Turkish Infantry on Mount Meredith who were firing on east end of Wellington Ridge.

0530 - The Leicesters opened effective fire first at 0530, they found the range luckily in two shots, and pouring in shrapnel along reverse side of the steep ridge, completely stopped the rifle fire from Mount Meredith. One section was moved back later and turned on to other targets in the same direction, while the other section continued to neutralise Mount Meredith and the ground behind it.

A Forward Observation Officer was sent out to Wellington Ridge but had to return without being of use when our men were driven back about 0800.

Had some difficulty with communications at 0700, owing to wires being continually out. This was put right by duplication.

0830 - About 0830 the Turks were beginning to line the crest of Wellington Ridge. The Ayrshire Battery and one section of the Leicesters were in a good position to stem any attack from there, and, on the Turks showing signs of advancing, at once opened heavy bursts of shrapnel fire which effectually stopped them.

Bursts of searching fire were continued behind the crest when necessary, and no further attempt was made by the enemy to cross the ridge.

1100 - One section of Ayrshires was detached at 1100 to a position north of Et Maler to fire on hods and ridges towards Mount Royston, where enemy was reported collecting again in front of our right.

Ammunition was replenished about this time from the Ammunition Column in both batteries.

Offers of co-operation came to me from 52nd Division Royal Artillery and from No. 3 Section and 2 Batteries Hants, Royal Horse Artillery from near Station and "B" 260th Brigade, Royal Field Artillery from near Anzac Mounted Division Headquarters, helped by fire on Wellington Ridge and below Mount Royston respectively.

The enemy's left flank had now almost reached Abu Diyuk, and he was holding the high ground about Mount Royston.

Shortly after 1100 a mountain battery from near Mount Royston began shelling Divisional Headquarters and the camps near there.

It was located by the dust of the discharges and the detached section of Ayrshires was directed to fire on it.

The hostile battery at once ceased firing.

Another section of the same German battery at the same time opened fire on a section of the Somerset Battery, then coming into action with the New Zealand Mounted Rifles Brigade about 3,000 yards due west of Mount Royston. The Somersets could not locate it.

After firing 30 rounds, it ceased.

The Somerset Battery had left Hill 70 at 0730 with the New Zealand Mounted Rifles Brigade and moved north east in the direction of Abu Diyuk.

They came into action by detached sections as stated above, in the gap between the 2nd Light Horse Brigade, on our right from Romani, and the 5th Mounted Brigade, who were attacking Mount Royston from the south west.

The Somersets continued to fire from the west on such targets as showed themselves, until 1630, when fire was concentrated to co-operate in an attack by the New Zealand Mounted Rifles Brigade and the 5th Mounted Brigade on Mount Royston.

This attack took place successfully at 1645, the enemy being driven off to the east, and the battery ceased firing.

The enemy surrendered in large numbers, finding themselves almost surrounded between the Romani troops and the New Zealand Mounted Rifles Brigade.

One Brigade of the 42nd Infantry Division arrived on the scene about 1800 and helped to gather in the prisoners.

To return to Et Maler.

Fire was continued through the day on the allotted zones by the Ayrshire and Leicester Batteries.

1830 - The Leicesters' detached Section was ordered to rejoin the Battery at 1830, to support the advance of the 1st and 2nd Light Horse Brigades with a Forward Observation Officer in the front line.

1700 - At 1700 all batteries were warned that the New Zealand Mounted Rifles Brigade were in possession of Mount Royston.

1830 - They continued to fire at Turkish trenches and supported an attack by the 52nd Division on the east end of Wellington Ridge at 1830.

1915 - The Ayrshires and Leicestershires returned to camp at 1915 and the Somersets bivouacked at Pelusium.

Big gun shell fire (probably 8.2 inches) continued on the camp at Romani throughout the night.

Casualties:-

Ayrshires lost 2 Other Ranks killed; 1 Officer, 6 Other Ranks wounded.

Leicesters lost 1 Other Rank killed.

Ammunition supply was well maintained and batteries expended:-

Ayrshires - 429;

Leicesters - about 500; and,

Somersets - 180 rounds.

The Inverness Battery, during this day marched from Ballybunion to Dueidar with 3rd Light Horse Brigade.


5 August

0330 - At 0330 I moved Ayrshire and Leicester Batteries to Et Maler camp. Fairly heavy rifle fire was coming from Wellington Ridge which was still occupied by crowds of enemy. Just at daylight however, and before the guns opened fire, the enemy stood up and surrendered to the Light Horse and 52nd Infantry Division who walked up from west and north east respectively.

0800 - About 0800, after watering at New Wells, having seen the Light Horse Brigades out in the low ground towards Qatia, and having been ordered to use my own discretion as to moving out, I ordered the two Batteries to follow with what escort we could pick up, (an Officer and about 20 men).

0900 - At 0900, about 2 miles east of the New Wells, long range rifle fire was opened on the left flank of the leading Battery (the Ayrshires) which was wheeled to the right and opened fire on some hostile Infantry then leaving Abu Hamra.

The Leicesters had by this time lagged somewhat behind and hearing the firing, and being practically without escort, they returned to the hills near New Wells and opened fire from there on Abu Hamra.

This was unfortunate, as they were badly wanted at Qatia later. However, I could not get into touch with them, and had to go on with the Ayrshires alone.

The Leicesters eventually reached Qatia about 1600.

1000 - About 1000 the Ayrshire Battery came into action near the Dueidar - Qatia Road, two miles west of Qatia.

An enemy's Mountain Battery fired at the Ayrshires coming into action, and at the Wellington Mounted Rifle Regiment horses, but the first two shots of ours bracketed them and they at once dismantled their guns. The ground being favourable, they managed to withdraw them during the day, in spite of the occasional bursts of shrapnel from the Ayrshires when any movement was seen in the place.

1600 - At 1600 the Ayrshires moved forward 1,000 yards nearer Qatia and the Leicesters came up into the Ayrshires' former position.

They both tried to support the attack of the 2nd Light Horse Brigade in the centre but it was difficult to locate the enemy, and though one or two columns leaving Qatia eastwards were fired on, the machine guns stopping our advance could not be located.

1900 - Both batteries broke off the fight and returned to Romani about dusk getting in at 2200.

The Ayrshires had two men wounded.

The Somerset Battery arrived two miles west of Qatia about 1700, to late to take part in the attack, having marched from Pelusium via Dueidar and Bir en Nuss. It returned to New Wells for the night.

The Inverness Battery with the 3rd Light Horse Brigade was in action against Hamisah and spent the night near Bir Nagid having marched from Dueidar.

6 August

Qatia occupied by our troops.

Ayrshires came on in Divisional Reserve to Umm Ugba and fired 18 rounds on a Turkish redoubt. They bivouacked at Qatia.

Leicestershires remained with 1st and 2nd Light Horse Brigades in camp at Romani.

Somersets proceeded with the New Zealand Mounted Rifles Brigade through Qatia and remained in readiness south of Umm Ugba, but did not come into action, though they were under enemy long range shell fire from 4 inch guns. They bivouacked at Rabah.

The Inverness Battery proceeded with the 3rd Light Horse Brigade to Abu Darem.


Roll of Honour

W COX, 91st Heavy Battery, Royal Garrison Artillery, Killed in Action 4 August 1916.

J DUNLOP, Ayrshire Battery, Royal Horse Artillery, Killed in Action 4 August 1916.

P GIBBONS, 1st/4th Lowland Brigade, Royal Field Artillery, Killed in Action 5 August 1916.

M HOWKINS, 1st/5th Lowland Brigade, Royal Horse Artillery, Killed in Action 4 August 1916.

WN HUTTON, 1st/5th Battery, Royal Field Artillery, Killed in Action 4 August 1916.

TH LAPWORTH, 1st/1st Leicester Battery, Royal Horse Artillery, Died of Wounds 6 August 1916.

H LEITCH, 263rd Brigade, Royal Field Artillery, Killed in Action 4 August 1916.

G WHITELAW, Ayrshire Battery, Royal Horse Artillery, Killed in Action 4 August 1916.

RTC WILLIS-FLEMING, 1st/5th Lowland Brigade, Royal Horse Artillery, Killed in Action 4 August 1916.

Lest We Forget


Further Reading:

Anzac Mounted Division, AIF

Battle of Romani, Sinai, August 4 to 5, 1916

Bir el Abd, Sinai, 9 August 1916

Battles where Australians fought, 1899-1920


Citation: Battle of Romani, Sinai, August 4 to 5, 1916, Anzac Mounted Division Artillery, AIF, War Diary Account

Posted by Project Leader at 12:01 AM EADT
Updated: Friday, 23 October 2009 11:31 AM EADT

Newer | Latest | Older

Full Site Index


powered by FreeFind
Let us hear your story: You can tell your story, make a comment or ask for help on our forum.

Desert Column Forum

A note on copyright

The Australian Light Horse Studies Centre is a not for profit and non profit group whose sole aim is to write the early history of the Australian Light Horse from 1900 - 1920. It is privately funded and the information is provided by the individuals within the group and while permission for the use of the material has been given for this site for these items by various donors, the residual and actual copyright for these items, should there be any, resides exclusively with the donors. The information on this site is freely available for private research use only and if used as such, should be appropriately acknowledged. To assist in this process, each item has a citation attached at the bottom for referencing purposes.

Please Note: No express or implied permission is given for commercial use of the information contained within this site.

A note to copyright holders

The Australian Light Horse Studies Centre has made every endeavour to contact copyright holders of material digitised for this blog and website and where appropriate, permission is still being sought for these items. Where replies were not received, or where the copyright owner has not been able to be traced, or where the permission is still being sought, the Australian Light Horse Studies Centre has decided, in good faith, to proceed with digitisation and publication. Australian Light Horse Studies Centre would be happy to hear from copyright owners at any time to discuss usage of this item.

Contact

Australian Light Horse Studies Centre

eXTReMe Tracker